Table of Contents >> Show >> Hide
- Before You Touch Insulation: Decide If Your Crawl Space Is Vented or Sealed
- Simple Way #1: Install Fiberglass or Mineral Wool Batts Between Floor Joists (Best for Vented Crawl Spaces)
- Simple Way #2: Insulate the Crawl Space Walls With Rigid Foam Board (Best for Sealed/Unvented Crawl Spaces)
- Simple Way #3: Add Continuous Insulation Across the Bottom of Joists (A Cleaner Upgrade That Reduces Thermal Bridging)
- The Not-So-Secret Ingredient: Moisture Control (Because Insulation Can’t Outrun Physics)
- Which Method Should You Choose? A Simple Decision Guide
- Common Mistakes That Make Crawl Space Insulation Fail
- Real-World Experiences: What People Learn After Insulating a Crawl Space (Extra 500+ Words)
- 1) “I thought insulation was the fix… but the real fix was stopping water.”
- 2) “Air sealing made a bigger difference than I expected.”
- 3) “Batts are fine… until they aren’t supported.”
- 4) “The musty smell didn’t stop until we handled ground moisture.”
- 5) “Sealed crawl spaces feel great… but they still need a humidity plan.”
- 6) “Termites and inspections are a regional reality.”
- 7) “Rigid foam was cleaner than I expectedand fussier than I expected.”
- 8) “The best result happened when we treated it like a system.”
- Conclusion
Your crawl space is basically your home’s “basement’s quirky cousin”dark, ignored, and somehow always involved when floors feel icy and energy bills get spicy. The good news: crawl space insulation can make your home more comfortable, help reduce drafts, and protect pipes and floors from temperature swings. The trick is doing it in a way that doesn’t accidentally create a moisture problem (because mold is the one houseguest who never leaves).
This guide breaks down three simple, common installation approaches used across the U.S. by weatherization programs, building-science experts, and code-backed best practicesplus the prep work that matters just as much as the insulation itself. You’ll also get practical examples, “watch-outs,” and real-world lessons people learn the hard way.
Before You Touch Insulation: Decide If Your Crawl Space Is Vented or Sealed
The “best” way to insulate depends on whether your crawl space is designed to be vented (outside air moves through) or unvented/sealed (treated more like part of the home’s conditioned space). Mixing strategies is how you end up with damp insulation and regret.
Quick rule of thumb
- Vented crawl space: Insulation usually goes under the floor (between or across the joists), and you focus on air sealing the floor above.
- Sealed/unvented crawl space: You typically insulate the crawl space walls and rim/band joist, and you control moisture with a ground vapor barrier and (often) some conditioning/dehumidification.
If you’re not sure what you have, don’t guess based on vibes. Look for foundation vents, check whether there’s a continuous ground vapor barrier, and note whether ductwork lives down there. When ductwork and plumbing are in the crawl space, sealing and insulating the walls often keeps those systems within a more stable temperature zone (which can improve comfort and efficiency).
Safety note (important): Crawl spaces can involve electrical hazards, pests, fiberglass irritation, low clearance, and mold. If there’s standing water, heavy mold, or signs of structural issues, it’s smart to bring in a qualified pro. If a teen is reading this: this is a project that should involve a licensed contractor or a responsible adultno “solo crawl-space hero” missions.
Simple Way #1: Install Fiberglass or Mineral Wool Batts Between Floor Joists (Best for Vented Crawl Spaces)
This is the classic approach: batts fit snugly between floor joists, turning the floor above the crawl space into a thermal boundary. It’s popular because materials are widely available and the concept is straightforward. The success (and comfort) comes down to air sealing and proper support so insulation stays in place.
When this method makes the most sense
- You have a vented crawl space and plan to keep it vented.
- The crawl space is dry (or you’ve already addressed drainage and humidity issues).
- You want a budget-friendly upgrade and can access the joist bays.
How it’s typically done (high-level)
- Fix water first. Improve drainage outside (gutters, grading, downspout extensions) and address plumbing leaks. Insulating a wet crawl space is like putting a fluffy sweater on a wet dog: it won’t end well.
- Air seal the floor system. Pros seal penetrations (wires, pipes) and the rim/band joist area to cut drafts. Air leaks can reduce real-world performance even when the R-value looks great on paper.
- Fit batts snuglyno gaps, no compression. Batts work best when they fully fill the cavity. Gaps = cold stripes on your floor. Compression = lower effective R-value.
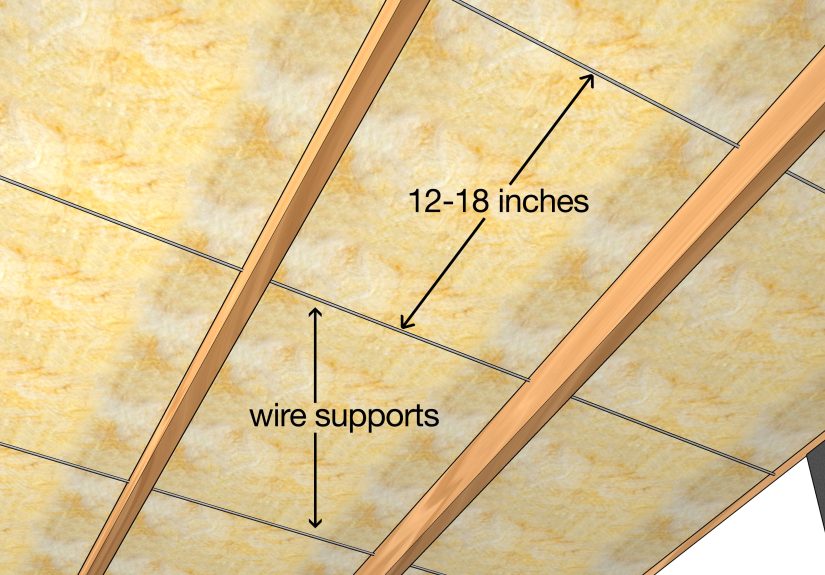
- Support batts so gravity doesn’t win. Wire supports (“staves”), netting, or other approved supports prevent sagging and fallout.
- Mind facing and vapor control. In many assemblies, faced batts are installed with the facing toward the conditioned space, but moisture strategy varies by climate and crawl-space design. When in doubt, follow local code and manufacturer guidance.
Example: A drafty living room over a vented crawl space
A common scenario: your living room floor feels like it’s auditioning for an ice rink, especially near exterior walls. Contractors will often start by sealing the rim joist area and floor penetrations, then installing well-supported batts. The comfort improvement can be immediatebecause stopping air movement is often as important as adding insulation.
Watch-outs (the stuff that causes “Why is my insulation hanging like a sad hammock?”)
- No support: Batts fall down over time without proper fastening.
- Moisture exposure: In humid regions, vented crawl spaces can push moist air into cooler areas, increasing condensation risk.
- Missing air sealing: Air leaks can undermine insulation performance and create cold spots.
Simple Way #2: Insulate the Crawl Space Walls With Rigid Foam Board (Best for Sealed/Unvented Crawl Spaces)
If your crawl space is (or will be) sealed, insulating the foundation walls instead of the floor can keep pipes and ducts in a more protected environment. This approach is widely supported in building-science guidance and energy-efficiency programswhen paired with good moisture control.
When this method makes the most sense
- You want (or already have) an unvented/sealed crawl space.
- There’s ductwork, plumbing, or equipment you’d rather keep in a more stable temperature zone.
- You’re ready to do the moisture-control steps that make sealing work.
The “simple” version (what pros focus on)
- Ground moisture control: Install a durable ground vapor barrier over exposed soil, with overlapped seams sealed. Many codes and best-practice guides emphasize this as foundational for unvented crawl spaces.
- Wall insulation: Attach rigid foam board to the interior foundation walls and seal/tape seams to help create continuous insulation and reduce air movement.
- Rim/band joist insulation: Insulate and air seal the band joist areaone of the biggest leakage points.
- Termite inspection and ignition barriers: In termite-prone areas, details may require an inspection gap or shield. Foam plastics may also need protection per local fire/ignition-barrier requirements.
- Humidity management: A sealed crawl space often needs a plan to stay drysometimes a small supply of conditioned air (where permitted) and/or a dehumidifier, depending on region and design.
Example: Humid Southeast crawl space with musty odor
In hot-humid climates, people often complain about musty smells that seem to “come from the floor.” Sealing the crawl space with a high-quality ground vapor barrier and insulating the walls with rigid foam, plus managing humidity, can reduce moisture migration and improve indoor air comfort. The key is detail work: seams sealed, edges turned up and fastened, and wall insulation installed continuouslyno big gaps.
Watch-outs (because “sealed” doesn’t mean “set it and forget it”)
- Skipping the vapor barrier: Without ground moisture control, wall insulation can trap moisture problems instead of solving them.
- Wrong foam product or detailing: Some faced foams can create unintended vapor trapping in certain assemblies.
- Local code requirements: Unvented crawl spaces often have specific requirements for vapor retarders and conditioning.
Simple Way #3: Add Continuous Insulation Across the Bottom of Joists (A Cleaner Upgrade That Reduces Thermal Bridging)
If batts between joists are the “classic move,” continuous insulation across the underside of the joists is the “glow-up.” Why? Joists themselves conduct heat, creating thermal bridgingthose colder stripes you feel as uneven floor temperatures. A continuous layer helps smooth out performance and can also act as a more effective air barrier when seams are sealed.
When this method makes the most sense
- You want better real-world performance than cavity-only insulation.
- You’re dealing with cold floors caused by air movement and thermal bridging.
- You want a more “finished” underside that can help protect cavity insulation from wind washing in vented spaces.
How it’s commonly assembled
- Option A (hybrid): Batts between joists + continuous foam board across the bottom, with seams taped/sealed.
- Option B (foam-only): Continuous foam board sized and fastened per product guidance, with careful seam sealing.
- Option C (pro-only air sealing): Professional spray foam used strategically for air sealing (especially rim joists), sometimes paired with other insulation types.
This approach can be especially useful when you’re trying to keep insulation in place long-term, prevent airflow through fibrous insulation in a vented crawl space, and reduce those chilly “joist lines” on the floor above.
Watch-outs
- Combustion safety and clearances: If there are fuel-burning appliances, follow safety clearances and code requirements.
- Fire protection requirements: Foam plastics often require specific coverings/ignition barriers depending on location and code.
- Moisture strategy still matters: Continuous insulation isn’t a substitute for fixing ground moisture and bulk water intrusion.
The Not-So-Secret Ingredient: Moisture Control (Because Insulation Can’t Outrun Physics)
The U.S. guidance that shows up again and again is simple: control moisture first. Crawl spaces are moisture magnetssoil vapor, humid outdoor air, plumbing leaks, and poor drainage all love to congregate in the same low place. Moisture problems can lead to mold, wood rot, and sagging insulation.
Practical moisture steps homeowners commonly overlook
- Keep rainwater away: Gutters that discharge far from the foundation and proper grading can make a huge difference.
- Cover exposed soil: A ground vapor barrier helps reduce moisture evaporating into the crawl space.
- Seal obvious air leaks: Air movement can transport moisture and reduce comfort.
- Manage humidity: In some regions, a sealed crawl space may need dehumidification or controlled conditioning.
Think of moisture control as the “foundation” for your foundation. (Yes, that’s a dad joke. No, I won’t apologize.)
Which Method Should You Choose? A Simple Decision Guide
Pick Way #1 (batts between joists) if…
- Your crawl space is vented and you plan to keep it vented.
- You can keep the crawl space dry and the batts properly supported.
- You want a straightforward, widely used approach.
Pick Way #2 (rigid foam on walls) if…
- You want a sealed/unvented crawl space strategy.
- You have ducts/pipes down there and want them in a more stable environment.
- You’re ready to do vapor-barrier detailing and humidity management.
Pick Way #3 (continuous insulation under joists) if…
- You want to reduce thermal bridging and improve real-world comfort.
- You’re upgrading a vented crawl space floor assembly or doing a hybrid build-up.
- You want a more durable “layered” approach.
Common Mistakes That Make Crawl Space Insulation Fail
- Insulating before fixing water: Bulk water problems will ruin materials and air quality.
- Forgetting the rim/band joist: This area can leak a surprising amount of air.
- Leaving gaps and voids: Insulation works best as a continuous blanketbreaks in coverage become comfort complaints.
- Ignoring local code: Unvented crawl spaces often have specific requirements for vapor retarders and conditioning.
- Underestimating safety needs: PPE mattersespecially with fibrous insulation and dusty crawl spaces.
Real-World Experiences: What People Learn After Insulating a Crawl Space (Extra 500+ Words)
If you read enough homeowner forums, contractor Q&As, and weatherization case studies, a pattern appears: crawl space insulation is rarely “hard” because the concept is complicatedit’s “hard” because crawl spaces are inconvenient, unforgiving, and absolutely obsessed with moisture. Here are the most common real-world lessons people share after the job is done (or after they’ve had to redo it).
1) “I thought insulation was the fix… but the real fix was stopping water.”
Many people start with insulation because it feels like the obvious comfort upgrade. But the biggest turning point often happens outside: extending downspouts, cleaning gutters, fixing negative grading, and redirecting surface runoff. Once the crawl space stays dry, insulation can actually do its job instead of turning into a damp, sagging mess.
2) “Air sealing made a bigger difference than I expected.”
A common surprise: sealing rim joists, plumbing penetrations, and gaps in the subfloor can noticeably reduce drafts, even before new insulation is added. People describe it as the home feeling less “leaky,” especially on windy days. That’s why pros treat air sealing as part of the insulation systemnot a bonus feature.
3) “Batts are fine… until they aren’t supported.”
Homeowners often report that batts looked perfect on day one and looked tragic a year later. The usual culprit is inadequate support. Gravity doesn’t care about your weekend project timeline. When batts are properly secured, they can perform well; when they’re not, they slump, gap, and invite cold spots back to the party.
4) “The musty smell didn’t stop until we handled ground moisture.”
In humid regions, people frequently connect the dots between musty odors and exposed soil. Once a durable vapor barrier is installed on the crawl space floorwith seams sealed and edges detailed up the wallsmany report the smell decreases significantly. The bigger takeaway: odor is often a moisture-management problem wearing a disguise.
5) “Sealed crawl spaces feel great… but they still need a humidity plan.”
Homeowners who switch to an unvented/sealed strategy often love the results: warmer floors, fewer drafts, and a crawl space that feels less like a swamp. But the best outcomes tend to come when people also plan for humidity control (like a properly sized dehumidifier or code-compliant conditioning). Without that, a sealed crawl space can trap humidityand trapped humidity is just moisture with commitment issues.
6) “Termites and inspections are a regional reality.”
In termite-prone areas, people learn quickly that insulation details may need to accommodate inspection requirements. Some report needing a visible inspection strip at the top of the wall insulation or a termite shield detail. The takeaway: the best crawl space insulation is the kind that doesn’t conflict with what local inspectors require.
7) “Rigid foam was cleaner than I expectedand fussier than I expected.”
Foam board on walls can look neat and perform well, but people often mention how detail-oriented the work is: fitting around irregular surfaces, sealing seams, and making transitions at the rim joist. In other words, foam board rewards patience. The comfort payoff is real, but so is the value of careful workmanship.
8) “The best result happened when we treated it like a system.”
The most satisfied homeowners describe a “systems” approach: water management outside, vapor barrier on the ground, air sealing at leaks, and then insulation placed where it matches the crawl-space design (floor for vented, walls for sealed). That’s the big lesson: crawl space insulation isn’t a single productit’s a coordinated plan that keeps heat where you want it and moisture where you don’t.
Conclusion
Crawl space insulation can be a comfort game-changer, but the smartest installs follow a simple principle: match the insulation location to the crawl space strategy (vented vs. sealed) and treat moisture control as non-negotiable. Choose batts between joists for many vented crawl spaces, rigid foam on walls for sealed crawl spaces, or a continuous insulation layer to reduce thermal bridging and improve real-world performance. Do the prep work, respect local code, and your floorsand your energy billwill stop acting so dramatic.


