Table of Contents >> Show >> Hide
- Start Like a Designer (So You Don’t Buy Random Stuff)
- Floors & Foundations That Look Pricey (But Aren’t)
- Seating That Doesn’t Destroy Your Budget
- Shade & Privacy: The “Walls” and “Ceiling” of Outdoor Rooms
- Lighting: The Fastest Way to Make It Feel Magical
- Comfort & Function: The Stuff That Makes People Stay Outside
- Now Build Actual “Rooms”: 16 Outdoor Room Setups That Can Be Done on a Budget
- Pull It Together: The Budget Priorities That Actually Work
- Real-Life, Budget Outdoor-Room Lessons (Experience)
Outdoor rooms are basically the cheat code of home design: you get the “extra living space” feeling without paying for drywall, HVAC, or a contractor who says, “We found something…” in the wall. The secret isn’t spending bigit’s defining zones, adding comfort, and making it feel intentional.
Below are 39 budget-friendly outdoor room ideasorganized like a real design planso your patio, porch, deck, balcony, or backyard can stop being “the place where the hose lives” and start being “the place where people actually want to hang out.”
Start Like a Designer (So You Don’t Buy Random Stuff)
- Write a one-sentence “room purpose.” Example: “This is our after-dinner chat spot for four.” That sentence will save you from buying a dining set when you really needed lounge chairs.
- Pick one “anchor” piece and build around it. A small table, a bench, a fire-safe centerpiece, or even a big planter works. Anchors make the space feel plannedeven if you sourced everything from a thrift store and pure determination.
- Sketch a simple layout with a clear walking path. Leave a “lane” from the door to the yard/gate. Outdoor rooms feel expensive when you can move through them without doing a sideways crab-walk.
- Create zones with inexpensive boundaries. A rug, a gravel edge, a line of planters, or a change in lighting can separate “dining” from “lounging” without building anything permanent.
- Use painter’s tape (or a garden hose) to outline your “room.” Mark the footprint on the ground before you place furniture. It’s the lowest-cost way to avoid the classic mistake: buying seating that doesn’t fit.
- Choose a tight color palette. Pick 2–3 colors (plus neutral). When pillows, planters, and textiles share a palette, the space looks curated instead of “yard sale chic.”
- Repeat one material on purpose. Wicker, black metal, warm wood, concretechoose one and echo it 3 times. Repetition is the grown-up version of “matching,” and it reads as high-end.
- Keep it “low maintenance honest.” If you hate storing cushions, go with quick-dry seating pads and one outdoor throw you bring in. A realistic setup gets used; a fussy setup becomes outdoor decor guilt.
Floors & Foundations That Look Pricey (But Aren’t)
- Define the “room” with an outdoor rug. This is the fastest budget outdoor living room trick. A rug instantly says: “This is a seating area,” not “we accidentally put chairs on the grass.”
- Create a simple gravel patio. Gravel is often one of the most affordable patio surfaces. Add a border (edging, bricks, or timbers) to keep it tidy and it suddenly looks intentional.
- Make a mini paver “pad” instead of a full patio. You don’t need pavers everywherejust under the seating group or under the dining table. A small footprint gives you the outdoor room feel for a fraction of the cost.
- Refresh existing concrete with paint or stain. A cleaned-up slab with a solid stain (or a stencil pattern) can feel like a boutique courtyard. It’s a makeover that changes everything without changing the structure.
- Try modular deck tiles for renters or small spaces. Interlocking tiles can cover tired concrete or a tiny balcony floor and are usually easy to remove when you move.
- Use mulch to create a “garden lounge.” Under a tree, mulch can define a relaxed reading nook. Add a chair, a small table, and string lights overhead and it feels like a secret hideaway.
- Lay stepping stones to “connect rooms.” Paths are outdoor hallways. A simple stepping-stone walkway makes your yard feel designed and helps separate zones like dining, lounging, and garden areas.
Seating That Doesn’t Destroy Your Budget
- Thrift mismatched chairs and unify them with spray paint. Matching sets are expensive. A consistent color makes “mismatched” look intentionallike you did it on purpose (because you did).
- Build a low-cost bench with basic lumber and brackets. Benches are outdoor room MVPs: seating for many, minimal footprint, and easy to dress up with a cushion and pillows.
- Make a cinder-block-and-board bench for a modern look. This is a classic budget move: simple materials, surprisingly stylish. Add outdoor cushions for comfort and suddenly you have “architectural seating.”
- Create a pallet-style lounge (with real comfort in mind). If you go DIY, prioritize cushions made for outdoor use (or cushion covers that can be washed). Comfort is what keeps people outside longer.
- Use floor poufs and waterproof cushions for flexible seating. Great for small patios and for hosting. Stack them away when not in use and your outdoor room stays open and airy.
- Choose a folding bistro set for tiny patios and balconies. It’s the outdoor equivalent of a compact car: not flashy, but it gets you where you need to gocoffee outside, lunch outside, life outside.
- Turn a storage bench into seating + clutter control. Store small items (covers, citronella alternatives, gardening gloves) and keep the outdoor room looking neat in one move.
- Use a “two small tables” strategy instead of one big coffee table. Two little tables (or stools) are often cheaper and more flexible. They can split up for drinks, snacks, books, and that one friend who always brings a giant water bottle.
- Repurpose indoor pieces wisely. A small metal side table, a plant stand, or a sturdy stool can work outdoors if it can handle humidity and temperature swings. If it can’t, it becomes “shabby” in a hurry.
Shade & Privacy: The “Walls” and “Ceiling” of Outdoor Rooms
- Add a shade sail for big coverage on a budget. Shade sails define a “ceiling,” which is a huge part of making an outdoor space feel like a room. Bonus: they make midday hangouts possible.
- Use an umbrella to create a “mini roof.” Umbrellas are underrated: instant shade, instant focal point, and they visually lower the space so it feels cozier.
- Create privacy with outdoor curtains (even on a small patio). Curtains make the space feel like a cabana. They also soften hard edges and add movementan easy way to upgrade the vibe.
- Install a simple reed/bamboo screen. Lightweight screening panels can block a neighbor view and instantly give you that “enclosed outdoor room” feeling.
- Use tall planters as living privacy walls. Group large planters in a line to create a green boundary. It’s renter-friendly, flexible, and it looks lush instead of fence-y.
- Grow vertical with a trellis and climbing plants. A trellis is a budget wall. Add climbing greenery and it becomes a soft, living partition that feels like a garden resort.
- Create a “pergola-lite” using a simple frame and fabric canopy. You don’t always need a full pergola. A basic overhead frame with outdoor fabric can define a dining or lounge zone and make it feel like a destination.
Lighting: The Fastest Way to Make It Feel Magical
- Hang string lights to define the “ceiling line.” Overhead lights make a room feel contained. Keep the drape neat and avoid sagging chaos for a cleaner, more polished look.
- Layer lighting at different heights. Think: overhead string lights + table lantern + a few path lights. Layering is what makes the space feel designed instead of “bright.”
- Use solar path lights for low-cost glow. Solar lights can outline edges and guide people through the yard. They’re also a budget-friendly way to add that “resort walkway” feel.
- Add portable lanterns for a cozy table vibe. Battery-powered lanterns (or LED candles) are easy, safe, and surprisingly elegantespecially when grouped in threes.
- Highlight plants with soft uplighting. A little light aimed at greenery turns “random shrub” into “dramatic landscaping feature.” It’s one of the best bang-for-buck upgrades.
- Use a timer so your outdoor room looks welcoming every night. Timers make lighting effortless and consistent. Consistency is what makes the space feel like a real extension of your home.
Comfort & Function: The Stuff That Makes People Stay Outside
- Add one “softening” element: pillows, cushions, or an outdoor throw. Comfort is the difference between “nice patio” and “I could stay here for hours.” Keep extras stored inside or in a bin to extend their life.
- Create a bug-smart zone. If bugs ruin the experience, you won’t use the space. Consider a screened canopy, a fan near seating, and keeping standing water under controlsimple, practical wins.
Now Build Actual “Rooms”: 16 Outdoor Room Setups That Can Be Done on a Budget
Sometimes the easiest way to design is to pick a “room type” and outfit it simply. These ideas work in big yards and tiny patiosjust scale down.
- The Morning Coffee Nook: Two chairs + a tiny table + shade. Add a plant nearby and it becomes your favorite five-minute vacation.
- The Outdoor Living Room: A rug, a seating cluster, and layered lighting. Keep furniture close enough for conversation, not shouting across the yard.
- The Budget Dining Room: A simple table (even a fold-out) under shade, with a lantern centerpiece. Dining outside feels fancy no matter what you ate.
- The Reading Retreat: One comfy chair, a small side table, a footstool, and a soft light. Put it near greenery so your brain believes it’s in a spa brochure.
- The Backyard “Bar” Corner: A rolling cart, a tray, and hooks for tools. It’s less about alcohol and more about having a hosting station that feels intentional.
- The Grill & Prep Station: A small outdoor-safe table next to the grill, plus a bin for tools. It keeps the cook from doing 37 trips inside.
- The Movie Night Room: A blank wall or sheet backdrop, floor cushions, and a snack table. Add soft lighting behind seating so people can find their chips.
- The Game Zone: A narrow table for cards/board games with good light overhead. Keep a lidded bin for game storage so it’s always ready.
- The Kids’ “Play Room” Outdoors: A washable rug or mat, a storage bench, and a defined boundary (planters or a small fence). Zones help contain chaos.
- The Pet Hangout: Shade + water + a durable mat. Put it near your seating so everyone “hangs out” together.
- The Garden Lounge: Place seating at the edge of garden beds so the view is plants, not the trash cans. Instant upgrade.
- The Balcony Mini-Room: Foldable seating, vertical plants, and a small rug. Use the railing as “wall space” with planters or lighting.
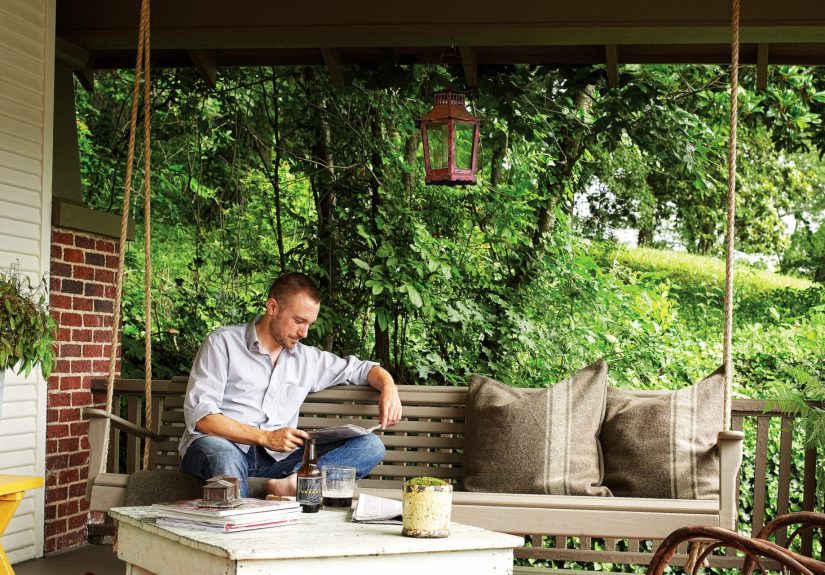
- The Porch Conversation Room: Chairs facing each other with a small table in between. A porch swing also counts as furniture and entertainment.
- The Outdoor Office (Weather-Permitting): A small table, shade, and a comfortable chair. The goal is 30–60 minutes of fresh-air productivity, not moving your entire desk outside.
- The “Spa-ish” Corner: Privacy screen + soft lighting + a little fountain-style water sound. Keep it simple and it feels luxe.
- The Fire-Side Chat Room (Safety First): If you use a fire feature, keep seating at a safe distance, follow local rules, and make sure an adult is present to manage it. The “room” comes from the circle layout and cozy lighting as much as the fire itself.
Pull It Together: The Budget Priorities That Actually Work
If you only spend money on a few things, spend it here:
- Definition: A rug, gravel edge, or planters that make the “room boundary” obvious.
- Comfort: Cushions that don’t feel like sitting on a polite rock.
- Shade: Even partial shade makes the space usable for more hours of the day.
- Light: Soft, layered lighting turns “yard” into “outdoor room” instantly.
And here’s what to skip (unless you love burning money as a hobby): buying everything at once, buying oversized furniture “just in case,” and choosing décor before you’ve solved comfort, shade, and lighting.
Real-Life, Budget Outdoor-Room Lessons (Experience)
The funniest thing about building outdoor rooms on a budget is how quickly you learn what actually matters. You can have the prettiest throw pillows in the world, but if the chair is uncomfortable or the sun is blasting your face at 2 p.m., everyone will migrate back inside like it’s a survival instinct (because it is).
Lesson one: the “room” starts with boundaries. The first time you lay down a rug outdoorson a deck, a patio, even a small concrete slabit’s like your brain instantly flips a switch. That rug doesn’t just sit there; it announces, “This is the lounge.” The same thing happens with planters placed in a line or gravel contained by edging. It’s not about fancy materialsit’s about making the space feel defined.
Lesson two: buy comfort first, style second. Budget chairs that look amazing but feel like lawn ornaments are a trap. A simple fix is adding a decent outdoor cushion and one lumbar pillow. Suddenly the chair becomes a place where people actually sitand once people sit, the space becomes a real outdoor living area. Comfort also changes how long you use the space. Ten minutes outside is “nice.” Two hours outside is “this is my favorite room.”
Lesson three: lighting is basically outdoor confidence. Without it, you’ll head inside as soon as the sun goes down. With it, you’ll look around at dusk and think, “Wait… this is adorable.” The best budget setup is layered: something overhead (string lights), something on the table (lantern or LED candle), and something that quietly marks the edges (a few path lights). It doesn’t need to be bright; it needs to be warm and consistent. Also, timers are undefeatedbecause nobody wants to manually become the “lighting manager” every night.
Lesson four: small spaces aren’t a disadvantagethey’re a shortcut. A tiny balcony or patio can feel finished faster because you’re designing a smaller footprint. A foldable bistro set, a vertical plant stand, and a rug can create a complete outdoor room in an afternoon. In big yards, the mistake is trying to “do the whole yard.” In small spaces, you focus, and focus looks expensive.
Lesson five: you’ll make one hilarious sizing mistake. It’s practically required. The rug will be too small. The table will block the door. The chairs will be “cozy” (meaning: cramped). The fix is simple: outline your room first, then place furniture inside that boundary, leaving a clear walking lane. Once you do that, your outdoor room stops feeling like random stuff outdoors and starts feeling like a plan.
Most of all, budget outdoor rooms are about progress, not perfection. Add one meaningful upgrade at a timeshade, then seating, then lightingand your backyard starts acting like an extra living room. And honestly? The best part is that fresh air makes even the cheapest lemonade taste like a vacation.


