Table of Contents >> Show >> Hide
- Before You Start: Is It Actually Silver?
- Why Silverware Turns Dark (And Why It’s Not Your Fault)
- Way #1: Gentle Wash + Microfiber Buff (Best for Light Film)
- Way #2: Baking Soda Paste (Best for Moderate Tarnish)
- Way #3: Aluminum Foil + Hot Water + Baking Soda (Best for Heavy Tarnish, Big Batches)
- Way #4: Commercial Silver Polish (Best for Maximum Shine and Stubborn Tarnish)
- How to Keep Silverware Sparkling Longer (So You Don’t Do This Every Weekend)
- Common Mistakes That Make Silverware Look Worse
- Quick Troubleshooting Guide
- Real-Life Cleaning Experiences: What Actually Happens in Kitchens (Extra)
Silverware has two personalities: “glows like a fancy restaurant” and “looks like it survived a pirate movie.”
The good news is that tarnish isn’t a life sentenceit’s just chemistry doing chemistry things.
With the right method (and the right amount of drama), you can bring back that mirror-like shine without scraping your forks into submission.
Below are four reliable, real-world ways to clean silverware so it sparklesplus tips to keep it that way longer and avoid the classic mistakes
(like the “I polished it… and now it’s scratched forever” situation).
Before You Start: Is It Actually Silver?
In the U.S., lots of people call all flatware “silverware,” even when it’s stainless steel.
Stainless doesn’t “tarnish” the same way sterling does, so it doesn’t need the same treatments.
Take 30 seconds to checkyour future self will thank you.
Quick ways to tell
- Look for markings: “Sterling,” “925,” or a maker’s mark often means real silver. “Stainless” means… well… stainless.
- Magnet test: Many stainless pieces are magnetic (not all), while sterling is not. (Not foolproof, but helpful.)
- Color and tarnish pattern: Real silver often darkens to brown/gray/black (especially in crevices). Stainless tends to look cloudy or spotty rather than truly “blackened.”
Why Silverware Turns Dark (And Why It’s Not Your Fault)
Real silver reacts with sulfur-containing compounds in the air and environment, forming a dark layer (tarnish).
That’s why a perfectly clean spoon can still look like it’s auditioning for “Goth Cutlery Weekly.”
Humidity, storage materials, rubber bands, and even certain foods (hello, eggs) can speed things up.
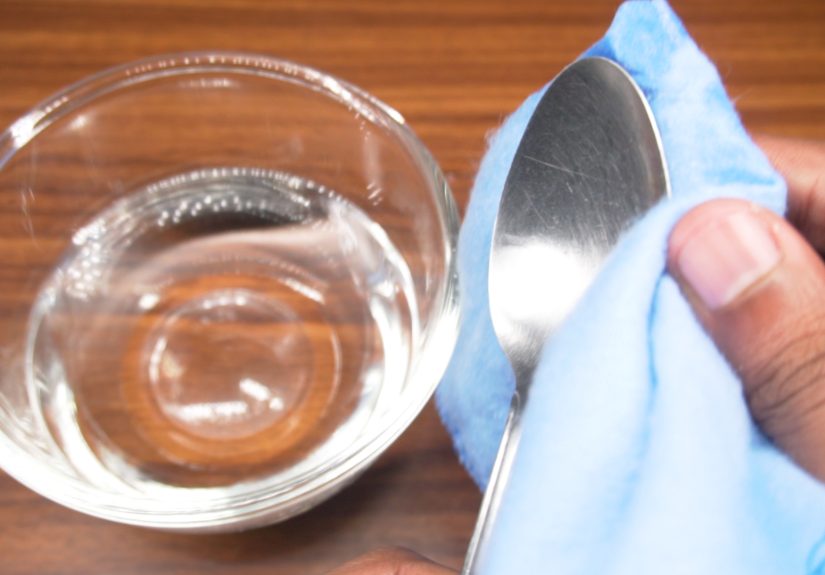
Way #1: Gentle Wash + Microfiber Buff (Best for Light Film)
If your silverware looks dull or slightly hazylike it’s wearing a thin “meh” filterstart here.
This method is low-risk, quick, and surprisingly effective for everyday upkeep.
What you need
- Mild dish soap
- Warm water
- Soft sponge or soft cloth
- Microfiber cloth (or clean, soft cotton towel)
How to do it
- Mix a few drops of mild dish soap into warm water.
- Dip a soft cloth into the soapy water and gently rub each piece. Focus on fingerprints and cloudy spots.
- Rinse in cool water (yes, coolless spotting).
- Dry immediately and buff with a microfiber cloth until it shines.
Why it works
Light dullness is often oils, residue, and minor oxidationnot heavy tarnish. Soap removes grime; microfiber restores shine without scratching.
Bonus: it’s the least “chemical” method of the four.
Best for
- Recently used sterling or silver-plated flatware
- Light haze, water spots, and fingerprints
- Regular maintenance between deeper cleanings
Way #2: Baking Soda Paste (Best for Moderate Tarnish)
When silverware starts getting that gray-ish castespecially around engraved detailsbaking soda paste is a classic.
It’s simple, inexpensive, and gives you control (which is great because silver plating can be thin, and “enthusiastic scrubbing” is not a love language).
What you need
- Baking soda
- Water
- Soft, lint-free cloth (avoid paper towels)
- Soft toothbrush or cotton swab (for patterns and crevices)
How to do it
- Make a paste: 3 parts baking soda to 1 part water (aim for toothpaste consistency).
- Wet the silverware first, then apply paste with a soft cloth.
- Rub gently in straight lines along the piece (not aggressive circles).
- Use a soft toothbrush for engraved areas, applying almost no pressurelet the paste do the work.
- Rinse thoroughly and dry immediately. Buff with a clean microfiber cloth for sparkle.
Why it works
Baking soda is a mild abrasive, which helps lift tarnish and grime from the surface.
Used gently, it can brighten silver without the harshness of stronger cleaners.
Best for
- Moderate tarnish and darkening in details
- Small batches of flatware (or spot-cleaning your favorite pieces)
- People who like hands-on control
Watch-outs
- Go gentle on silver-plated pieces: plating can wear down over timeespecially if you scrub like you’re sanding a deck.
- Rinse well: paste left in crevices dries into a chalky mess, and nobody wants “crispy baking soda garnish.”
Way #3: Aluminum Foil + Hot Water + Baking Soda (Best for Heavy Tarnish, Big Batches)
This is the “science fair magic trick” methodand it’s popular because it can clean a whole pile of tarnished silverware at once.
Instead of polishing away tarnish, it helps transfer the tarnish reaction back, so the dark layer lifts off with much less rubbing.
Translation: less elbow grease, more “wow.”
What you need
- Aluminum foil
- Very hot or boiling water
- Baking soda
- Large glass baking dish or non-reactive container
- Tongs (optional but smart)
- Soft cloth for drying and buffing
How to do it (simple and effective)
- Line a dish with aluminum foil (shiny side up is commonly recommended).
- Place silverware in a single layer so it touches the foil where possible.
- Pour in very hot water until the pieces are submerged.
- Add baking soda. A practical guideline is about 1 cup per gallon of hot water. Stir gently if needed.
- Let it soak until you see the tarnish fadeusually a few minutes, sometimes longer for heavy tarnish.
- Remove pieces, rinse thoroughly, dry immediately, and buff to finish.
Optional “extra boost”
Some variations include a small amount of salt to increase conductivity. If you do this, keep it measuredthis is a cleaning method,
not a brine for pickles.
Why it works
Tarnish is largely silver sulfide. In the foil-and-baking-soda bath, an electrochemical reaction can help convert that tarnish so it releases from the silver.
You’re not grinding it off; you’re coaxing it off. Much kinder to your wrists.
Best for
- Heavily tarnished silverware
- Large batches before holidays or events
- Intricate patterns where polishing takes forever
Watch-outs (important)
- Antique or high-value pieces: this method can remove desirable patina and, in some cases, may contribute to pitting. If value matters, consider gentler approaches or professional advice.
- Silver-plated items: many people use this successfully, but if plating is thin or already worn, be cautious. If you see coppery tones or patchiness, stop and switch to gentler cleaning.
- Hollow-handled knives or pieces with seams: avoid long soakswater can get trapped inside and cause problems later. Dry thoroughly.
Way #4: Commercial Silver Polish (Best for Maximum Shine and Stubborn Tarnish)
Sometimes you want the “wow, did you buy new flatware?” finish. Commercial silver polishes are built for that.
The key is choosing the right formcream, liquid, wipes, or dipand using it gently.
Pick your polish type
- Cream polish: Great for deep tarnish and overall brightening. Often applied with a sponge, then rinsed and buffed.
- Liquid polish: Helpful for detailed patterns and crevices; usually applied with a cloth and buffed.
- Wipes: Convenient for quick touch-ups or smaller jobs with less mess.
- Dip cleaners: Fast for heavily tarnished flatware, but can be harsh and smelly. Use ventilation, follow instructions closely, and rinse thoroughlyespecially for anything that touches food.
How to use commercial polish safely
- Wash the silverware first (Way #1). Polishing over grime just grinds dirt around.
- Apply polish with a soft cloth or spongelight pressure is your friend.
- For patterned handles, use a soft toothbrush to reach grooves without scratching.
- Rinse if the product instructions call for it (and as a general rule, rinse anything that contacts food).
- Dry immediately and buff with a clean microfiber cloth.
Why it works
Commercial formulas are designed to remove tarnish efficiently and often leave behind a protective layer that helps slow re-tarnishing.
They’re also consistentmeaning you can get repeatable results without inventing new kitchen chemistry every time.
How to Keep Silverware Sparkling Longer (So You Don’t Do This Every Weekend)
Cleaning is great. Cleaning less often is greater. A few storage and habit tweaks can dramatically reduce tarnish buildup.
Smart storage habits
- Dry it completely: after washing or polishing, dry immediately to prevent water spots and trapped moisture.
- Use anti-tarnish storage: tarnish-resistant cloth bags, flannel-lined drawers, or wrapped storage helps slow darkening.
- Add a moisture helper: a piece of plain white school chalk in the storage area can help absorb moisture.
- Avoid sulfur offenders: rubber bands, some papers (like newspaper), and certain storage materials can accelerate tarnish.
Everyday habits that help
- Use your silver: regular use and routine washing can slow tarnish compared to “forgotten in a box for five years.”
- Wash after use: especially after foods that can encourage tarnish (like eggs) or acidic residues.
- Gloves aren’t just for detectives: wearing gloves while polishing reduces fingerprints (which can turn into stubborn marks later).
Common Mistakes That Make Silverware Look Worse
- Using abrasive scrubbers: steel wool and harsh pads can scratch silver and wear down silver plate.
- Paper towels as polishing cloths: they can be more abrasive than they look.
- Letting silver air-dry: hello, spots and streaks.
- Dishwasher roulette: many experts recommend skipping it for sterling or heirloom piecesheat, detergent, and contact with other metals can lead to damage or discoloration.
- “Anything in the pantry must be safe” logic: some DIY acids or abrasives can be risky on antiques, plated pieces, or detailed finishes.
Quick Troubleshooting Guide
- Cloudy film but not dark: Way #1 (soap + microfiber) or light wipe polish
- Gray/black tarnish in spots: Way #2 (baking soda paste)
- Heavy tarnish on a whole set: Way #3 (foil + baking soda bath)
- Need maximum shine fast: Way #4 (commercial cream/liquid/wipes; dip only if appropriate and used carefully)
Real-Life Cleaning Experiences: What Actually Happens in Kitchens (Extra)
If you’ve ever cleaned silverware, you know the internet makes it sound like a peaceful spa day: soak, rinse, sparkle, sip tea.
Real life is more like: “Why is the spoon black again?” and “Who touched the polished forks with buttery fingers?”
Here are a few common, very relatable experiences people run intoand what they learn from them.
The Holiday Panic Polish. A lot of folks only notice tarnish when guests are already on the way.
The silver chest comes out, the forks look suspiciously gray, and suddenly everyone becomes a chemist.
In these moments, the foil-and-baking-soda bath feels like a miracle because it handles a whole batch quickly.
The surprise is the finishing step: even after the tarnish lifts, you still have to rinse and dry thoroughly.
Skip that, and the silver looks “better” but not “sparkling,” like it’s wearing a clean shirt that’s still wrinkled.
The fix is simplebuff with microfiber and you get that bright, confident shine.
The “I Scrubbed Harder, So It Should Be Cleaner” Trap. This is especially common with silver-plated pieces.
People see dark spots, grab a rough sponge, and scrub like they’re trying to erase a bad decision from 2012.
What they learn fast: aggressive scrubbing can leave fine scratches or wear through plating at high points.
The better experience is switching to a gentle paste (baking soda + water) and letting time do more of the work than pressure.
When you polish lightlyespecially along the length of the utensilyou get shine without turning the surface into a tiny scratch map.
The “Why Does My Silver Tarnish So Fast?” Mystery. Many households discover their silver tarnishes quicker when stored with the wrong materials.
Rubber bands, certain papers, humid cabinets, or a drawer that isn’t lined can speed up darkening.
Once people swap to tarnish-resistant cloth, individual wrapping, or even toss a piece of plain white chalk into storage, they’re shocked by the difference.
The silver doesn’t stay perfect forever (nothing does), but it stops doing that overnight “I turned gray again” stunt.
The Dishwasher Incident. This one gets retold like a cautionary campfire story.
Someone runs sterling or heirloom flatware through the dishwasher and it comes out discolored, spotty, or dull.
The lesson is that dishwashers combine heat, strong detergent, and friction from other utensils.
Even if a piece survives once, repeated cycles can be roughespecially on silver plate.
Most people who’ve lived this experience become immediate fans of hand-washing and immediate drying (not glamorous, but effective).
The “It’s Clean, But It Doesn’t Shine” Moment. Cleaning removes tarnish; shine is the finishing touch.
A lot of people discover that the final buff is where the magic happens.
Even a perfectly cleaned spoon can look a little flat until it’s dried and polished with a soft cloth.
Once you do it, you recognize that “sparkle” isn’t just the absence of tarnishit’s the presence of a smooth, streak-free surface.
That’s why microfiber cloths become the unsung heroes of silver care. They’re basically the stage crew that makes the star look good.
The most realistic takeaway? Pick the gentlest method that matches your level of tarnish, finish with a buff, and store smart.
That’s how silverware stays sparkly without turning your life into a never-ending polishing montage.


