Table of Contents >> Show >> Hide
- Why Ribbon Flowers Are Worth Making
- What You’ll Need
- Before You Start: Tiny Tips That Prevent Huge Annoyances
- 1. How to Make a Rolled Ribbon Rose
- 2. How to Make a Looped Ribbon Daisy
- 3. How to Make a Gathered Ribbon Carnation
- 4. How to Make a Folded Petal Ribbon Flower
- How to Choose the Right Ribbon Flower Style
- Common Mistakes to Avoid
- Creative Ways to Use Ribbon Flowers
- Extra Experience and Practical Tips for Making Ribbon Flowers
- Conclusion
- SEO Tags
Ribbon flowers are one of those crafts that look wildly impressive compared with how little actual chaos they require. A strip of ribbon, a bit of glue or thread, and five minutes later you have something that looks like it belongs on a gift, a wreath, a hair clip, a table setting, or the kind of handmade card that makes people say, “Wait, you made this?” in a mildly suspicious tone.
If you want to learn how to make ribbon flowers without turning your craft table into a dramatic scene of loose ribbon tails and existential confusion, you’re in the right place. In this guide, you’ll learn four easy ribbon flower styles: a rolled ribbon rose, a looped ribbon daisy, a gathered ribbon carnation, and a folded petal flower. Each has a different look, a different level of fluffiness, and a different personality. Yes, flowers can have personalities. Some are elegant. Some are cheerful. Some are a little extra. We respect them all.
These handmade ribbon flowers are great for gift toppers, home decor, wedding DIYs, accessories, party decorations, scrapbook embellishments, and floral crafts that won’t wilt by Tuesday. Better yet, once you understand the basic construction, you can swap ribbon widths, textures, and colors to create dozens of variations.
Why Ribbon Flowers Are Worth Making
Fresh flowers are lovely, but ribbon flowers win on durability, flexibility, and the small but important detail that they don’t collapse when ignored on your desk for a week. They’re lightweight, reusable, easy to color-coordinate, and simple to store. You can make them from satin ribbon for a polished finish, grosgrain ribbon for extra structure, sheer ribbon for a soft airy look, or wired ribbon when you want petals that actually stay where you put them instead of rebelling immediately.
Ribbon flowers also work for crafters at almost every skill level. If you can fold, roll, pinch, glue, or sew a few basic stitches, you can make a flower. If you can do all of those while drinking coffee and looking for your scissors, you are already overqualified.
What You’ll Need
- Satin, grosgrain, sheer, or wired ribbon
- Sharp fabric scissors
- Hot glue gun or craft glue
- Needle and thread
- Floral wire or thin craft wire for some styles
- Buttons, beads, pearls, or rhinestones for centers
- Felt circles or fabric scraps for backing
- Ruler or measuring tape
- Optional: alligator clips, brooch pins, headbands, wreath forms, gift boxes
Before You Start: Tiny Tips That Prevent Huge Annoyances
1. Pick the right ribbon width
Narrow ribbon makes smaller, neater flowers. Wider ribbon gives you fuller petals and a bolder look. For beginners, ribbon between 5/8 inch and 1 1/2 inches is usually the sweet spot.
2. Decide whether you want soft or structured petals
Satin ribbon creates smooth, elegant flowers. Grosgrain adds texture and helps petals hold shape. Wired ribbon is ideal when you want loops or petals that stay fluffed instead of drooping like they’ve had a long day.
3. Don’t make every petal identical
Real flowers are not perfectly symmetrical, and your ribbon flower does not need to be, either. Slight variation often makes the final bloom look more natural and less like it was assembled by a very anxious ruler.
4. Use a backing
A felt circle on the back of a finished flower makes it easier to attach to clips, pins, wreaths, gifts, or decor. It also hides the construction mess, which is one of crafting’s greatest traditions.
5. Test one flower first
Before cutting ten ribbon lengths in a burst of optimism, make one full sample. It will tell you whether the ribbon is too stiff, too floppy, too wide, too narrow, or just personally offended by your plans.
1. How to Make a Rolled Ribbon Rose
The rolled ribbon rose is classic, elegant, and probably the flower most people picture first when they hear “ribbon flower.” It works beautifully for corsages, gift wrap, wedding decor, and hair accessories.
Best ribbon for this style
Satin ribbon is the star here because it creates smooth, rose-like curves. Ribbon around 1 inch wide is beginner-friendly and gives you enough surface area to shape the petals clearly.
How to make it
- Cut a piece of ribbon about 18 to 24 inches long. Longer ribbon makes a fuller rose.
- Fold one end diagonally to create the center bud.
- Roll the folded end tightly three or four times to form the middle of the rose.
- Now begin wrapping the remaining ribbon around the bud. After each partial wrap, twist or angle the ribbon outward slightly so it starts forming petals instead of one sad ribbon burrito.
- Keep rolling and turning until the flower reaches the size you want.
- Secure the base with hot glue or stitch it tightly with needle and thread.
- Flatten the base a little, then glue it to a felt circle if you want to attach it to something later.
Why this method works
The tight center gives the rose its realistic bud shape, while the angled wraps around the outside mimic open petals. The trick is not just rolling. It’s rolling, then gently shifting the angle so the ribbon spirals outward instead of stacking flat.
Where to use it
Try a rolled ribbon rose on a bridal sash, a ring pillow, a gift topper, a keepsake box, or a headband. A cluster of three roses in different sizes also looks beautiful on a wreath or a decorative pillow corner.
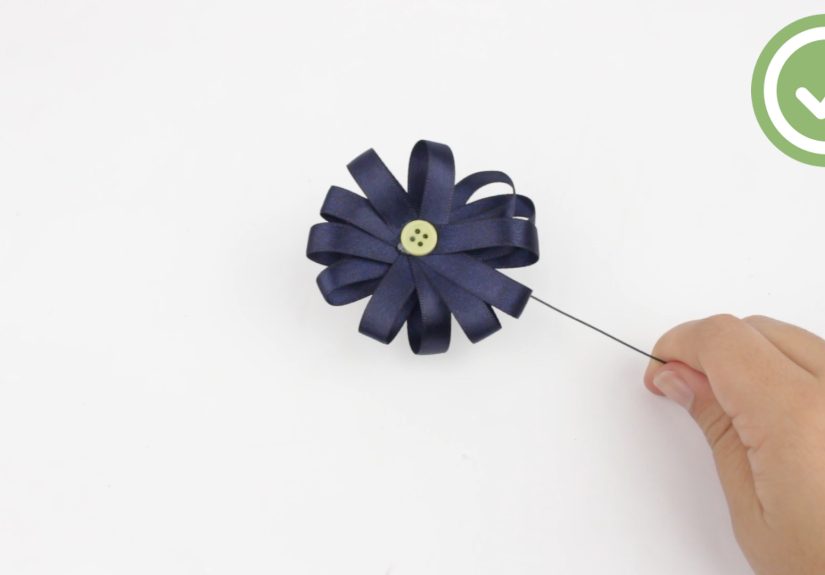
2. How to Make a Looped Ribbon Daisy
If the rolled rose is the elegant cousin, the looped ribbon daisy is the cheerful friend who shows up in bright colors and makes everything feel more fun. This flower is especially good for kids’ crafts, gift bows, spring decor, and accessories.
Best ribbon for this style
Use grosgrain, satin, or wired ribbon between 1/2 inch and 7/8 inch wide. Ribbon that holds a loop well is your best friend here.
How to make it
- Cut 6 to 10 equal lengths of ribbon, each about 3 to 5 inches long depending on how large you want the petals.
- Take one ribbon piece and bring the two ends together to form a loop. Glue or stitch the ends together at the bottom.
- Repeat until you have a full stack of petals.
- Arrange the loops in a circle so all the joined ends meet in the center.
- Glue the petals to a small felt circle or stitch them together through the base.
- Add a button, bead, pearl, or rhinestone in the center to hide the joins and finish the look.
How to make it look fuller
Use two layers of petals. Make one lower layer with slightly larger loops, then add a second smaller layer on top. That gives the flower more dimension and stops it from looking flat. You can also alternate colors, such as white and yellow, pink and coral, or red and polka dot if you’re feeling festive and slightly unstoppable.
Where to use it
This style is perfect for hair clips, gift packaging, party favors, handmade cards, and spring wreaths. It’s also a great choice when you need several flowers fast because the loop method is quick, repeatable, and less fussy than petal-by-petal shaping.
3. How to Make a Gathered Ribbon Carnation
The gathered ribbon carnation is soft, fluffy, and wonderfully forgiving. If your goal is a full flower with lots of texture, this is the method to try. It works especially well when you want volume without complicated folding.
Best ribbon for this style
Satin or sheer ribbon works nicely, especially in widths from 1 inch to 2 inches. Wider ribbon produces bigger, more ruffled blooms.
How to make it
- Cut a long strip of ribbon, roughly 20 to 30 inches depending on desired fullness.
- Thread a needle with strong thread and knot the end.
- Sew a running stitch along one long edge of the ribbon.
- Pull the thread gently to gather the ribbon into ruffles.
- Once fully gathered, start coiling the ruffled ribbon around itself to form a flower.
- Adjust the gathers as you wrap so the bloom looks even and full.
- Stitch through the base several times to secure it, or add glue for extra hold.
Why crafters love this one
This method creates a flower that looks lush without requiring perfect folds. The ruffles do a lot of the visual work for you. If your stitch line wobbles a bit, congratulations: you have accidentally made the flower look more natural.
Style ideas
Use soft pink for a romantic look, ivory for wedding crafts, or bold red for dramatic decor. A cluster of gathered ribbon carnations can be attached to napkin rings, favor bags, table centerpieces, or wall letters in a nursery.
4. How to Make a Folded Petal Ribbon Flower
This flower has a more structured, layered look and can range from sweet and simple to fancy enough for formal decorations. It’s ideal when you want defined petals rather than loops or ruffles.
Best ribbon for this style
Use satin or grosgrain ribbon in 1 1/2-inch pieces, or wired ribbon if you want extra shape retention.
How to make it
- Cut several ribbon squares or equal lengths, usually 2 to 3 inches long.
- Fold each piece into a petal shape by bringing the edges inward or folding the ribbon into a pointed loop.
- Pinch the base of each petal and secure it with thread, glue, or a tiny wrap of wire.
- Make 5 to 8 petals for one flower.
- Arrange the petals around a felt base in a circle.
- Add a second layer if you want a more dimensional bloom.
- Finish with a decorative center such as a pearl button, bead cluster, or fabric-covered brad.
How to customize it
Pointed petals create a more star-like flower. Rounded folds create a softer blossom. Mixing two ribbon colors in alternating petals adds contrast without making the flower feel busy. For example, blush and cream look refined, while turquoise and yellow feel playful and summery.
Where to use it
This style shines on home decor projects, wreaths, holiday ornaments, statement hair accessories, and decorative gift boxes. If you need a flower that looks tidy and intentional from a distance, folded petals are a strong choice.
How to Choose the Right Ribbon Flower Style
Not every ribbon flower is right for every project, and that’s a good thing. A rolled ribbon rose looks polished and romantic, so it’s excellent for weddings, keepsakes, and elegant accessories. A looped daisy feels bright and casual, making it a smart pick for party decor, kids’ crafts, and everyday embellishments. A gathered carnation gives you fullness and softness, which works beautifully on gift decor and table accents. A folded petal flower has the most structure, so it’s ideal for statement pieces and decorative displays.
Think about distance, too. If the flower will be seen up close, delicate details matter. If it’s going on a wreath or backdrop, shape and color contrast matter more than tiny finishing touches.
Common Mistakes to Avoid
Using ribbon that is too stiff
Some ribbon simply refuses to cooperate. If your petals look awkward instead of intentional, the material may be the problem, not your technique.
Using too much glue
Hot glue is helpful, but it is not a personality trait. Tiny dots are usually enough. Too much glue can soak through ribbon or create bulky, messy bases.
Ignoring scale
A tiny flower can disappear on a wreath, while an oversized bloom can overwhelm a card or clip. Match the flower size to the project.
Forgetting the center finish
A flower often goes from “nice” to “wow” when you add a thoughtful center. Buttons, pearls, beads, and rhinestones are small details that make a big difference.
Creative Ways to Use Ribbon Flowers
- Glue them onto wrapped gifts instead of standard bows
- Attach them to headbands, clips, or brooch pins
- Add them to wreaths, garlands, or wall decor
- Use them on wedding favors, invitations, and centerpieces
- Decorate throw pillows, baskets, and storage boxes
- Create a bouquet that never wilts and never asks for water
Extra Experience and Practical Tips for Making Ribbon Flowers
After you make your first few ribbon flowers, something interesting happens: you stop following the instructions like a cautious scientist and start adjusting things by instinct. That’s usually when the best flowers happen. You realize that a rose looks prettier when the outer petals are looser, that a daisy looks happier with a brighter center, and that one ribbon you almost threw aside is actually perfect for a fluffy carnation. Crafting does that. It turns leftovers into favorites and mild confusion into suspicious confidence.
One of the most useful real-world lessons is that ribbon behaves differently from spool to spool, even when the label makes grand promises. Satin can be sleek and cooperative, or slippery and dramatic. Grosgrain may hold a petal beautifully, but create bulk if your flower is tiny. Wired ribbon can look amazing in large decorative flowers, but it can feel too stiff for delicate mini blooms. So when experienced crafters say, “Test one first,” they are not being cautious for fun. They are speaking from the lived experience of making twelve petals and realizing all twelve look like festive little tacos.
Color choice matters more than many beginners expect. A flower made with a single shade can look elegant and clean, especially for wedding or baby shower decor. But layered shades often create more depth. A rose made from dusty pink ribbon with a slightly darker center looks richer than one made from a flat single pink. A looped flower made from alternating ivory and gold instantly looks more finished. Even a simple gathered bloom becomes more interesting when paired with a contrasting button center. The point is not to make every flower flashy. It is to make the shape easier to see and appreciate.
Another thing you learn with practice is that backing matters. A neat felt backing can save a flower with a messy underside, strengthen the base, and make the bloom much easier to attach to another project. This becomes especially important when you are creating flowers for headbands, wreaths, handbags, place cards, or gift boxes. The front gets all the compliments. The back does all the work.
It is also smart to think in batches. If you are decorating a wreath, making one flower at a time may feel manageable, but cutting all ribbon pieces first speeds up the process and keeps the flowers consistent. For example, you might cut all your loop petals in one sitting, then glue the loops, then assemble the centers. This small assembly-line approach is not glamorous, but it makes the project go much faster and reduces the chance that your third flower ends up mysteriously twice the size of the first.
Finally, don’t underestimate how useful ribbon flowers are once you start making them. One bloom can dress up a plain gift bag. Three can elevate a boring frame. Five can turn a basic wreath into custom decor. A dozen can become a keepsake bouquet for a party table or bedroom shelf. They are inexpensive, adaptable, and oddly addictive to make. You start with “I just need one flower for this card,” and the next thing you know, you’re color-matching ribbon for seasonal door decor like a person who has fully embraced the craft life. Honestly, there are worse hobbies.
Conclusion
If you want a craft that is easy to learn, budget-friendly, and endlessly customizable, ribbon flowers are hard to beat. The rolled ribbon rose gives you timeless elegance, the looped daisy adds playful charm, the gathered carnation delivers soft volume, and the folded petal flower offers structured beauty. Once you know these four ribbon flower techniques, you can mix materials, colors, sizes, and embellishments to create flowers that match almost any project.
Start simple, make one sample bloom, and let the ribbon tell you what it wants to become. Preferably a flower. Not a knot. Though sometimes crafting likes to keep things interesting.


