Table of Contents >> Show >> Hide
- Start Strong: The “Make It Easy to Put Away” Rules
- 1. Do the expiration-date sweep first (yes, even the cinnamon)
- 2. Sort by category, not by “where it used to fit”
- 3. Create pantry zones (think: mini grocery store aisles)
- 4. Put everyday items in “prime real estate”
- 5. Add a dedicated “Backstock” bin for bulk or extras
- 6. Use FIFO: “first in, first out” so food actually gets eaten
- 7. Make a kid-friendly snack zone at kid eye level
- 8. Give non-food items their own “kitchen support” zone
- 9. Measure your shelves and choose storage that fits (not “close enough”)
- Containers That Actually Help (Not Just Look Pretty)
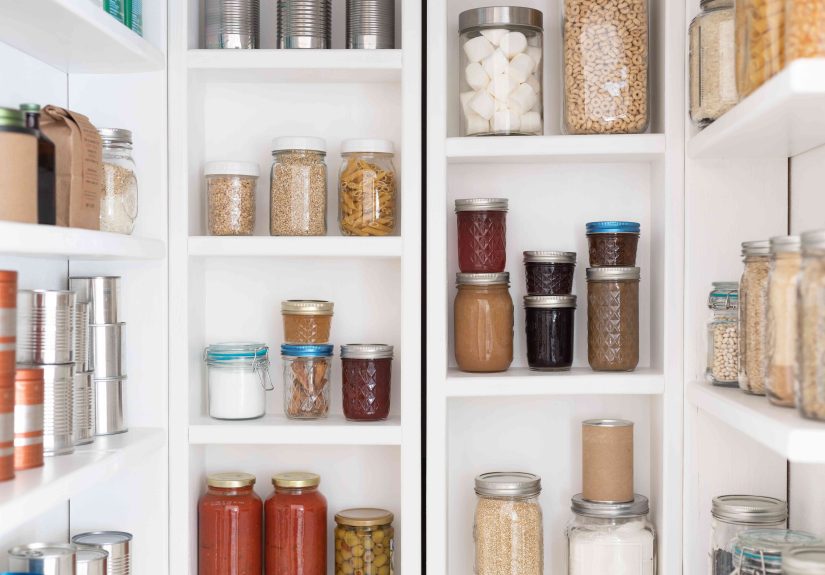
- 10. Store dry goods in clear, airtight containers
- 11. Decant selectively (you don’t have to decant everything)
- 12. Write expiration dates on the container
- 13. Use uniform containers to stack cleanly
- 14. Choose square or rectangular containers whenever possible
- 15. Add shelf risers to double your usable surface
- 16. Use a tiered spice riser inside the pantry
- 17. Put snacks, sauces, or jars on a Lazy Susan turntable
- 18. Treat handled bins like drawers
- 19. Use breathable baskets for onions/garlic (only if your pantry is suitable)
- 20. Stack clear bins to use vertical space
- 21. Use baskets to corral bulky bags (chips, marshmallows, flour sacks)
- 22. Use magazine holders for wraps, foil, and parchment
- 23. Use file dividers for drink mixes, sauce packets, and flat items
- Shelves, Drawers, and Hardware Upgrades That Pay Off
- 24. Install pull-out drawers or slide-out shelves
- 25. Consider a narrow pull-out pantry if space is tight
- 26. Add under-shelf baskets for extra “bonus” storage
- 27. Use wall-mounted hooks for lightweight items
- 28. Hang chip bags or snack bags with simple clips (yes, it works)
- 29. Add door-mounted racks for spices, snacks, or wraps
- 30. Use a door pocket organizer for small packets
- 31. Hang measuring cups/spoons inside the pantry
- 32. Add a small counter or landing zone if you have a walk-in pantry
- 33. Install puck lights or motion-sensor lighting
- 34. Keep a slim folding step stool nearby
- Labels, Lists, and Systems That Keep It Organized
- 35. Label shelves or bins with simple, clear categories
- 36. Use erasable labels for flexible categories
- 37. Color-code zones for special needs (allergies, gluten-free, school snacks)
- 38. Store heavy items low and lighter items up high
- 39. Put rarely used small appliances on the top shelf in a bin
- 40. Add a rolling cart as pantry overflow
- 41. Create a “Use First” bin for soon-to-expire items
- 42. Build a grab-and-go lunch station
- 43. Do a 10-minute pantry reset once a week
- Real-World Experiences: What People Notice After They Upgrade Their Pantry (Plus What Trips Them Up)
- Conclusion
A pantry should be a helpful sidekick, not a chaotic cave where pasta disappears forever and a single bag of rice triggers a shelf avalanche.
The good news: smarter pantry storage isn’t about buying every acrylic bin on the internet. It’s about setting up a system that matches how you
actually cook, snack, and grocery shopthen using a few simple tools (zones, bins, labels, and visibility) to make it stick.
Below are 43 kitchen pantry ideas designed for real life: busy weekdays, bulk buys, kids who can’t reach, deep shelves that hide things,
and that one mystery jar you swear you’ll use someday. Mix and match what fits your spacecabinet pantry, reach-in closet, or full walk-in.
Start Strong: The “Make It Easy to Put Away” Rules
Pantry organization works when it’s faster to put things back where they belong than to toss them on the nearest shelf and sprint away.
These first ideas create the foundation: fewer duplicates, fewer expired surprises, and a layout that makes sense at 6 p.m. on a Tuesday.
1. Do the expiration-date sweep first (yes, even the cinnamon)
Pull everything out and check dates. Keep what’s still good, toss what isn’t, and wipe shelves down. A clean slate makes the rest easierand
prevents the “Why do we have four open ketchups?” moment from repeating.
2. Sort by category, not by “where it used to fit”
Group like with like: baking, breakfast, snacks, canned goods, pasta/grains, sauces, drinks, and so on. Category grouping is the backbone of
smarter pantry storage because it reduces hunting time.
3. Create pantry zones (think: mini grocery store aisles)
Assign shelves to zonesbaking zone, lunch-packing zone, weeknight dinner zone. This keeps your pantry from becoming one long “miscellaneous”
shelf with vibes but no function.
4. Put everyday items in “prime real estate”
Eye-level shelves are for what you use most: cereals, coffee, snacks, and weeknight staples. Top shelves are for backups and rarely used items.
5. Add a dedicated “Backstock” bin for bulk or extras
If you shop at warehouse stores (or just love a deal), corral extras in one labeled bin on a higher or lower shelf. This keeps your main shelves
uncluttered while still letting you see what you already own.
6. Use FIFO: “first in, first out” so food actually gets eaten
When restocking, move older items to the front and new items to the back. It’s simple, it’s effective, and it saves money by reducing waste.
7. Make a kid-friendly snack zone at kid eye level
If kids live in your house, set a lower shelf with approved snacks in bins they can reach. Independence goes up, pantry chaos goes down.
8. Give non-food items their own “kitchen support” zone
Napkins, paper plates, storage bags, and lunch supplies belong together in a basket/bin. It keeps them from creeping into the cereal shelf like
they pay rent.
9. Measure your shelves and choose storage that fits (not “close enough”)
Quick measuring prevents buying bins that waste vertical space. Aim for stackable containers that use height efficiently without blocking sight lines.
Containers That Actually Help (Not Just Look Pretty)
Clear, airtight containers and bins aren’t just for influencer pantries. They’re practical: you can see what you have, protect dry goods,
and stack more efficientlyespecially in deep shelves.
10. Store dry goods in clear, airtight containers
Flour, sugar, rice, pasta, cereal, and snacks stay fresherand you’ll spot “we’re running low” instantly.
11. Decant selectively (you don’t have to decant everything)
Decant the messy stuff (flour, cereal, crackers) and keep some items in original packaging (like boxed pasta) if it’s already tidy and labeled.
The goal is function, not a museum exhibit.
12. Write expiration dates on the container
Put the expiration date on the back or bottom with a small label or marker. This keeps food safety easy even after you’ve ditched the original box.
13. Use uniform containers to stack cleanly
Matching shapes maximize space and reduce wasted gaps. A “container family” (a few sizes that nest/stack) beats random one-offs.
14. Choose square or rectangular containers whenever possible
Round containers leave dead space on shelves. Squares tuck together tightlymore storage, less pantry Tetris.
15. Add shelf risers to double your usable surface
Risers create a second level for cans, jars, or small containers. You’ll see what’s behind without pulling everything out.
16. Use a tiered spice riser inside the pantry
Whether you store spices in the pantry or keep backups there, tiers make labels visibleso you don’t buy paprika for the fifth time.
17. Put snacks, sauces, or jars on a Lazy Susan turntable
Turntables shine on deep shelves and corners. Spin to find what you needno more “lost salsa” situation.
18. Treat handled bins like drawers
On deep shelves, bins with handles pull out easily. Use them for packets, bars, snacks, baking add-ins, or small pantry items that love to scatter.
19. Use breathable baskets for onions/garlic (only if your pantry is suitable)
If your pantry is cool, dry, and ventilated, baskets can work for certain produce. If it’s warm or humid, skip this and store produce elsewhere.
20. Stack clear bins to use vertical space
Stackable bins keep categories separate and visible. Great for snack pouches, packets, or lunch supplies.
21. Use baskets to corral bulky bags (chips, marshmallows, flour sacks)
Bags flop. Baskets don’t. Toss bulky items into one bin so the shelf stays tidy and you can grab what you need quickly.
22. Use magazine holders for wraps, foil, and parchment
Stand boxes upright in a sturdy holder so they don’t slide around. Bonus: you stop playing “Find the edge of the cling wrap” in a panic.
23. Use file dividers for drink mixes, sauce packets, and flat items
Flat packets disappear when stacked. Keep them upright in a divider so you can see and sort them by type.
Shelves, Drawers, and Hardware Upgrades That Pay Off
You don’t need a renovation. A few small upgradesespecially pull-outs and under-shelf add-onscan turn an awkward pantry into a high-functioning one.
24. Install pull-out drawers or slide-out shelves
Slide-outs make the back of deep cabinets usable. You see everything at once, and nothing gets forgotten behind the peanut butter.
25. Consider a narrow pull-out pantry if space is tight
Slim pull-outs can store cans, spices, and small jars efficiently, especially in kitchens that lack a dedicated pantry closet.
26. Add under-shelf baskets for extra “bonus” storage
Clip-on baskets create an instant second layer for napkins, snack bars, or teawithout adding new shelving.
27. Use wall-mounted hooks for lightweight items
Hooks are perfect for aprons, reusable bags, or small tools. If you have wall space, use itpantry walls are often underworked.
28. Hang chip bags or snack bags with simple clips (yes, it works)
If bags explode all over your shelves, hanging them can prevent the “chip-slide.” Clip systems work especially well in closet-style pantries.
29. Add door-mounted racks for spices, snacks, or wraps
The back of the pantry door is prime storage real estate. Use sturdy racks for lightweight items so the door still closes smoothly.
30. Use a door pocket organizer for small packets
Seasoning packets, yeast, gravy mixes, and instant oatmeal packets become visible and sorted instead of forming a mysterious paper pile.
31. Hang measuring cups/spoons inside the pantry
Mount a small strip with hooks to hang measuring cups or frequently used tools. It’s a tiny change that makes cooking smoother.
32. Add a small counter or landing zone if you have a walk-in pantry
Even a narrow shelf can become a staging area for meal prep, unpacking groceries, or placing appliances you use regularly.
33. Install puck lights or motion-sensor lighting
Good lighting reduces duplicates because you can actually see what you own. No more buying “backup cumin” that becomes “backup backup cumin.”
34. Keep a slim folding step stool nearby
If you use upper shelves for backstock, a step stool makes access safe and easy. (Also: dramatically improves your “I can reach anything” confidence.)
Labels, Lists, and Systems That Keep It Organized
The secret to a pantry that stays organized is making it easy for everyone in the house to follow the system. Labels and simple routines do the heavy lifting.
35. Label shelves or bins with simple, clear categories
Labels are the “return address” for your food. They help you put items away quickly and keep the system consistent across the household.
36. Use erasable labels for flexible categories
If your pantry changes a lot, erasable labels help you adapt without reprinting everything. Perfect for seasonal snacks and rotating staples.
37. Color-code zones for special needs (allergies, gluten-free, school snacks)
A visual cue reduces mistakes and speeds up lunch packing. Even a simple colored label strip can help.
38. Store heavy items low and lighter items up high
Water, canned goods, and bulk bags belong on lower shelves for stability and safety. Lighter items can live higher up.
39. Put rarely used small appliances on the top shelf in a bin
Keep the food zone focused by storing the waffle maker, slow cooker, or seasonal items neatly in a labeled bin up high (or elsewhere if space is tight).
40. Add a rolling cart as pantry overflow
A small cart can hold backstock, snack bins, or meal-prep itemsthen roll away when you need floor space.
41. Create a “Use First” bin for soon-to-expire items
Make a small basket for foods that should be eaten soon. It reduces waste and gives you easy meal inspiration (“Oh look, pasta night again!”).
42. Build a grab-and-go lunch station
Keep lunch items together: snacks, granola bars, baggies, napkins, and juice boxes (if applicable). When everything is in one zone, mornings are calmer.
43. Do a 10-minute pantry reset once a week
The fastest way to maintain pantry organization is a quick weekly reset: return strays, rotate items, and update your “Use First” bin.
Ten minutes beats a full Saturday clean-out.
Real-World Experiences: What People Notice After They Upgrade Their Pantry (Plus What Trips Them Up)
Here’s the funny thing about kitchen pantry ideas: the best ones feel almost boring on day onebins, labels, zones, repeat. But in real kitchens,
the payoff shows up in tiny moments that add up fast. One common experience people report is the sudden disappearance of “panic grocery shopping.”
When your pantry storage is visible and categorized, you stop buying duplicates because you can actually see you already own lentils, rice, and
three open jars of marinara (surprise!). That visibility is why clear containers and handled bins are so popular: they turn your pantry from a black
hole into a dashboard.
Another real-life win: weeknight cooking gets faster. A “weeknight dinner” zonepasta, sauces, beans, broth, and quick grainsmeans you aren’t
scanning every shelf like a contestant on a cooking show who just heard, “You have 90 seconds remaining.” People also notice that kids become more
independent when snacks are placed at kid eye level in a dedicated bin. It sounds small, but it’s a huge quality-of-life improvement: fewer requests,
fewer spills from climbing shelves, and fewer snack tornadoes because the category is contained.
The most common frustration? Systems that are too complicated. When pantry organization requires ten steps, it collapses the first time you unload
groceries while the fridge door is beeping and someone asks where the scissors are. That’s why organizers often recommend simple labels, broad
categories, and a backstock bin. Broad categories (“Baking,” “Snacks,” “Breakfast,” “Cans”) are easier to maintain than ultra-specific ones
(“Chocolate chips, but only the mini ones”). And the backstock bin is a hero in real homes: it keeps extras from overflowing into everyday shelves,
which is usually what triggers the mess spiral.
Deep shelves create their own special brand of chaos. People frequently describe the “duplicate purchase trap”: you can’t see the second jar of peanut
butter hiding in the back, so you buy another, and now you’re basically running a peanut butter boutique. Pull-out drawers, risers, and turntables
solve this by bringing items into view. A simple can riser makes it obvious what you have; a Lazy Susan prevents the “lost condiment” problem; handled
bins act like drawers so nothing is trapped behind something else.
Finally, most people find that a pantry stays organized when it’s paired with a tiny routine. Not a weekend project every monthjust a quick reset.
A 10-minute weekly sweep to return strays, rotate the FIFO line, and move “use first” foods forward prevents clutter from becoming a big job.
And if you want the most realistic advice of all: leave a little breathing room. A pantry packed to 100% capacity will fight you. Aim for space to
slide new groceries in without rearranging the universe, and your smarter storage system will actually last.
Conclusion
Smarter pantry storage isn’t about perfectionit’s about making your kitchen easier to use. Start with categories and zones, add a few high-impact
tools (clear containers, bins with handles, risers, and labels), and protect your system with FIFO and a short weekly reset. Do that, and your pantry
becomes a calm, functional space that supports your meals instead of sabotaging them.


