Table of Contents >> Show >> Hide
- Quick Prep for Better-Looking Pumpkins
- The 45 Pumpkin Decorating Ideas
- No-Carve Pumpkin Ideas (Fast, Safe, and Shockingly Cute)
- Pumpkin Painting Ideas (No Knife, All Personality)
- Texture & Embellishment (When Your Pumpkin Needs Accessories)
- Characters & Themed Pumpkins (Crowd-Pleasers for Parties and Contests)
- Carved & Semi-Carved Showstoppers (For When You Want the Glow)
- Pro Tricks: Paint, Glue, Texture, and Lighting
- Make Your Pumpkins Last Longer
- Real-Life Pumpkin Decorating Experiences (500+ Words)
Pumpkin decorating is basically Halloween’s version of arts-and-crafts therapyexcept the canvas is round, occasionally lumpy,
and will quietly judge you if you try to draw a perfect circle. The good news: you don’t need elite carving skills (or a
steady surgeon’s hand) to make your porch look like it belongs in a spooky magazine spread.
Below you’ll find 45 pumpkin decorating ideas ranging from no-carve pumpkin ideas (safe, fast, and
kid-friendly) to painted designs and a few carved classics for the brave. I’ve also included practical tips on prep,
lighting, and keeping your pumpkins from turning into sad, squishy science experiments before Halloween even hits.
Quick Prep for Better-Looking Pumpkins
Whether you’re carving, painting, or bedazzling like a tiny gourd stylist, great pumpkins start with boring prep.
(Yes, prep is boring. No, you can’t skip it. The pumpkin will punish you with peeling paint.)
1) Choose the right pumpkin for the job
- Painting & embellishments: look for smooth, firm pumpkins with minimal bruising.
- Carving: pick one with a stable, flat bottom and a sturdy stem (no wobbly porch disasters).
- Mini pumpkins: perfect for quick cute faces, place cards, or a “pumpkin family” cluster.
2) Clean and dry
Wipe dirt off with a damp cloth, then dry completely. Moisture is the enemy of paint, glue, and “please don’t mold yet” vibes.
3) Optional: prime for paint
If you’re doing detailed pumpkin painting ideas, a thin coat of acrylic craft paint (white or light neutral) helps colors pop.
Let it dry fully before layering.
The 45 Pumpkin Decorating Ideas
These are grouped to help you match your energy level: from “I have 20 minutes and a playlist” to
“I own a glue gun and I’m not afraid to use it.”
No-Carve Pumpkin Ideas (Fast, Safe, and Shockingly Cute)
- Googly-Eye Monster Paint a bright base color, slap on oversized googly eyes, and draw a goofy mouth. Instant porch gremlin.
- Mummy Wrap Wrap in gauze or white fabric strips, add eyes peeking out. Bonus: it hides pumpkin blemishes like a pro.
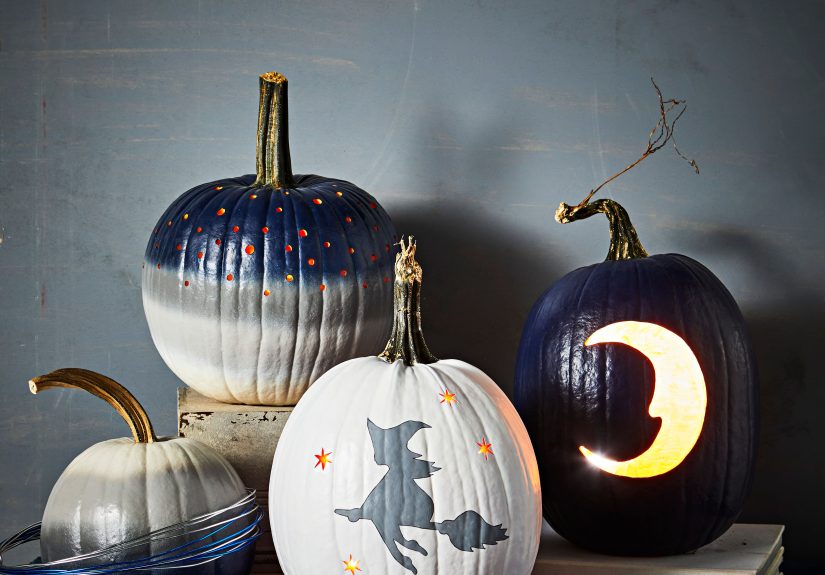
- Metallic Minimalist Spray (or sponge) metallic paint for a modern look. Cluster several for a high-impact display.
- Polka-Dot Party Use round stickers as stencils: paint over them, peel off for crisp dots.
- Chalkboard Pumpkin Paint with chalkboard paint and write spooky puns, names, or “TURN BACK NOW” in chalk.
- Pushpin Constellations Map out stars, moons, or a monogram with gold pushpins. No mess, big sparkle.
- Floral Pumpkin Hot-glue dried flowers around the top or create a full flower-covered pumpkin for a centerpiece vibe.
- Leaf-Imprint Pumpkin Press leaves onto wet paint or use them as stencils for crisp fall shapes.
- Pumpkin Family Stack Stack pumpkins and gourds into a “family,” then add faces and accessories (scarves, hats, etc.).
Pumpkin Painting Ideas (No Knife, All Personality)
- Ombre Fade Blend one color into another top-to-bottom for a “fancy store display” look.
- Drip Paint Melt Melt crayons (or drip paint) from the stem area downward for a playful, messy-on-purpose effect.
- Classic Black Cat Paint black, add triangle ears from felt or cardstock, then whiskers. Instant Halloween icon.
- Spiderweb Chic Paint the pumpkin matte black, then add thin white web lines with a paint pen.
- Skeleton Face Sketch a simple skull design and fill with white/gray shading; it reads spooky without being gory.
- Pastel “Cute Creepy” Paint in soft pastels, then add tiny bats or ghosts with black paint pen for contrast.
- Disco Ball Pumpkin Use mirror tiles or metallic mosaic pieces (or silver paint plus glitter). It’s Halloween, but make it sparkle.
- Neon Pop Pumpkin Paint neon shapes (lightning bolts, stripes) for a modern, party-ready porch.
- Painted Plaid Use painter’s tape to grid the pumpkin and paint alternating squares for cozy fall vibes.
Texture & Embellishment (When Your Pumpkin Needs Accessories)
- Bedazzled Rhinestone Glam Outline the stem or a monogram with rhinestones for a “gourd, but couture” moment.
- Sequin Shine Pin sequins in patterns (stars, gradients, stripes). Great for contests because it looks complicated (it’s not).
- Lace Overlay Wrap lace around the pumpkin and secure with pins; add a ribbon bow for vintage spooky.
- Ribbon-Wrapped Pumpkin Create vertical “stripes” with ribbon anchored by pins. Looks polished in minutes.
- Button Pumpkin Glue buttons in a swirl or monogram. Raid the junk drawer and call it “upcycling.”
- Felt Shape Collage Cut felt bats, moons, or candy shapes and attach with glue dots for easy kid-friendly pumpkin decorating.
- Gold Foil Accents Add gold leaf/foil to raised ridges or around the stem for an elegant fall centerpiece.
- Fabric “Sweater” Pumpkin Wrap in a knit sleeve or fabric for cozy textureespecially cute with white pumpkins.
- Paper Bat Swarm Pin or glue paper bats “flying” across the pumpkin. Instant motion and drama.
Characters & Themed Pumpkins (Crowd-Pleasers for Parties and Contests)
- Hedgehog Pumpkin Candy corn “spikes,” felt face, and tiny paws. Cute enough to disarm even the most Halloween-grumpy neighbor.
- Classic Emoji Faces Big eyes, simple mouth shapes. Make a whole set: 😱 😈 😂.
- Witch Hat Topper Add a small hat and paint a greenish face or keep it minimal with just the accessory.
- Unicorn Pumpkin Pastel paint, glitter horn, and paper flowers for the mane. Magically unbothered by Halloween rules.
- Harry “Gourd-er” Wizard Round glasses, lightning bolt, and a scarf. (Pun strongly encouraged.)
- Alien Abduction Scene Paint a little UFO and a beam; add tiny cows (toy figurines work great).
- Farm Animal Set Pig, cow, owluse felt ears and paint details. A whole barnyard of pumpkins is absurd in the best way.
- Haunted House Silhouette Paint a sunset gradient, then black silhouettes of a haunted house and trees.
- Day-of-the-Dead Inspired Paint sugar-skull patterns with bright colors and symmetrical dots/flowers.
Carved & Semi-Carved Showstoppers (For When You Want the Glow)
- Polka-Dot Carve Drill or carve round holes for a starry glow. Easier than big cuts, looks awesome at night.
- Stencil Silhouette Use a stencil for bats, a cat, or a classic face. Clean lines, maximum Halloween payoff.
- Toothy Grin Carve a wide mouth with big goofy teeth. It’s funny-spooky, not “nightmare fuel.”
- Tongue-Out Face Carve a silly expression and add a felt/fabric tongue for 3D comedy.
- Haunted Window Carve window shapes and add “curtains” inside with tissue paper for a haunted-house vibe.
- Monochrome Modern Carve Keep the face minimal (eyes + geometric mouth), then paint the pumpkin matte black for sleek drama.
- Layered Cutouts Carve shapes at different depths (some shaved, some fully cut through) for extra dimension.
- Carved Message Cut out letters (“BOO,” “TRICK OR TREAT,” or your family name). Pro tip: simpler fonts win.
- Classic Jack-o’-Lantern (But Better) Make the triangle eyes, but sharpen the edges and add a subtle eyebrow angle for personality.
Pro Tricks: Paint, Glue, Texture, and Lighting
Paint that sticks (and looks smooth)
- Use acrylic craft paint for detail work; it dries fast and layers well.
- Use paint pens for crisp lines, dots, and letteringespecially for skulls, webs, and monograms.
- Seal if needed: a light clear craft sealer can help, but always test first (some sealers stay tacky).
Glue that doesn’t betray you
- Hot glue is strong and quick, but can slip on curved surfaceshold pieces for a few seconds to set.
- Glue dots are perfect for kids and light pieces (felt, paper, small gems).
- Stick pins are secretly the MVP for sequins, ribbon, and fabric wraps (easy to adjust, minimal mess).
Lighting that looks spooky (without being a fire hazard)
If you carve, consider LED tea lights, glow sticks, or small battery lights. They last longer, run cooler,
and won’t turn your pumpkin into a tiny bonfire audition.
Make Your Pumpkins Last Longer
Pumpkins are dramatic. They look amazing… then suddenly slump into a soft, moldy sigh. A little care helps your
DIY Halloween pumpkin decorations survive long enough for people to actually see them.
For uncarved pumpkins
- Keep them cool and dry, out of direct sun.
- Bring them in overnight if it’s very hot, very cold, or very wet.
- Lift off damp ground (use a tray or a piece of wood) to slow rot.
For carved pumpkins
- Clean thoroughly after scooping (less gunk = less mold).
- Disinfect lightly using a diluted bleach-and-water approach (common advice is around a 1:10 ratio). Let it dry.
- Hydrate by misting cut edges; dryness speeds shriveling.
- Skip real candles if you canheat accelerates breakdown and increases fire risk.
If you want the “carved look” without the countdown clock, consider carving a faux pumpkin. You get the glow,
you get the drama, and you don’t get the mold.
Real-Life Pumpkin Decorating Experiences (500+ Words)
Let’s talk about what actually happens when real humans attempt pumpkin decoratingbecause the glossy photos never show the part
where the googly eyes slide off and your pumpkin starts looking emotionally exhausted.
One of the most common “first pumpkin” experiences is painting too soon. You rinse the pumpkin, it looks clean,
you feel productive, you start painting… and the paint beads up like the pumpkin is wearing a raincoat. That’s the moment you learn
the ancient seasonal wisdom: dry means dry. The fix is simplewipe it down, let it air-dry longer, and if you’re impatient,
hit it with a fan for a bit. Once it’s truly dry, acrylic paint suddenly behaves like it’s getting paid to be there.
Next comes the glue-gun confidence arc. At first you’re cautious: one rhinestone at a time, carefully placed.
Then you start flyingribbons, sequins, felt bats, tiny hatsuntil you realize pumpkins are curved, gravity is real, and hot glue can
be a little… slippery. The best trick is to build from the bottom up and give each piece a few seconds of pressure before letting go.
If something keeps sliding, switch to stick pins for lighter items (sequins and ribbon especially), or use glue dots for paper and felt.
It’s less “permanent installation” and more “Halloween fashion tape,” which honestly matches the season’s chaotic energy.
If kids are involved, you’ll likely witness the five-minute attention span sprint. Children will enthusiastically pick
a theme (“Let’s do a haunted mansion with a moonlit graveyard!”) and then immediately pivot to “Can we just make it a pumpkin with 47 eyes?”
This is not failureit’s creativity. The best family setup is a “design bar”: put out googly eyes, paint pens, stickers, felt shapes,
and a few safe tools, then let everyone freestyle. You’ll end up with a mismatched pumpkin squad that’s genuinely charming because it looks
like your family made it (not a store display assembled by a professional pumpkin whisperer).
Outdoor display introduces a whole new genre: pumpkin survival in the wild. Wind can knock over tall stacks. Rain can
weaken adhesives. Squirrels may decide your candy-corn hedgehog is a buffet with a cute face. If your porch is exposed, use a tray to keep
pumpkins off damp ground, and avoid edible decorations unless you’re okay feeding the neighborhood wildlife. (They will not thank you.
They will simply return.)
Finally, there’s the moment when you light everything up and realize: nighttime is the great equalizer. Small details that
look “meh” in daylight can look incredible with the right glow. If you carved, a battery LED inside makes patterns pop without extra heat.
If you didn’t carve, a string of tiny lights around a cluster of painted pumpkins can still create that Halloween magic. The overall vibe matters
more than perfectionespecially because pumpkins are temporary, and that’s the point. You’re making something fun, a little ridiculous,
and proudly seasonal. So if your “disco ball pumpkin” looks like it lost a fight with a craft store… congratulations. That’s Halloween.


