Table of Contents >> Show >> Hide
- What You’ll Need (No Fancy Cart Required)
- Step 1: Pick Your Container, Then Decide the “Job” of the Arrangement
- Step 2: Clean the Vase Like You Mean It, Then Add “Mechanics” for Control
- Step 3: Condition Your Flowers (This Is Where “Pro” Actually Starts)
- Step 4: Build Your Shape with Greenery First
- Step 5: Add Focal Flowers in Odd Numbers (Your “Main Characters”)
- Step 6: Layer in Secondary Flowers for Color, Rhythm, and Texture
- Step 7: Finish with Filler and Accent Stems (Then Edit Ruthlessly)
- Step 8: Do the “Pro Finish” CheckThen Maintain It Like a Grown-Up
- Three Quick Examples You Can Copy This Week
- Conclusion: The Real Secret Is Structure (and a Little Audacity)
- Extra: of Real-Life Flower Arranging Experiences (So You Can Skip My Mistakes)
Flower arranging looks mysterious until you realize the “secret” is mostly: clean water, sharp snips, and a plan.
(So… basically the same advice as cooking, woodworking, and life.)
Whether you’re dressing up a dinner table, rescuing a grocery-store bouquet, or trying to make your kitchen feel like it belongs in a magazine,
these eight steps will help you build a flower arrangement that looks intentionalaka “professional”without needing a floral-degree.
What You’ll Need (No Fancy Cart Required)
- Vase or bowl (clear vase is easiest to “read” while you work)
- Clean bucket or big container for conditioning stems
- Sharp pruners or floral shears (dull scissors = crushed stems = sad flowers)
- Flower food (the packet that comes with bouquets is small but mighty)
- Optional mechanics: clear tape (for a grid), a flower frog, or chicken wire
- A towel (because water will teleport onto your counter, somehow)
Quick mindset shift: pros don’t “stick flowers in a vase.” They build structure first, then layer flowers in a logical order.
You’re not making a pile. You’re making a tiny, joyful architecture project.
Step 1: Pick Your Container, Then Decide the “Job” of the Arrangement
Start with where the flowers will livebecause a beautiful arrangement in the wrong place is just expensive clutter.
- Dining table: go low and wide so nobody has to talk through a hydrangea hedge.
- Entryway or sideboard: taller is finethis is where drama belongs.
- Coffee table: compact, slightly loose, easy to view from all sides.
Next, match the shape to the container:
a narrow-neck vase supports a naturally upright bouquet, while a wide-mouth vase needs structure (we’ll handle that in Step 2).
A simple rule that helps: aim for an overall arrangement height that feels proportionateoften around one-and-a-half to two times the vase height for taller pieces,
and shorter for tables where people actually have eyeballs.
Step 2: Clean the Vase Like You Mean It, Then Add “Mechanics” for Control
If flowers had a group chat, “dirty vase” would be their number-one complaint.
Bacteria builds up fast and can block water uptake, which means blooms fade soonereven if you did everything else right.
Wash the vase with soap and hot water, rinse well, and you’re already ahead of many well-intentioned bouquets.
Make a Simple Tape Grid (Your Instant Pro Upgrade)
For wide-mouth vases, create a tape grid across the opening using clear tape.
The grid acts like training wheels: it keeps stems separated, prevents bunching, and helps you place flowers exactly where you want them.
Tip: start with a dry rim so the tape sticks, then add water and flower food.
Other “Mechanics” That Work
- Flower frog: great for low bowls and centerpiece styles (no foam required).
- Chicken wire: creates a flexible nest inside opaque containers.
Step 3: Condition Your Flowers (This Is Where “Pro” Actually Starts)
“Conditioning” sounds fancy, but it just means prepping stems so they drink water efficiently and last longer.
Do this even for store-bought bouquetsespecially for store-bought bouquets.
- Unwrap and separate stems so they aren’t crushed together.
- Strip leaves that would sit below the waterline (submerged leaves rot and dirty the water).
- Re-cut stems at an angle with sharp pruners. A fresh cut improves water uptake and prevents stems from sealing.
- Hydrate in a clean bucket with water + flower food for 30–90 minutes if you have time.
If you’re working with mixed flowers, re-cut a few stems every so often while you arrange.
Think of it like keeping your ingredients fresh while you cookbecause flowers are basically salad, but prettier.
Step 4: Build Your Shape with Greenery First
Greenery is your scaffolding. It sets the silhouette, adds movement, and makes the arrangement look lush before you spend your “wow” flowers.
Start with 5–7 stems of greenery (depending on size) and place them around the vase opening to create a loose outline.
- For a rounded look: angle greenery outward like a gentle dome.
- For a modern look: keep it tighter, let negative space show, and use fewer varieties.
- For a garden look: vary angles and lengths so it feels “just picked.”
Pause and rotate the vase. If the greenery looks balanced from multiple angles, you’ve built a stable foundation.
If it looks lopsided now, it’ll look extra lopsided once you add heavy blooms. Fix the shape earlyit’s easier.
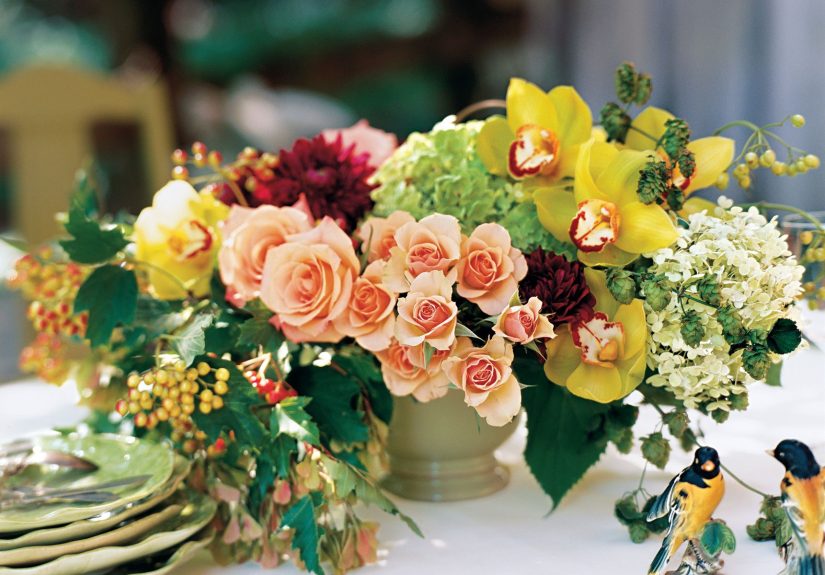
Step 5: Add Focal Flowers in Odd Numbers (Your “Main Characters”)
Focal flowers are the biggest, most eye-catching blooms: roses, peonies, hydrangeas, lilies, sunflowers, big dahlias.
Pick 1–2 focal varieties, then place them first so you control the arrangement’s “story.”
How to Place Them Like a Florist
- Use odd numbers (3 or 5 often looks more natural than 4).
- Create a triangle (one slightly higher, two lower) to guide the eye.
- Vary depth: place one bloom deeper and one closer to the rim for dimension.
Aim for a clear focal area: where your eye naturally lands first.
Pros don’t make everything the star at the same volumebecause then nothing is the star.
Step 6: Layer in Secondary Flowers for Color, Rhythm, and Texture
Secondary flowers are the supporting cast: tulips, ranunculus, spray roses, carnations (yes, carnationswhen used well, they’re fantastic),
lisianthus, alstroemeria, mums, or smaller dahlias.
Their job is to connect focal blooms, fill “awkward gaps,” and add texture without stealing the spotlight.
The “Repeat, Repeat, Repeat” Trick
Instead of putting all one flower type on one side (aka the dreaded “half bouquet, half bouquet” look),
distribute similar stems around the arrangement.
Repetition creates rhythm and makes the design feel cohesive rather than accidental.
The “Push and Pull” Trick for Depth
Alternate stem placement: push one bloom deeper into the vase, pull the next slightly outward.
This creates layers and prevents the arrangement from looking flat (like a floral ID photo).
Step 7: Finish with Filler and Accent Stems (Then Edit Ruthlessly)
Filler flowers (baby’s breath, waxflower, statice, asters) and accents (berries, seed pods, interesting foliage)
make arrangements feel finishedbut only if they don’t take over like glitter at a craft table.
- Use filler to soften edges and connect color transitions.
- Protect breathing room: a little negative space looks modern and expensive.
- Check the “neckline”: the top of the vase should look tidy, not like a stem traffic jam.
A Simple Stem Formula When You’re Not Sure What to Buy
For a medium arrangement, try a loose version of the “3–5–8” idea:
3 focal stems, 5 structural/greenery stems, and 8 accent/filler stems.
It’s not a law. It’s a helpful guardrail that keeps you from buying 14 roses and calling it “balanced.”
Step 8: Do the “Pro Finish” CheckThen Maintain It Like a Grown-Up
The 60-Second Pro Check
- Rotate the vase: does it look good from the front, sides, and slightly above?
- Look for holes: fill a gap with greenery or a small secondary bloom, not a giant focal flower.
- Trim messy leaves and remove anything that falls below the waterline.
- Step back: if it looks stiff, loosen a few stems and vary heights.
Keeping It Fresh (So You Don’t Accidentally Create Compost)
- Top off water dailyflowers drink a surprising amount.
- Change water every 2–3 days (or sooner if cloudy), and rinse the vase if needed.
- Re-cut stems when you refresh water for better uptake.
- Keep flowers cool and away from direct sun, heat vents, and ripening fruit (ethylene gas speeds aging).
- Remove fading stems so they don’t drag the whole arrangement down.
Three Quick Examples You Can Copy This Week
1) The Grocery Bouquet Glow-Up (Fast + Foolproof)
Buy one mixed bouquet plus one bunch of greenery. Use a tape grid, strip submerged leaves, re-cut stems,
then rebuild the bouquet: greenery first, big blooms next, smaller blooms last. The grid keeps everything separated so it looks “designed,” not dumped.
2) The Low Dinner Centerpiece (Conversation-Friendly)
Use a low bowl with a flower frog or chicken wire. Start with greenery angled outward, add 3 focal blooms in a loose triangle,
then layer secondary flowers and a touch of filler. Keep everything low enough that you can still see your guests’ faceswild concept, I know.
3) The “Entryway Statement” (Tall and Airy)
Use a taller vase with a narrower opening. Place a few line elements (like snapdragons or delphinium),
then anchor with focal blooms and fill with secondary flowers. Keep a little negative space so it feels modern, not crowded.
Conclusion: The Real Secret Is Structure (and a Little Audacity)
Arranging flowers like a pro is less about rare blooms and more about a smart sequence:
clean vase → conditioned stems → sturdy mechanics → greenery shape → focal flowers → secondary → filler → maintenance.
Once you follow that order a few times, you’ll stop guessing and start designing.
And the next time someone says, “Wow, did you buy that arrangement?” you can smile politely and pretend you’re not emotionally attached to your tape grid.
Extra: of Real-Life Flower Arranging Experiences (So You Can Skip My Mistakes)
The first time I tried to “arrange flowers like a pro,” I treated the bouquet like it was a microphone and the vase like a stand:
I shoved everything in, adjusted one sad rose, and walked away like I’d done something impressive.
Ten minutes later, the flowers leaned to one side like they were trying to hear gossip, and the water turned slightly murky by the next morning.
That’s when I learned the least glamorous truth of florals: the behind-the-scenes prep is the whole show.
One surprisingly memorable lesson came from a tape grid fail. I made a perfect little tic-tac-toe on the vase opening
and then immediately filled the vase with water like an overconfident magician. The tape floated, loosened, and slid off the rim.
My “professional mechanics” became a sticky, wet bracelet for the vase. Now I always dry the rim first, build the grid,
then add water and flower food. It’s such a small step, but it’s the difference between “effortless” and “why is there tape on my elbow?”
Another time, I tried to make an arrangement look extra full by packing in more stemsbecause clearly more is always better, right?
Wrong. The bouquet ended up looking like a floral traffic jam: blooms crowded, petals bruised, no negative space, and no clear focal point.
When I pulled out just three stems and redistributed the rest, everything suddenly looked intentional.
That was my “edit like a stylist” moment: if the arrangement feels heavy, remove one thing, rotate, and reassess.
You can always add it back, but you can’t un-crush a delicate bloom.
I also learned the power of building in layers when I started arranging with greenery first.
Before that, I’d treat greenery like an afterthoughtsomething you toss in only if the bouquet looks sparse.
But when you use it as the foundation, it defines the silhouette and supports blooms so they sit where you place them.
The result looks fuller with fewer flowers, which is excellent news for anyone who likes pretty things but also likes having money.
Finally, maintenance is where arrangements either stay gorgeous or quietly fall apart.
The best-looking bouquet I ever made lasted because I topped up water daily, changed it every couple of days,
and snipped stems when I refreshed it. It felt mildly ridiculouslike giving flowers a spa routinebut it worked.
Now I treat flower care like brushing teeth: not thrilling, extremely effective, and regret-inducing when skipped.


