Table of Contents >> Show >> Hide
- Why This DIY Works So Well
- What You’ll Need
- Choose the Right Faux Flowers First
- Prep Like a Calm Person, Even If You Are Not One
- How to Mix Plaster Of Paris for Faux Porcelain Flowers
- How to Coat the Flowers
- Drying, Smoothing, and Strengthening
- Painting for a Porcelain-Inspired Look
- How to Arrange the Finished Flowers
- Common Mistakes to Avoid
- Real-World Experience: What This Project Feels Like When You Actually Make It
- Final Thoughts
There are craft projects that whisper, “I’m tasteful.” Then there are craft projects that strut into the room wearing a tiny invisible crown and announce, “I look expensive, but I came from the craft aisle.” DIY faux porcelain flowers made from Plaster of Paris belong firmly in the second category. They have that soft white, sculptural, almost antique look that makes people assume you either paid too much at a boutique or inherited them from an aunt who described everything as “continental.”
The beauty of this project is that it blends two worlds that normally do not hang out together at the same table: humble faux flowers and classic plaster. With the right technique, ordinary silk or fabric blooms can take on a porcelain-inspired finish that feels elegant, handmade, and surprisingly high-end. The result is not true porcelain, of course, but a faux porcelain flower arrangement can absolutely deliver that same refined, chalky, vintage appeal.
Even better, this project is beginner-friendly once you understand the rhythm of the material. Plaster of Paris sets fast, which means it rewards preparation and punishes chaos. In other words, this is not the craft for someone who starts by saying, “I’ll just wing it.” But if you gather supplies, mix small batches, and work with intention, you can create flowers that look like ceramic art without needing a kiln, a pottery studio, or a dramatic beret.
Why This DIY Works So Well
The secret is contrast. Faux flowers are flexible, lightweight, and often a little too shiny or obviously synthetic. Plaster of Paris changes that personality instantly. It softens bright fabric texture, mutes the artificial finish, and creates a matte surface that feels more sculptural than floral. Suddenly, those discount-store blooms stop looking like party leftovers and start looking like curated home decor.
This technique also gives you design control. You can leave the flowers crisp white for a minimalist porcelain effect, tint the plaster slightly for a creamier antique finish, or paint details after drying for a hand-glazed look. Want modern monochrome stems in a stoneware-style vase? Done. Want romantic white roses that look like they belong in a French country dining room? Also done. Want moody black tulips that look like they judge your throw pillows? That, too, is available.
Because faux flowers are reusable and easy to shape, they also give you freedom that fresh flowers never will. You are not racing against wilting petals, weird vase water, or a bouquet that collapses by Tuesday. Once your arrangement is finished, it stays finished. That is the kind of commitment many relationships could learn from.
What You’ll Need
- Faux flowers with fabric or silk petals
- Plaster of Paris
- Cool water
- Disposable mixing bowl or container
- Wooden stir stick or plastic spoon
- Drop cloth, kraft paper, or newspaper
- Gloves and protective eyewear
- Dust mask, especially while mixing or sanding
- Small paintbrush for detail work
- Fine-grit sandpaper or sanding sponge
- White gesso or primer
- Acrylic paint, optional
- Clear sealer, optional
- Wire cutters
- Vase, floral frog, stones, or tape grid for arranging
Choose the Right Faux Flowers First
Not all faux flowers are created equal. Some are born to become faux porcelain art, and some are destined to remain suspiciously shiny forever. The best candidates are flowers with soft fabric petals, wired stems, and shapes that hold detail well. Roses, peonies, ranunculus, hydrangea clusters, tulips, magnolias, and many leaves work beautifully.
Avoid blooms that are overly plastic, heavily glittered, or coated with a slick finish. Plaster needs something it can cling to. If your flower looks like it came pre-approved for a children’s birthday tiara, it may resist the elegant glow-up you are hoping for.
Also pay attention to scale. Oversized blooms can be dramatic, but they get heavier once coated. Smaller and medium blooms are usually easier to manage, dry more evenly, and make better grouped arrangements. Odd-number groupings often look more natural than perfectly symmetrical bunches, so think in threes or fives instead of building a floral marching band.
Prep Like a Calm Person, Even If You Are Not One
Plaster of Paris is famous for setting quickly, which is a polite way of saying it will not wait for you to answer a text, find scissors, and rethink your life choices. Before mixing anything, set up your entire workspace.
1. Protect the surface
Cover your table with paper or plastic. This is not optional unless your decorating style is “accidental fossilized countertops.”
2. Trim and shape the flowers
Cut stems to a workable length and gently fluff the petals. Wired faux stems can be curved and repositioned before coating so the final arrangement looks more organic. Slight bends and varied angles create a more natural result than stiff, identical stems.
3. Plan the drying area
You need somewhere for wet flowers to rest while they harden. A cardboard box, foam block, drying rack, or jars can help support stems without flattening the petals.
4. Wear basic protection
Plaster dust is not craft glitter. It can irritate eyes, skin, and lungs, so work in a well-ventilated area, avoid breathing the dust, and keep sanding gentle and controlled.
How to Mix Plaster Of Paris for Faux Porcelain Flowers
The classic starting ratio is about two parts plaster to one part water, though exact texture may vary slightly by brand and by what you are coating. For flowers, you want a smooth, creamy slurry that is thick enough to cling to petals but not so heavy that it turns your bloom into a decorative potato.
Step 1: Start with cool water
Pour cool water into your mixing container first. This helps slow the setting process slightly and gives you a few more precious moments to work like the responsible craft genius you were always meant to be.
Step 2: Add plaster to water, not the other way around
Sprinkle the plaster gradually across the surface instead of dumping it into one dramatic mountain. Let it absorb, then stir slowly. Stirring too aggressively introduces bubbles, and bubbles are the sworn enemy of a smooth faux porcelain finish.
Step 3: Mix small batches only
This is the golden rule. Plaster of Paris begins to thicken quickly, and once it starts going chalky and stubborn, it is basically announcing its retirement. Make only what you can use in a short window. Small fresh batches beat one giant panicked batch every time.
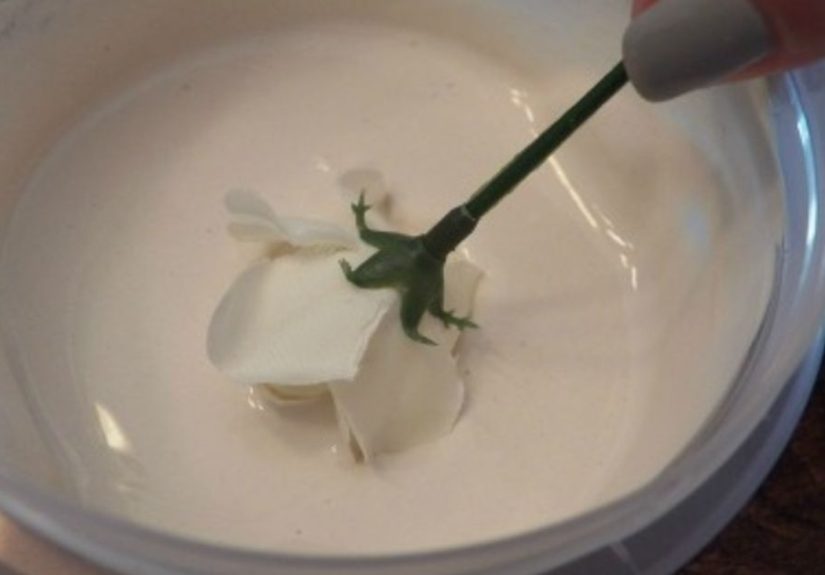
How to Coat the Flowers
There are two common methods: dipping and brushing. Dipping gives a smoother, more all-over finish. Brushing gives more control and is often better for delicate flowers. Some crafters combine both.
Dipping method
Hold the flower by the stem and dip the bloom into the plaster mixture. Lift it out slowly and let the excess drip back into the container. Gently tap the stem or rotate the flower so heavy spots do not pool in one area.
Brushing method
Use a soft brush to paint the plaster onto petals, starting at the center and moving outward. This approach works especially well if you want to preserve petal definition or avoid overloading a bloom with weight.
Hybrid method
Dip quickly for base coverage, then use a brush to refine the edges, remove drips, and smooth the surface. This is usually the sweet spot for a polished finish.
As you coat each flower, reshape petals gently while the plaster is still workable. Open some petals, tuck others inward, and give the bloom a natural curve. Once the plaster sets, that shape is largely locked in place. This is where the magic happens, and also where you discover whether you are a delicate artist or a person who keeps accidentally making cabbages.
Drying, Smoothing, and Strengthening
Set the coated flowers aside to dry fully. They may feel firm within half an hour, but that does not mean they are ready for sanding or painting. Give them extra time so the surface stabilizes.
When dry, inspect each bloom. If you see drips, rough ridges, or crusty edges, use fine-grit sandpaper or a sanding sponge very lightly. Wet sanding can help control dust and reduce mess. The goal is not to grind the flower into oblivion. You are just softening bumps and refining the finish.
For better paint adhesion and a more even finish, add a thin coat of white gesso or primer. This step is especially helpful if the plaster dried patchy or if you plan to add color. Think of it as giving your faux porcelain flowers a cleaner canvas and a better chance at looking intentional rather than merely surviving.
Painting for a Porcelain-Inspired Look
White is the classic choice, and honestly, it is hard to beat. A white or soft ivory finish highlights petal shape and makes the arrangement look timeless. But faux porcelain flowers do not have to stay white forever.
Color ideas that work beautifully
- Soft ivory for an antique porcelain feel
- Dusty blush for romantic vintage decor
- Pale blue and white for chinoiserie-inspired style
- Matte black for modern sculptural drama
- Sage green or stone gray for a ceramic garden look
Use thin coats of acrylic paint rather than one thick layer. Thick paint can swallow petal detail, and petal detail is the whole reason this project looks special. If you want a glazed or sealed effect, finish with a clear matte or satin sealer once the paint has cured. Matte looks more chalky and sculptural; satin gives a softer ceramic-style sheen.
How to Arrange the Finished Flowers
A beautiful bloom can still be ruined by awkward staging. Once your faux porcelain flowers are ready, arrange them with the same care you gave the coating process. Choose a vessel that supports the weight and scale of the finished stems. Taller stems usually look best in a vase with enough height and heft to keep everything balanced.
Instead of relying on floral foam, consider a tape grid over the vase opening, a floral frog, stones, or even a compact wire support. These mechanics keep stems in place without turning your arrangement into a blocky green science experiment.
Start with structure, then add focal blooms, then fill with supporting stems or leaves. Vary height and angle. Step back often. If everything points in the same direction, the arrangement can look stiff. A little asymmetry creates movement, which makes the finished piece feel more natural, more layered, and more expensive.
Common Mistakes to Avoid
Using too much plaster at once
Large batches harden fast and waste material. Small batches give you better texture and less stress.
Choosing flimsy flowers
Very delicate blooms can collapse under the weight of plaster. Test one flower before committing to the whole bunch.
Skipping surface cleanup
Drips and pooled plaster dry into obvious lumps. Smooth them while wet or sand lightly after drying.
Painting too heavily
One thick coat can blur petal lines. Thin, controlled layers keep the ceramic illusion intact.
Forgetting long-term care
These flowers are decorative, not indestructible. Keep them dry, dust them gently, and store them carefully if you swap decor seasonally.
Real-World Experience: What This Project Feels Like When You Actually Make It
The first time most people try DIY faux porcelain flowers from Plaster of Paris, they expect a neat little afternoon craft. Then the plaster starts thickening, one rose gets weirdly heavy, another one drips like a melting candle, and suddenly the project becomes a lesson in patience, timing, and not overestimating your ability to “just fix it later.” The funny part is that this slightly chaotic first round is exactly how many people learn to make the second round look beautiful.
One of the most common experiences is realizing that faux flowers behave very differently once coated. A bloom that looked soft and floppy before dipping can become sculptural and dramatic after drying. Petals that seemed ordinary take on shadow and depth. Cheap-looking stems often become the surprise stars of the project because the plaster mutes their fake shine and gives them that chalky, elegant finish. It is one of those rare DIY moments where an inexpensive material actually becomes more convincing after being covered up.
Another thing people notice quickly is that speed matters, but rushing makes everything worse. There is a sweet spot. If you move too slowly, the plaster thickens before you finish coating the bloom. If you move too fast, you get drips, blobs, and petals that stick together in a way that says less “porcelain heirloom” and more “flower survived a minor avalanche.” After a few flowers, though, your hands learn the rhythm. Mix. Dip. Lift. Turn. Adjust. Rest. That rhythm is what makes the process satisfying.
Many crafters also discover that imperfection is part of the charm. A tiny crack, a softly uneven edge, or a slightly weathered finish can make the flowers look more artistic and less factory-made. In fact, the arrangements that feel the most believable often are not the ones with the smoothest finish. They are the ones with subtle variation, where each bloom looks like it has its own personality. That handmade character is what gives the project warmth.
There is also the decorating payoff, which is huge. Once the flowers are dry and arranged, they do not read like a typical craft project. They read like home decor. People place them on mantels, coffee tables, shelves, console tables, wedding displays, and even in minimalist office corners that desperately needed some charm. The flowers catch light in a soft way, especially in white or ivory, and they work with a lot of styles: farmhouse, vintage, cottage, modern organic, French country, and even moody contemporary spaces.
Perhaps the best experience of all is the reaction from other people. Faux porcelain flowers have that delightful quality of making guests ask, “Wait, what are these made of?” That is the dream, really. Not because you need applause from the living room audience, but because it means the project crossed the line from craft to conversation piece. And when a thrift-store bouquet and a bowl of plaster can do that, it feels like a tiny domestic miracle.
So yes, the first batch may teach you humility. One flower may look amazing, one may look confused, and one may resemble a historical vegetable. But that is part of the experience. By the second batch, you understand the material better. By the third, you start making intentional design choices. And by the time your arrangement is sitting in a vase looking quietly luxurious, you realize this is the kind of DIY worth repeating.
Final Thoughts
DIY faux porcelain flowers from Plaster of Paris are a wonderful reminder that elegant decor does not always come from expensive materials. Sometimes it comes from smart technique, a little patience, and the willingness to look at a pile of fake flowers and think, “You could be classier.”
This craft works because it transforms the ordinary into something sculptural, timeless, and personal. It gives faux florals a fresh identity, lets you experiment with texture and color, and creates decor that lasts longer than fresh arrangements ever could. Best of all, it is customizable enough to fit almost any home style, from soft vintage romance to crisp modern minimalism.
If you want a project that feels artistic but still approachable, this is a strong contender. Just remember the basic rules: prep first, mix small, shape thoughtfully, and let the finish do the talking. Then step back, admire your work, and enjoy the deeply satisfying moment when a craft-store bouquet starts acting like it belongs in a gallery.


