Table of Contents >> Show >> Hide
- Why This Dollar Tree Bunny Wreath Works So Well
- Supplies You Need
- Step-by-Step Tutorial: How to Make a 30-Minute Bunny Wreath
- Design Ideas for Your DIY Easter Bunny Wreath
- Helpful Tips for a Better-Looking Wreath
- Common Mistakes to Avoid
- How to Make This Bunny Wreath Last Longer
- Budget Breakdown
- Where to Display Your Easter Bunny Wreath
- Personal Experience: What Makes This 30-Minute Bunny Wreath Worth Making
- Conclusion
If your front door looks like it just survived winter, tax season, and a minor identity crisis, this Easy 30-Minute DIY Dollar Tree Bunny Wreath for Easter is here to stage a cheerful intervention. The best part? You do not need a craft room, a designer budget, or the patience of a saint. With a bunny wreath form, soft yarn, ribbon, faux flowers, and a few simple tools, you can create a festive Easter wreath that looks charming, spring-ready, and far more expensive than it actually is.
Dollar Tree Easter crafts have become popular for a very good reason: they are affordable, flexible, and surprisingly stylish when you know how to combine textures. A simple bunny-shaped wire wreath form can turn into a fluffy farmhouse bunny, a pastel floral wreath, a rustic burlap decoration, or a bright spring door hanger. This tutorial focuses on a quick version that can be finished in about 30 minutes, making it ideal for busy parents, last-minute decorators, beginner crafters, or anyone who enjoys seasonal decor but does not want glitter in their coffee for three weeks.
Why This Dollar Tree Bunny Wreath Works So Well
A good Easter wreath needs three things: a recognizable shape, seasonal texture, and a little personality. The bunny wreath form handles the shape. Yarn or mop-style material gives it softness. Ribbon, flowers, eggs, carrots, or greenery bring in that happy Easter feeling. Together, these pieces create a wreath that feels playful without looking messy.
Another reason this project is so practical is the price. Many ready-made Easter wreaths can cost much more than a basic DIY version. By using Dollar Tree supplies and a few items you may already have at home, you can create a custom bunny wreath for a fraction of the price. You also get to choose your style: farmhouse neutral, pink and floral, bright and kid-friendly, or soft and elegant.
Supplies You Need
Before you begin, gather everything on your table. A 30-minute craft becomes a 90-minute craft very quickly when you spend half the time searching for scissors under a pile of ribbon.
Basic Supply List
- 1 Dollar Tree bunny-shaped wire wreath form
- 1 to 2 skeins of chunky white yarn, chenille yarn, or loop yarn
- Hot glue gun and glue sticks
- Floral wire, twist ties, or zip ties
- Ribbon for a bow
- Faux flowers, greenery, mini carrots, or pastel eggs
- Scissors or wire cutters
- Twine, ribbon, or a wreath hanger for displaying
For a very fluffy bunny wreath, chunky yarn or chenille yarn is your best friend. It covers wire quickly and hides small mistakes. If you prefer a rustic look, burlap ribbon, jute rope, or natural-colored yarn can make the wreath feel more farmhouse-inspired. For a brighter Easter look, try pink, lavender, mint, or yellow accents.
Step-by-Step Tutorial: How to Make a 30-Minute Bunny Wreath
Step 1: Prepare the Bunny Wreath Form
Start by placing your bunny wreath form flat on the table. Check for any bent areas and gently straighten them with your hands. If the wreath form has rough wire edges, cover them with a small dot of hot glue or wrap them with floral tape. This prevents yarn from catching while you work.
Decide where the top of your wreath will be. Most bunny wreath forms have two ears at the top and a rounded face or body below. If you plan to add a large bow, choose whether it will sit between the ears, under one ear, or at the bottom like a bunny bow tie.
Step 2: Attach the Yarn
Tie the end of your yarn to the wire frame with a tight knot. Add a small amount of hot glue to secure it. Do not use too much glue here; a pea-sized dot is plenty. The goal is to anchor the yarn, not create a glue mountain that could qualify for its own ZIP code.
Begin wrapping the yarn around the frame. Pull it snug, but not so tight that it flattens the fluffy texture. Work slowly around the ears first because they have curves and tighter spaces. Once the ears are covered, move down to the round part of the bunny.
Step 3: Cover the Entire Frame
Continue wrapping until the wire frame is completely hidden. If you are using loop yarn or chenille yarn, gently fluff it with your fingers as you go. Push the yarn rows close together so there are no bare spots. If a section looks thin, wrap over it again.
When you reach the end, cut the yarn and secure it to the back of the wreath with hot glue or floral wire. Hold it in place for a few seconds until the glue sets. Turn the wreath over and check the front. If any wire is showing, add a small piece of yarn and glue it carefully in place.
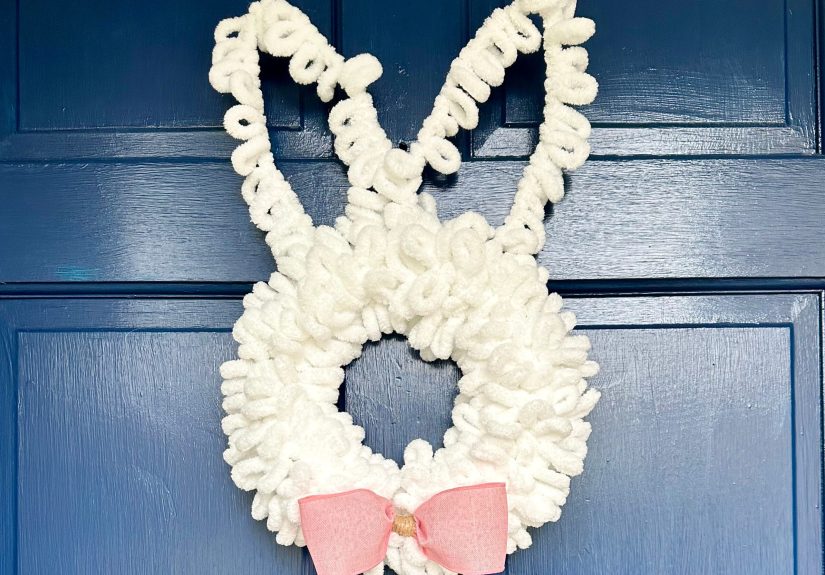
Step 4: Make a Simple Bow
A bow is the difference between “cute bunny wreath” and “I absolutely planned this spring porch moment.” You can use wired ribbon, burlap ribbon, gingham ribbon, pastel satin ribbon, or whatever ribbon makes your heart do a little Easter hop.
Cut a piece of ribbon about 24 to 30 inches long. Make two loops, pinch the center, and secure it with floral wire or a twist tie. Cut a smaller piece of ribbon to wrap around the center so the wire is hidden. Trim the ends at an angle or into a V shape for a finished look.
Step 5: Add Flowers, Eggs, or Carrots
Now it is time to decorate. Faux flowers look beautiful around one ear or along the bottom curve of the wreath. Mini carrots create a playful farmhouse Easter style. Pastel eggs add color and make the wreath extra festive. Greenery helps soften the design and gives it a fresh spring look.
Before gluing anything, place your decorations on the wreath and step back. This quick preview helps you avoid the classic crafting problem known as “why did I glue seven flowers in one corner?” Once you like the arrangement, attach each piece with hot glue or floral wire.
Step 6: Add a Hanger
Cut a small loop of twine, ribbon, or floral wire and attach it to the back of the wreath. Make sure it is centered so the bunny hangs straight. If your wreath tilts to one side, adjust the hanger or add a small decoration to balance the weight.
Hang your finished Dollar Tree bunny wreath on your front door, pantry door, mantel, wall hook, or entryway mirror. If you are displaying it outdoors, place it in a covered area to protect the yarn and decorations from rain, strong wind, and direct harsh sunlight.
Design Ideas for Your DIY Easter Bunny Wreath
Farmhouse Bunny Wreath
For a farmhouse Easter wreath, use white or cream chunky yarn, burlap ribbon, jute twine, small carrots, and soft greenery. Keep the color palette simple. A black-and-white gingham bow also works beautifully with this style.
Pink Floral Bunny Wreath
For a sweet spring look, wrap the frame in pink chenille yarn and decorate one ear with pink roses, peonies, or cherry blossom-style flowers. Add a pale ribbon bow for a soft, feminine finish. This version looks especially nice in bedrooms, nurseries, and pastel Easter displays.
Kid-Friendly Easter Wreath
If children are helping, use larger decorations that are easy to place, such as foam eggs, felt shapes, pom-poms, and pre-made bows. Adults should handle the hot glue gun, but kids can help choose colors, arrange pieces, and fluff the yarn. The final wreath may not be symmetrical, but it will have something better: personality.
Minimal Spring Bunny Wreath
Prefer something simple? Use white yarn, a narrow satin bow, and one small cluster of greenery. This style feels more modern and can stay up beyond Easter as general spring decor.
Helpful Tips for a Better-Looking Wreath
The easiest way to make a budget wreath look high-end is to limit your colors. Choose two or three main colors and repeat them throughout the design. For example, white yarn, pink flowers, and green leaves create a clean spring palette. White yarn, burlap ribbon, and orange carrots create a rustic farmhouse palette.
Another helpful trick is to decorate in clusters. Instead of placing flowers randomly around the entire wreath, group them around one ear or one lower corner. This gives the wreath a designed look and keeps it from feeling cluttered.
Use wired ribbon if possible. It holds its shape better than soft ribbon and makes your bow look fuller. If your bow looks flat, gently pull the loops apart and shape the tails with your fingers. Bows are dramatic little creatures; they need attention.
Common Mistakes to Avoid
Using Too Much Hot Glue
Hot glue is useful, but too much can create hard lumps under the yarn. Use small dots and let them dry before moving to the next section. If you are attaching heavier decorations, floral wire or zip ties may hold better than glue alone.
Wrapping the Yarn Too Loosely
Loose yarn can slide around and expose the wire frame. Keep the yarn snug and close together. If the frame still shows through, wrap the area a second time.
Adding Too Many Decorations
Easter decor is cheerful, but your wreath does not need to carry the entire seasonal aisle on its back. A few well-placed accents usually look better than covering every inch with eggs, flowers, carrots, ribbons, and one suspiciously judgmental chick.
How to Make This Bunny Wreath Last Longer
Store the wreath in a plastic wreath container, a large storage bag, or a box with tissue paper around the decorations. Avoid crushing the ears or bow. If the yarn gets dusty, gently shake the wreath or use a lint roller. For outdoor use, hang it on a covered porch or behind a storm door.
If a flower falls off, simply reattach it with hot glue. If the bow loses shape, fluff it before hanging. Because the base is reusable, you can even remove decorations and redesign the wreath next year. That is the beauty of DIY: nothing is permanent unless you used an aggressive amount of glue.
Budget Breakdown
The final cost depends on what you already own, but a simple Dollar Tree bunny wreath can often be made with a small list of inexpensive supplies. A bunny wreath form, yarn, ribbon, faux flowers, and small decorations are usually enough. If you already have a glue gun, scissors, and leftover ribbon, the project becomes even more budget-friendly.
For the best savings, shop your craft stash first. Leftover Christmas ribbon, neutral greenery, extra floral stems, and unused twine can all be repurposed. Easter wreaths do not have to be made entirely from Easter-labeled products. Spring colors, soft textures, and bunny shapes do most of the work.
Where to Display Your Easter Bunny Wreath
The front door is the classic choice, but it is not the only option. Hang the wreath above a mantel, on a kitchen cabinet, over a mirror, inside an entryway, or on a child’s bedroom door. Smaller bunny wreaths can also be used as part of an Easter brunch display.
If you are hosting Easter dinner, try placing the wreath flat around a cake stand or centerpiece. Add battery-operated candles, faux eggs, or small flowers in the center. Just remember: yarn and open flames are not friends. Use flameless candles only.
Personal Experience: What Makes This 30-Minute Bunny Wreath Worth Making
The first time you make an Easy 30-Minute DIY Dollar Tree Bunny Wreath for Easter, you may start with the innocent belief that it is “just a quick craft.” Then suddenly you are comparing ribbon widths like a professional decorator and saying things like, “This bunny needs more texture.” That is when you know the wreath has won.
One of the most satisfying parts of this project is how quickly it transforms. At the beginning, the wire bunny form looks plain and a little awkward. After ten minutes of wrapping yarn, it begins to look soft and intentional. After the bow goes on, it suddenly has charm. Once the flowers or carrots are added, it looks like something you could find in a boutique spring collection.
Another enjoyable part is how forgiving the project is. If your yarn wrapping is not perfect, the fluffy texture hides it. If your bow is slightly uneven, you can tilt it and call it “whimsical.” If one flower sits higher than the others, congratulations, you have created movement. This wreath is beginner-friendly because the materials work with you, not against you.
A helpful experience-based tip is to keep the decorations lightweight. Heavy eggs, large flower heads, or thick signs can pull the wreath forward or make it hang crooked. Smaller accents are easier to balance and usually look more polished. When in doubt, attach decorations temporarily with floral wire first, hang the wreath, and check the balance before gluing everything permanently.
It also helps to choose the ribbon before choosing the flowers. Ribbon often sets the whole mood. A gingham ribbon says farmhouse picnic. A pink satin ribbon says sweet Easter brunch. A burlap ribbon says rustic porch charm. A bright polka-dot ribbon says, “Yes, I own seasonal mugs and I am not ashamed.” Once the ribbon is chosen, matching flowers and accents becomes much easier.
If you are crafting with family, this is a great project to do assembly-line style. One person wraps the yarn, another makes the bow, and someone else arranges the flowers. Children can help pick decorations and decide where the bunny should live when it is finished. The project is quick enough to hold everyone’s attention, but creative enough to feel special.
The biggest lesson from making this wreath is that simple seasonal decor often brings the most joy. You do not need a huge budget or complicated tools to make your home feel festive. A few affordable supplies, 30 minutes, and a little creativity can turn an ordinary door into a cheerful Easter welcome. And if the bunny ends up slightly lopsided? That just means it has character. Honestly, same.
Conclusion
This Easy 30-Minute DIY Dollar Tree Bunny Wreath for Easter is proof that beautiful seasonal decor does not need to be expensive or complicated. With a simple bunny wreath form, soft yarn, ribbon, and a few spring accents, you can create a charming Easter decoration that fits your style and budget. Whether you prefer farmhouse neutrals, pastel florals, kid-friendly colors, or minimalist spring decor, this project is easy to customize and fun to make.
The key is to keep the design balanced, use soft texture, and let one or two accent areas shine. In about half an hour, you can have a finished bunny wreath ready for your front door, mantel, kitchen, or Easter party display. It is affordable, adorable, and just crafty enough to make you feel wildly productive without requiring a full weekend or emotional support glitter.


