Table of Contents >> Show >> Hide
- What You’re Making (And Why It Looks Expensive)
- Budget Game Plan: What to Buy vs. What to Improvise
- Choosing the Right Plants (So You’re Not Fighting Nature)
- DIY Rosemary Topiary: Step-by-Step
- DIY Boxwood Topiary: Step-by-Step
- Care Basics: Keeping Your Living Topiaries Alive (Not Just Cute)
- When to Trim (So You Don’t Accidentally Set Them Back)
- Cold Weather Tips: Overwintering Without Tears
- Boxwood Problems to Prevent (Cheap Prevention Beats Expensive Panic)
- Budget Tricks That Make a Big Difference
- Troubleshooting: Quick Fixes for Common “Uh-Oh” Moments
- Real-Life Lessons From Budget Topiary Projects (Experience-Based Tips Without the Price Tag)
- Conclusion
Topiaries are basically plants wearing fancy haircutsand somehow they make a porch, patio, or kitchen window look like you have your life together. The best part? You don’t need a mansion, a gardener named “Pierre,” or a $200 pair of shears to pull it off. With one upright rosemary plant (hello, amazing scent) and one small boxwood (hello, classic evergreen vibes), you can DIY two living topiaries that look boutique… on a very normal-person budget.
This guide walks you through choosing the right plants, shaping them without drama, keeping them alive in containers, and saving money at every step. You’ll end up with two tidy, green “statement pieces” you can move around like décorbecause they are décor. Just… alive.
What You’re Making (And Why It Looks Expensive)
- Rosemary “lollipop” topiary: a little trunk with a rounded or lightly coned topfragrant, cheerful, and surprisingly forgiving.
- Boxwood topiary: a classic ball or cone (or a simple two-tier ball if you’re feeling bold).
These look high-end because topiary shapes read as “intentional.” People assume you measured things. In reality, you’ll mostly be squinting at the plant, trimming a little, stepping back, and whispering, “Close enough.”
Budget Game Plan: What to Buy vs. What to Improvise
Buy (the essentials)
- 1 upright rosemary plant (look for a straight-ish central stem)
- 1 small boxwood shrub (healthy, dense, and evenly green)
- Potting mix (a well-draining mix; you can blend in perlite or coarse sand if you have it)
Improvise (to keep it cheap)
- Pots: thrift stores, dollar stores, clearance shelves, or “mystery pot” from the garage
- Stakes: bamboo skewers, chopsticks, dowels, or a straight twig (clean and sturdy)
- Plant ties: garden twine, soft string, fabric strips, or even a cut-up T-shirt
- Pruning tool: hand pruners are ideal, but clean scissors can work for light rosemary trimming
Optional upgrades (still budget-friendly)
- Terra-cotta pot for rosemary (helps reduce soggy soil issues)
- Mulch or decorative moss on top of soil (for the “I shop at fancy garden centers” look)
- Simple plant saucers (to protect floors and furniture)
Choosing the Right Plants (So You’re Not Fighting Nature)
Pick an upright rosemary (not a trailing type)
For topiary, you want an upright rosemary that naturally grows more vertical. A plant with at least one reasonably straight “main stem” will train faster into a mini tree shape. If it’s a little wonky, that’s fineplants are allowed to have personality.
Pick a boxwood with dense, even growth
Look for a full, symmetrical little shrub without bare patches. Boxwoods grow steadily, but they’re not fast fashionso starting with a nicely filled-in plant saves time and makes shaping easier.
Quick health check at the store
- Leaves should look vibrant (no widespread browning, spotting, or heavy leaf drop).
- Avoid plants that look waterlogged (soggy soil, funky smell, limp stems).
- Gently rotate the pot: if roots are circling like spaghetti, plan to loosen them at planting.
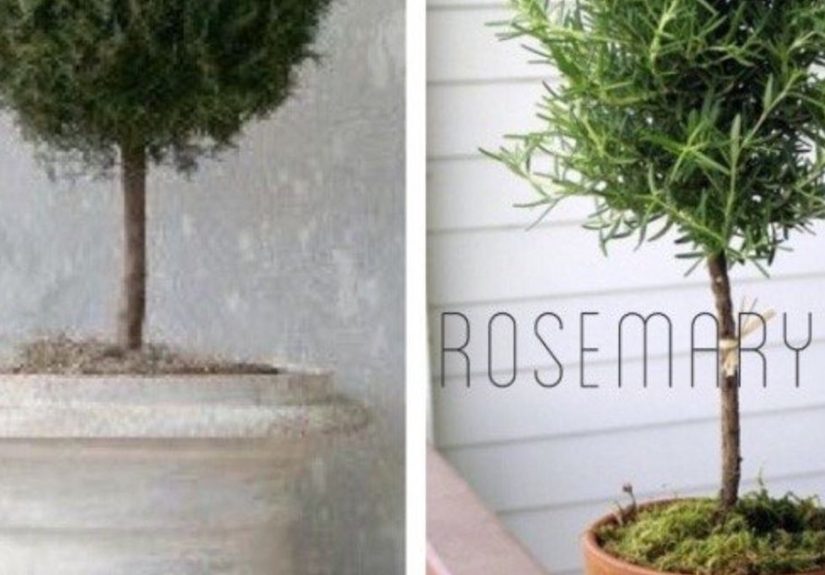
DIY Rosemary Topiary: Step-by-Step
Step 1: Pot it like you mean it
- Choose a pot with drainage holes. (Rosemary hates “wet feet.”)
- Add potting mix. If your mix feels heavy, lighten it with perlite or coarse sand.
- Remove rosemary from its nursery pot. Loosen the outer roots if they’re tightly wrapped.
- Plant at the same depth it was growing before. Water lightly to settle the soil.
Step 2: Find the “trunk” and commit
Identify the strongest, straightest stem to be your trunk (the “leader”). Insert a stake next to it. Tie the stem to the stake with soft tiessnug, not strangling. You want support, not a hostage situation.
Step 3: Clean up the bottom for a tree shape
To create that classic lollipop look, remove lower side shoots and leaves from the bottom portion of the main stem. Don’t strip the plant aggressively all at once. Aim to clear the bottom third to half over time, especially if the plant is small.
Step 4: Start shaping the top (lightly!)
The top becomes your “crown.” Use small snips to round it into a ball or soft cone. Trim a little, step back, rotate the pot, repeat. The rotation step is the difference between “elegant” and “why is it flat on one side?”
Step 5: Maintain with frequent tiny trims
Rosemary responds well to regular harvesting/pruning. Snip the soft green tips to encourage branching and density. If you let it grow wild for months and then shave it down, it can get woody and sparse. Think “hair trims,” not “head shaving.”
DIY Boxwood Topiary: Step-by-Step
Step 1: Pot the boxwood
- Choose a pot that’s stable and wide enough not to tip (boxwood can get top-heavy).
- Plant in quality potting mix. Water thoroughly after potting, then let the top inch dry before watering again.
Step 2: Decide your shape (start simple)
- Ball: easiest and classic.
- Cone: also beginner-friendly and forgiving.
- Two-tier ball: doable, but wait until the plant is dense and you’re comfortable trimming.
Step 3: Use a “guide” so your eyes don’t lie
Your eyes will absolutely lie. They will swear it’s symmetrical until you take a photo and realize you made a “comet” shape. Use one of these cheap guides:
- String method: loosely wrap string around the plant to mark a spiral or band guide.
- DIY template: cut a half-circle out of cardboard to guide a rounded ball trim.
- Hands method: gently cup the shrub and trim what sticks out past the “ideal” outline.
Step 4: Trim lightly, rotate constantly
Take off a little at a time. Rotate the pot every few snips. Keep air and light moving into the plant by thinning tiny bits from the outer surface instead of only shearing the outside like a green helmet.
Step 5: Follow the one-third rule
Don’t remove more than about one-third of the shrub in a season. Boxwood can handle pruning, but it’s not a fan of extreme makeovers. If it needs a major correction, do it gradually over multiple trims.
Care Basics: Keeping Your Living Topiaries Alive (Not Just Cute)
Light
- Rosemary: loves bright light and full sun. Indoors, it wants a very sunny window (or supplemental grow light).
- Boxwood: often appreciates some afternoon shade, especially in hot climates or harsh winter sun exposure.
Water
- Rosemary: water deeply, then let the soil dry somewhat between waterings. Too-wet soil is a common failure point in containers.
- Boxwood: keep evenly moist but not soggy. Container plants dry out faster than in-ground shrubs, especially in wind.
Soil and drainage
Both plants do best when excess water can escape quickly. A pot with drainage holes and a well-draining potting mix is your cheapest insurance policy.
Fertilizer (don’t overdo it)
You’re shaping these plants, not trying to launch them into orbit. Too much fertilizer can push weak, leggy growth. If you fertilize, use a light handespecially with rosemary.
When to Trim (So You Don’t Accidentally Set Them Back)
Rosemary trimming rhythm
Rosemary can be lightly trimmed often, especially by harvesting tips for cooking. Regular small trims help it stay dense and topiary-ready.
Boxwood trimming rhythm
For boxwoods, spring is usually prime time for shaping, with an optional light touch-up in summer. Avoid heavy trimming late in the season, because tender new growth can get damaged by cold and wind.
Cold Weather Tips: Overwintering Without Tears
Rosemary in winter
In many areas, rosemary is safer in a pot so you can move it. When nights get cold, bring it indoors to the brightest spot you have. Aim for strong light and avoid overwateringwinter + wet soil is a classic rosemary problem combo.
Boxwood in winter
Boxwood is hardy, but containers can expose roots to colder temperatures than in-ground plantings. Protect the pot from harsh wind, consider insulating the container (even by grouping pots together), and be mindful of winter sun exposure that can cause browning (“winter burn”).
Boxwood Problems to Prevent (Cheap Prevention Beats Expensive Panic)
Winter burn
If foliage bronzes or turns orange-brown after winter, it may be winter burnoften tied to sun + wind + frozen soil. Positioning and some protection matter a lot for potted boxwood.
Pests and disease basics
- Leafminer can cause cosmetic damage and stress in boxwood.
- Boxwood blight is a serious disease; prevention focuses on sanitation and not spreading infected debris.
Simple, budget-friendly prevention habits
- Avoid overhead watering on boxwood when possible.
- Don’t prune boxwood when foliage is wet.
- Clean pruners between plants (a quick wipe-down is better than nothing).
- Pick up fallen leaves around the pot and toss them (don’t compost if disease is suspected).
Budget Tricks That Make a Big Difference
1) Start small and shape over time
Smaller plants cost less. With a little patience and frequent tiny trims, they fill in. Topiary is basically “slow décor,” and that’s a compliment.
2) Use clippings wisely
Rosemary trimmings can be used in cooking, dried for later, or even rooted from cuttings if you want to multiply plants on the cheap.
3) Upgrade the pot, not the plant
A thrifted urn-style container can make a basic nursery plant look instantly designer. If the pot looks expensive, the whole topiary looks expensive. That’s just science.
4) Shop end-of-season
Late-season clearance can be gold. Just choose healthy plants and plan to nurture them back with good light, correct watering, and gentle trimming.
Troubleshooting: Quick Fixes for Common “Uh-Oh” Moments
My rosemary is dropping leaves
- Check light: it probably needs more.
- Check soil: if it’s staying wet, switch to a faster-draining mix and make sure the pot drains freely.
- Trim lightly: pinching tips can encourage bushiness if the plant is otherwise healthy.
My boxwood is browning
- If it’s after winter: consider winter burn and give it time to recover before heavy pruning.
- Check watering: container boxwood can dry out faster than you think, especially in wind.
- Look closely for pests/disease signs and remove damaged portions gradually.
Real-Life Lessons From Budget Topiary Projects (Experience-Based Tips Without the Price Tag)
When you make living topiaries on a budget, you learn fast that “cheap” shouldn’t mean “rushed.” Most people don’t fail because they didn’t buy the perfect plantthey fail because they tried to do all the shaping in one afternoon like it’s a home makeover show. In real life, your rosemary and boxwood need time to respond, fill in, and toughen up between trims.
One of the most common surprises is how much rotation matters. You trim the front because that’s what you see. Then you turn the pot and discover the back has been quietly doing its own interpretive dance. A good habit is to rotate the pot a quarter turn every few days (or at least every trimming session). This is especially helpful indoors near a window, where plants naturally lean toward light.
Another very real budget-topiary moment: you realize your “free” pot is free for a reason. Maybe it has one tiny drainage hole the size of a peppercorn. Maybe it’s a decorative cachepot with no drainage at all. If you’re determined to use it anyway, set a smaller draining nursery pot inside it and empty any collected water. Rosemary, in particular, tends to punish soggy soil with a slow decline that feels mysterious until you realize the roots have basically been living in a damp basement. When people say rosemary “suddenly died,” it usually wasn’t suddenit was a long, quiet puddle situation.
Boxwood teaches a different lesson: don’t chase perfection in one session. If you keep snipping because one side looks slightly fuller, you can accidentally “thin” the plant into see-through territory. Many DIYers find it’s better to do a light shape, live with it for a week, and then touch up once you see how the plant actually looks in normal light (not just in your intense, plant-stylist panic lighting). Photos help, tooyour phone camera is brutally honest, which is exactly what you need.
People also notice that budget topiaries look most expensive when you style them simply. Matching pots, a pair of topiaries flanking a doorway, or placing one on a step with a lantern nearby can make a small project feel high-impact. And if you want instant “fancy,” top-dress the soil with a thin layer of moss or small gravel so the pot looks finished. It’s like adding earrings to an outfitsmall detail, big effect.
Finally, there’s the emotional arc of topiary ownership: excitement, confidence, over-trimming, regret, recovery, pride. The good news is that rosemary and boxwood are both plants that respond well to steady, gentle care. If you trim a little too much, stop, water correctly, give good light, and let them grow. In a few weeks, you’ll often have new tips and a better sense of the plant’s natural shapemeaning your next trim will be calmer, cleaner, and way more symmetrical. That’s the real budget win: you get better at it, so each plant you shape after this one becomes easier (and looks more expensive).
Conclusion
DIY living topiaries are proof that you can get “designer porch” energy without designer prices. Start with healthy plants, pot them correctly, shape slowly, and maintain with small trims. Rosemary rewards you with fragrance (and dinner ingredients), while boxwood delivers that classic evergreen structure. Go easy, rotate often, and remember: perfection is optionalfresh green confidence is not.


