Table of Contents >> Show >> Hide
- Before You Download Anything, Know This
- Easy Ways to Download Images from Google Images: 7 Steps
- Step 1: Search Like You Mean It
- Step 2: Use the Filters, Especially Usage Rights
- Step 3: Open the Image Preview and Check the Source
- Step 4: Visit the Hosting Website for the Best Version
- Step 5: Download the Image on Desktop
- Step 6: Download the Image on Mobile
- Step 7: Rename, Organize, and Verify Before You Use It
- Common Problems When Downloading Images from Google Images
- Can You Use Any Image You Download from Google Images?
- Best Practices for Bloggers, Students, Marketers, and Small Businesses
- Examples of Smart Image Downloads
- Experience Notes: What Usually Happens in the Real World
- Conclusion
- SEO Tags
If you have ever opened Google Images looking for one tiny picture and somehow resurfaced 37 tabs later with a wallpaper, a meme, a stock photo of a suspiciously happy dentist, and no clue where anything came from, welcome. You are among friends.
The good news is that downloading images from Google Images is still easy. The less-good news is that many people do it the messy way. They grab a low-resolution preview, forget where the image came from, ignore licensing, and later wonder why their “perfect free photo” came with a watermark, weird file format, or a stern copyright email. Not ideal.
This guide walks you through the smart, clean, and website-friendly way to download images from Google Images in seven simple steps. You will learn how to find the right image, save it on desktop or mobile, avoid blurry files, and check whether you can actually use it. Because yes, downloading a picture is easy. Downloading the right picture the right way is the real superpower.
Before You Download Anything, Know This
Google Images is a search engine for images, not the original owner of most images you see. That means the picture usually lives on someone else’s website. So if you want the best version of an image, the cleanest method is often to open the hosting page and save it from there instead of treating Google Images like a bottomless vending machine for internet pixels.
It also helps to separate two things people mix up all the time:
- Saving an image to your device means the file is downloaded to your computer, tablet, or phone.
- Saving an image to a Google collection means Google bookmarks it for later. Handy, yes. A download, no.
Once you know that difference, the whole process gets much less confusing and dramatically less likely to end with you asking, “Why is this image not in my Downloads folder?”
Easy Ways to Download Images from Google Images: 7 Steps
Step 1: Search Like You Mean It
Start with a specific search phrase in Google Images. Broad searches like dog or office are technically valid, but they also invite chaos. Use descriptive terms instead, such as:
- golden retriever puppy running in snow
- minimalist home office desk setup
- public domain vintage botanical illustration
The more precise your query, the better your results. This is the fastest way to avoid scrolling through hundreds of unrelated images that all somehow look like they were chosen by a very confused robot. If you need a transparent PNG, a wallpaper-size image, or a diagram, include that in the search too. Specificity is your best friend here.
Google Images can also help you narrow results visually, but your words do most of the heavy lifting. If you know what you need, say it clearly. The search bar is not a mind reader, although it does occasionally act like it has opinions.
Step 2: Use the Filters, Especially Usage Rights
After searching, click Tools in Google Images to reveal filters. This is where casual searchers become efficient searchers. Depending on the query, you may see filters for size, color, type, time, and usage rights.
If you want images for a blog, a presentation, marketing, or anything public-facing, pay attention to Usage Rights. This filter helps surface images that include licensing information. That does not mean you should blindly assume every result is free to use. It means you have a much better starting point than random internet roulette.
For example, if you are searching for a photo to include in a classroom handout, a small business blog, or a YouTube thumbnail, filtering by usage rights can save you a mountain of future headaches. You should still click through and verify the license details on the source website. Think of Google’s filter as the bouncer at the door, not the entire legal department.
Step 3: Open the Image Preview and Check the Source
Click the image you want. Google Images will open a larger preview with information about the website hosting the image. This step matters because the preview alone is not always the best or final version of the file.
Take a breath and look at three things:
- The website name
- The image dimensions or apparent quality
- Any visible license details or attribution clues
This quick inspection helps you avoid saving the wrong file. Maybe the preview looks great, but the actual page contains a higher-resolution image. Maybe the image belongs to a stock site and requires a license. Maybe it is a tiny thumbnail pretending to be useful. Google Images is excellent at discovery, but it is not always where the smartest download happens.
If the source looks sketchy, skip it. If it looks legitimate, move on. Your future self will thank you for not downloading a mystery file from a website that looks like it was built during a caffeine emergency in 2007.
Step 4: Visit the Hosting Website for the Best Version
This is the step many people skip, and it is exactly why they end up with blurry images. Click through to the original website whenever possible. That is often where you will find:
- a higher-resolution image
- download buttons or media options
- license details
- creator credit and attribution requirements
Google removed its old “View image” shortcut years ago, so the modern workflow usually nudges you toward the source page. Annoying if you are impatient, yes. Better for image owners and for finding the actual image file, also yes.
This is especially important when downloading images for professional use. If you are building a website, writing an article, designing a product page, or making social content for a brand, going to the source site is the adult-in-the-room move. It gives you context, clearer licensing, and often a much cleaner image file.
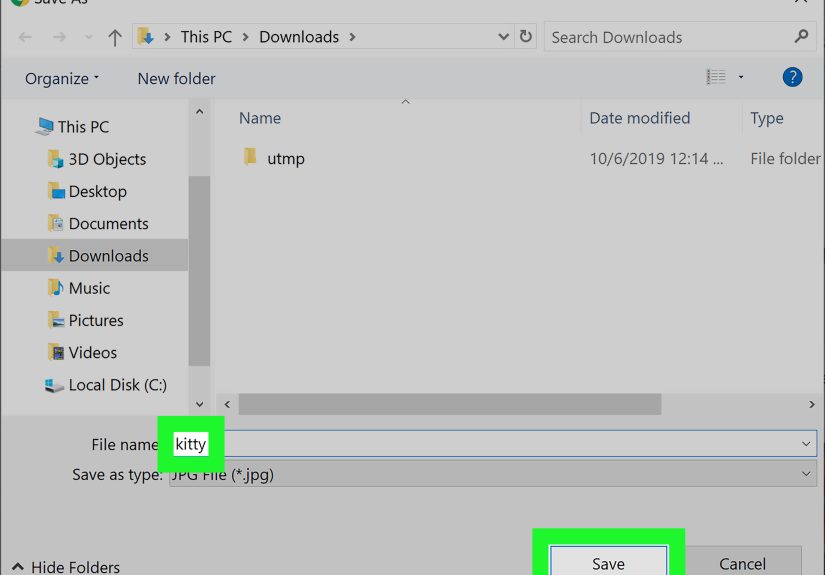
Step 5: Download the Image on Desktop
On a desktop or laptop, this is the easiest part. Once you are viewing the image in Google Images or, better yet, on the original website, right-click the image and choose Save image as. Then select the folder where you want to save it, rename the file if needed, and click Save.
That is it. No wizardry. No secret handshake. Just the classic browser workflow.
Still, a few common desktop issues are worth knowing:
- You saved a WEBP file instead of JPG or PNG: Some websites serve images in WEBP because it is efficient for the web. That is normal.
- The image is tiny: You probably saved a preview or thumbnail instead of the original file.
- Right-click does not work: The site may restrict direct saving, or the image may be embedded in a viewer. Open the source page or image in a new tab.
If your goal is quality, always compare the downloaded file to what you expected. A two-second check can save you from uploading a fuzzy image to your site and then pretending it is “retro.”
Step 6: Download the Image on Mobile
On a phone or tablet, the steps are similar, but the gestures are different. In many browsers, you press and hold the image, then choose an option like Download image, Save image, or Save to Photos. On some devices, the image may go to your Photos app; on others, it lands in your Downloads folder or Files app.
This is where people get tripped up because mobile interfaces vary. One phone says “Download image.” Another says “Add to Photos.” A third behaves like it was raised by wolves. If pressing and holding the preview does not work, tap through to the hosting website and try again there.
Also remember that using Google’s Save button on an image may store it in your Google saved items or collection, not on your device. Useful for bookmarking. Not useful when you need the file right now for a Canva project due in six minutes.
Step 7: Rename, Organize, and Verify Before You Use It
Once the image is downloaded, do not just let it vanish into your Downloads folder with a name like 9f7aa2b3-final-final-realfinal.webp. Rename it something human. Good file names help with organization, faster reuse, and even SEO if the image will later go on your website.
For example:
- blue-modern-office-desk.jpg
- vintage-botanical-rose-illustration.png
- teacher-classroom-whiteboard-photo.webp
Then verify three things before publishing or sharing:
- Image quality: Is it sharp enough for your purpose?
- File type: Does your software accept JPG, PNG, or WEBP?
- License or permission: Are you allowed to use it the way you plan to use it?
This final check is what separates a quick download from a smart workflow. It is not glamorous, but neither is receiving an email that politely asks why you used someone else’s image in a paid ad campaign.
Common Problems When Downloading Images from Google Images
The image saves in low quality
This usually happens when you save the preview instead of the original file. Go to the hosting page and download the image from there.
The image will not save at all
Try opening the image in a new tab, switching browsers, or downloading from the source site instead of the Google Images results page.
The file is WEBP and you wanted JPG
WEBP is common on modern websites. If you need JPG or PNG for a specific tool, convert the file after download using an editor or trusted converter.
You are not sure whether the image is legal to use
Check the source website, read the license terms, and confirm whether attribution, payment, or permission is required. Google Images can help you discover images, but it does not magically transfer ownership rights to you.
Can You Use Any Image You Download from Google Images?
No. And this is the part of the story where the fun uncle of the internet briefly turns into an accountant.
Downloading an image and having the legal right to reuse it are not the same thing. A photo can be easy to save and still be protected by copyright. Some images are available under Creative Commons licenses. Some are public domain. Some are sold through commercial licenses. Some require attribution. Some require permission. Some are absolutely not for reuse unless the owner says so.
If you are using an image for personal reference, like saving inspiration for later, the stakes may be lower. If you are using it on a website, in a blog post, in marketing materials, in an ebook, or on social media for business, you need to verify what the license allows.
That is why the safest habit is simple: filter by usage rights, visit the source site, read the license terms, and keep a record of where the image came from. Glamorous? No. Smart? Very.
Best Practices for Bloggers, Students, Marketers, and Small Businesses
If you download images from Google Images regularly, build a repeatable routine. Here is a practical one:
- Search with specific keywords
- Filter results where appropriate
- Open the preview and inspect the source
- Visit the hosting website
- Download the highest suitable version
- Rename the file clearly
- Save the source URL or licensing note somewhere
This matters for SEO too. If you later upload the image to your own site, a clear file name, helpful alt text, and relevant page placement can support image SEO and improve accessibility. In other words, the image-download process does not end when the file hits your folder. That is just halftime.
Examples of Smart Image Downloads
Example 1: A blogger needs a header image.
Instead of downloading the first attractive landscape photo that appears, the blogger filters by usage rights, visits the hosting site, checks the license, downloads a high-resolution version, and keeps the attribution information. Result: beautiful image, fewer future problems.
Example 2: A teacher needs a science diagram.
The teacher searches with exact terms, checks whether the image comes from a school, museum, or educational publisher, and downloads a readable version from the source page. Result: clearer classroom materials and a lower chance of using a mislabeled graphic.
Example 3: A small business owner wants social media content.
Instead of grabbing random photos from search results, the owner uses licensing filters, downloads from reputable sites, and stores the file with a descriptive name and source note. Result: more organized content and less legal guesswork.
Experience Notes: What Usually Happens in the Real World
In real-world use, downloading images from Google Images tends to be one of those tasks people assume is too simple to mess up, right up until they mess it up in three different ways before lunch. The first experience most people have is pure optimism. They search for an image, click the prettiest one, save it, and move on with the confidence of someone who has absolutely not checked the file size, source, license, or whether the image is actually a blurry preview wearing a confidence costume.
Then reality enters the room. A blogger drops the image into a post and realizes it looks fuzzy on desktop. A student adds a graphic to a slide deck and notices the tiny watermark in the corner during class. A small business owner uploads a photo to an ad and later discovers it came from a stock site that expected payment. Suddenly, what felt like a five-second task turns into a cleanup operation with the emotional energy of stepping on a LEGO brick.
The better experience usually begins when people stop treating Google Images like the final destination and start using it as a discovery tool. That one mindset shift changes everything. Once you get in the habit of checking the source page, image size, and usage terms, downloads become faster, not slower. You waste less time replacing bad files later. You also build a better library of images that are actually useful, which is a sentence no one says dramatically, but every content creator eventually learns to appreciate.
Another common experience is file-format confusion. Many users expect every image to arrive as a JPG or PNG, then get surprised by WEBP. At first it feels annoying. After a while, it just becomes part of modern web life. Experienced users learn to check the format early and convert only when necessary, instead of acting personally betrayed by a file extension.
Mobile downloading has its own comedy. Sometimes a long press works perfectly. Sometimes it saves to Photos. Sometimes it sends the file to Downloads. Sometimes it offers to bookmark the image instead of downloading it, which is helpful in the same way giving someone a map is helpful when they asked for a sandwich. That is why experienced users quickly learn to tell the difference between saving for later and actually downloading the file.
Over time, the people who get the best results tend to follow the same habits: they search with clearer keywords, favor reputable source sites, verify image rights, and rename files immediately. It is not flashy. It will not win any awards for internet drama. But it works. And when you need an image fast for a post, presentation, product page, or classroom handout, a boring system is a beautiful thing.
Conclusion
Downloading images from Google Images is easy when you know the right workflow. Search with precision, use filters wisely, open the preview, visit the source page, save the file correctly on desktop or mobile, and verify the license before using it. That is the difference between a clean, professional result and a blurry, questionable image you will regret five minutes later.
Google Images is an excellent starting point for discovery, but the smartest users know the real magic happens after the click. Use the tool well, and you will find better images, stay organized, and keep your website or project on the right side of both quality and common sense.


