Table of Contents >> Show >> Hide
- What Are Layers in Illustrator?
- Why Adding Layers Matters
- How to Add Layers in Illustrator: 8 Steps
- Step 1: Open the Layers Panel
- Step 2: Look at the Default Layer Structure
- Step 3: Rename the Existing Layer
- Step 4: Create a New Layer
- Step 5: Rename and Organize the New Layer Immediately
- Step 6: Move the Layer into the Right Stacking Order
- Step 7: Add or Move Artwork onto the Correct Layer
- Step 8: Create Sublayers, Then Lock or Hide Layers as Needed
- Quick Example: Building a Simple Poster with Layers
- Common Mistakes to Avoid
- Pro Tips for Cleaner Illustrator Layer Management
- Final Thoughts
- Practical Experience: What Designers Usually Learn After Using Layers for a While
- SEO Tags
If Adobe Illustrator sometimes feels like your artboard turned into a yard sale, layers are the fix. They help you separate text from shapes, backgrounds from icons, and polished work from glorious chaos. In short, layers make Illustrator files easier to edit, easier to share, and much less likely to trigger a dramatic sigh at 1:14 a.m.
Learning how to add layers in Illustrator is one of those beginner skills that quietly becomes a superpower. A single layer might work for a quick doodle, but the moment you build a logo system, social graphic, poster, packaging mockup, or anything with more than three moving parts, organization matters. Layers let you stack artwork, hide sections, lock elements, move objects without wrecking everything else, and build files that still make sense when you open them a week later.
This guide breaks the process into eight clear steps, with tips, examples, and a few reality checks from actual design workflow. Whether you are brand new to Illustrator or just tired of hunting for that one rectangle hiding behind seventeen other objects, this tutorial will help you work smarter.
What Are Layers in Illustrator?
Think of layers as transparent folders stacked on top of each other. Each one can hold artwork such as text, lines, shapes, images, and grouped objects. The order of those layers matters: content on higher layers appears in front of content on lower layers. That means your headline can sit above a photo, your icon can float above a colored circle, and your background can stay politely in the back where it belongs.
Illustrator also supports sublayers, which are smaller organizational sections nested inside a parent layer. These are handy when one layer contains several related objects, like a character illustration with separate eyes, hair, clothes, and shadows. If that sounds delightfully nerdy, good news: it is.
Why Adding Layers Matters
Before jumping into the step-by-step process, it helps to know why layers deserve your attention. First, layers improve control. You can lock one layer while editing another, which prevents accidental nudges that make logos mysteriously drift across the page. Second, layers improve visibility. You can hide artwork you do not need to see right now, which is especially useful in complex files. Third, layers improve collaboration. If someone else opens your Illustrator document, clear layers make the file look professional instead of haunted.
Layers also help when exporting assets, preparing files for print, or sending artwork into other Adobe apps. A well-layered file is easier to revise and easier to repurpose. That is not glamorous, but it is the kind of boring magic that keeps projects moving.
How to Add Layers in Illustrator: 8 Steps
Step 1: Open the Layers Panel
Start by opening your Illustrator document. Then go to Window > Layers. If the Layers panel is already visible, congratulations: you are ahead of the game. If not, this menu command brings it back instantly.
The Layers panel is your command center. This is where you create new layers, rename them, rearrange them, hide them, lock them, and drill down into sublayers. If you plan to do serious work in Illustrator, this panel should become one of your closest friends.
Step 2: Look at the Default Layer Structure
In a new Illustrator file, you usually start with a single default layer called Layer 1. That is normal. Illustrator is basically saying, “Here is one big drawer. Good luck.”
Click the arrow next to the layer name if needed to expand it and inspect what is inside. If you have already placed or drawn artwork, you may see paths, groups, or objects listed beneath it. This quick peek helps you understand what you are organizing before you start creating more layers.
Step 3: Rename the Existing Layer
Before adding a bunch of new layers, rename the current one. Double-click the layer name and type something useful, like Background, Main Artwork, Text, or Reference.
This step sounds tiny, but it matters. “Layer 1 copy 3” is not a naming strategy. It is a cry for help. Clear layer names save time later, especially when your document grows or another designer needs to work with the file.
For example, if you are designing a promotional flyer, your layers might be named Background Texture, Product Photo, Headline, Body Copy, and Icons. Suddenly, the file feels less like a puzzle and more like a plan.
Step 4: Create a New Layer
Now for the main event. At the bottom of the Layers panel, click the Create New Layer icon. Illustrator will add a new layer above the currently selected one.
That is the core action behind adding layers in Illustrator. One click, one new layer, one step closer to inner peace. Repeat this whenever you need another section for separate artwork.
If you prefer menus, you can also open the Layers panel menu and choose the option to create a new layer there. Either method gets the job done.
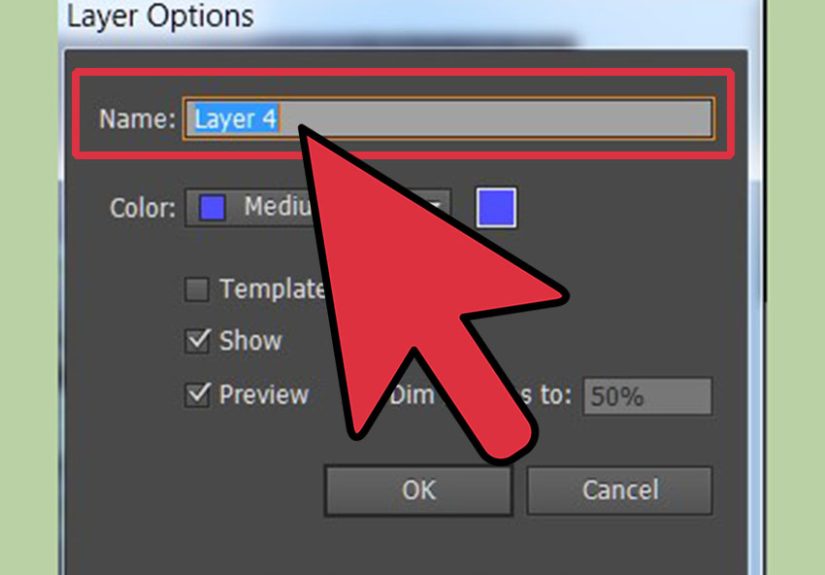
Step 5: Rename and Organize the New Layer Immediately
As soon as the new layer appears, rename it. Do not wait until you have twelve unnamed layers and one existential crisis. Double-click the layer name and label it based on what will live there.
Good examples include:
Logo Mark
Navigation
Illustration Shadows
CTA Button
Footer Elements
You can also adjust layer options such as color labels if needed. This helps visually distinguish selected objects and can make navigation easier in busy documents.
Step 6: Move the Layer into the Right Stacking Order
Layers are not just containers. They are stacked in order. That means placement in the Layers panel affects what appears in front and what sits behind.
Click and drag the new layer up or down in the panel to reposition it. If the layer contains a background shape, it should usually sit near the bottom. If it holds text or interface controls, it likely belongs higher up.
Imagine you are creating a badge graphic with a circle, ribbon, stars, and title text. You might place Background Circle at the bottom, Ribbon above it, Stars above the ribbon, and Title Text on top. Cleaner stack, better control, fewer muttered complaints.
Step 7: Add or Move Artwork onto the Correct Layer
Once the new layer exists, you can place fresh artwork on it by selecting that layer first and then drawing or pasting. You can also move existing artwork from one layer to another if your file started messy and you are cleaning it up after the fact. No judgment. That is called growth.
A practical method is to select an object on the artboard, then use the Layers panel to drag its small selection indicator into a different layer. You can also cut and paste strategically after activating the destination layer. Illustrator is fairly flexible here, which is nice because real-world files are rarely born organized.
This step is where layer management becomes truly useful. Instead of having everything tangled together, you separate objects based on purpose. Text goes on a text layer. Decorative elements go on decoration layers. Imported references go on a locked reference layer. Everybody gets a seat.
Step 8: Create Sublayers, Then Lock or Hide Layers as Needed
If a layer becomes crowded, create sublayers to break it up. This is especially useful for illustrations, icon systems, packaging layouts, and anything with multiple repeated parts. For instance, a single Character layer might contain sublayers for Face, Hair, Clothing, and Highlights.
After organizing, use visibility and locking controls to manage your workflow. Hide layers you do not need to see at the moment. Lock layers you do not want to accidentally select. This is one of the fastest ways to keep precision high, especially when you are refining small details.
By the time you reach this step, you are no longer just adding layers. You are building a file structure that is efficient, flexible, and far less likely to explode during revisions.
Quick Example: Building a Simple Poster with Layers
Let’s say you are designing a concert poster. A smart layer setup might look like this:
Background – gradient fill and texture
Photo – artist image or vector portrait
Decorative Shapes – stars, lines, abstract accents
Main Heading – event title
Details – date, location, ticket info
Guides/Reference – optional helper elements, locked
With that structure, you can hide the photo to work on typography, lock the background while adjusting details, and move decorative elements without disturbing the main text. That is the kind of control layers are designed for.
Common Mistakes to Avoid
Using One Layer for Everything
This is the most common beginner habit. It works for five minutes, then punishes you for the next two hours.
Forgetting to Rename Layers
Unnamed layers make simple edits slower. Naming as you go is much easier than decoding your own file later.
Ignoring Stacking Order
If something seems to vanish, it may not be gone. It may simply be hiding under another layer like a design gremlin.
Not Locking Finished Elements
If you have ever accidentally dragged your background by two pixels and spent ten minutes wondering why the layout feels “off,” this one is for you.
Pro Tips for Cleaner Illustrator Layer Management
Keep background elements near the bottom and text near the top for predictable structure. Group related objects before moving them to a new layer. Use sublayers when one major section contains many parts. Create a reference layer for sketches or placed images and lock it. If the Layers panel feels crowded, adjust panel display settings so it is easier to navigate complex files.
One more useful habit: organize as you build, not just after the mess appears. Illustrator will let you postpone order for quite a while. It will not reward you for it.
Final Thoughts
Learning how to add layers in Illustrator is not flashy, but it is foundational. It makes design work smoother, revisions faster, and complex files far less intimidating. Once you get used to building with layers from the start, you will wonder how you ever worked without them.
The actual button click is easy. The real skill is developing the habit of using layers intentionally. Name them clearly. Stack them logically. Hide and lock them when needed. Create sublayers when projects get dense. That simple discipline can transform Illustrator from “powerful but chaotic” into “powerful and surprisingly civilized.”
And honestly, that is what good workflow is all about: fewer surprises, better control, and more time spent designing instead of wrestling with your own file.
Practical Experience: What Designers Usually Learn After Using Layers for a While
Once people start using layers regularly in Illustrator, the biggest surprise is usually not how to create them, but how much calmer the entire design process becomes. Beginners often assume layers are just an optional extra, something professionals use because they enjoy making panels look tidy. Then they build a slightly more complicated file, try selecting one object in a crowded composition, and suddenly realize layers are not decoration. They are survival equipment.
A common experience happens during logo work. At first, everything may sit on one layer because the artwork seems simple: a symbol, a wordmark, maybe a shape behind it. But once variations begin, the project grows quickly. There is a horizontal version, a stacked version, a black-and-white version, and maybe a few experimental icon ideas off to the side. Without layers, selecting the right pieces becomes annoying fast. With layers, each version can live in its own organized section, and edits feel deliberate rather than desperate.
Another real-world lesson shows up when working with text. Designers often discover that keeping typography on a dedicated layer saves an absurd amount of time. Need to test a new background color? Lock the text layer. Need to compare two headline treatments? Hide one text layer and duplicate another. Need to export artwork without the notes and placeholders? Turn off the reference layer and move on with your life. It is a small workflow shift that makes Illustrator feel much more cooperative.
Layers also become incredibly useful when revising client work. Clients love revisions the way birds love singing and designers love coffee: consistently and with enthusiasm. A well-layered file makes these changes less painful. If a client asks to “make the icons bigger, but keep the headline where it is,” you can isolate that icon layer and edit with confidence. If they want the background pattern removed, you do not have to click around the artboard like you are defusing a bomb. You just hide or adjust the right layer.
Many users also learn that layers help them think more clearly about composition. Separating foreground, middle-ground, background, text, effects, and references forces better planning. Instead of dumping everything onto the page and hoping it behaves, you begin building the artwork with structure in mind. That planning often improves the design itself, not just the file organization.
Then there is the handoff experience. If artwork is heading into Photoshop, InDesign, or After Effects, layers become even more valuable. Motion designers, especially, tend to care a lot about properly separated Illustrator layers because organized elements translate better into animation workflows. A messy Illustrator file can still look nice on the screen, but it becomes much harder to reuse once another program or another teammate enters the picture.
Probably the most relatable experience of all is reopening an old file. If layers were named clearly and arranged well, the document feels familiar within seconds. If not, it feels like trying to read a map drawn by a raccoon. That alone convinces many designers to become layer believers for life.


