Table of Contents >> Show >> Hide
- Why chain tension matters (and why your saw cares a lot)
- Know what you’re adjusting (so the saw doesn’t feel like a mystery box)
- What “correct chain tension” looks like in real life
- When to check chain tension (without turning it into a full-time job)
- The safest way to get chain tension adjusted
- Common tension problems and what they usually mean
- Mistakes people make (so you don’t have to join the club)
- Chain-tension “supporting habits” that make life easier
- FAQ: The questions everyone asks (usually after the chain acts up)
- Real-World Owner Experiences: Lessons People Learn the Hard Way (and then never forget)
- Conclusion
Chainsaw chain tension is the “Goldilocks” setting of outdoor power equipment: too loose and things get sketchy;
too tight and your saw starts acting like it’s jogging in dress shoes. The sweet spot keeps the chain tracking
correctly on the guide bar, cutting smoothly, and reducing wear on expensive parts.
Important safety note: Chainsaws are inherently dangerous tools. If you’re inexperienced (or under 18),
the safest move is to have a trained adult, a certified arborist, or an authorized service shop handle adjustments and inspections.
Always follow your specific owner’s manual for your exact model.
Why chain tension matters (and why your saw cares a lot)
Proper chainsaw chain tension isn’t just a neatness thingit’s a performance and safety issue. When tension is off,
you can see faster wear, less efficient cutting, and a higher chance of the chain derailing (coming off the bar).
Most safety guidance and operator manuals emphasize checking chain tension before use because it directly affects control.
What can happen if the chain is too loose
- Derailment risk: A loose chain can hop out of the bar groove, especially during awkward cuts, pinches, or sudden stops.
- More vibration and rough cutting: The chain can chatter instead of glide, which makes cutting feel “jumpy.”
- Faster wear: Loose running can chew up the bar rails and drive components over time.
What can happen if the chain is too tight
- Heat and premature wear: Excess friction can accelerate wear on the bar and chain, and can stress the sprocket.
- Power loss: The saw works harder to spin the chain, which can make it feel sluggish.
- Higher chance of binding: A too-tight chain may not move freely, especially once debris or heat enters the equation.
In short: correct tension helps the chain stay seated, move freely, and cut like it means businesswithout grinding your hardware into an early retirement.
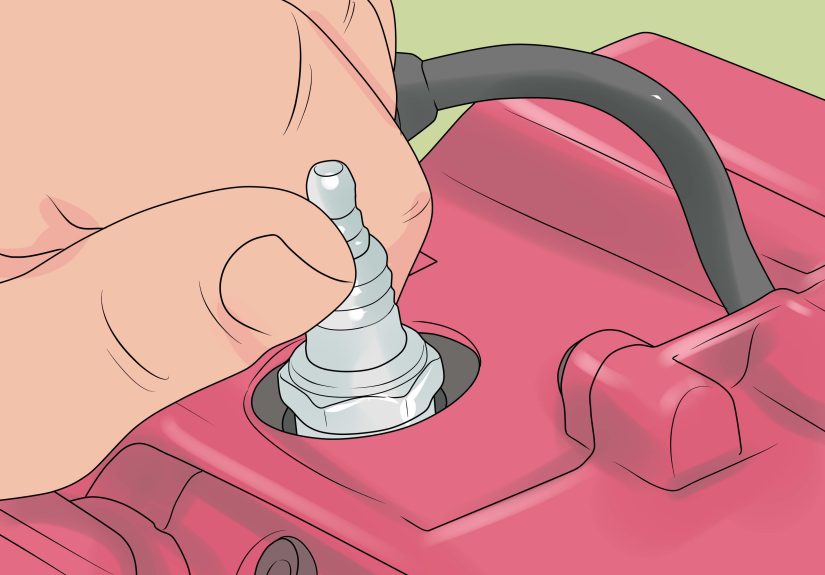
Know what you’re adjusting (so the saw doesn’t feel like a mystery box)
Before talking about tension, it helps to know the cast of characters involved:
- Saw chain: The cutting loop with teeth (cutters), tie straps, and drive links.
- Drive links: The “shark-fin” pieces that ride in the guide bar groove and engage the sprocket.
- Guide bar: The long bar that guides the chain.
- Sprocket cover / side cover: The cover that holds the bar in place on many saws.
- Tensioner: A mechanism (often a screw-based adjuster) that shifts bar position to set chain tension.
- Chain brake: A safety device designed to stop the chain in certain situations, including kickback events.
Two common tensioning styles
Most chainsaws fall into one of these camps:
- Tool-adjusted tensioning: Often involves a “scrench” (a combo wrench/screwdriver tool). The bar is clamped by fasteners, and the tensioner changes bar position.
- Tool-less tensioning: Often uses knobs/dials that allow adjustments without separate tools, common on some cordless and homeowner models.
Your manual is the ultimate referee herebrands and models vary, and the “where” and “how” depend on your saw’s design.
What “correct chain tension” looks like in real life
Manuals and training materials commonly describe correct tension with the same general idea:
the chain should sit snugly in the bar groove, not sag along the underside of the bar, and still be able to move freely
when checked safely (typically with gloves and the saw powered off).
Quick signs you’re in the right zone
- No droop: The chain doesn’t visibly hang below the bar.
- Snug contact: The drive links remain seated in the bar groove during inspection.
- Free movement: The chain can be rotated along the bar when checked safely according to the manufacturer’s guidance.
- “Snap-back” behavior: Many manuals describe a gentle pull-away check where the chain returns neatly to the bar rather than staying slack.
Hot vs. cold: the tension “shape-shifter” problem
Here’s the sneaky part: chain tension changes with temperature. During use, heat and normal wear can alter how the chain fits.
When the saw cools, the chain can contract. That’s why many guides warn against leaving a chain overly tight after cutting
and stress rechecking tension as conditions change.
New chains stretch (and they’re not shy about it)
A brand-new chain often “beds in” during early use. Translation: you may need more frequent checks during the first session or two.
This is normallike breaking in new boots, except the boots are sharp and the stakes are higher.
When to check chain tension (without turning it into a full-time job)
The most common recommendation across safety guidance and manuals is to check chain tension before starting work.
After that, smart checkpoints are the moments when tension is most likely to change.
- Before each use: A quick pre-flight checklike buckling your seatbelt, but louder.
- After the first few cuts: Especially with a new chain, tension can change early.
- After refueling or battery swaps: You’re already pauseduse that break wisely.
- After the saw cools: Cooling can change the fit, and some manuals warn about over-tightness after cooling.
- Any time cutting suddenly feels “off”: More vibration, wandering cuts, unusual noise, or rough feed can justify stopping and inspecting.
If you’re ever unsure, the safest choice is to stop using the saw and have someone qualified inspect it.
“I’ll just finish this one cut” is how tools win arguments.
The safest way to get chain tension adjusted
If you’re not trained, the best “how-to” is actually a “who-to.” An authorized service shop or a knowledgeable adult can:
verify the correct chain and bar match, inspect the tensioner mechanism, check bar rail wear, and make sure the sprocket and drive components are healthy.
What to tell the person helping you
- Your chainsaw brand and model number
- Bar length
- Chain specs (pitch, gauge, and drive link countusually listed on the bar or chain packaging)
- What you’ve noticed (chain loosens quickly, binds, makes noise, cuts crooked, etc.)
What a good helper will typically check
- Chain-to-bar fit: Wrong gauge or mismatched components cause constant problems.
- Bar rail condition: Worn rails can make tension seem “impossible” to hold.
- Tensioner engagement: If the tensioner pin/adjuster isn’t seated correctly, the chain may loosen repeatedly.
- Sprocket wear: A worn sprocket can contribute to uneven running and accelerated chain wear.
- Lubrication flow: Poor bar oiling increases heat and wear, which can affect how the chain behaves.
Common tension problems and what they usually mean
“My chain keeps loosening no matter what.”
This often points to one of a few culprits: a new chain settling in, bar fasteners that aren’t holding clamping pressure,
a tensioner mechanism that isn’t engaging correctly, or component wear (bar rails, sprocket, or chain).
If it loosens repeatedly during normal cutting, stop using the saw and have it inspected.
“My chain feels tight and the saw bogs down.”
Over-tension is a common cause of sluggish chain movement. Excess friction can make the saw feel underpowered,
increase heat, and accelerate wear. A qualified person can verify tension and inspect for debris in the bar groove or lubrication issues.
“The cut pulls to one side.”
This is often blamed on tension, but it’s frequently a sharpening or bar-wear issue: uneven cutter lengths, incorrect filing angles,
or uneven bar rails. Tension might contribute, but it’s not always the main villain in the story.
Mistakes people make (so you don’t have to join the club)
- Adjusting while the chain is hot: Many manuals warn that heat changes chain length; tension set “just right” hot can become too tight when cool.
- Over-tightening “for safety”: Tight isn’t automatically safetoo tight creates heat and wear, and can reduce free movement.
- Ignoring lubrication: Poor bar oiling raises friction and wear, which can make tension seem unstable.
- Forgetting the basics: Using the wrong chain size/spec for the bar can cause constant tension trouble.
- Not inspecting the bar groove: Packed debris can keep the chain from seating correctly.
Think of chain tension like shoelaces: you want them secure enough to run, but not so tight your toes go numb halfway down the driveway.
Chain-tension “supporting habits” that make life easier
Stable tension is often the result of overall maintenance, not a single adjustment. If your saw is clean, lubricated, and correctly matched,
tension checks become quick and predictable.
Helpful maintenance habits
- Keep the bar groove and oiling path clean: Debris can affect how the chain seats and wears.
- Rotate the guide bar periodically: This helps promote even wear on the rails.
- Inspect drive components: Sprockets and bars wear over time; worn parts can make tension inconsistent.
- Sharpen properly: A sharp chain cuts with less forcing, which reduces stress on the bar-and-chain system.
- Follow storage guidance: Some manufacturers advise relieving tension for storage on certain designs to reduce stress on parts.
FAQ: The questions everyone asks (usually after the chain acts up)
How tight should a chainsaw chain be?
In general terms used by many manuals: snug in the bar groove, no sag underneath, and it should still move freely when checked safely with the saw off.
Exact guidance varies by model, so the owner’s manual is the most accurate source.
How often should I check chain tension?
Most safety materials recommend checking before each use. It’s also smart to recheck during workespecially early with a new chain,
after breaks, or when the saw cools.
Why does my chain get loose so fast?
Common reasons include normal break-in stretch, wear on the bar or sprocket, a tensioner that isn’t seated or functioning correctly,
or a mismatch between chain and bar specifications.
Is it dangerous to run a loose chain “just for one cut”?
It can be. A loose chain increases the risk of derailment and unpredictable behavior. The safest choice is to stop and have it corrected
according to the manufacturer’s instructions.
Real-World Owner Experiences: Lessons People Learn the Hard Way (and then never forget)
The internet is full of chainsaw stories that start with confidence and end with someone saying, “Well, that was… educational.”
While every saw model is different, the pattern of chain tension problems is surprisingly consistent.
Here are common real-world experiences owners reportshared here as cautionary tales, not a DIY invitation.
1) The “brand-new chain” surprise
A lot of first-time owners describe the same moment: the saw is fresh out of the box, the chain looks fine, and the first few cuts feel great.
Then suddenly the chain seems looser, the cut feels rougher, and the operator starts wondering if the saw is “defective.”
In many cases, it’s simply the break-in period. New chains can settle quickly, and owners who don’t expect that change may keep pushing
instead of pausing for inspection. The lesson people share afterward is simple: treat early sessions like a “getting to know you” phase.
Expect checks, and don’t assume one setup stays perfect forever.
2) The “why does it smell hot?” moment
Another common story comes from the opposite end of the tension spectrum: someone tightens the chain to feel extra safe,
then notices the saw doesn’t seem to “spin up” as easily. Cutting becomes slower, the tool feels strained, and sometimes the bar area gets hotter than expected.
Owners frequently describe this as the day they learned that “tight” is not the same as “right.”
Afterward, many people adopt a new rule: if the chain doesn’t move freely during a proper inspection,
something is offeither tension, cleanliness, lubrication, or all three.
3) The “it keeps coming loose” frustration spiral
Few things test patience like a chain that won’t stay consistently tensioned. People often recount stopping repeatedly,
checking again, adjusting again, and still seeing the chain loosen during normal work.
In these stories, the eventual fix often isn’t “more adjusting,” but addressing a root cause:
worn parts (like a bar or sprocket), a tensioner issue, hardware that isn’t holding clamping pressure, or a chain/bar mismatch.
The takeaway experienced users repeat is: persistent tension problems are a maintenance and inspection problem, not a willpower contest.
If the saw can’t hold tension, it’s time for a qualified inspectionbecause forcing continued operation is a risk.
4) The “I didn’t realize dirt mattered” revelation
A surprisingly common experience is learning how much tiny debris affects performance. Owners describe cutting low stumps,
brushing the ground, or working in dusty conditions and then noticing inconsistent behavior afterward.
Many people only discover later that debris in the bar groove or poor lubrication flow can change how the chain seats and wears.
After that, they become the person who says things like “clean the bar groove” at parties (which is a great way to get extra guacamole all to yourself).
5) The “I asked for help and it saved me money” win
Not all stories are cautionarysome are refreshingly practical. Plenty of owners describe taking a problem saw to a service shop or asking a more experienced adult,
and discovering an easy-to-miss issue (wrong chain gauge, worn bar rails, a damaged adjuster, or a lubrication blockage).
The common theme is that a quick, expert look prevented replacing parts unnecessarilyor worse, using a saw in unsafe condition.
If you want a true “pro tip,” it’s this: when chainsaw behavior becomes unpredictable, the smartest move is to stop and get qualified help.


