Table of Contents >> Show >> Hide
- Why Shower Caulk Matters More Than Most People Think
- Signs It Is Time to Re-Caulk Your Shower
- What Type of Caulk Is Best for a Shower?
- Tools and Materials You Will Need
- How to Caulk a Shower: Step-by-Step
- Where to Caulk in a Shower
- Common Shower Caulking Mistakes to Avoid
- How to Keep New Shower Caulk Looking Good
- What a Good Caulk Job Should Look Like
- Final Thoughts on How to Caulk a Shower
- Real-World Experiences With Caulking a Shower
If your shower caulk is cracked, peeling, moldy, or hanging on by pure stubbornness, it is time for a refresh. The good news is that learning how to caulk a shower is one of those rare DIY jobs that is affordable, beginner-friendly, and wildly satisfying. You spend a little time scraping, squeezing, and smoothing, and suddenly your bathroom looks cleaner, fresher, and far less likely to let water sneak into places where water absolutely should not live.
Shower caulk is not there just to look neat. It helps seal joints where different surfaces meet, especially inside corners, along the shower pan, around a tub-shower combo, and near trim or fixtures. Those areas move slightly over time as materials expand, contract, and flex. Grout is rigid. Caulk is flexible. That is why the right caulk matters, and why old, failing caulk needs to go instead of getting covered up with a hopeful second layer and a prayer.
In this guide, you will learn exactly how to recaulk a shower the right way, what tools to use, which mistakes to avoid, and how to get a smooth, watertight finish that does not scream, “I panicked halfway through.”
Why Shower Caulk Matters More Than Most People Think
A failing caulk joint is not just a cosmetic issue. Sure, it looks bad. But the bigger problem is what happens behind the scenes. When water slips into seams around the shower walls, base, or corners, it can lead to mildew, mold, soft drywall, damaged backer materials, and a whole chain of expensive headaches. In other words, a $10 tube of caulk can stand between you and a much larger bathroom repair bill.
Fresh caulk also makes cleaning easier. A smooth, continuous bead leaves fewer places for soap scum, grime, and mold to settle in. So yes, caulking is technically maintenance, but it is also a nice little bathroom glow-up.
Signs It Is Time to Re-Caulk Your Shower
Not sure whether your shower needs new caulk? Here are the biggest clues:
- Visible cracks or gaps in the caulk line
- Caulk that is peeling, shrinking, or pulling away from the wall
- Dark spots or mold that keep returning after cleaning
- Sections that feel loose or rubbery in a bad way
- Missing caulk in corners or where the wall meets the shower base
- A shower that looks clean everywhere except along the seams, where it looks like a haunted geology project
If you see any of those, do not just caulk over the old bead. New caulk sticks best to a clean, dry surface, not to failing material that is already halfway checked out.
What Type of Caulk Is Best for a Shower?
For most shower projects, the best choice is a 100% silicone kitchen and bath caulk or a bathroom-specific silicone sealant labeled waterproof and mold- or mildew-resistant. Silicone is popular for showers because it stays flexible, handles moisture well, and creates a durable seal in wet areas.
You may also see siliconized acrylic or latex-based bathroom caulk. Those are often easier to apply and clean up, but pure silicone generally holds up better in high-moisture areas like shower corners and seams. If you want longevity, silicone is usually the safer bet.
A few quick tips when choosing:
- Use bathroom or kitchen-and-bath caulk, not general-purpose caulk
- Pick a mildew-resistant formula for a humid bathroom
- Choose white, clear, or color-matched caulk depending on your shower materials
- Check the label for cure time because “dry to the touch” and “ready for daily shower use” are not the same thing
One more thing: silicone is usually not paintable. So if color matters, choose carefully before you start squeezing.
Tools and Materials You Will Need
- Bathroom-grade silicone caulk
- Caulk gun
- Utility knife or razor scraper
- Caulk remover gel or solvent if needed
- Putty knife or caulk removal tool
- Painter’s tape
- Paper towels or clean rags
- Rubbing alcohol or mineral spirits for stubborn residue
- Mild cleaner or mold-removing bathroom cleaner
- Gloves
- Optional caulk finishing tool
If the joint is unusually wide, you may also need a backer rod. That is a foam filler used behind caulk in larger gaps so you do not waste half a tube trying to fill a canyon.
How to Caulk a Shower: Step-by-Step
Step 1: Remove the Old Caulk Completely
This is the least glamorous part of the project, but it is also the part that decides whether your new caulk will last. Use a utility knife, razor scraper, or caulk removal tool to cut along both sides of the old bead. Peel away as much as you can by hand. For stubborn bits, apply a caulk remover and let it soften the material before scraping again.
Take your time here. If old silicone residue is left behind, the new bead may not bond properly. Think of this as bathroom surgery, except your patient is a corner seam and the mood is slightly less dramatic.
Step 2: Clean the Joint Thoroughly
Once the old caulk is out, clean the area well. Remove soap scum, dust, and any mold or mildew. If mold is present, treat it first so you are not sealing over a science experiment. Rinse the area and wipe it down.
If there is leftover silicone film, rubbing alcohol or mineral spirits can help loosen and remove residue. Just make sure whatever cleaner or solvent you use is appropriate for your shower surface. Fiberglass, acrylic, tile, glass, and stone do not all appreciate the same chemistry.
Step 3: Let Everything Dry Completely
This step is where many DIY jobs go sideways. Caulk does not like wet joints. Even a little trapped moisture can ruin adhesion and invite future mold.
Dry the area with towels, then let it air-dry thoroughly. If possible, leave the shower unused overnight, run the exhaust fan, and keep the bathroom ventilated. A hair dryer on a cool or low setting can help in a pinch, but patience is still your best friend.
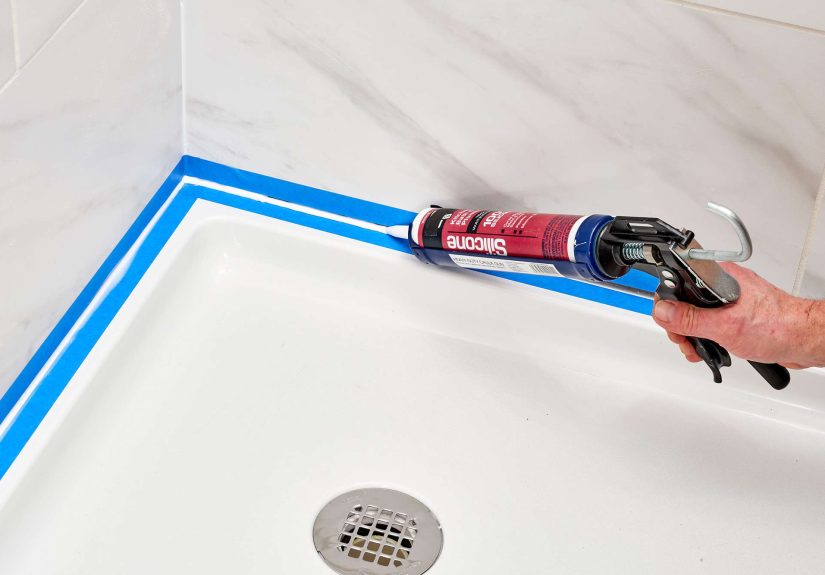
Step 4: Tape the Edges for a Cleaner Line
If you want a neat bead, run painter’s tape along both sides of the joint. Leave a narrow channel for the caulk, usually just wide enough to cover the seam. This trick makes a huge difference, especially if you are new to caulking or if your hands become weirdly theatrical the second a caulk gun appears.
Tape is optional, but it can make the final result look much more professional.
Step 5: Prep the Caulk Tube
Cut the nozzle at a 45-degree angle. Start with a small opening. A smaller cut gives you more control and reduces the odds of laying down a bead the size of a breadstick. If your tube has an inner seal, puncture it using the tool built into the caulk gun or a long nail.
Load the tube into the caulk gun and test a short bead onto cardboard or scrap paper first. This helps you get a feel for the trigger pressure and flow before you commit to the actual shower seam.
Step 6: Apply the Caulk
Place the nozzle at the joint and move steadily with even pressure. Many pros like to push the bead slightly ahead of the nozzle instead of dragging it behind, because that helps force the sealant into the gap. Keep the gun at a consistent angle and try to apply one smooth, continuous line per section.
Start with vertical corners, then work along horizontal seams. Do not stop every three inches unless you enjoy the look of lumpy topography.
The goal is not to pile on the maximum amount of caulk. The goal is to lay down enough to fill the seam cleanly and evenly.
Step 7: Smooth the Bead Right Away
After applying the bead, smooth it immediately with a caulk finishing tool or a gloved finger. This presses the caulk into the joint and removes excess material. Keep a paper towel or rag nearby to wipe off buildup as you go.
If you used painter’s tape, remove it while the caulk is still wet. Pull it away carefully at an angle so you do not disturb the fresh bead. Then do a final light smoothing pass if needed.
Step 8: Let It Cure Before Using the Shower
This is not the moment for impatience. Some bathroom silicones are water-ready fairly quickly, while others need a full 24 hours or more before regular exposure to moisture. Always follow the label on your product.
If you use the shower too soon, you can ruin the seal before it has a chance to cure. That means all your scraping, cleaning, taping, and careful bead work will be rewarded with disappointment and possibly new curse words. Let it cure properly.
Where to Caulk in a Shower
If you are unsure where the caulk belongs, focus on joints where two different planes or materials meet, such as:
- Inside vertical corners
- Where the wall meets the shower pan or tub
- Around trim plates and escutcheons if needed
- Seams in some shower surround systems, based on manufacturer directions
In tiled showers, corners and movement joints are typically caulked rather than grouted because those areas need flexibility. If your shower system has specific installation instructions, follow those first.
Common Shower Caulking Mistakes to Avoid
Caulking Over Old Caulk
This is the classic shortcut that creates a not-so-classic failure. If the old caulk is loose, moldy, or dirty, new caulk over the top will not fix the root problem.
Using the Wrong Product
Interior paint caulk and basic latex caulk are not built for constant moisture. Use a shower-safe, waterproof, bathroom-rated formula.
Skipping the Drying Time
Even the best sealant will struggle if you apply it onto a damp seam.
Cutting the Nozzle Too Large
A giant opening makes it harder to control the bead and easier to make a mess.
Using Too Much Caulk
More is not better. A clean, well-tooled bead beats a thick, gummy line every time.
Ignoring Cure Time
A shower is a wet, humid environment. Give the product enough time to set up before water exposure.
How to Keep New Shower Caulk Looking Good
Once your shower is freshly caulked, a little maintenance helps it stay that way longer.
- Use the bathroom fan during and after showers
- Wipe down excess water when possible
- Clean the shower regularly so soap scum does not build up on the bead
- Avoid overly harsh cleaners that can wear down sealant
- Check seams periodically for cracks or separation
A few minutes of upkeep beats redoing the whole job earlier than necessary.
What a Good Caulk Job Should Look Like
A properly caulked shower should have a bead that is smooth, continuous, and firmly bonded on both sides of the joint. It should not have bubbles, gaps, jagged breaks, or giant globs that look like cake frosting gone rogue. The caulk should be just wide enough to seal the seam and neat enough that you stop noticing it after the first day. That is the sweet spot.
Final Thoughts on How to Caulk a Shower
Caulking a shower is one of those projects that seems small until you realize how much it affects the look and health of your bathroom. Done well, it keeps water out, slows mold growth, and makes the whole shower look cleaner and newer. Done badly, it becomes the bathroom equivalent of a bad haircut: impossible not to notice, hard to ignore, and more expensive if neglected long enough.
The good news is that this is a very learnable DIY skill. Remove the old caulk completely, clean the area well, let it dry, choose the right bathroom silicone, apply a controlled bead, smooth it neatly, and let it cure. That is the formula. Nothing mystical. Just careful prep, steady hands, and enough restraint not to test the shower “just for one quick rinse.”
If your current shower seams are cracked, moldy, or peeling, this is your sign. Grab the caulk gun. The bathroom has seen things, and today is the day you help it recover.
Real-World Experiences With Caulking a Shower
The funny thing about learning how to caulk a shower is that it almost always starts with confidence and ends with humility. Most people go into the project thinking, “How hard can it be?” Then the old caulk refuses to come out in one satisfying strip, the new bead starts too thick, and suddenly the shower corner looks like a frosting bag exploded. That is a normal part of the learning curve.
A very common first-time experience is underestimating the prep work. People imagine the job is mostly about squeezing new caulk into place, but the real work is removing every last bit of the old material and getting the surface truly clean and dry. That can take longer than expected, especially in older showers where the caulk has hardened, shrunk, or bonded itself like it signed a long-term lease. The upside is that once people do the prep properly, the actual caulking goes much more smoothly.
Another common lesson is that less caulk usually looks better. First-timers often cut the nozzle too wide, pull the trigger too hard, and end up laying down a bead thick enough to survive a hurricane. Then comes the frantic smoothing phase, where half the caulk ends up on a glove, a rag, and somehow one elbow. After that experience, most DIYers become believers in the “small tip, steady pressure, slow pass” method. It is one of those home-improvement truths that only fully clicks after you have made one very ugly bead.
People also tend to discover that painter’s tape is not just for perfectionists. It is for anyone who wants to avoid explaining weird zigzag caulk lines to guests. Taping the seam can make a beginner look far more experienced than they feel. It adds a few extra minutes, but it often saves a lot of cleanup and regret. The same goes for testing the bead on cardboard first. It sounds unnecessary until you realize the first squeeze from a fresh tube can be wildly enthusiastic.
Then there is the patience lesson. One of the most relatable experiences is finishing the job, admiring the clean new lines, and immediately wanting to use the shower. But cure time is where discipline matters. Plenty of people have done a beautiful caulk job only to compromise it by letting steam, splashes, or direct water hit it too soon. Waiting can feel annoying, but redoing the entire seam feels much worse.
There is also a quiet satisfaction that comes with getting it right. Even if the process is mildly messy, even if the old caulk fought back like a villain in a low-budget action film, the final result can make the whole shower look dramatically fresher. It is one of those repairs that does not require special electrical knowledge, expensive tools, or a week of demolition. You just need care, patience, and a willingness to scrape old caulk without questioning every choice that led you there.
Over time, many homeowners end up seeing shower caulking as a maintenance skill rather than a dreaded repair. Once you have done it once, future touch-ups feel less intimidating. You know what bead size works, what tape spacing looks best, how long the drying phase really takes, and which corners are likely to need attention first. In that sense, learning how to caulk a shower is a very practical win. It saves money, improves the bathroom, and gives you one more home skill that makes adult life feel slightly less chaotic, even if your first attempt included a few moments of dramatic whispering at a caulk gun.


