Table of Contents >> Show >> Hide
- What Is Landscape Mode in Word?
- How to Change the Entire Document to Landscape Mode
- How to Change Only One Page to Landscape in Word (Fastest Method)
- How to Make a Specific Page Landscape Using Section Breaks (Manual Method)
- How to Change All Pages After the Cursor to Landscape
- Common Problems and How to Fix Them
- Word for the Web vs. Desktop Word
- Best Practices for Clean Formatting
- Practical Examples of When to Use Landscape Pages
- of Real-World Experience and Tips (Because This Is Where the Pain Happens)
- Final Thoughts
If you’ve ever tried to squeeze a wide table, chart, org chart, or screenshot into a normal Word page, you already know the feeling: the document starts looking like it’s wearing jeans two sizes too small. That’s where landscape mode in Microsoft Word saves the day.
In this guide, you’ll learn exactly how to change a page to landscape mode in Wordwhether you want to rotate the entire document, just one page, or a specific section. I’ll also cover the most common mistakes (hello, accidental “the whole document is sideways now” moment), plus practical troubleshooting tips for Windows and Mac.
The goal is simple: get your content to fit cleanly, keep your formatting intact, and avoid the classic Word meltdown that happens five minutes before a deadline.
What Is Landscape Mode in Word?
Microsoft Word gives you two page orientations:
- Portrait: taller than it is wide (the default for most documents)
- Landscape: wider than it is tall (great for wide content)
Landscape pages are especially useful for:
- Large tables and spreadsheets pasted into Word
- Charts, dashboards, and data visualizations
- Timelines and process diagrams
- Images that lose readability when shrunk
- Appendices or exhibits in reports, proposals, and dissertations
And yes, you can absolutely mix portrait and landscape pages in the same document. The trick is understanding how sections work in Word.
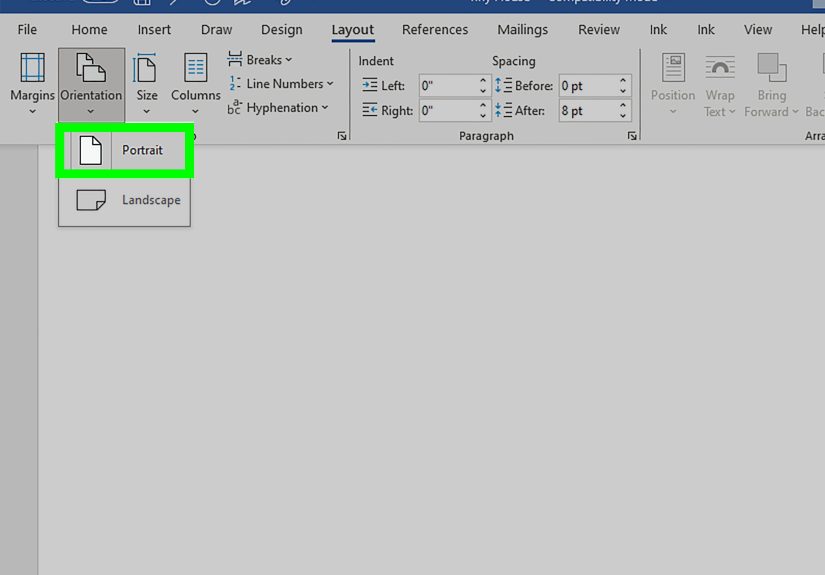
How to Change the Entire Document to Landscape Mode
If every page in your document needs to be horizontal, this is the easiest method.
Windows (and most desktop Word versions)
- Open your Word document.
- Go to the Layout tab.
- Click Orientation.
- Select Landscape.
That’s it. Word will apply landscape orientation to the whole document.
Mac
- Open your document in Word for Mac.
- Go to the Layout tab and choose Orientation.
- Select Landscape.
If you plan to print, always open File > Print and confirm the print settings show landscape orientation. This quick check can prevent a “why is my printer undoing my work?” moment.
How to Change Only One Page to Landscape in Word (Fastest Method)
This is the method most people actually need. You have a mostly portrait document, but one page (usually a table or image page) needs more horizontal space.
The fastest way is to apply orientation to selected text/content.
Step-by-Step (Windows)
- Select the content you want on the landscape page (text, table, image, chart, etc.).
- Go to Layout.
- Open the Page Setup dialog box launcher (small arrow in the Page Setup group).
- Under Orientation, choose Landscape.
- In Apply to, choose Selected text.
- Click OK.
Word typically creates the needed section formatting behind the scenes, so your selected content lands on a landscape page while the rest of the document stays portrait. Magic? No. Sections. But it feels like magic.
Step-by-Step (Mac)
- Select the content you want to rotate to landscape.
- Go to Format > Document (or use the document/page setup path depending on your Word version).
- Open Page Setup.
- Choose Landscape under Orientation.
- Set Apply to as Selected text.
- Click OK.
Important: If your content has wrapped images, floating objects, or complex tables, Word may reflow text and push some content to another page. That doesn’t mean you did it wrongit means Word is being Word. You may need to adjust spacing, margins, or image wrapping.
How to Make a Specific Page Landscape Using Section Breaks (Manual Method)
If the “Selected text” method doesn’t behave nicely (common in complex documents), use manual section breaks. This gives you more control and is the best option for reports, legal documents, academic papers, and anything with strict formatting.
Why Section Breaks Matter
Page orientation is a section-level setting in Word. That means if you want one page to be different from the rest, you need to isolate it in its own section.
Manual Section Break Method (Windows)
- Place your cursor at the beginning of the page you want to make landscape.
- Go to Layout > Breaks.
- Under Section Breaks, choose Next Page.
- Now place your cursor at the beginning of the page after the one you want in landscape.
- Go to Layout > Breaks again and choose Next Page.
- Click anywhere on the page you want to change.
- Go to Layout > Orientation and choose Landscape.
This rotates only that section (the page between your two section breaks). Everything before and after stays portrait.
Mac Version (Manual Method)
- Insert section breaks before and after the page you want to change.
- Click inside the target section.
- Open Format > Document, then Page Setup.
- Choose Landscape.
- In Apply to, select This section (if shown) or the equivalent section-specific option.
- Click OK.
This method is a little more manual, but it gives you cleaner control over long documents and reduces “surprise formatting” later.
How to Change All Pages After the Cursor to Landscape
Sometimes you don’t need just one page. Maybe the rest of your document (like an appendix or image gallery) should be landscape from a certain point onward.
In that case, use the Apply to: This point forward option.
- Click where you want the new orientation to begin.
- Open the Page Setup dialog box.
- Choose Landscape.
- Set Apply to to This point forward.
- Click OK.
This is a huge time-saver when you’re building multi-part documents and don’t want to insert breaks manually page by page.
Common Problems and How to Fix Them
1) “Word changed the whole document to landscape”
You probably used Layout > Orientation > Landscape directly without selecting text or isolating a section. That command changes the active section, which is often the entire document.
Fix: Undo, then use the Page Setup dialog and set Apply to: Selected text (or create section breaks manually).
2) “My next pages also became landscape”
You inserted only one section break before the target page but not one after it.
Fix: Insert another Next Page section break after the landscape page, then switch the following section back to portrait.
3) “My page numbers/header/footer look weird now”
Section breaks can affect headers, footers, and page numbering. If needed, edit the header/footer in the new section and check whether Link to Previous is turned on or off.
4) “My content moved to a new page”
Landscape orientation changes the page shape, and Word may reflow wrapped text or objects. Tables and floating images are common troublemakers.
Fix: Adjust image wrap settings, reduce margins slightly, shrink the table width, or move captions to separate lines.
5) “I can’t see what’s happening with section breaks”
Turn on formatting marks. Go to Home and click Show/Hide (¶). This helps you see page breaks and section breaks so you can troubleshoot like a pro instead of guessing like a gremlin.
Word for the Web vs. Desktop Word
If you’re working in Word for the web, keep expectations realistic. Basic orientation features may be available, but section-level formatting tasks (like inserting/changing section breaks for one-page landscape layouts) are limited compared with desktop Word.
Translation: if you need mixed portrait and landscape pages in one document, open it in the desktop version of Word. It will save you time, formatting headaches, and at least one dramatic sigh.
Best Practices for Clean Formatting
- Save a copy first before major layout changesespecially in long reports.
- Use section breaks intentionally; too many can make editing harder later.
- Turn on Show/Hide (¶) when troubleshooting.
- Check print preview before finalizing or exporting to PDF.
- Test with one page first if your document contains lots of tables, text wrapping, or complex headers/footers.
- Keep captions and tables together to reduce layout shifts after orientation changes.
Practical Examples of When to Use Landscape Pages
Example 1: Financial Report Table
You have a quarterly comparison table with 12 columns. In portrait mode, the text becomes microscopic. Changing that one page to landscape keeps the table readable without reducing the font to “ant-sized.”
Example 2: Research Paper Appendix
Your paper is portrait, but one appendix contains a wide chart. Use section breaks before and after that page so the appendix page goes landscape while the rest stays aligned with your formatting rules.
Example 3: Resume Portfolio or Project Proposal
Most of the document is portrait text, but one page includes a timeline or visual workflow. Make only that page landscape to preserve legibility and design quality.
of Real-World Experience and Tips (Because This Is Where the Pain Happens)
The most common real-world experience with changing a page to landscape in Microsoft Word goes something like this: you click Orientation > Landscape, feel proud for half a second, and then discover your entire document has rotated. Page numbers shift, tables move, and a previously calm Tuesday becomes a formatting crime scene. If that sounds familiar, congratulationsyou’re using Word like the rest of us.
In practice, people usually run into this issue when they’re adding one “problem page” near the end of a project. It’s often a wide table from Excel, a gantt chart screenshot, a marketing performance dashboard, or a legal exhibit. The document is nearly done, so nobody wants to rebuild formatting from scratch. That’s why the Selected text method is such a lifesaver for quick fixes. It’s fast, and in many cases Word quietly inserts the necessary section formatting for you.
That said, experienced users learn pretty quickly that “fast” and “stable” are not always the same thing in Word. If a page includes floating images, text wrapping, grouped shapes, or captions anchored to objects, the automatic method can create odd spacing. A table may jump to the next page. A caption might detach and wander off like it pays rent elsewhere. In those situations, manual section breaks are not overkillthey’re the grown-up solution.
Another real-world lesson: print preview catches mistakes your editing view hides. A page can look fine while editing, then print with clipped margins or unexpected scaling if the printer settings don’t match your orientation. People often blame Word, but sometimes the printer dialog is the secret villain. A quick check in File > Print saves a lot of frustration.
Academic and legal users have their own version of this adventure. They often need one landscape page and consistent page numbering, headers, and formatting rules. In those documents, section breaks are essential, but they also affect headers/footers. The fix is to treat each section like a mini-document: verify orientation, check header/footer linkage, confirm page numbering, and only then move on. It sounds tedious, but it prevents late-stage formatting disasters.
One of the best habits I’ve seen from power users is this: before changing orientation, they turn on Show/Hide (¶) and make a duplicate copy of the document. That tiny two-minute step makes troubleshooting dramatically easier. You can see exactly where section breaks are, and if something goes sideways (sometimes literally), you have a backup.
Final experience-based tip: if you know a document will need multiple landscape pages, plan sections early. Adding them at the end works, but planning ahead keeps headers, page numbering, and layout cleaner. Word behaves much better when you’re deliberate. It still has moods, of coursebut fewer.
Final Thoughts
Changing a page to landscape mode in Microsoft Word is easy once you know which method matches your situation. For a full document, use Layout > Orientation. For one page or selected content, use the Page Setup dialog and apply it to Selected text. For complex documents, use section breaks before and after the target page.
The big takeaway: landscape mode isn’t hardWord just hides the good stuff behind section formatting. Once you understand that, you can format reports, resumes, research papers, and proposals without turning your entire document into a sideways accident.


