Table of Contents >> Show >> Hide
- Before You Start: A 2-Minute Grout Reality Check
- Your Pantry-Staple Grout-Cleaning Toolkit (and What Each One Does)
- Step Zero: Prep Like a Pro (So You’re Not Scrubbing Dirt Soup)
- Method 1: Dish Soap + Warm Water (Best for Greasy Grout in Kitchens)
- Method 2: Baking Soda + Water Paste (Everyday “Maintenance Clean”)
- Method 3: The Brightening Trio (Baking Soda + Hydrogen Peroxide + Dish Soap)
- Method 4: Baking Soda + Vinegar (Use Carefully and Briefly)
- Method 5: Oxygen Bleach Soak (For Stubborn Stains on Durable Tile)
- Safety Rules (Because Grout Isn’t Worth a Trip to the ER)
- Rinse and Dry Like You Mean It (This Is Where Most People Lose the Plot)
- Seal the Deal: Should You Seal Grout After Cleaning?
- Keep It Clean Longer: Low-Effort Habits That Pay Off
- Troubleshooting: When Grout Won’t Cooperate
- Conclusion
- Extra: Real-Life Experiences With Pantry-Staple Grout Cleaning (About )
Grout has one job: quietly hold your tile together and never draw attention to itself. Unfortunately, grout is also the
world’s most talented dirt collector. It’s porous, slightly textured, and usually a light colorbasically a welcome mat
for soap scum, cooking grease, hard-water minerals, and whatever that mystery “how did it get there?” film is.
The good news: you don’t need a cabinet full of specialty sprays to get grout looking fresh again. With a few pantry
staples (plus a brush and a little patience), you can lift grime, brighten discoloration, and keep it from turning
dingy again next week.
Before You Start: A 2-Minute Grout Reality Check
1) Know what you’re cleaning (so you don’t accidentally make it worse)
- Cement-based grout (most common) is porous and can absorb stains. It usually responds well to gentle abrasives and oxygen-based cleaners.
- Epoxy grout is more stain-resistant and less porous. It cleans up easily, but you still want to avoid harsh abrasives that can dull tile.
- Natural stone tile (marble, travertine, limestone) is sensitive to acids. Skip vinegar and lemon on these surfaces.
2) Do a quick test patch
Pick a tiny, out-of-the-way spot. Apply your chosen cleaner, wait the recommended time, scrub lightly, then rinse.
If the tile dulls, the grout softens, or color lifts, switch methods.
3) Ventilation and gloves aren’t “extra,” they’re “smart”
Even gentle DIY cleaners can irritate skin, and scrubbing can kick up grime. Crack a window, run the bathroom fan,
and wear gloves if your hands deserve joy.
Your Pantry-Staple Grout-Cleaning Toolkit (and What Each One Does)
- Baking soda: mild abrasive + deodorizer; helps scrub without scratching most tile.
- Dish soap: cuts grease and helps lift oily grime so it rinses away.
- White vinegar: dissolves some mineral buildup/soap scum; best used carefully and briefly on appropriate surfaces.
- Hydrogen peroxide (3%): gentle oxidizer that can brighten and help with organic stains.
- Oxygen bleach powder (often sodium percarbonate, like many “oxygen cleaners”): boosts stain-lifting power when mixed with warm/hot water.
- Salt: adds extra scrub power in a pinch (use lightly; avoid on delicate tile finishes).
- Warm water + microfiber cloth: underrated and essentialmost success comes from good rinsing and drying.
Step Zero: Prep Like a Pro (So You’re Not Scrubbing Dirt Soup)
- Remove surface debris: Sweep/vacuum floors or wipe tile down with a damp cloth.
- Pre-wet lightly: For floors or very dry grout, a light mist of warm water helps cleaners spread evenly.
- Work in small sections: Think 2–4 square feet at a time so nothing dries before you scrub and rinse.
Method 1: Dish Soap + Warm Water (Best for Greasy Grout in Kitchens)
If your grout looks dull near the stove, trash can, or kitchen entryway, grease is probably the main villain. Start
simple before you bring in the “baking soda cast.”
What you’ll do
- Mix 2 cups warm water with 1 teaspoon dish soap.
- Dip a stiff nylon brush (or old toothbrush) in the solution.
- Scrub grout lines with short, firm strokes.
- Rinse with clean water and wipe dry.
Why it works
Dish soap is designed to break up oils. Once grease releases, the rest of the dirt has a much harder time clinging to
grout like it pays rent.
Method 2: Baking Soda + Water Paste (Everyday “Maintenance Clean”)
This is your “I want it better, not a full grout makeover” option. It’s gentle, cheap, and surprisingly effective.
Recipe
Mix 2 parts baking soda with 1 part water until you get a paste like soft toothpaste.
Steps
- Apply paste directly onto grout lines.
- Let it sit for 5–10 minutes.
- Scrub with a grout brush or toothbrush.
- Rinse thoroughly with clean water.
- Dry with a microfiber cloth.
Where it shines
- Bathroom floors with light soap haze
- Entryways where dirt tracks in
- Backsplashes that need a refresh, not a rescue mission
Method 3: The Brightening Trio (Baking Soda + Hydrogen Peroxide + Dish Soap)
If your grout has turned gray-ish, yellow-ish, or “what color even is this?” this is the method most people fall in
love with. It’s still simple, but it packs more punch for set-in discoloration.
Recipe options (pick one)
- Option A (ratio style): 2–3 parts baking soda + 1 part 3% hydrogen peroxide, plus a few drops of dish soap.
- Option B (measured): 3/4 cup baking soda + 1/4 cup 3% hydrogen peroxide + 1 tablespoon dish soap.
Steps
- Mix ingredients into a thick paste. If it’s runny, add baking soda. If it’s crumbly, add a little peroxide.
- Apply to grout lines (a squeeze bottle or spoon helps keep it neat).
- Let sit for 10–15 minutes. Don’t rush thiscontact time is doing part of the work.
- Scrub firmly with a grout brush.
- Rinse with warm water until no residue remains.
- Dry completely with a microfiber cloth.
Pro tips for better results
- Use the right brush: A stiff nylon grout brush is faster than a toothbrush (but a toothbrush is great for corners).
- Keep it targeted: Concentrate paste on grout lines instead of frosting the entire tile like a cupcake.
- Repeat rather than over-scrub: Multiple gentle passes beat one aggressive scrub that damages grout.
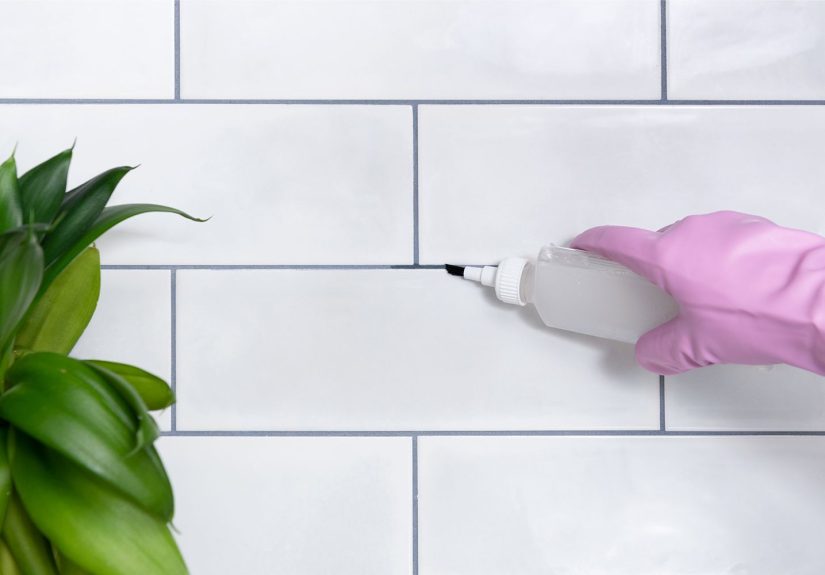
Method 4: Baking Soda + Vinegar (Use Carefully and Briefly)
Vinegar is famous for cleaning, but grout is not always a fan. On some tile setups, diluted vinegar can help loosen
mineral deposits and soap scum. On other setupsespecially if grout is old, crumbling, or unsealedacid can contribute
to wear over time. So this is a “use wisely” method, not an “every Saturday forever” method.
Safer approach
- Dilute vinegar (50/50 with water) for most jobs.
- Keep contact time short: a few minutes, not a half-hour.
- Avoid natural stone and any tile/grout you’re unsure about.
Steps
- Make a paste: 2 parts baking soda + 1 part vinegar (or start with water and spritz diluted vinegar after applying the paste).
- Apply to grout lines and let it foam for 3–5 minutes.
- Scrub gently but thoroughly.
- Rinse very well with clean water.
- Dry with a microfiber cloth.
Method 5: Oxygen Bleach Soak (For Stubborn Stains on Durable Tile)
Oxygen bleach (often sold as “oxygen cleaner” powder) is a powerhouse for organic stains and dingy buildup. It’s not
the same as chlorine bleach, and it’s generally kinder to many surfacesstill, you want to follow label directions,
test first, and rinse thoroughly.
Two easy ways to use it
A) Dissolve-and-scrub
- Dissolve oxygen bleach powder in warm/hot water per the product’s directions.
- Apply to grout lines (sponge, brush, or spray bottle).
- Let sit 10–15 minutes (keep it damp; don’t let it dry on the surface).
- Scrub and rinse thoroughly.
B) Paste for vertical grout (showers/backsplashes)
- Mix a small amount of powder with warm water to create a paste.
- Apply, let sit, scrub, and rinse.
Safety Rules (Because Grout Isn’t Worth a Trip to the ER)
- Never mix bleach with vinegar (or other acids). Dangerous gases can form.
- Never mix bleach with ammonia (found in some window cleaners and in urinebe careful in bathrooms/litter areas).
- Don’t mix hydrogen peroxide and vinegar in the same container or at the same time.
- One cleaner at a time: Rinse thoroughly between products if you switch methods.
If you ever notice a sharp, irritating smell after mixing products (or accidentally combining something you shouldn’t),
leave the area immediately for fresh air and follow local safety guidance.
Rinse and Dry Like You Mean It (This Is Where Most People Lose the Plot)
Residue attracts dirt. So if you leave baking soda film or cleaner behind, your grout may look great today and grimy
again next weeklike it’s speed-running disappointment.
- Rinse twice if you used a paste.
- Wipe dry with a microfiber cloth.
- Let grout fully dry before sealing or heavy use.
Seal the Deal: Should You Seal Grout After Cleaning?
If you have cement-based grout (most homes do), sealing can help reduce future staining by creating a protective barrier.
Many experts recommend sealing in high-moisture or high-traffic areasjust make sure grout is completely dry first.
Simple sealing guidelines
- Wait until grout is fully dry after deep cleaning (often at least a day, depending on humidity and how wet the area got).
- Use the sealer recommended for your grout type and follow directions.
- Plan to reseal periodically, especially in showers and busy floors.
Keep It Clean Longer: Low-Effort Habits That Pay Off
- Weekly wipe-down: A quick pass with warm water + a drop of dish soap prevents grime from settling in.
- Squeegee the shower: Less water left behind means less soap scum and fewer mineral deposits.
- Use bath mats strategically: They protect floorsbut lift and dry them so trapped moisture doesn’t darken grout underneath.
- Address spills fast: Tomato sauce and turmeric are grout’s version of permanent ink.
Troubleshooting: When Grout Won’t Cooperate
If the grout still looks dark after cleaning
- It may still be wet (grout darkens when damp). Give it time to dry fully.
- Staining may be deep, especially in unsealed grout. Repeat the peroxide/baking soda method.
- In showers, persistent dark areas can indicate ongoing moisture issues behind tileconsider a professional assessment.
If grout is crumbling or powdery
Skip aggressive scrubbing and avoid acidic cleaners. You may be looking at repair, regrouting, or grout renewal instead
of “cleaning your way out.”
If you’re tempted to use steam
Steam can be effective, but it’s safest on sealed grout and should be tested in a small area first. Unsealed grout may
be more vulnerable to heat and moisture. If you want a chemical-free approach, sealing first (or sticking with paste
methods) is often a safer bet.
Conclusion
Cleaning grout using pantry staples is mostly about matching the method to the mess. Dish soap tackles grease. Baking
soda handles everyday grime. Baking soda plus hydrogen peroxide brightens stubborn discoloration. Oxygen bleach steps
in when you need heavy-duty stain lifting. Vinegar can help in specific situations, but it’s not the hero for every
grout story.
The real secret isn’t a magical recipeit’s a smart routine: prep the surface, give the cleaner a little contact time,
scrub with the right brush, rinse thoroughly, and dry like you’re trying to impress your future self. Do that, and your
tile will stop looking “kind of clean” and start looking actually clean.
Extra: Real-Life Experiences With Pantry-Staple Grout Cleaning (About )
If grout had a personality, it would be the friend who says, “I’m fine,” while clearly not being fine. And in real
homes, the mess is rarely uniformthere’s the “busy hallway stripe,” the “shower corner science experiment,” and the
“kitchen backsplash that somehow collects spaghetti aura.”
One common scenario: someone cleans the tile, steps back proudly, and then notices the grout looks even worse by
comparison. That’s not your imaginationthat’s contrast. When tile gets brighter, dirty grout stands out like a typo
in a wedding invitation. In these situations, starting with the baking soda + water paste can be a confidence booster.
It’s gentle, low-risk, and it usually lifts that first layer of dingy film. The moment you rinse and see even a small
improvement, it gets a lot easier to commit to round two.
Kitchens have their own special brand of grout drama because grease behaves like it’s auditioning for a clingy
relationship. People often jump straight to “stronger” cleaners, but dish soap and warm water can be the surprising
MVP here. Once grease loosens, the grout stops holding onto every speck of dust like it’s building a scrapbook. After
that, the peroxide-baking soda paste becomes dramatically more effective because it can actually reach the stain
instead of fighting through an invisible oil shield.
Bathrooms bring a different challenge: moisture plus soap plus minerals equals buildup that’s part grime, part math
problem. This is where timing matters. Many homeowners spread paste, scrub immediately, and then wonder why nothing
changed. Letting the paste sit for 10–15 minutes is the unglamorous trick that makes the whole process feel easier.
Contact time doesn’t replace scrubbing, but it reduces the amount of “elbow grease” requiredso you’re not scrubbing
like you’re trying to erase a bad decision from 2012.
Another real-world moment: people panic when they see bubbling or fizzing. With baking soda and peroxide, gentle
bubbling can be normal. With vinegar and baking soda, fizzing is expected. The key is not to treat bubbles as proof
of success all by themselves. The real measure is what happens after you scrub and rinse. If you rinse and the grout
looks the same, adjust: give it more dwell time, switch to a stiffer brush, or upgrade from the mild paste to the
brightening trio.
Finally, there’s the “why did it get dirty again so fast?” frustration. This is almost always residue or moisture.
A thorough rinse and a dry wipe feel boring in the moment, but they’re what keep grout from turning into a dirt magnet
again. When people adopt one small habitlike drying the shower wall after use or doing a quick weekly wipe-downthe
next deep clean stops being a dreaded weekend project and starts being a quick touch-up. That’s the goal: less drama,
more clean tile, and grout that goes back to quietly doing its job.


