Table of Contents >> Show >> Hide
- Why Acorn Squash Is Tough (and Why You Should Still Bother)
- Tools That Make Cutting Acorn Squash Easier
- Before You Cut: The 30-Second Safety Setup
- The Core Method: Halve It, Seed It, Then Choose Your Shape
- 5 Popular Ways to Cut Acorn Squash (and When to Use Each)
- Troubleshooting: What to Do When the Squash Fights Back
- Cut Size “Math”: Why Evenness Matters
- Storage Tips (So Your Hard Work Doesn’t Go to Waste)
- Quick Cut-to-Recipe Pairings (So You Know What to Do Next)
- Final Thoughts: Cutting Acorn Squash Is a Skill (Not a Strength Test)
- Extra Kitchen Experiences: Real-Life Lessons from Cutting Acorn Squash
Acorn squash is the cute little winter squash that looks like it belongs on a fall centerpiece… right up until you try to cut it.
Then it transforms into a bowling ball wearing armor. The good news: you can cut acorn squash safely and cleanly
into halves, wedges, rings, or cubeswithout white-knuckling your chef’s knife or negotiating with your cutting board.
This guide walks you through the smartest ways to prep acorn squash (including a “microwave assist” trick), explains which cut works best
for which recipe, and shares practical “don’t do what I did” lessons from real kitchens. By the end, you’ll be slicing that fluted little
gourd like it owes you money (politely, safely, and with good technique).
Why Acorn Squash Is Tough (and Why You Should Still Bother)
Acorn squash is dense, firm, and wrapped in ridged skingreat for roasting because it holds its shape, less great for your knife’s morale.
Unlike softer produce, it doesn’t compress much when you press down, so a dull blade can skid or get stuck. The ridges also make it roll
like it’s trying to escape.
But here’s why it’s worth the effort: the flesh turns tender and sweet when roasted, it plays well with both savory and sweet flavors,
and (bonus!) the skin is edible once cookedso you don’t always need to peel it. That means less prep, less waste, and fewer opportunities
to do something dramatic like “peel a rock.”
Tools That Make Cutting Acorn Squash Easier
You don’t need a gadget parade. A simple, sturdy setup wins:
- A sharp chef’s knife (8-inch is ideal). Sharp beats strong. Always.
- A stable cutting board. Wood or thick plastic is great.
- A damp kitchen towel or paper towel to keep the board from sliding.
- A metal spoon (or ice-cream scoop) for scraping seeds.
- A vegetable peeler if you plan to peel (safer and easier than using a knife).
- Optional: microwave + fork/knife tip for the “soften first” hack.
Before You Cut: The 30-Second Safety Setup
Most squash “accidents” happen because the squash moves or the knife slips. Fix both problems before they start:
- Anchor your cutting board with a damp towel underneath.
- Wash and dry the squash so it isn’t slick. Dry skin grips the board better.
- Make a flat base if your squash rolls. A stable squash is a safe squash.
- Keep your non-knife hand high and back. Use knuckles as guides only when you’re slicing softer piecesnever when you’re forcing through hard squash.
The Core Method: Halve It, Seed It, Then Choose Your Shape
Step 1: Wash and Dry
Rinse off dirt (winter squash can be… outdoorsy) and dry it well. If your recipe keeps the skin on (many do),
you want it clean before it goes in the oven.
Step 2: Create a Stable Surface (Trim a Tiny Slice)
Set the squash on your board. If it wobbles, cut a thin slice off the bottom (not a huge chunkjust enough to keep it steady).
If the stem is tall or awkward, you can also trim a small amount from the stem end to create a flat spot for better control.
Step 3: Use the Microwave Assist (Optional but Glorious)
If your squash feels like it could survive re-entry, soften it slightly first:
- Prick the skin all over with a fork or the tip of a knife (so steam can vent).
- Microwave on HIGH for about 2–5 minutes, depending on size.
- Let it rest until cool enough to handle. You’re not cooking it fullyjust taking the edge off the hardness.
This small step can make a big difference in how easily (and safely) your knife moves through the skin.
Step 4: Cut the Squash in Half (Stem to Tip)
Place the squash with the stem end pointing away from you. Instead of trying to chop straight through the stem like you’re auditioning
for a lumberjack competition, start your cut just to the side of the stem, following one of the “valleys” between ridges.
Press down firmly and steadily. If the knife meets resistance in the hollow center, don’t force it. Keep control, then continue cutting
by working the blade forward along the curve. Some cooks find it easiest to cut around the squash’s side and then pull the halves apart.
The goal is control, not speed.
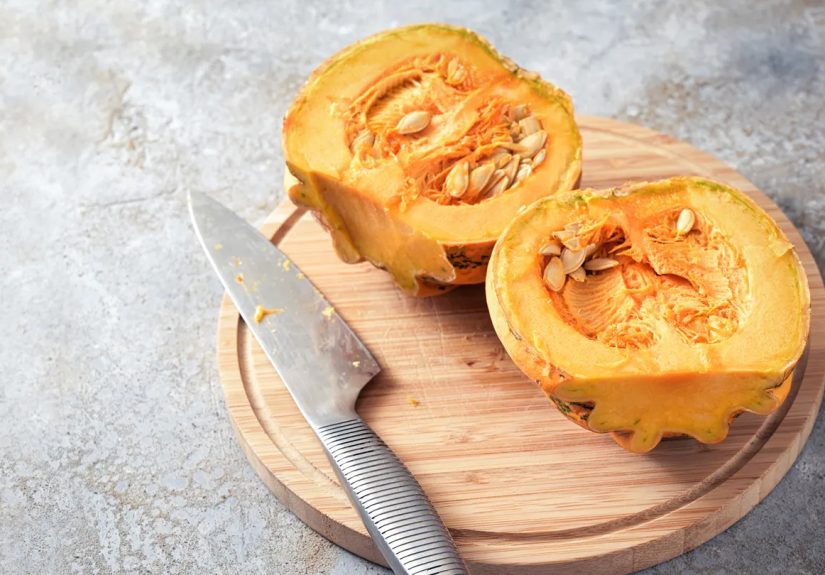
Step 5: Scoop Out Seeds and Stringy Bits
Use a metal spoon to scrape out the seeds and fibrous pulp. This is oddly satisfyinglike cleaning a pumpkin, but smaller and with fewer
people judging your artistic choices.
Pro move: save the seeds. Rinse, dry, toss with oil and seasoning, then roast until crisp for a snack or salad topper.
5 Popular Ways to Cut Acorn Squash (and When to Use Each)
1) Halves (Best for Roasting and Stuffing)
Once halved and seeded, you’re ready for the classic approach: roast the halves cut-side up or down, then fill or top as you like.
Halves are perfect for “stuffed squash” dinners because the cavity becomes a built-in bowl.
Example: Roast halves until tender, then fill with quinoa, sausage, mushrooms, and herbs. Or go sweet with butter, cinnamon,
and a drizzle of maple syrup.
2) Quarters or Wedges (Best for Even Roasting and Pretty Serving)
Wedges roast beautifully and are easy to portion. Start with halves, then cut each half into 2–4 wedges. Aim for roughly equal thickness
so everything finishes at the same time.
Example: Toss wedges with olive oil, salt, pepper, and smoked paprika; roast until browned on the edges. Serve alongside chicken,
pork chops, or a hearty grain bowl.
3) Rings (Best for “Wow” Presentation)
Acorn squash rings look fancy because the ridges turn into a fluted edge. To make rings:
- Trim off a small slice from the top and bottom for stability.
- Stand the squash upright on the flat end.
- Slice crosswise into 1/2-inch to 1-inch rings.
- Cut or scoop out the seedy center of each ring (a cookie cutter can help).
Rings are excellent for roasting because you get caramelized edges and tender centersplus they look like they belong on a restaurant plate.
4) Skin-On Cubes (Best for Sheet-Pan Roasts and Fast Prep)
If your recipe doesn’t demand peeling, don’t peel. For cubes with skin on:
- Cut squash in half and seed it.
- Cut each half into wedges.
- Slice wedges into chunks, aiming for similar sizes for even cooking.
The skin softens during roasting and is edible, so these cubes are great for weeknight mealsminimal fuss, maximum payoff.
5) Peeled Cubes (Best for Soups, Curries, and Silky Purées)
If you want peeled squash, you have two safer options:
- Peel after cooking: roast halves or wedges until tender, then peel slips off more easily (or just scoop out the flesh).
- Peel with a vegetable peeler: cut into manageable wedges first, then peel the skin off each wedge.
Once peeled, cube the squash for soups and stews. Keep cubes roughly the same size so they cook evenlyno one wants half their pot turning to mush
while the other half is still doing crunch impressions.
Troubleshooting: What to Do When the Squash Fights Back
If your knife gets stuck
Stop pushing. Keep your hands clear, carefully pull the knife straight back, and start again from a slightly different angle.
If needed, rotate the squash and cut from the other side. “Prying” is where things get risky.
If the squash rolls around
Make a flat base with a thin slice off the bottom. You’re not wasting squashyou’re buying stability.
If the squash is too hard to cut
Use the microwave assist. A few minutes of heat can soften the skin just enough to turn a struggle into a normal cut.
If scraping seeds is a mess
Use a sturdy metal spoon and scrape firmly. An ice-cream scoop works beautifully because it has a sharp edge and a comfortable grip.
Cut Size “Math”: Why Evenness Matters
Cutting is not just about shapeit’s about cooking results. Pieces that are similar in thickness roast and simmer at the same pace.
That means:
- Wedges should be close in thickness for consistent tenderness.
- Rings should be uniform so edges brown without the center staying firm.
- Cubes should be similar so soups don’t end up half purée, half pebbles.
You don’t need ruler-level perfectionjust avoid extreme size differences in the same pan or pot.
Storage Tips (So Your Hard Work Doesn’t Go to Waste)
Whole acorn squash stores best in a cool, dry place. Once you cut it, though, it’s a different story:
- Raw, cut acorn squash: wrap tightly or store airtight in the refrigerator and use within about 3–7 days.
- Cooked leftovers: refrigerate airtight and eat within a few days (a common window is around 3–4 days).
- Freezing: freeze cooked squash (mashed or in pieces) for longer storagegreat for future soups and sides.
Label your container, too. Future-you deserves a little kindness when staring into the fridge like it’s a mystery novel.
Quick Cut-to-Recipe Pairings (So You Know What to Do Next)
- Halves: roast and stuff (grains, sausage, veggies), or serve with butter and herbs.
- Wedges: sheet-pan roast with onions; serve as a side or toss into salads.
- Rings: roast with butter + brown sugar for a classic sweet side, or go savory with chili powder and lime.
- Skin-on cubes: roast for bowls, tacos, or warm grain salads.
- Peeled cubes: simmer into soups, curries, or purée for sauces.
Final Thoughts: Cutting Acorn Squash Is a Skill (Not a Strength Test)
The secret isn’t superhuman forceit’s stability, a sharp knife, smart positioning, and (when needed) a tiny head start from the microwave.
Once you learn the core methodhalve, seed, then choose your cutyou’ll be able to prep acorn squash for pretty much any recipe without stress.
Extra Kitchen Experiences: Real-Life Lessons from Cutting Acorn Squash
Let’s talk about what actually happens in a normal kitchen, where the cutting board is slightly warped, someone borrowed your good knife,
and the squash you bought is the size of a small meteor. The first time many people cut acorn squash, they do the “classic mistake combo”:
they grab a knife that’s fine for tomatoes, try to slice straight through the stem, and discover the squash doesn’t respect confidence.
The blade sticks halfway in, the squash rolls, and suddenly you’re negotiating like, “Okay… what if we just order pizza?”
The biggest upgrade I’ve seen across home kitchens is this: make the squash stop moving. That one thin slice off the bottom
changes everything. It turns your squash from a rolling hazard into a stable object you can control. If you do nothing else from this guide,
do that. It’s the difference between “I am calmly preparing dinner” and “I am auditioning for a kitchen disaster reel.”
The second upgrade is accepting that microwaving for a few minutes is not cheating. People sometimes avoid it because they think
it’s a “shortcut,” but it’s really a safety tool. A slightly softened skin means your knife bites in instead of skating across the ridges.
It’s also a confidence boost: the first cut is always the hardest, and anything that makes that first cut smoother makes the whole process smoother.
Just remember to vent the squash by pricking it firstnobody wants a squash that turns into a tiny steam experiment.
Another real-life trick: cut beside the stem, not through it. Stems are tough, woody, and basically the squash’s built-in armor.
Going slightly to the side lets you split the squash more easily and keeps your knife from hitting that stubborn “nope” zone. Once the halves are open,
scooping seeds becomes the oddly satisfying partlike cleaning out a pumpkin, but with a better payoff at dinner.
Rings deserve a special mention because they look impressive, but they can be awkward the first time you try them. The first ring slice often feels
like you’re cutting a very stubborn bagel made of wood. This is where the microwave assist really shines. Once you get into a rhythm, though, rings are fun:
they roast evenly, brown at the edges, and look like they belong in a cookbook photo. If you’re serving guests and want something that says “effort”
without actually being complicated, rings are your friend.
Finally, don’t underestimate how much joy is hiding in the “extras.” Those seeds you scooped out? Rinse them, dry them, toss them with oil and seasonings,
and roast until crisp. Sprinkle them on salads, soups, or even just snack on them while the squash cooks. It’s a small move, but it makes the whole process
feel more rewardinglike you didn’t just prep dinner, you also created bonus crunch.
Cutting acorn squash is one of those kitchen skills that feels intimidating until it suddenly doesn’t. After a few rounds, you stop bracing for battle.
You set up your board, make a flat base, cut beside the stem, scoop the seeds, and move on with your life. And that’s the real win:
not “I survived the squash,” but “I handled it like it was normal”because now it is.


