Table of Contents >> Show >> Hide
- Why Adding Movies to an iPad Can Feel Weirdly Complicated
- 1. Download Purchased Movies in the Apple TV App
- 2. Sync Movies From a Mac Using Finder
- 3. Sync Movies From a Windows PC With Apple Devices
- 4. Use File Sharing to Copy Movies Directly Into VLC or Another Player App
- 5. Add Movies Through the Files App and Cloud Storage
- 6. Download Movies Inside Streaming Apps for Offline Viewing
- Which Method Is Best for You?
- Common Problems When Adding Movies to iPad
- Final Thoughts
- More Real-World Experiences With Adding Movies to an iPad
Note: HTML body only, English content only, SEO tags in JSON format at the end.
Few things feel more tragic than boarding a long flight, opening your iPad, and realizing your movie plan was basically just hope with a battery percentage. The good news is that adding movies to an iPad is not hard once you know which route makes sense for your setup. The slightly annoying news is that there is more than one route. Apple gives you a polished path for purchased content, Mac users get Finder, Windows users get Apple Devices, cloud storage works nicely through the Files app, and third-party players can rescue those stubborn video formats that refuse to behave.
In other words, there is no single “best” way to put movies on an iPad. There is only the best way for your movie, your file type, and your patience level. If you bought a movie from Apple, one method is almost effortless. If you ripped a DVD years ago and the file name looks like it survived three computers and a family argument, another method is better. If you want to avoid cables entirely, cloud storage may be your new best friend.
This guide walks through six user-friendly ways to add movies to your iPad, including the pros, the limits, and the small gotchas that can save you from yelling at a perfectly innocent tablet. By the end, you should know exactly how to watch movies on iPad whether you are traveling, commuting, or hiding from everyone for two glorious hours.
Why Adding Movies to an iPad Can Feel Weirdly Complicated
The iPad is excellent for watching movies, but “adding” a movie can mean several different things. Sometimes it means downloading a title you purchased in the Apple TV app. Sometimes it means syncing a file from a Mac or Windows PC. Sometimes it means opening a movie stored in iCloud Drive, Dropbox, Google Drive, or OneDrive. And sometimes it means using a third-party video player because your file is in MKV, AVI, or another format that Apple’s default apps do not always handle as gracefully as you would like.
That is why the smartest move is to match the method to the source of the movie. Are you dealing with purchased content, personal files, cloud storage, or streaming downloads? Once you answer that, the rest gets dramatically easier.
1. Download Purchased Movies in the Apple TV App
If you bought or rented a movie through Apple, this is the cleanest and most iPad-friendly method. No cables, no conversion, no side quests. Just open the Apple TV app, find the title in your library, and download it to the device.
Why this method is so easy
The Apple TV app is built for exactly this job. Your purchases live in your library, your downloads stay organized, and playback feels native because, well, it is. If you redownload a movie later, Apple keeps the library connection intact, so deleting the local copy does not erase your purchase. That makes this method ideal for people who want the least friction and the fewest moving parts.
Best use case
Choose this option if you buy or rent movies from Apple and want the simplest offline viewing setup. It is especially handy for trips, hotel stays, and anywhere Wi-Fi behaves like it has emotional issues.
What to watch out for
Not every title or channel supports downloads, and availability can vary by country, region, or content agreement. So if the download button is missing, it may not be you. It may just be licensing doing its usual licensing thing.
2. Sync Movies From a Mac Using Finder
If your movie files are already on a Mac, Finder is one of the most dependable ways to add them to your iPad. This is the route for people who own the files, want a direct transfer, and do not mind plugging in a cable for a few minutes.
How it works
Connect your iPad to your Mac, open Finder, select your iPad in the sidebar, then choose the content type you want to sync. You can sync all movies or just a selected group. That makes Finder a great option for building a small offline library without dumping your entire video history onto the tablet like a digital garage sale.
Why Mac users love it
Finder gives you control. You can choose specific content, keep syncing settings saved, and even enable automatic syncing when the device connects. If you regularly move movies from a Mac to an iPad, this becomes a smooth routine instead of a technical chore.
The catch
This method works best with Apple-friendly video files. If your movie is already in a common compatible format like MP4 or M4V, great. If it is an oddball format or carries external subtitle files, you may be happier with a dedicated player like VLC or Infuse instead of standard syncing.
3. Sync Movies From a Windows PC With Apple Devices
Windows users are not left out. Apple now supports syncing through the Apple Devices app on Windows, and if you want to sync movies, you also need the Apple TV app installed on your PC. Once that setup is in place, transferring movies to your iPad is pretty straightforward.
Why this method matters
A lot of older advice online still talks like it is permanently 2017 and iTunes runs the universe. That is not the current reality. If you are on Windows, the modern Apple workflow is centered around Apple Devices, with Apple TV handling movie-related support. This method is the official path if you want Apple’s first-party transfer experience on a PC.
Who should use it
This option is best for Windows users who keep a movie library on a desktop or laptop and want reliable local transfers to iPad for offline viewing. It is also helpful if you prefer managing files on a bigger screen before syncing selected movies to the tablet.
What to remember
Just like on a Mac, format matters. If the file is not especially iPad-friendly, syncing alone may not magically fix playback. In that case, move to one of the app-based methods below.
4. Use File Sharing to Copy Movies Directly Into VLC or Another Player App
This is the secret weapon for people with video files that refuse to act normal. If you have an MKV, AVI, or another format that does not fit neatly into Apple’s standard ecosystem, copying the movie into a player app like VLC is often the easiest solution.
Why this method is underrated
Instead of trying to make the whole iPad library system understand your file, you hand the movie to an app that was built to deal with weird formats, subtitle tracks, multiple audio options, and the occasional file that looks like it was downloaded during the Jurassic period of the internet. VLC is especially popular because it supports a wide range of formats and can pull media from cloud storage, direct downloads, Wi-Fi sharing, and network servers.
On a Mac, you can connect your iPad, open Finder, click the Files tab, and drag the movie into the player app’s file area. On Windows, Apple Devices offers a similar Files section where you can drag supported files into the chosen app. Once the copy finishes, open the app on your iPad and play the movie there.
When this is the best choice
This method shines when you have personal video files, external subtitle files, or formats that do not play nicely in Apple’s default environment. It is also great for travelers who want a small stash of dependable offline movies that do not require a subscription or a constant internet connection.
One practical tip
If you care about subtitles, custom playback speed, or broad codec support, app-based playback is often the least frustrating route. It is not flashy, but it gets the job done without forcing you into unnecessary file conversion gymnastics.
5. Add Movies Through the Files App and Cloud Storage
If cables are not your thing, using the Files app with iCloud Drive or a third-party cloud service is wonderfully convenient. Apple lets you add services like Dropbox, Google Drive, and OneDrive to the Files app, so your storage providers can appear in one place instead of living in separate digital apartments across your iPad.
How this method works
Upload the movie from your computer to iCloud Drive, Dropbox, Google Drive, or OneDrive. Then open the Files app on your iPad and browse to the file. From there, you can stream it, open it in a compatible app, or in some cases mark it for offline availability depending on the service and app behavior.
iCloud Drive is especially natural for Apple users because it is built right into the Files app. Dropbox and OneDrive both support making files available offline. Google Drive also offers offline access inside its app, though many users find that a dedicated player app still gives the most dependable movie playback experience when they want fewer surprises.
Why people like it
The biggest advantage is flexibility. Your movie can live in the cloud, which means you do not need to connect your iPad to a computer every time you want something new. It is perfect for families, remote workers, students, or anyone bouncing between a laptop, phone, and tablet.
The downside
Cloud storage is great, but offline behavior varies by app. Some services are better at true offline access than others, and sometimes what looks like a local file is really an app-managed copy. If you absolutely need guaranteed offline playback on a plane, download the file in advance and test it before you leave home. Future You will be grateful and far less dramatic.
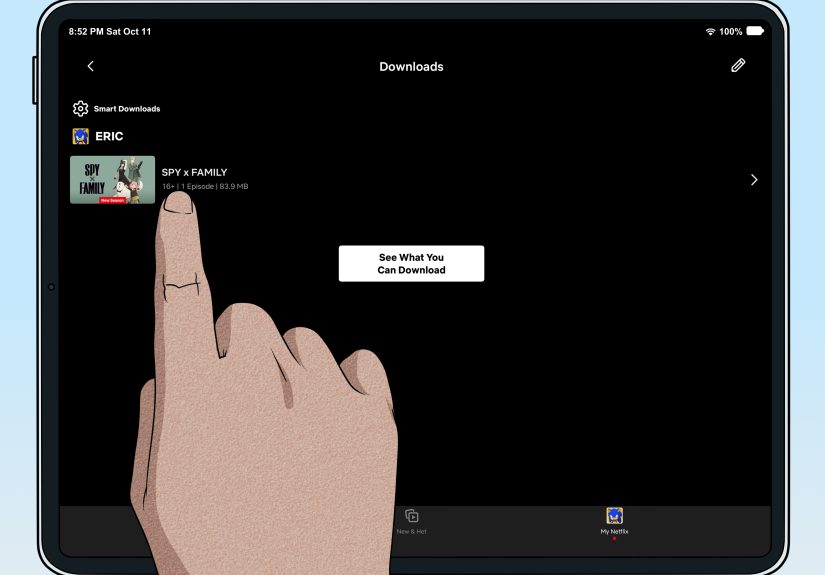
6. Download Movies Inside Streaming Apps for Offline Viewing
Sometimes the easiest way to “add” movies to your iPad is not to transfer files at all. It is simply to open the streaming app, tap the download icon on a supported title, and let the app handle the rest. Netflix, Prime Video, Disney+, and Hulu all support offline downloads for eligible content on iPad.
Why this method is so popular
It is fast, familiar, and almost impossible to mess up. You do not have to think about file formats, syncing settings, or where the movie lives. The app manages storage, playback, and expiration rules. For many people, that convenience is worth far more than having a permanent video file stored somewhere in the Files app.
Who should use it
This is the best choice for commuters, parents, students, and frequent travelers who just want a few movies ready to go before a flight or road trip. It is also ideal when you already pay for a streaming service and do not feel like building a personal media library from scratch.
The catch
Not every movie is downloadable, and the rules vary by app, subscription plan, and licensing. Downloads also stay locked inside the streaming app, which means you are not really creating a reusable local video file. You are creating a convenient offline copy with some boundaries attached. Still, for many users, convenience wins by a landslide.
Which Method Is Best for You?
If you want the simplest Apple-native route, use the Apple TV app. If your movies already live on a computer and you want a direct local transfer, use Finder on Mac or Apple Devices on Windows. If your files are in awkward formats or you care about subtitle support, go with VLC or another dedicated player. If you hate cables, try Files plus iCloud Drive, Dropbox, Google Drive, or OneDrive. And if your only goal is to watch something offline during travel, streaming app downloads may be the easiest move of all.
The smartest choice is not the fanciest one. It is the one that matches your actual habits. The best movie workflow is the one you will still use next week.
Common Problems When Adding Movies to iPad
The movie file will not play
This usually points to a format or codec issue. If a synced file refuses to cooperate, open it in VLC or another flexible player before assuming the file is broken.
You are running out of storage
Movie files are not shy about taking up space. Remove old downloads, trim streaming app caches, and avoid storing giant video files locally unless you really need them. Cloud storage and app-based downloads can help you stay lighter.
Your cloud movie is not truly offline
“Available offline” does not always behave exactly the same across services. When offline viewing matters, verify the file opens with Wi-Fi turned off before travel day. That tiny test can save a lot of disappointment.
Subtitles are missing or messy
Apple’s built-in experience is smooth, but dedicated video players usually give you more control over subtitle files, audio tracks, and playback settings. If you care about those details, use the right tool instead of forcing the default one.
Final Thoughts
Adding movies to your iPad is easy once you stop treating every movie the same way. Apple purchases belong in the Apple TV app. Computer-based libraries work best through Finder or Apple Devices. Cloud storage is great for convenience, VLC is great for odd formats, and streaming apps are excellent when you just want offline entertainment with minimal effort.
In short, the iPad is a fantastic movie machine. You just need the right door into it. Pick the method that fits your files, test your playback before you travel, and your next movie night can happen anywhere from a living room couch to a middle seat at 35,000 feet. Not bad for a slab of glass.
More Real-World Experiences With Adding Movies to an iPad
In real life, people usually discover their favorite iPad movie method only after a tiny disaster. It is rarely a calm, organized decision made with tea and perfect lighting. More often, it happens the night before a flight, during a power outage, or five minutes before handing the iPad to a child who has already asked, “Is the movie ready yet?” seventeen times. That is why experience matters here just as much as technical steps.
A lot of users start with the Apple TV app because it feels natural. They buy or rent a movie, hit download, and everything works exactly the way it should. That first smooth experience gives people confidence. Then one day they try to add an old personal video file, and suddenly they meet the less glamorous side of digital life: formats, syncing, and the occasional file that looks playable until it absolutely is not. That is where Finder, Apple Devices, VLC, and cloud storage stop being “extra options” and become genuine lifesavers.
Travelers often become the biggest fans of direct downloads and local copies. Airport Wi-Fi is unpredictable, hotel internet can be painfully slow, and streaming on mobile data is a fast way to watch your battery and your patience disappear together. People who travel a lot usually learn to keep a small rotation of tested downloads on the iPad: maybe one comfort movie, one new release, and one backup title in case the mood changes. It is a tiny habit, but it makes the device feel far more reliable.
Parents tend to prefer the most foolproof method available. For many families, that means streaming app downloads or movies copied into a simple player app with big, obvious thumbnails. Nobody wants to troubleshoot a codec issue in the back seat of a car while someone in a booster seat offers aggressive feedback. A working local copy is worth its weight in gold during long drives, delayed flights, or quiet afternoons when everyone needs a break.
People who keep personal media libraries often end up loving player apps the most. They appreciate being able to organize files their own way, use subtitles, and avoid converting every video before watching it. These users usually care less about the “official” path and more about consistent playback. Once they find a setup that works, they stick with it like it is a treasured family recipe.
Then there are the cloud-storage fans. These are the people who want flexibility above all else. They like uploading a movie once, then opening it from multiple devices whenever needed. For them, convenience beats cable transfers every time. The trade-off, of course, is that offline behavior can vary, so experienced users usually test their files before leaving home. It is not glamorous, but it is smart.
The biggest lesson from real-world use is simple: the best iPad movie method is the one that matches your routine, not the one that sounds the most technical. If a two-tap streaming download works for you, great. If dragging MKV files into VLC makes your life easier, also great. The goal is not to win a gadget contest. The goal is to press play and have the movie actually start when you need it.


