Table of Contents >> Show >> Hide
- What Is a Dry Verge System?
- Before You Start: Safety, Compatibility, and Planning
- Tools and Materials You Will Need
- How to Fit a Dry Verge: Step-by-Step Guide
- Step 1: Inspect the Existing Roof Verge
- Step 2: Check the Battens
- Step 3: Install Batten End Clips
- Step 4: Prepare the Eaves Area
- Step 5: Fix the Eaves Closure
- Step 6: Fit the First Dry Verge Unit
- Step 7: Continue Up the Verge
- Step 8: Handle Tile Profiles and Trimming
- Step 9: Finish at the Ridge
- Step 10: Inspect the Finished Dry Verge
- Common Mistakes to Avoid
- Maintenance After Installation
- When Should You Call a Professional Roofer?
- Experience Notes: What Real Dry Verge Jobs Teach You
- Conclusion
- SEO Tags
A roof verge is one of those building details most people ignore until something goes wrong. Then suddenly, the edge of the roof becomes the star of a very expensive drama. Loose mortar, cracked pointing, rattling tile edges, birds moving in rent-free, and rainwater sneaking where it should not go can all begin at the verge. That is where a dry verge system comes in.
Learning how to fit a dry verge is a smart move if you want a cleaner roofline, better edge protection, and less maintenance than traditional mortar bedding. A dry verge uses interlocking verge units, eaves closures, batten end clips, and ridge end caps to mechanically secure the exposed edge of roof tiles. Instead of relying on mortar, which can crack over time, the system uses fasteners and molded components to protect the roof edge from wind, rain, pests, and general weather tantrums.
Although “dry verge” is a term more commonly used in tile-roofing markets outside the United States, the idea is easy to understand for American homeowners and contractors: it is a weather-resistant roof-edge finishing system for tiled roofs, especially along the sloping gable ends. Think of it as giving your roof a tidy, protective jacketone that does not crumble like old mortar after a few winters.
What Is a Dry Verge System?
A dry verge system is a mortar-free method of finishing the exposed edges of roof tiles at the gable end of a pitched roof. The system usually includes individual verge caps or continuous verge sections, an eaves closure at the bottom, ridge closure pieces at the top, and fixings that attach the units to the tile battens or supporting timber.
Traditional mortar verges can look good when new, but they are vulnerable to cracking, shrinkage, freeze-thaw damage, movement in the building, and wind-driven rain. Once mortar starts to fail, water can reach the roof structure, tiles can become unstable, and the gable wall may develop staining. A dry verge installation replaces that wet mortar with a mechanical fixing system, giving the roof edge a consistent, finished appearance and improved resistance to movement.
Dry Verge vs. Mortar Verge
A mortar verge relies on cement-based bedding to hold and seal the tile edges. A dry verge relies on interlocking units and mechanical fasteners. That is the main difference, and it is a big one. Mortar can be weather-sensitive during installation and maintenance-heavy over time. Dry verge systems are generally faster to install, cleaner to work with, and less likely to crack because they are designed to flex slightly with the roof.
Dry verge systems also help prevent bird and insect entry at the roof edge. Many eaves closure units include a comb or barrier that closes off awkward gaps without blocking needed ventilation. In other words, your roof gets protection; the birds can find a more traditional apartment.
Before You Start: Safety, Compatibility, and Planning
Roof work is not a casual weekend hobby like painting a mailbox. You will be working at height, handling tools, and possibly removing old mortar or tiles. Use proper ladder practices, fall protection, stable access equipment, gloves, eye protection, and footwear with good grip. If the roof is steep, high, wet, icy, damaged, or hard to access, hire a qualified roofing professional.
You should also check whether the roof is suitable for a dry verge system. Most dry verge products are designed for concrete or clay interlocking tiles, but compatibility varies. Some systems are handed, meaning there are separate left-hand and right-hand units. Others are universal or ambidextrous. The roof pitch, tile profile, batten gauge, ridge style, bargeboard detail, and gutter position can all affect the installation.
Before buying materials, measure both gable runs from the eaves to the ridge. Count the tile courses along each verge, because many systems require one verge unit per tile course. Add eaves closures, ridge end caps, batten end clips, screws, and any manufacturer-specific accessories. Buying “almost enough” roofing parts is a classic way to spend Saturday afternoon staring angrily at a half-finished roof.
Tools and Materials You Will Need
The exact parts depend on the dry verge brand, but most installations require similar tools and components.
Common Materials
- Dry verge units or verge caps
- Eaves closure units or starter pieces
- Ridge closure pieces or ridge end caps
- Batten end clips or fixing brackets
- Stainless steel screws or ring shank nails recommended by the manufacturer
- Replacement timber battens if existing battens are damaged or too short
- Roofing underlayment if installing as part of a new roof or repair
Useful Tools
- Tape measure
- Chalk line
- Hammer
- Drill or impact driver
- Utility knife
- Fine-tooth saw or snips for trimming plastic units
- Pry bar for removing old mortar or damaged verge material
- Safety equipment, including gloves, eye protection, ladder stabilizer, and fall protection
How to Fit a Dry Verge: Step-by-Step Guide
Step 1: Inspect the Existing Roof Verge
Start by inspecting the gable end from the eaves to the ridge. Look for cracked mortar, loose tiles, rotten battens, uneven tile overhang, missing undercloak, damaged bargeboards, and signs of water staining. If the roof edge is already unstable, do not simply cover the problem with shiny new plastic. That is like putting a tuxedo on a raccoonit may look better briefly, but the chaos is still inside.
For retrofit projects, remove loose mortar, old undercloak, broken verge pieces, and debris. Be careful not to damage the roof tiles. Any tile that is cracked or badly worn should be replaced before the dry verge units are fitted.
Step 2: Check the Battens
The dry verge units need a secure fixing point. On many systems, the tile battens should extend beyond the gable wall or bargeboard by a consistent distance, commonly around 20 to 40 millimeters depending on the product. Other systems may require a different overhang, so follow the product guide.
If the battens are too short, rotten, split, or weak at the ends, they should be repaired or replaced. On an existing roof, this may mean cutting back to the nearest rafter and installing a longer batten section. Do not fix verge units into damaged timber. A dry verge is only as secure as the material holding it.
Step 3: Install Batten End Clips
Batten end clips are small but important. They reinforce the end of each batten and provide a stronger fixing point for the verge unit. This matters because driving nails or screws directly into the end grain of timber can split the wood or create a weak fixing, especially where wind uplift is a concern.
Fit one batten end clip to each batten end along the verge, following the manufacturer’s position guide. Some clips are pushed on by hand, while others are nailed into place. Keep them aligned so the finished verge line stays straight. This is where a chalk line earns its keep.
Step 4: Prepare the Eaves Area
The eaves are the bottom starting point of the dry verge system. This area must be neat, secure, and able to drain correctly into the gutter. Position the first roof tile correctly at the verge, making sure the tile overhang matches the system requirements.
Dry verge systems usually include an eaves closure or starter insert. This piece blocks gaps at the bottom of the run and helps prevent pests, wind-blown debris, and rain from entering beneath the roof covering. Some closures also include a comb filler, which closes the space under profiled tiles while still allowing appropriate airflow.
Step 5: Fix the Eaves Closure
Place the eaves closure over or around the first tile as instructed. It may fix to the fascia board, bargeboard, brickwork, or a dedicated batten, depending on the roof detail. Use the screws or fasteners recommended by the manufacturer.
Take your time here. If the eaves closure is crooked, every verge unit above it may follow the same bad line. Roof components are very loyal to mistakes; once the first one leans, the rest often join the parade.
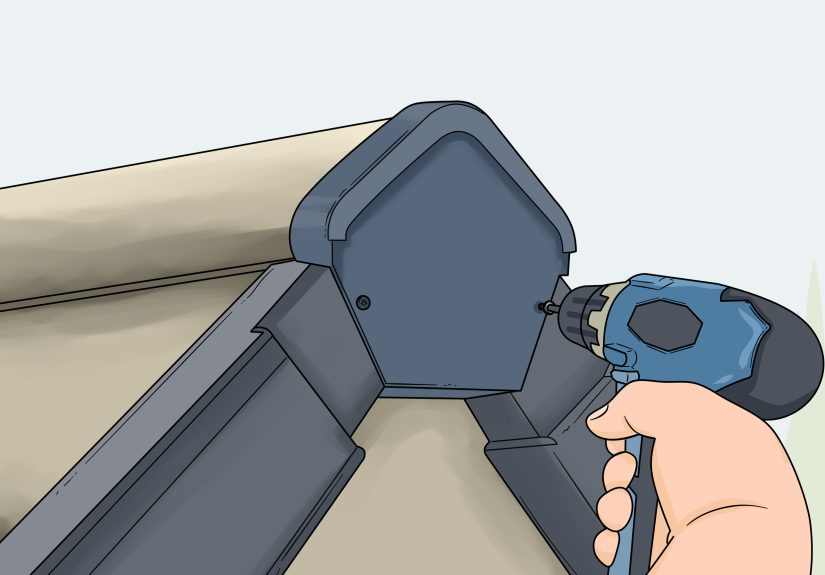
Step 6: Fit the First Dry Verge Unit
Slide or clip the first verge unit onto the eaves closure. Make sure the front lip of the unit hooks correctly over the tile edge and that the unit is fully engaged with the starter piece. The unit should sit snugly without forcing the roof tile out of position.
Once aligned, fix the verge unit into the batten end clip or batten using the specified nail or screw. Stainless steel fixings are often recommended because they resist corrosion. Avoid over-tightening screws. Plastic components may need slight movement for thermal expansion, especially on sunny roof slopes.
Step 7: Continue Up the Verge
Install the next verge unit by engaging it with the one below. Depending on the system, it may slide into slots, hook under the previous unit, click into place, or flex over the tile tail. Check that each unit covers the edge of its tile course and lines up cleanly with the unit below.
Fix each unit as you go. Do not install several units loose and plan to come back later, because small alignment errors can multiply quickly. Keep checking the line from ground level if possible. A dry verge should look crisp and even from the street, not like it was installed during a minor earthquake.
Step 8: Handle Tile Profiles and Trimming
Some tile profiles require light trimming of tabs, fins, or closure pieces. Universal dry verge systems may have removable tabs so the same unit can be used on either side of the roof. Handed systems require the correct left-hand or right-hand unit.
Use a fine-tooth saw, snips, or utility knife where appropriate. Cut cleanly and avoid removing more material than necessary. Any trimming should preserve the unit’s weathering function, locking tabs, and drainage path.
Step 9: Finish at the Ridge
At the roof apex, the final verge units meet the ridge. Many systems use ridge closures, comb fillers, or ridge end caps to seal and finish this point. Fit the last verge units on both sides, insert the ridge closure if required, and screw the ridge end cap into the ridge batten or approved fixing point.
The top detail matters because wind and rain love exposed gaps. A poorly finished apex can let water, insects, or debris enter the roofline. It can also make an otherwise neat installation look unfinished.
Step 10: Inspect the Finished Dry Verge
Once the system is fitted, inspect the entire run. Check that every unit is locked into the one below, all fixings are secure, the eaves closure is tight, the ridge cap is fixed, and the units form a straight visual line. Look for pinched tiles, blocked gutters, sharp cut edges, missing clips, and gaps large enough for pests.
Finally, stand back and admire the roof edge. This step is technically optional, but emotionally necessary.
Common Mistakes to Avoid
Using the Wrong Verge Unit
Some dry verge units are left-hand or right-hand specific. Installing the wrong side can cause poor locking, awkward alignment, and weak weather protection. Always sort the parts before climbing the ladder.
Fixing Into Weak Battens
Old battens may look acceptable from below but crumble at the ends. If the fastener does not bite firmly, the unit will not resist wind properly. Replace bad timber before fitting the system.
Skipping Batten End Clips
Batten end clips are not decorative confetti. They improve fixing strength and reduce the risk of splitting end grain timber. Skipping them may make the installation faster, but it can also make it weaker.
Over-Tightening Screws
Plastic verge units expand and contract with temperature changes. Over-tightening can distort the unit, crack plastic, or prevent natural movement. Fix securely, but do not crush the component.
Ignoring the Gutter Line
The lower verge detail must drain cleanly into the gutter. If the eaves closure or verge channel interferes with the gutter, water may spill or track down the fascia. Adjust carefully before final fixing.
Maintenance After Installation
A properly fitted dry verge system is low-maintenance, but not “forget it exists forever” maintenance. Inspect it at least once a year and after major storms. Look for loose caps, missing screws, cracked units, bird activity, lifted tiles, and debris buildup near the eaves.
Clean gently with water and a soft brush if dirt or algae appears. Avoid harsh solvents unless the product manufacturer approves them. If a unit is damaged, replace it with a matching part rather than mixing brands or profiles. Dry verge components are designed as systems, not random plastic puzzle pieces.
When Should You Call a Professional Roofer?
Call a professional if the roof is high, steep, fragile, leaking, structurally damaged, or difficult to access. You should also get help if the battens need significant replacement, the verge tiles are loose, the ridge requires repair, or the roof has complex details such as dormers, valleys, unusual tile profiles, or old timber framing.
A dry verge installation may look simple in a product diagram, but roofs have a talent for hiding complications. A qualified roofer can identify issues that are easy to miss, including poor ventilation, rotten fascia, failing underlayment, and incorrect tile gauge.
Experience Notes: What Real Dry Verge Jobs Teach You
The biggest lesson from fitting a dry verge is that preparation matters more than speed. The actual clipping and fixing can move quickly once the battens, eaves closure, and tiles are ready. But if the first line is wrong, the whole verge will advertise that mistake from the street. A good installer spends extra time at the eaves, checks the tile overhang, confirms the batten projection, and dry-fits the first couple of units before committing with screws.
On retrofit jobs, old mortar is often the troublemaker. It may look solid from the ground, but once you start removing loose sections, you may discover cracked bedding, broken tile corners, and tired battens. That is normal. The temptation is to clean only enough space to squeeze the dry verge units into position. Resist that temptation. Removing unstable mortar and checking the timber gives the new system a clean, reliable base. Covering weak material is not repair; it is camouflage.
Another useful experience is to sort the parts before going up. Lay out left-hand units, right-hand units, eaves closures, ridge caps, clips, and fasteners. Count the tile courses. Check colors in daylight. More than one installer has reached the ridge and discovered the missing cap is still in the garage, which is a fine way to practice ladder climbing but a poor way to enjoy roofing.
Weather also changes the job. Dry verge systems can usually be fitted in conditions where mortar would be a bad idea, but that does not mean every day is a roofing day. Wind makes lightweight components awkward. Heat can make dark plastic units expand slightly. Cold weather can make plastic less forgiving during trimming. Work carefully, store parts flat, and avoid forcing components that should click together naturally.
One practical trick is to step back frequently. From close range, a unit may look perfectly aligned. From the driveway, the verge line may reveal a small wave. Checking the roofline from below every few courses helps catch alignment problems early. The finished edge should look straight, evenly stepped, and intentional.
Finally, remember that a dry verge is part of the roof system, not a cosmetic add-on. It protects tile edges, helps manage water, supports wind resistance, discourages pests, and finishes the gable neatly. Installed well, it looks almost boringand in roofing, boring is beautiful. Boring means no leaks, no rattles, no mystery stains on the wall, and no pigeons throwing a housewarming party under your tiles.
Conclusion
Knowing how to fit a dry verge gives you a clear understanding of how roof edges are protected without relying on traditional mortar. The job starts with inspection, safe access, and product compatibility. From there, the key steps are simple: prepare sound battens, install batten end clips, fix the eaves closure, work the verge units up the roof one tile course at a time, and finish neatly at the ridge.
The best dry verge installation is straight, secure, weather-resistant, and matched to the roof tile profile. Take your time, follow the manufacturer’s instructions, and do not ignore damaged timber or loose tiles. Done properly, a dry verge system can give a tiled roof a cleaner appearance, stronger edge protection, and fewer maintenance headaches. Your roof may not thank you out loud, but it will stop dropping hints in the form of cracked mortar and damp patches.


