Table of Contents >> Show >> Hide
- Why Eclipse Photos on a Phone Are So Tricky
- Safety First, Because the Sun Does Not Care About Your Content Calendar
- What You Actually Need
- How to Set Up Your Phone Before the Eclipse
- The Best Camera Settings for Eclipse Photos on a Phone
- Composition Tips That Make Eclipse Photos Better
- Common Mistakes to Avoid
- How to Edit Eclipse Photos Without Making Them Weird
- A Smarter Shot List for Eclipse Day
- Conclusion
- Real-World Experiences: What Eclipse Photography With a Phone Actually Feels Like
Photographing an eclipse with your phone sounds easy in the same way baking a wedding cake sounds easy: technically possible, emotionally risky, and likely to leave you yelling at glass. But here is the good news. You do not need a suitcase full of pro gear to come home with beautiful eclipse photos. What you do need is a smart plan, a little patience, and a firm refusal to let your phone camera make all the decisions while the sky is doing something spectacular.
This guide focuses mainly on solar eclipse phone photography, because that is the trickier and more safety-sensitive version. Lunar eclipses are far easier and safer to shoot, but a solar eclipse asks more from your timing, your camera, and your common sense. The goal is simple: help you capture the moment without frying your retinas, melting your confidence, or ending up with a blurry orange pea floating in an empty sky.
If you want the short version before we dive in, here it is: protect your eyes, use a proper solar filter for the partial phases, stabilize your phone, avoid digital zoom whenever possible, lock your exposure and focus, and remember that the best eclipse photo is often not the tightest shot of the sun. Sometimes the winning image includes the crowd, the horizon, your kid in eclipse glasses, or the weird crescent-shaped light all over the world around you. In other words, do not chase only the sun. Chase the story.
Why Eclipse Photos on a Phone Are So Tricky
A phone camera is incredibly smart, but it is also hilariously overconfident. It loves faces, food, pets, and sunsets. An eclipse, however, is a high-contrast, tiny, bright subject surrounded by a huge scene. That is a recipe for confusion. Your phone may expose for the sky instead of the sun, sharpen the wrong thing, overprocess the image, or digitally zoom until your eclipse looks like a glowing potato chip.
That does not mean your phone is useless. It means you need to lean into what a smartphone does well. Phones are fantastic for wide environmental shots, quick bursts of changing moments, easy sharing, and spontaneous creativity. With the right setup, they can also produce surprisingly good close-up images, especially when paired with a clip-on telephoto lens or a safe smartphone solar filter.
The biggest mindset shift is this: your job is not to force your phone to behave like a giant telescope. Your job is to help it do its best work within its limits. That is where the magic starts.
Safety First, Because the Sun Does Not Care About Your Content Calendar
Before we talk about composition, we need to talk about not harming your eyes or your gear. For a solar eclipse, you cannot safely photograph the sun during the partial phases without proper solar protection. Regular sunglasses are useless here. So are “looks dark enough to me” solutions. A real solar filter is not optional. It is the ticket to the show.
If you are using only your phone camera, you need a solar filter made for smartphone eclipse photography or an approved workaround designed specifically for that purpose. During the partial phases, the filter must be in place over the phone’s camera lens. If you are attaching your phone to binoculars, a telescope, or any other optics, the filter belongs on the front of that optical device, not near the eyepiece and definitely not somewhere random that “sort of covers it.”
There is one important exception: totality. If you are physically inside the path of totality and the moon completely covers the bright face of the sun, that brief period is the time when the filter comes off and the corona can be photographed directly. But totality is short, dramatic, and easy to mistime if you are not prepared. If you are not in the path of totality, or if any part of the sun is still visible, the filter stays on. No debate. No improvisation. No “maybe this is close enough.”
Also, do not try to look through a camera lens, telescope, or binoculars while wearing eclipse glasses and assume that solves everything. It does not. Eye protection and camera filtration are related, but they are not interchangeable in every setup. Keep your safety simple, correct, and boring. Boring is good when the alternative is eye damage.
What You Actually Need
The Basic Setup
You can do a lot with a surprisingly small kit. Start with your smartphone, a proper solar filter for smartphone use, and a stable support. A small tripod is ideal, but even a clamp mount on a fence or a steady tabletop beats shaky hands and wishful thinking. Add a microfiber cloth to clean the lens, because eclipse photography is not the moment to discover your camera has been living behind a greasy fingerprint.
Helpful Extras
A Bluetooth shutter remote or self-timer is useful because tapping the screen can shake the shot. A clip-on telephoto lens can help the eclipse appear larger if it is good quality. The key phrase is good quality. A cheap accessory lens can turn your eclipse into a glowing smear with commitment issues. If your phone has a dedicated optical telephoto camera, use that before pinching to zoom.
Optional Features Worth Using
If your phone supports RAW, ProRAW, or advanced manual controls, that is a nice bonus. RAW files preserve more detail and give you more freedom in editing later. Burst mode is also handy during rapid changes, especially near totality. None of this is mandatory, but each feature gives you a little more room to recover from tricky lighting.
How to Set Up Your Phone Before the Eclipse
Preparation matters more than people think. The best time to learn your camera controls is not while the moon is taking a bite out of the sun and strangers are gasping around you like it is the season finale of the universe. Practice the day before.
Clean your lens first. Then open your camera app and disable flash. The flash contributes nothing useful to eclipse photos, unless your goal is to annoy nearby humans. Next, learn how to lock focus and exposure on your phone. On iPhone, AE/AF Lock can help keep your camera from constantly hunting. On many Android phones, you can tap and hold to lock focus or adjust exposure manually. If you have a Pixel or another phone with a timer, turn it on. Even a three-second delay can make a visible difference.
If your phone supports RAW capture, enable it before the event. If you have an iPhone Pro model with ProRAW, turn it on ahead of time. If you are using a Pixel for a wider post-totality environmental shot, a stable surface and timer are your friends there, too. The point is to remove last-minute decisions. The eclipse should be the surprise. Your settings should not be.
The Best Camera Settings for Eclipse Photos on a Phone
For Partial Phases
With the solar filter attached, use your phone’s main or telephoto lens, whichever gives the best optical reach. Avoid heavy digital zoom. Keep the exposure slightly darker than your phone probably wants. If the sun looks like a giant glowing blob with no shape, pull exposure down until the crescent or ring becomes more defined.
Use the timer or a remote. Stay still. Take several frames as the eclipse changes. The light will shift gradually, and so will your results. Think of it as collecting options instead of relying on one heroic tap.
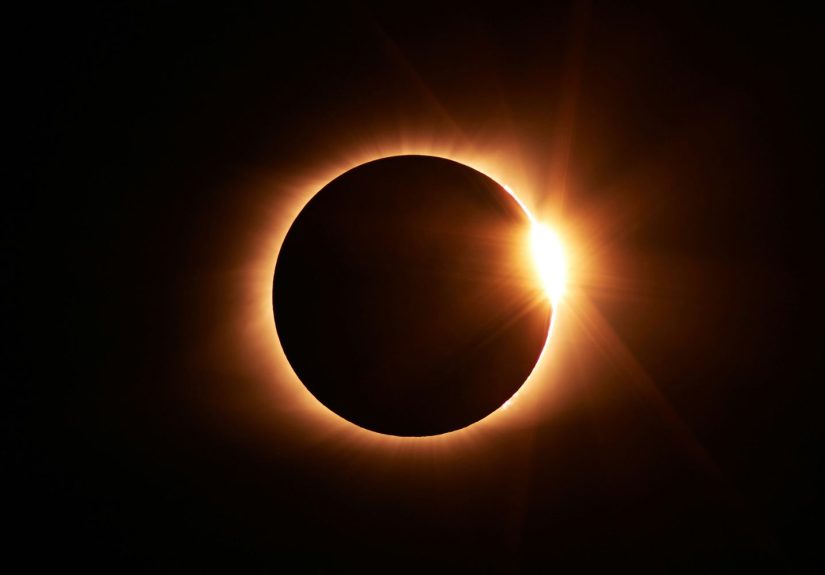
For Totality
If you are in the path of totality, remove the filter only during the fully total phase. This is when the corona, the darkened sky, and the emotional chaos all arrive at once. Your phone may suddenly try to brighten everything too aggressively, so lock focus and exposure if you can. Burst mode can help because the scene changes fast, and you may get one frame where the corona structure looks cleaner or the crowd reaction adds life to the image.
Wide shots can be especially powerful during totality. Yes, the dramatic close-up is tempting. But a wide image showing the dark horizon, the people looking up, and the strange twilight mood can tell the story better than a tiny technical crop ever will.
For Environmental Eclipse Shots
Some of the best phone photos are not of the sun itself. Try shooting the changing daylight, shadows under trees, people in eclipse glasses, reflections in windows, or a skyline that suddenly looks like afternoon forgot how to afternoon. These photos are easier for a phone to handle and often more memorable later.
Composition Tips That Make Eclipse Photos Better
This is the section where your eclipse photos stop looking like scientific evidence and start looking like pictures someone actually wants to share. Composition matters. A lot.
First, do not center every shot. Place the eclipse off to one side and let the rest of the frame do some work. A tree line, rooftop, mountain ridge, bridge, or city silhouette gives your photo scale and place. That instantly makes it more interesting than “bright circle in blank sky, version 14.”
Second, think in layers. Foreground, middle ground, background. Maybe the foreground is a person holding eclipse glasses. Maybe the middle ground is a field or a street. Maybe the background is the eclipsed sun. That layered structure helps even a simple phone image feel more cinematic.
Third, shoot vertical and horizontal. Vertical works well for people-centered storytelling and social media. Horizontal is better for landscapes and the strange atmosphere of totality. Take both. Your future self will appreciate your lack of commitment.
Finally, take a few seconds to look around. Eclipse memories are often made of details: the way shadows sharpen, the way people go quiet, the way a parking lot suddenly feels like a moonlit movie set. Those details are photo gold.
Common Mistakes to Avoid
Mistake one: using no solar filter during the partial phases. This is the big one, and it is not worth getting wrong.
Mistake two: relying on digital zoom. Pinch zoom can make the eclipse larger, but it often makes the image softer, noisier, and sadder.
Mistake three: forgetting stability. The eclipse is not blurry. Your hands are.
Mistake four: spending the entire event staring at the screen. Get the shot, then actually experience the eclipse. You are not being graded by the internet.
Mistake five: expecting one perfect close-up to beat a thoughtful set of different images. A small gallery of varied shots usually tells the story better than one extreme crop.
How to Edit Eclipse Photos Without Making Them Weird
Once the event is over, a little editing can help. The keyword is little. Bring down highlights if the sun area is too bright. Add a touch of contrast to define the crescent or corona. Adjust warmth or coolness carefully to match the scene you remember. Crop for stronger composition if needed.
If you shot RAW or ProRAW, you will have more flexibility. That can be useful for preserving highlight detail or balancing a dark foreground under totality. But resist the urge to oversharpen, oversaturate, or create an eclipse that looks like it is auditioning for a sci-fi reboot. Natural edits usually age better than dramatic ones.
A Smarter Shot List for Eclipse Day
If you want variety, plan to capture five kinds of images. First, take a filtered close-up of the partial phase. Second, shoot a wider landscape that shows the location. Third, photograph people reacting. Fourth, capture the strange light and atmosphere around totality. Fifth, after the peak moment, take one image that feels personal, whether that is your family, your travel setup, or the quiet right after everything brightens again.
That shot list keeps you from obsessing over one frame and forgetting the bigger story. It also makes your final photo set much more useful for a blog post, social post, or personal album.
Conclusion
The best eclipse photos with your phone come from a mix of safety, preparation, and realism. You are not trying to outshoot a space agency with a device that also contains grocery reminders and old screenshots. You are trying to make the most of a rare event with the camera you already own. And that is absolutely possible.
Use the right solar filter. Practice your camera controls before the event. Stabilize your phone. Favor optical zoom over digital zoom. Lock focus and exposure when you can. Shoot both the sun and the world around it. And once you have your pictures, lower the phone for a minute and look up. The best image may live in your camera roll, but the best memory probably will not.
Real-World Experiences: What Eclipse Photography With a Phone Actually Feels Like
The funny thing about photographing an eclipse with your phone is that the experience rarely matches the plan in your head. In your imagination, you arrive early, set up calmly, attach the solar filter with the precision of a NASA engineer, and capture stunning images while everyone nearby whispers, “Wow, that person clearly has their life together.” In real life, there is usually wind, at least one confusing camera notification, and a moment when you wonder whether your tripod was designed by a personal enemy.
Still, that chaos is part of the charm. The first time many people try to shoot an eclipse on a phone, they are surprised by how small the sun looks on-screen. It can feel almost disappointing at first. You point the camera up, and instead of a grand cosmic event, you get a bright dot in a huge sky. Then you start adjusting. You lower exposure. You steady the phone. You stop pinching to zoom like you are trying to inspect a spreadsheet. Suddenly, the crescent shape appears. It is tiny, yes, but it is real. That is the moment the whole thing becomes addictive.
Another common experience is discovering that the surrounding world is just as photogenic as the eclipse itself. People often go in determined to capture the sun and come out loving the human side of the event more. Someone laughing in eclipse glasses. A kid pointing at the sky like they personally scheduled the moon. A line of strangers passing around spare viewers and acting like old friends for ten minutes. Phone cameras are excellent for these moments. They are quick, flexible, and less intimidating than large camera rigs, which means you can move through the scene and document the mood as it unfolds.
Totality, for the lucky people who experience it, tends to scramble every plan. Even people who practiced their settings sometimes forget half their shot list when the sky darkens and the crowd gasps. That is normal. In fact, it is one reason simple setups work so well. A phone on a tripod with exposure already dialed in can free your brain to be present. You press the shutter, maybe grab a burst, and then you actually witness the thing instead of negotiating with menus while the universe puts on a limited-time performance.
There is also a very specific kind of joy in reviewing eclipse photos later. Some frames will be bad. One will be blurry. One will be mostly your thumb. Another will be weirdly beautiful for reasons you cannot explain. That is part of the record. The photos become less about technical perfection and more about proof that you were there when daylight changed character and everyone around you briefly became an astronomer. A phone photo may not rival a telescope image on pure detail, but it can capture atmosphere in a way that feels personal and immediate.
And that, honestly, is the best reason to photograph an eclipse with your phone. It is the camera you already carry, the one you know, the one that lets you move from sky to crowd to landscape in seconds. With a little planning, it becomes more than good enough. It becomes the tool that helps you remember not only what the eclipse looked like, but what it felt like to stand under it.


