Table of Contents >> Show >> Hide
- What Window Insulation Film Actually Does (and Why It Works)
- Pick the Right Product (So You Don’t Install the Wrong “Film”)
- Tools and Materials Checklist
- Before You Start: Prep for a Clean Seal (and Fewer Rage Whispers)
- How to Install Window Insulation Film: 15 Steps
- Step 1: Identify the Worst Offenders
- Step 2: Decide Which Windows Should NOT Be Covered
- Step 3: Measure the Window Frame Opening
- Step 4: Clear the Area (and Protect Your Stuff)
- Step 5: Clean the Frame Thoroughly
- Step 6: Let the Frame Dry Completely
- Step 7: Address Big Gaps First (Optional but Smart)
- Step 8: Apply Double-Sided Tape Around the Frame
- Step 9: Keep the Tape Backing On (For Now)
- Step 10: Cut the Film Oversized
- Step 11: Peel the Top Tape Backing and Attach the Film
- Step 12: Attach the Sides, Then the Bottom
- Step 13: Shrink the Film with a Hair Dryer
- Step 14: Trim Excess Film Carefully
- Step 15: Final Seal Check (and Micro-Fixes)
- Troubleshooting: Common Problems and Quick Fixes
- Safety and Practical Notes (The Stuff People Wish They Read First)
- How Long It Lasts and How to Remove It Cleanly
- When Window Insulation Film Isn’t Enough
- Real-World Lessons: of “What People Actually Learn” (So You Don’t Have To)
- Conclusion
Drafty windows have a special talent: they can turn a cozy living room into a “Why do I own sweaters?” situation in about 12 seconds.
The good news is that window insulation film (the clear shrink-wrap kind) is one of the fastest, cheapest, most satisfying DIY fixes you can do in an afternoon.
Done right, it tightens up like a drum, looks nearly invisible, and helps your home feel warmerwithout blocking your winter sunshine.
What Window Insulation Film Actually Does (and Why It Works)
Most shrink-film window kits work less like “adding insulation” and more like “stopping tiny wind storms from sneaking into your house.”
The film seals around the interior window frame with double-sided tape, creating a still air pocket between the cold glass and your warm room.
That trapped air (sometimes called an “air lock”) reduces drafts and improves comfort.
Here’s the honest take: plastic film kits can add a modest bump in thermal performance and noticeably reduce air leakage.
Think of it as a seasonal bandage for leaky windowsexcellent for comfort and draft control, but not a permanent cure if the window itself is failing.
Pick the Right Product (So You Don’t Install the Wrong “Film”)
“Window film” can mean two very different things:
- Shrink insulation film kits (what this guide is about): clear plastic + double-sided tape; you heat it with a hair dryer to tighten.
-
Permanent/semipermanent adhesive window films (solar control, privacy, UV): typically installed “wet” with a solution and squeegee, trimmed to the glass edge.
Great for glare/UV/heat gain control, but not the same install method.
Also consider durability. If you have kids, pets, or a household that treats hallways like a NASCAR track, look for “heavy-duty” kits with thicker film.
Thicker film tends to resist punctures better and can be easier to handle during install.
Tools and Materials Checklist
Most kits include the film and tape, but your results depend on prep and a few basic tools.
- Window insulation film kit (clear shrink film + double-sided tape)
- Scissors
- Utility knife (fresh blade recommended)
- Hair dryer
- Tape measure
- Rubbing alcohol + cotton balls or a lint-free cloth
- Ladder or step stool (if needed)
- Optional: microfiber cloth, painter’s tape, extra double-sided tape for tricky trim
Before You Start: Prep for a Clean Seal (and Fewer Rage Whispers)
The most common reason shrink film “doesn’t work” is not the filmit’s the tape losing its grip.
Tape needs a clean, dry, grease-free surface. Take five minutes now and save yourself thirty minutes of redoing it later.
- Choose a calm day. If your home is very cold, warm the room a bit before installing so the tape bonds well.
- Clean the frame, not just the glass. Dust on the trim = tape failure waiting to happen.
- Know your surface. Many kits are intended for metal, painted wood, or vinyl frames. Avoid questionable surfaces (like delicate wallpaper or crumbly plaster) unless the manufacturer says it’s safe.
- Plan for safety. Don’t seal a window you might need as an emergency exit.
How to Install Window Insulation Film: 15 Steps
Step 1: Identify the Worst Offenders
Start with the windows that feel drafty, rattle in the wind, or form condensation.
If you want to be extra thorough, do a quick “draft detective” check: hold a tissue near the trim or use a gentle smoke source (like incense) near seams to see airflow movement.
(If you’re not into smoke indoors, the tissue test is the polite version.)
Step 2: Decide Which Windows Should NOT Be Covered
If a window is used for ventilation in winter (kitchen smoke, bathroom moisture) or could be needed for emergency egress, skip it or use another draft-control method.
Think of shrink film as a seasonal sealonce it’s up, that window is effectively “closed for the season.”
Step 3: Measure the Window Frame Opening
Measure the width and height of the interior frame where you’ll attach tape (usually the trim or the inside of the frame).
Buy a kit that comfortably covers your dimensions. If you’re between sizes, go largeryou can trim film, but you can’t stretch regret.
Step 4: Clear the Area (and Protect Your Stuff)
Move curtains, plants, and breakables away from the window.
If you have mini blinds, decide now whether you’ll need access to them while the film is installed.
A little planning here prevents the winter classic: “I sealed the blinds wand behind plastic.”
Step 5: Clean the Frame Thoroughly
Wipe the frame/trim where tape will stick using rubbing alcohol on a lint-free cloth or cotton balls.
Focus on corners and the sillthose spots collect oils and dust like it’s their job.
Step 6: Let the Frame Dry Completely
Tape and moisture are not friends. Give it a minute.
If your home is humid, run a fan briefly or wait until the surface is fully dry to the touch.
Step 7: Address Big Gaps First (Optional but Smart)
If you can see daylight around trim, have loose weatherstripping, or notice major gaps, film alone may not fix everything.
Quick upgrades like replacing worn weatherstripping or sealing obvious trim gaps can make the film work betterand make the whole room feel less like a chilly cave.
Step 8: Apply Double-Sided Tape Around the Frame
Apply tape along the perimeter where the film will attach.
Press it firmly as you go, especially in corners.
For contoured or uneven molding, you may need extra tape to create a continuous, airtight line.
Tip: Some rolled-film kits instruct starting with the top edge first; sheet kits often have you tape all sides before attaching the film.
Either way, your mission is the same: continuous tape, no gaps.
Step 9: Keep the Tape Backing On (For Now)
Don’t peel the backing immediately unless your kit says to.
Leaving the liner on while you place all tape helps prevent the tape from grabbing lint, sleeves, or your soul.
Step 10: Cut the Film Oversized
Cut the film so it extends a few inches beyond the taped area on all sides.
Oversizing gives you room to reposition and smooth wrinkles before committing.
Step 11: Peel the Top Tape Backing and Attach the Film
Start at the top edge. Peel the tape backing along the top and press the film onto it, keeping the film level.
Lightly tack it first, then smooth once it’s aligned.
If you’re using a rolled kit, make sure you’re attaching the correct edge of the film (some rolls have a folded edge and a loose edgeusing the wrong edge makes everything harder).
Step 12: Attach the Sides, Then the Bottom
Peel the side tape backing one side at a time, smoothing the film as you go.
Finish with the bottom edge. Gently pull the film taut (not stretched tight like a trampoline) to minimize wrinkles before shrinking.
Press firmly along the tape line to form a strong bond and airtight seal.
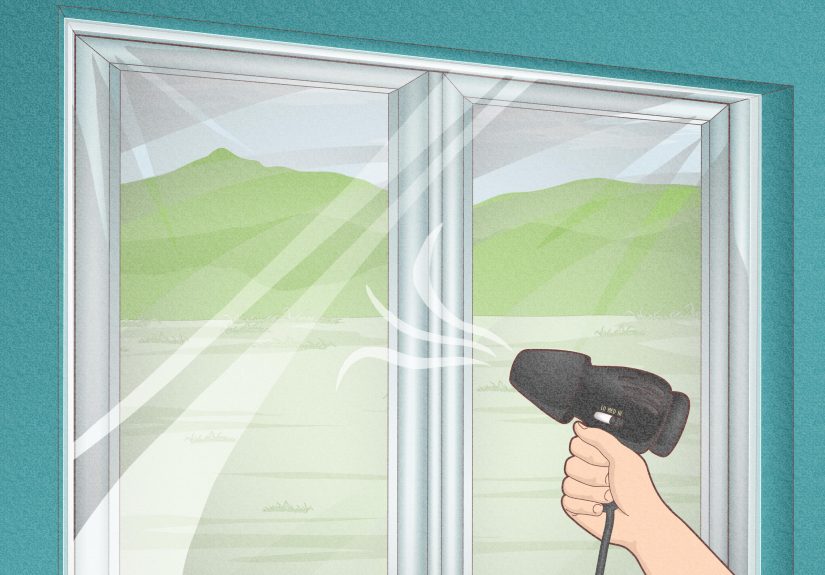
Step 13: Shrink the Film with a Hair Dryer
Set the hair dryer to a higher heat setting and hold it several inches away from the film.
Move the dryer continuouslythink “paintbrush strokes,” not “laser beam.”
Start near the edges and work inward to chase wrinkles out.
- Don’t touch the plastic with the hot dryer.
- Don’t overshrink. Too much tension can stress tape and cause lifting later.
- Be patient. Some hair dryers run cooler and need extra time.
Step 14: Trim Excess Film Carefully
Once the film is smooth and tight, trim the extra plastic around the edges.
Use sharp scissors or a utility knife with a fresh blade.
Dull blades can snag and rip, turning your neat job into a plastic confetti moment.
Step 15: Final Seal Check (and Micro-Fixes)
Walk around the window and look for loose edges, gaps, or spots where tape didn’t bond.
Press down any lifting edges. If you find a tiny pinhole, a small piece of clear tape can patch it.
Then do the simplest test: stand near the window. If the “cold waterfall” feeling is gone, you nailed it.
Troubleshooting: Common Problems and Quick Fixes
Problem: The tape won’t stick
- Cause: Dust, oil, moisture, or a textured/paint-chalky surface.
- Fix: Re-clean with rubbing alcohol and dry thoroughly. Consider extra tape for uneven molding.
- Pro move: Warm the room slightly so adhesive bonds better.
Problem: Wrinkles won’t disappear
- Cause: Not enough heat, dryer too far away, or film too slack.
- Fix: Move the dryer closer (still several inches away), keep it moving, and work edges-to-center. Give thicker film more time.
Problem: The film pulled loose after shrinking
- Cause: Overshrinking created too much tension.
- Fix: Re-tape the lifting area (or replace tape) and reattach. Next time, shrink graduallydon’t try to “one-pass” it into perfection.
Problem: Condensation still happens
Film can help reduce moisture buildup, but humidity, poor ventilation, and very cold glass can still cause condensation.
Use bathroom/kitchen fans, keep indoor humidity reasonable, and consider longer-term window solutions if it’s persistent.
Safety and Practical Notes (The Stuff People Wish They Read First)
- Emergency exits: Don’t seal windows you may need for escape.
- Ventilation: If you rely on a window for airflow (or you live with a passionate cook), leave at least one nearby window unsealed.
- Heat tools: Keep the dryer moving and away from the plastic to avoid overheating.
- Kids/pets: Film is tougher than it looks, but curious claws and sharp toys can puncture it. Heavy-duty kits help.
How Long It Lasts and How to Remove It Cleanly
Most people use shrink film kits for one heating season. When spring arrives and you’ve had your fill of “indoor greenhouse chic,” removal is straightforward:
- Use warm air (a hair dryer on low) to soften adhesive along the tape line.
- Peel the film away slowly.
- Remove tape residue with mild solutions as needed (start gentle, test a small area first).
If you’re a careful remover, you’ll usually avoid paint damage. If the trim paint is already peeling or fragile, treat the tape like it’s pulling off a loose bandage: slow and steady.
When Window Insulation Film Isn’t Enough
If you find yourself shrink-wrapping the same windows every winter, it may be a sign of bigger issues:
failed seals, worn weatherstripping, gaps behind trim, or single-pane windows that simply struggle in harsh weather.
Shrink film is a great seasonal comfort boostbut pairing it with basic air sealing and insulation upgrades typically delivers bigger, longer-lasting gains.
Real-World Lessons: of “What People Actually Learn” (So You Don’t Have To)
Here’s the part no instruction sheet says out loud: installing window insulation film is 80% preparation and 20% “why is this corner still wrinkly?”
The first window often looks like you wrapped it with optimism and a prayer. The second window looks like you’ve been doing this for years. That’s normal.
The biggest surprise for most DIYers is how picky tape can be. You can clean the glass until it sparkles like a car commercial, but if the trim has a light film of dust, hand oils, or cleaner residue, the tape will fail.
People usually discover this at 10:47 p.m. when the bottom edge lets go and the film starts gently flapping like a tiny ghost. The fix is boring but effective:
rubbing alcohol, fully dry surface, and firm pressure along the entire tape lineespecially corners.
Another common lesson: “taut” is not the same as “stretched.”
If you pull the film super tight before shrinking, the hair dryer can turn that tension into edge lift.
It’s like tightening a drum until it ripsimpressive, but not the goal.
Aim for smooth and lightly snug, then let heat do the real tightening.
Speaking of heat: hair dryers vary wildly. Some run hot enough to make film tighten in seconds; others are basically warm breezes with confidence.
If your film won’t shrink, don’t panic and don’t melt it out of spite.
Move closer (still keeping distance), keep the dryer moving, and work systematically: edges first, then the center.
Thicker “heavy-duty” films often need more time, and that’s not a flawit’s the tradeoff for durability.
Trimming is where the “looks pro” transformation happensif you use a sharp blade.
A dull utility knife doesn’t cut cleanly; it drags and snags, which can tear the film and make you consider new hobbies like rock polishing or staring at walls.
Fresh blade, slow cuts, and a steady hand get you that crisp finish.
If you’re nervous, trim with scissors first, then do a final tidy pass.
Lastly, plan around real life. If you have mini blinds, decide whether you need to use them this season.
If you have pets, accept that your cat will view the finished film as a luxury drumhead.
And if you’re sealing a bedroom window, remember: once it’s sealed, opening it for fresh air requires removing the film.
Many people compromise by sealing the draftiest windows first (living room, office) and leaving at least one easy-vent window unsealed.
The best “experience-based” tip is simple: do one window completely, learn from it, then knock out the rest.
By window three, you’ll be installing film with the calm confidence of someone who has defeated winterone perfectly shrink-wrapped rectangle at a time.
Conclusion
Installing window insulation film is one of those rare DIY projects that’s cheap, quick, and immediately noticeable.
Focus on clean, dry trim; continuous tape with strong corner adhesion; and patient, even heat.
You’ll cut drafts, improve comfort, and make your home feel less like it’s sharing air with the outdoors.
And if you love the results? Use it as a stepping stone toward longer-term fixes like weatherstripping, caulking, or professional air sealing.


