Table of Contents >> Show >> Hide
- What Makes It “Living” (and Why It’s Not a Regular Pumpkin Arrangement)
- Pick the Right Pumpkin (Your Future Self Will Thank You)
- Materials and Tools (AKA the “Don’t Panic” Checklist)
- Step-by-Step: How to Make a Living Pumpkin Succulent Centerpiece
- Step 1: Prep your pumpkin base
- Step 2: Prep your succulents (the secret to a polished look)
- Step 3: Build a moss “landing pad”
- Step 4: Arrange succulents like a designer (without becoming one)
- Step 5: Secure everything (without gluing your life together)
- Step 6: Add the “finishing touches” (optional, but fun)
- Care Tips: Keep It Pretty for Weeks (Not Days)
- How Long Will a Living Pumpkin Succulent Centerpiece Last?
- How to Save (and Replant) the Succulents After Pumpkin Season
- Design Ideas That Look Expensive (But Aren’t)
- Troubleshooting: Fix the Weird Stuff Fast
- FAQs
- Conclusion: A Centerpiece That’s Equal Parts Cozy and Clever
- Experiences and Real-World Lessons (The 500-Word “What You’ll Actually Notice” Section)
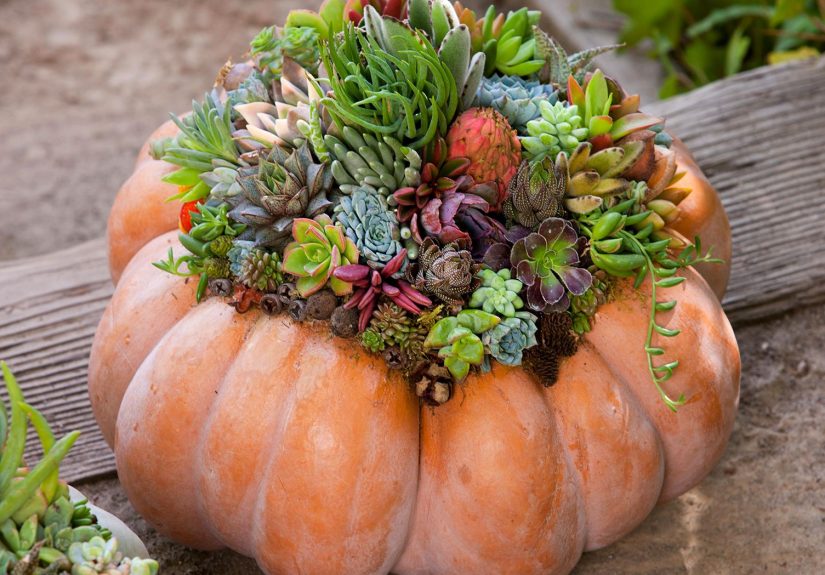
If fall had a mascot, it would be a pumpkin. If fall had a cool mascot, it would be a pumpkin wearing a crown of succulents like it just got back from a desert spa weekend. A living pumpkin succulent centerpiece is exactly what it sounds like: a real pumpkin topped (or filled) with real succulents, creating a low-mess, high-wow table moment that looks like you hired a florist who charges by the gasp.
The best part? You’re not “sacrificing” the succulents to the seasonal decor gods. When pumpkin season ends, you can usually replant most of them and keep the party going year-round. Let’s build one that looks designer, lasts as long as a pumpkin reasonably can, and doesn’t require a craft degree or a background check at the glue-gun store.
What Makes It “Living” (and Why It’s Not a Regular Pumpkin Arrangement)
A traditional pumpkin centerpiece is basically: pumpkin + candles + maybe a suspicious amount of glitter. A living pumpkin centerpiece uses live plants (succulents) that continue to grow (slowly, but still) while perched on the pumpkin. Because succulents store water in their leaves, they’re ideal for this project: they can handle the “no pot, no soil, just vibes” phase for weeks.
There are two main styles:
- No-carve topper (most popular): You keep the pumpkin intact, glue/secure a pad of moss on top, then nestle succulent cuttings or small plants into the moss. This tends to make the pumpkin last longer because you’re not exposing the inside to air and microbes.
- Carved “planter” insert: You hollow a pocket and place a small nursery pot (or a liner) inside with soil, then plant succulents like a mini container garden. It’s slightly more work, but it can be more stable and reusable if you’re using a hidden pot.
Pick the Right Pumpkin (Your Future Self Will Thank You)
The pumpkin is your “vase,” your base, and your time limitso choose wisely. Think less “perfect jack-o’-lantern candidate” and more “sturdy little coffee table.” Here’s what matters:
Shape: Go for a stable top
Look for a pumpkin with a flatter top or at least a wide shoulder area. Tall, skinny pumpkins are cute until your succulent crown starts sliding like it’s late for an appointment. Shorter, squat pumpkins (including many heirloom varieties) are easier for beginners because you have more usable surface area.
Condition: No soft spots, no drama
Skip any pumpkin with bruises, cuts, mushy spots, or leaks. You’re building a centerpiece, not fostering a science experiment. The skin should feel firm all around. A stem is a bonus (it looks great and can help with handling), but not required.
Optional but helpful: Clean and sanitize the surface
If you want extra longevity, wipe the pumpkin down and let it fully dry before decorating. Some garden/extension guidance for pumpkin preservation recommends a mild sanitizing approach (often a diluted bleach solution) to reduce surface microbesuse common sense, keep it off your plants, and let the pumpkin dry completely before adding succulents. If you’d rather avoid bleach, a vinegar-and-water wipe is a popular alternative for decorative pumpkins.
Materials and Tools (AKA the “Don’t Panic” Checklist)
- 1 fresh pumpkin (medium is easiest to work with)
- Succulents (mix sizes, textures, and shapes; cuttings work great)
- Sphagnum moss (best “root-friendly” option) or sheet/forest/Spanish moss
- Adhesive: hot glue gun or clear craft gel/tacky glue or floral adhesive
- Pruners or scissors (for trimming succulent stems/roots and moss)
- Floral pins or U-pins (optional, for a no-glue or low-glue approach)
- Disposable gloves (optional, if you don’t want sticky fingers)
- A tray or plate (to protect your table and catch any moisture)
Step-by-Step: How to Make a Living Pumpkin Succulent Centerpiece
Step 1: Prep your pumpkin base
- Wipe the pumpkin clean with a dry cloth (or a lightly damp one), then dry it thoroughly.
- Decide where your succulent “garden” will situsually centered on top or slightly off-center for a more natural look.
- Place the pumpkin on a plate or tray so it doesn’t sit directly on a porous table surface.
Step 2: Prep your succulents (the secret to a polished look)
You can use small potted succulents (soil removed) or cuttings. Either works. The goal is to create a mix: one or two “hero” succulents (larger rosettes), several medium fillers, and a handful of small/trailing pieces.
- If using small potted succulents: Gently remove them from their pots, loosen the soil, and brush off as much as you can. You don’t need perfection, but less soil means less moisture trapped in the moss (which reduces rot risk).
- If using cuttings: Trim stems neatly. For fresh cuts, let them sit out of direct sun for a couple of days so the cut end can callus (this can reduce rot when rooting). If you bought cuttings online, they’re often already callused.
Step 3: Build a moss “landing pad”
Moss is the MVP here. It hides glue, cradles cuttings, and gives roots somewhere to form. Aim for a pad about ¼ to ½ inch thick, large enough to hold your design.
- Apply your adhesive to the pumpkin where the moss will go. If using hot glue, work in sections so it doesn’t cool before you press the moss down.
- Press moss firmly into the adhesive. Hold it for a few seconds so it grips.
- Shape the edges: trim for a clean “floral arrangement” vibe, or leave it a bit wild for rustic charm. Both are correct. (Fall is forgiving like that.)
Step 4: Arrange succulents like a designer (without becoming one)
Here’s the trick most pros use: start tall in the center and work outward. This creates a mound that looks intentional instead of “I dropped my plants and committed to it.”
- Place your largest succulents firstslightly off-center looks especially natural.
- Add medium succulents around them, angling some outward.
- Tuck smaller cuttings into gaps. Let trailing succulents drape over the moss edge for movement and softness.
Helpful plant choices: rosette types (like echeveria-style shapes), hardy rosettes (often sold as “hens and chicks”), sedum varieties, and small textural pieces (like spiky or bead-like succulents) combine beautifully because they contrast without arguing.
Step 5: Secure everything (without gluing your life together)
You have a few options depending on how “forever” you want the arrangement to feel:
- Hot glue method: Use small dabs of glue on the moss (not directly on delicate leaves), then press the succulent base in place. Use minimal gluethink “tack,” not “cement.”
- Tacky/craft gel glue: Slower set time, easier adjustments. Great if you’re indecisive (or artistic).
- Floral pins/U-pins: Pin succulents into the moss. This is especially handy if you want to avoid glue or plan to reuse plants quickly.
Step 6: Add the “finishing touches” (optional, but fun)
Once your succulent layout looks full and balanced, you can add seasonal accents around the edges:
- Dried seed pods or wheat stems for height
- Mini pinecones or acorns for texture
- Cinnamon sticks (smells like you tried harder than you did)
- Extra moss tucked around the rim to hide mechanics and soften transitions
Care Tips: Keep It Pretty for Weeks (Not Days)
Your centerpiece has two living-ish parts: the pumpkin (very alive… in spirit) and the succulents (actually alive). The goal is to slow pumpkin breakdown and avoid overwatering the plants.
Light
Succulents want bright light. Place the centerpiece near a bright window if possible, especially if you plan to keep it for more than a week. If it’s strictly for a dinner party, it can live on the table for the evening and move back to better light afterward.
Water (the most common way people accidentally ruin this)
Succulents don’t want soggy anything. Instead of “watering the pumpkin,” lightly moisten the moss only when it feels crisp-dry. Use a squeeze bottle, dropper, or a careful pour aimed under leaves so water doesn’t pool in rosettes. If water sits in the plant’s center, it can encourage rot.
Temperature and placement
Pumpkins last longer in cooler, dry conditions. Keep your centerpiece away from heat vents, direct sun blasting through a window, fireplaces, and candles. Also: set it on a tray so condensation or moisture doesn’t stain surfaces.
Mold prevention (a realistic conversation)
Even uncarved pumpkins eventually break down. To slow that down:
- Start with a firm, undamaged pumpkin and keep it dry on the outside.
- Promote airflow around the base (don’t crowd it into a wet centerpiece runner).
- If you sanitized the pumpkin beforehand, make sure it was fully dry before attaching moss.
- If a small mold patch appears, gently wipe it away and move the pumpkin to a cooler, drier spot.
How Long Will a Living Pumpkin Succulent Centerpiece Last?
In typical indoor conditions, many people get several weeks out of an intact pumpkin centerpiece, sometimes longerespecially if the pumpkin stays cool and dry and the moss isn’t kept wet. Mini pumpkins can sometimes spoil sooner (less mass, faster drying), while thicker-skinned heirlooms can sometimes last longer.
Your “time to retire the pumpkin” signs:
- Soft spots or collapsing skin
- Persistent mold that keeps returning
- A smell that says, “This is no longer decor; this is a warning”
How to Save (and Replant) the Succulents After Pumpkin Season
This is where the project quietly becomes a gateway into succulent collecting. Once the pumpkin starts to decline:
- Gently remove succulents from the moss. If any are glued, ease them free slowlydon’t yank leaves.
- Let any freshly exposed cut ends dry and callus for a day or two (especially for stem cuttings).
- Plant them in a pot with drainage and a well-draining succulent/cactus mix.
- Water lightly after a few days, then follow normal succulent care (bright light, deep but infrequent watering once established).
Tip: If some succulents look a little wrinkled, don’t panic. A short “in-between” period is normal. Once they’re in proper soil and light, they usually perk back up.
Design Ideas That Look Expensive (But Aren’t)
1) The Neutral Thanksgiving Table
Use a white pumpkin, pale green succulents, and soft gray-green moss. Add a few wheat stems and tiny pinecones around the rim. It reads “modern farmhouse,” even if you live in a studio apartment with exactly one chair.
2) The Bold Autumn Color Pop
Choose an orange pumpkin and pair it with deep purple, burgundy, and blue-green succulents. Add dried seed pods or red berries (faux is fine) for contrast. This one photographs like a magazine spread.
3) Mini Pumpkin Place Settings
Make tiny succulent-topped pumpkins and place one at each setting. Bonus points if you tuck in a name card. Double bonus if the name card is spelled correctly.
Troubleshooting: Fix the Weird Stuff Fast
“My moss won’t stick.”
The pumpkin may be dusty or damp. Wipe it clean and dry completely. Use more adhesive (in sections), and press firmly. Spray adhesive can help with moss coverage, then reinforce with small glue dabs where needed.
“My succulents keep sliding.”
Start with a thicker moss pad so stems have something to grip. Use U-pins, floral wire, or a few strategic glue dabs near the base. Also: keep heavier succulents closer to the center.
“The succulents look droopy.”
Check light firstlow light causes stretching and fatigue. Next, check moisture: bone-dry moss can dehydrate cuttings, but soggy moss can rot them. Aim for lightly moist moss, not wet. And keep water out of rosette centers.
“My pumpkin is molding early.”
Move it to a cooler, drier spot with airflow. Reduce moss moisture. If you used a pumpkin with hidden soft spots, it may simply be on a faster timelineswap the base and reattach the moss-and-succulent “topper” if you built it as a single piece.
FAQs
Do I have to carve the pumpkin?
Nope. In fact, keeping the pumpkin intact often helps it last longer. Carving is optional if you’re doing a pot-insert method or want a true planted container garden.
Will hot glue hurt succulents?
Many DIY tutorials use hot glue successfully because it sets quickly and doesn’t require wet soil. Use small amounts, aim for the moss/base rather than delicate leaf tissue, and avoid smearing hot glue into the center of rosettes.
Can I use faux pumpkins?
Yesand they can be a great option if you want the look for months (or you’re decorating early and refuse to let a vegetable control your calendar). Faux pumpkins also let you build a reusable planter insert that can live on long after fall.
Conclusion: A Centerpiece That’s Equal Parts Cozy and Clever
A living pumpkin succulent centerpiece is one of those rare DIY wins where the process is genuinely relaxing, the result looks high-end, and the cleanup doesn’t involve vacuuming glitter out of your soul. Pick a firm pumpkin, build a comfy moss pad, start with tall succulents in the center, and keep moisture light and controlled. You’ll end up with a centerpiece that feels like fallwithout smelling like it’s going too authentic.
Experiences and Real-World Lessons (The 500-Word “What You’ll Actually Notice” Section)
People usually expect this project to be “crafty-chaos” (hot glue strings everywhere, succulents rolling away like tiny green tumbleweeds). In reality, the experience is surprisingly calm once you treat it like arranging a bouquet: lay everything out first, then build from the center outward. The biggest emotional shift tends to happen around minute eightright when the first succulent sticks successfully and you realize, “Oh. I’m basically a fall florist now.”
The most common first-time surprise is how much structure moss provides. A thick moss pad (that ¼–½ inch range) turns the top of the pumpkin into a soft pinboard, especially if you’re using U-pins or floral wire. Beginners who go too thin end up fighting gravity; beginners who go thicker suddenly feel like design geniuses. If you want a centerpiece that looks lush, the moss is where “lushness” is bornsucculents are the stars, but moss is the stage lighting.
The second surprise is how much plant variety changes the vibe. A pumpkin topped with only rosettes can look neat and modern, but it sometimes reads a little “cookie-cutter” if every plant has the same silhouette. Mixing in a few textural piecesspiky, beaded, trailingmakes it look more organic and expensive. A simple example: one large rosette as the focal point, two medium rosettes for balance, a handful of tiny fillers for density, and one trailing strand to soften the edge. That one trailing plant does a lot of heavy lifting, like the friend who always brings the best snacks to the party.
On the practical side, DIYers often learn quickly that water management is the difference between “lasts for weeks” and “why is my centerpiece fuzzy?” The instinct is to mist because it feels gentle, but misting leaves can trap moisture in rosettes. The better experience is targeted moisture: dampen the moss only, keep the leaves dry, and place the centerpiece where it gets bright light but not heat. A squeeze bottle feels oddly satisfying herelike you’re doing plant skincare.
Another real-world moment: the centerpiece tends to become a conversation magnet. Guests will touch it (politely, hopefully), ask if it’s real, and then stare at it like it’s performing a magic trick. If you’re hosting, it helps to place it where it won’t be constantly bumpedcenter of the table is great, edge of a crowded buffet line is not. For larger gatherings, a trio of smaller pumpkin centerpieces can be more practical than one giant one: easier to move, easier to light around, and less likely to become a centerpiece-collision incident.
Finally, the best “experience” takeaway is what happens after fall: you don’t just end up with decoryou end up with plants. When you replant the succulents, the centerpiece becomes a little seasonal ritual rather than a one-and-done craft. It’s the rare holiday project that doesn’t go straight into storage or the trash. Instead, it quietly upgrades your houseplant collection… and makes you eye every pumpkin in October like it’s potential real estate.


