Table of Contents >> Show >> Hide
- Cleaning vs. Disinfecting: Why It Matters
- Safety First: What Makes a Wipe “Disinfecting”?
- What You’ll Need to Make Disinfectant Wipes
- Recipe 1: Alcohol-Based Disinfectant Wipes
- Recipe 2: Bleach-Based Disinfectant Wipes
- Recipe 3: Hydrogen Peroxide Cleaning Wipes
- How to Use Disinfectant Wipes Effectively
- Eco-Friendly and Sensitive-Surface Options
- Storage, Labeling, and Safety Tips
- Real-Life Experiences and Practical Tips for Making Disinfectant Wipes
If the last few years taught us anything, it’s this: never underestimate the power of a good disinfecting wipe. Whether you’re wiping down doorknobs during cold and flu season or cleaning up the kitchen after raw chicken night, having a tub of wipes nearby feels like a superpower.
But store-bought disinfectant wipes can be pricey, hard to find during shortages, and often come in single-use plastic. The good news? You can make your own disinfectant wipes at home with simple ingredients you probably already havewhile still following safety guidance from agencies like the CDC and EPA about what truly counts as a disinfectant.
In this guide, you’ll learn how to make disinfectant wipes safely, how to use them correctly so they actually work, and how to tweak recipes for sensitive surfaces or a more eco-friendly routine.
Cleaning vs. Disinfecting: Why It Matters
Before we dive into recipes, it helps to know the difference between cleaning and disinfectingbecause they’re not the same thing.
- Cleaning removes dirt, crumbs, and some germs using soap or detergent and water.
- Disinfecting uses chemicals to actually kill many of the remaining germs on a surface.
Most health agencies, including the CDC, recommend cleaning first and then disinfecting if you’re dealing with high-touch surfaces or someone in the household is sick. That means your DIY disinfectant wipes should be used on surfaces that are already visibly cleanor you should wipe once with soap and water, then follow with a disinfecting wipe.
Safety First: What Makes a Wipe “Disinfecting”?
Here’s the catch with homemade disinfectant wipes: the solution you use has to be strong enoughand used long enoughto kill germs. Commercial products have EPA registration numbers and have been tested and approved for specific pathogens (like SARS-CoV-2).
At home, you’re not getting lab-tested results, but you can still follow well-established guidelines:
- Alcohol-based disinfectants: Use at least 70% isopropyl or ethyl alcohol for surfaces.
- Bleach-based disinfectants: Use regular, unscented household bleach with 5–9% sodium hypochlorite and dilute according to CDC or WHO guidelines (for example, around 0.1% for general surface disinfection).
- Contact time: The surface usually needs to stay visibly wet for a few minutes (often 1–10 minutes depending on the product) to achieve disinfection.
Important reminder: if you want guaranteed, label-approved disinfection against specific pathogens, you’ll still want EPA-registered wipes or sprays from List N or other EPA lists. Homemade wipes are best thought of as a practical, “good enough” option for everyday use, not a certified medical-grade product.
What You’ll Need to Make Disinfectant Wipes
Most DIY disinfecting wipes start with the same core components:
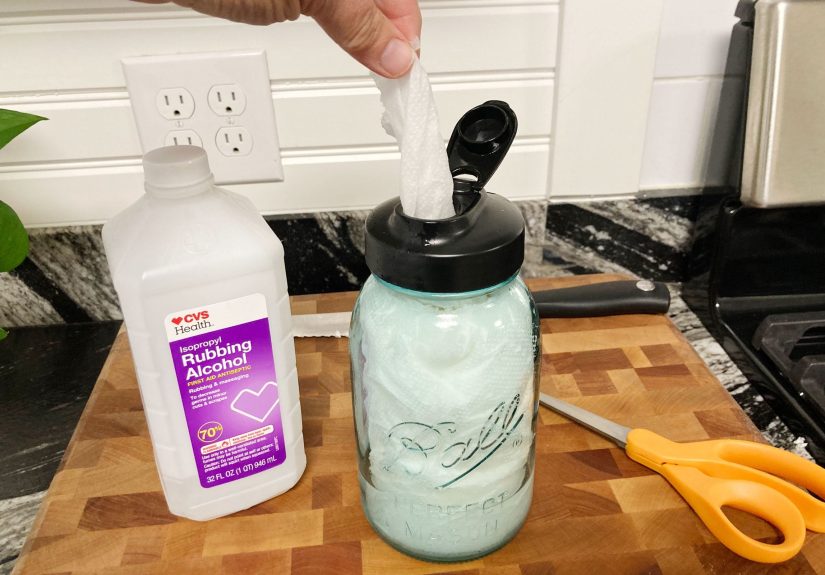
1. A Container
You need something that seals well so your liquid doesn’t evaporate:
- Repurposed store-brand wipes canister
- Large, wide-mouth glass jar
- Plastic food storage container with tight lid
Alcohol evaporates quickly, so an airtight container keeps your disinfecting solution effective.
2. The “Wipe” Material
- Paper towels: Choose a thick, sturdy brand; some DIYers cut a full roll in half to fit a canister.
- Reusable cloths: Old cotton T-shirts, microfiber cloths, or baby washcloths for an eco-friendly option.
3. The Disinfectant Solution
You’ll choose one of these bases:
- 70% isopropyl or ethyl alcohol
- Diluted household bleach
- Hydrogen peroxide solution (typically 3% in the bottle) used according to label directions
Optional add-ins: a few drops of dish soap or essential oils for cleaning power and scent (used carefully and not as a replacement for disinfectant).
Recipe 1: Alcohol-Based Disinfectant Wipes
Alcohol-based wipes are popular because they’re quick-drying, don’t leave residue, and are generally safe for many hard, nonporous surfaces like countertops, doorknobs, and phone cases (though always test in an inconspicuous spot first).
Ingredients
- 2 cups 70–91% isopropyl alcohol (or 70% ethyl alcohol)
- 1/2 cup distilled or boiled-and-cooled water
- 1–2 teaspoons mild liquid dish soap (optional, for cleaning)
- 10–15 reusable cloth squares or half a roll of strong paper towels
- A sealable container
Instructions
- Prepare your wipes: If using paper towels, cut the roll in half with a sharp knife so it fits your container. Remove the cardboard tube once it’s in place. If using cloths, fold them neatly into the container.
- Mix the solution: In a separate bowl or measuring cup, combine alcohol, water, and optional dish soap. Stir gently.
- Pour over wipes: Slowly pour the solution over the paper towels or cloths. Press down to help the liquid soak through evenly.
- Seal and label: Close the lid tightly. Label the container with what’s inside (“70% alcohol disinfectant wipes”) and the date.
Because these wipes are alcohol-based, they evaporate quickly. Make smaller batches you can use within a couple of weeks, and keep the container closed between uses.
Not for: porous surfaces, unfinished wood, natural stone that’s sensitive to alcohol, or delicate finishes that streak easily.
Recipe 2: Bleach-Based Disinfectant Wipes
Bleach wipes are powerful, budget-friendly, and widely used in healthcare and household settings when properly diluted. The key is getting the ratio right and using them only on bleach-safe surfaces.
Ingredients
- 4 teaspoons regular, unscented household bleach (5–9% sodium hypochlorite)
- 1 quart (4 cups) cool water
- Paper towels or reusable cloths (white cotton is best so you don’t bleach the color)
- Plastic or glass container with lid (no metal lidbleach can corrode it)
Instructions
- Protect yourself: Wear gloves and work in a well-ventilated area. Never mix bleach with other cleaners like ammonia or vinegar.
- Mix the solution: In a measuring pitcher, add water first, then carefully measure and add the bleach. This helps prevent splashing.
- Load your container: Place your cloths or paper towels into the container.
- Pour and saturate: Pour the bleach solution evenly over the wipes. Press gently so everything is thoroughly soaked but not swimming in liquid.
- Label and date: Mark the container “Bleach disinfectant wipes,” include the dilution, and add the date.
Bleach solutions lose strength over time; many public health guidelines suggest making fresh solutions daily or at least every 24 hours for best effectiveness.
Not for: natural stone, unfinished wood, fabric furniture, or metal that may corrode (check manufacturer recommendations).
Recipe 3: Hydrogen Peroxide Cleaning Wipes
Hydrogen peroxide (usually sold as a 3% solution) is commonly used as a disinfectant on hard, nonporous surfaces when used according to label instructions and allowed proper contact time.
Ingredients
- 1 cup 3% hydrogen peroxide
- 1 cup distilled or boiled-and-cooled water
- 1–2 teaspoons dish soap (optional)
- Cloth squares or strong paper towels
- Dark or opaque container (peroxide breaks down in light)
Instructions
- Prep the container: Use a dark-colored container or keep a clear one in a dark cabinet.
- Mix the solution: Combine hydrogen peroxide and water gently.
- Saturate the wipes: Place wipes in the container and pour the solution over them, pressing lightly to distribute.
- Seal and label: Close tightly and label with contents and date.
Hydrogen peroxide breaks down into water and oxygen over time, especially when exposed to light, so smaller, frequently refreshed batches are best.
How to Use Disinfectant Wipes Effectively
Even the strongest solution won’t help much if you “wipe and run.” To get the most from your DIY disinfectant wipes:
- Start with a clean surface: Remove crumbs, grease, and visible dirt with soap and water first.
- Wipe generously: Use enough solution that the surface looks visibly wet.
- Check contact time: Aim to leave the surface wet for at least a few minutes, similar to commercial disinfectant label directions (often 1–10 minutes).
- Air-dry when possible: Let the surface air-dry rather than immediately wiping dry with a towel.
- Use on hard, nonporous surfaces: Think doorknobs, light switches, faucets, appliance handles, phones (if manufacturer approves), and bathroom fixtures.
For areas where food is directly prepared, follow disinfecting with a clean water rinse if needed, especially with bleach-based wipes, to avoid residue.
Eco-Friendly and Sensitive-Surface Options
If you’re trying to cut down on waste or protect delicate finishes, you can tweak your approach:
- Use reusable cloth wipes: Instead of paper towels, use cloths you can launder in hot water with detergent after use.
- Avoid harsh chemicals on stone: For marble or granite, many experts recommend skipping bleach and high-acid cleaners. Some DIY wipe recipes for these surfaces use mild soap solutions plus disinfecting sprays tested for stone.
- Ventilate: Open windows or run fans when using bleach or strong alcohol solutions, especially if you clean large areas.
Remember, “natural” doesn’t automatically mean “disinfecting.” Essential oils can add pleasant scent and some antimicrobial activity, but they shouldn’t be your primary disinfectant for serious germ control.
Storage, Labeling, and Safety Tips
A final word on safetybecause homemade wipes still count as chemical products:
- Label clearly: Write what’s inside, the main disinfectant (alcohol, bleach, peroxide), and the date you made it.
- Keep out of reach of kids and pets: They may look like baby wipes, but they are definitely not.
- Don’t mix chemicals: Never mix bleach with ammonia, vinegar, or other cleaners.
- Wear gloves if needed: Bleach and strong alcohol solutions can dry or irritate skin.
- Refresh regularly: Especially with bleach and peroxide, mix new solution frequently (daily is ideal for bleach).
With the right ingredients, good labeling, and safe use, your homemade disinfectant wipes can be a reliable part of your household cleaning toolkitwithout the panic of empty store shelves.
Real-Life Experiences and Practical Tips for Making Disinfectant Wipes
Once you’ve made your first batch of disinfectant wipes, you’ll quickly discover that the “official recipe” is only half the story. The other half is real-world trial and errorfiguring out what works in your home, with your surfaces, your family, and your routine.
Finding the Right Paper Towels (or Giving Up on Them)
Many people start their DIY journey by cutting a paper towel roll in half… and then watch it explode into confetti when the liquid hits. Ultra-cheap towels tend to shred, especially with high-alcohol or bleach solutions. In practice, you often get better results by:
- Using premium, thick paper towels even if they cost a little more.
- Folding individual sheets into a stack instead of using a whole roll.
- Switching to cloth wipes for anything stronger than mild soap-based cleaning.
If you hate fishing disintegrated paper bits off your counters, reusable cloths may be your new best friend. Just remember they need to be laundered properlyhot water, good detergent, and full dryingto be ready for next time.
The “Too Strong” Problem
Another common experience: your first batch smells like it could knock out a whole colony of germs from across the room. Strong bleach odor or heavy alcohol fumes can be overwhelming in smaller spaces like bathrooms or apartments.
People often adjust by:
- Using the lowest effective concentration recommended by health guidelines.
- Opening windows or turning on fans during cleaning sessions.
- Reserving bleach wipes for high-risk areas (like bathroom fixtures) and using milder alcohol or soap-based wipes for everyday spots like light switches.
The goal isn’t to fumigate your house; it’s to keep surfaces cleaner and safer while still being able to breathe.
Labeling Saves You From Yourself
Homemade wipes often look suspiciously similar. One container might hold baby wipes in gentle soap, another might be loaded with 70% alcohol, and another might be bleach-based. Without labels, you’re basically running a chemistry roulette.
Real-world fix: over-label everything. Put on the container:
- “ALCOHOL DISINFECTANT WIPES – NOT FOR SKIN”
- “BLEACH WIPES – USE ON TOILET & SINK ONLY”
- “MILD SOAP WIPES – SAFE FOR KIDS’ TOYS (RINSE AFTER)”
Clear labels help guests, kids, and tired future-you reach for the right wipes at the right time.
Learning Where Wipes Work Best (and Where They Don’t)
Another lesson that tends to show up quickly: not every surface is a good match for DIY disinfectant wipes.
People often report that bleach or high-alcohol wipes can:
- Dull or etch natural stone countertops over time.
- Damage waxed wood finishes.
- Leave streaks on stainless steel or glossy black appliances.
The practical response is to divide your home into “zones”:
- Heavy-duty zone: Bathroom, trash can lids, toilet handles, and sink areasgreat for bleach or higher-strength disinfectants.
- Everyday touch zone: Door handles, light switches, remote controlsideal for alcohol-based wipes or milder solutions safe for electronics and paint (if manufacturer allows).
- Gentle surfaces zone: Stone, real wood, and delicate finishesbetter for mild, stone-safe cleaners and a separate disinfectant product approved by the manufacturer.
Batch Size and the “Oops, They Dried Out” Moment
One of the most common complaints from DIYers is that the first batch works beautifully…and the second batch is a pile of dry, slightly sad rags staring back at them from the container. Alcohol evaporates and bleach loses power over time, especially if the container isn’t tightly sealed or is opened constantly.
Experience helps you dial in a realistic batch size. Instead of making a month’s worth of wipes, many people find success making enough to last:
- About a week for alcohol-based wipes.
- One day to several days for bleach wipes, depending on how strictly they follow freshness recommendations.
Smaller batches may feel like more work, but they help ensure the wipes you’re using are actually doing the job you made them for.
Balancing Convenience, Safety, and Sanity
Finally, there’s the big-picture lesson: homemade disinfectant wipes are about balance. They’re not meant to turn your home into a sterile lab. They’re there to make it easier to wipe down the bathroom after a sick kid, clean kitchen handles after handling raw meat, or feel a bit more in control during flu season.
For many people, the sweet spot ends up being a mix of options:
- Homemade wipes for everyday cleaning and quick disinfecting.
- A few EPA-registered commercial products on hand for high-risk situations or specific pathogens.
- Good old soap, water, and elbow grease as the first line of defense.
With some experimentation, solid labeling, and attention to safety guidelines, your DIY disinfectant wipes can fit seamlessly into a cleaning routine that’s practical, affordable, and just a little more under your control.


