Table of Contents >> Show >> Hide
- Quick Navigation
- Why Registering Your Samsung Smart TV Matters
- Before You Start: A 5-Minute Prep Checklist
- Method 1: Sign In to Your Samsung Account on the TV (Often the Fastest)
- Method 2: Register Your Samsung Smart TV on Samsung.com (Warranty & Ownership)
- Method 3: Add Your Samsung Smart TV to SmartThings (Phone-Based Setup + Control)
- After Registration: Settings Worth Checking (So Your TV Doesn’t Become “That Roommate”)
- Troubleshooting: Common Samsung TV Registration Problems (and Fixes)
- FAQ: Quick Answers About Samsung Smart TV Registration
- Real-World Experiences and Pro Tips (Because Life Is Messier Than a Setup Wizard)
- Experience #1: The “I used the wrong email” classic
- Experience #2: Open-box and secondhand TVs can be… socially complicated
- Experience #3: The Wi-Fi password moment (a rite of passage)
- Experience #4: Privacy settings aren’t just for the paranoid
- Experience #5: Registration is also a “future-proofing” move
- Conclusion
You bought a shiny new Samsung Smart TV. It’s on the wall, it’s huge, and you’ve already told at least one friend, “You can practically see the pores.” Now let’s do the not-as-glamorous part that saves future-you from headaches: registering your Samsung Smart TV.
The good news: registration isn’t one mysterious button hidden in a secret menu guarded by dragons. It’s usually a combination of (1) signing into your Samsung account on the TV and (2) registering the product to your Samsung account for ownership and warranty tracking. Optional, but extremely useful: (3) adding the TV to the SmartThings app so your phone can double as a remote when the real one disappears into the couch dimension.
Why Registering Your Samsung Smart TV Matters
“Do I have to register it?” Technically, no. But here’s what registration can do for you:
- Proof of ownership in your Samsung account (helpful for service requests and records).
- Warranty and support tracking (especially if you need repair options later).
- Faster troubleshooting because your model details are already attached to your account.
- Smart features that behave (SmartThings linking, app downloads, and syncing can be smoother when you’re signed in).
Think of it like putting your name on your lunch in the office fridge. You still might not stop the snack thief, but you’ll have a much stronger case when you show up with receipts. Literally.
Before You Start: A 5-Minute Prep Checklist
Do this prep once and the rest goes quickly:
- Connect the TV to the internet (Wi-Fi or Ethernet). Registration and account sign-in won’t work offline.
- Have your Samsung account ready (email + password). If you don’t have one, you can create it during the process.
- Find your model code and serial number (you may need them for product registration).
- Keep proof of purchase handy (digital receipt, order email, or paper receipt) in case warranty details require it.
- Update your phone apps if you’ll use SmartThings (helps avoid pairing tantrums).
Method 1: Sign In to Your Samsung Account on the TV (Often the Fastest)
This is the most common “I just want it done” method. Signing in gives you access to Samsung services and can also help link the device to your account ecosystem.
Step-by-step: Sign in (or create an account) on your TV
- Press Home on your remote.
- Go to Settings.
- Select All Settings (if shown).
- Open General & Privacy.
- Choose System Manager → Samsung Account.
- Select Sign in and follow the on-screen prompts (or choose Create account).
Tip: Menu names can vary slightly by year/model and Tizen version. If you don’t see “All Settings,” look for a similar Settings → General area, then “Samsung Account.”
If you don’t have a Samsung account yet
You can create a Samsung account on the TV, your phone, or a computer. Creating it on your phone/computer is often faster because typing long passwords with a TV remote is a character-building exercise.
- Fast route: Create the account on your phone/computer, then sign in on the TV.
- TV route: Choose “Create account” on the TV and follow the prompts.
Either way, expect a verification step (email confirmation and/or two-step verification depending on your settings). If you’re using two-step verification, keep your phone nearbythis is not the moment to play hide-and-seek with your device.
Two-step verification (without the drama)
If your Samsung account uses two-step verification, you may be asked to approve a login on a trusted device or enter a code. If the code isn’t coming through, double-check your phone’s signal, notification settings, and that you’re signing into the correct email address.
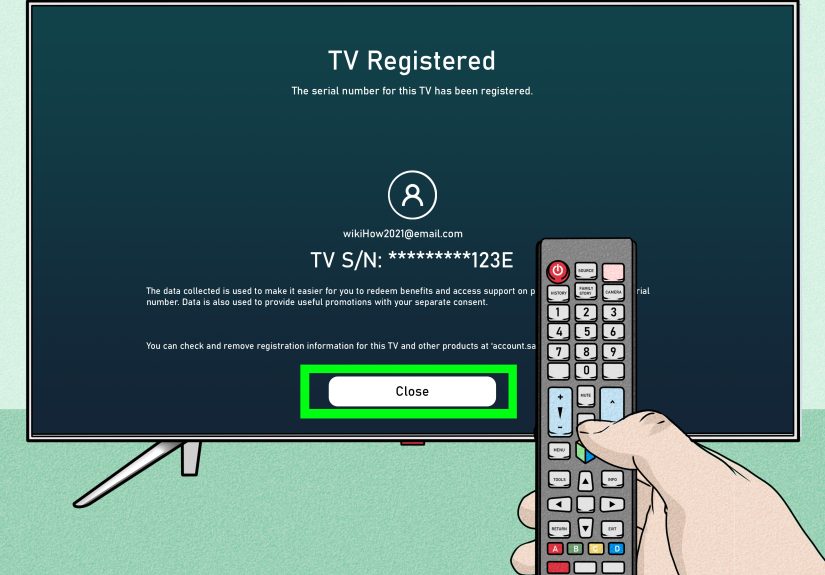
Method 2: Register Your Samsung Smart TV on Samsung.com (Warranty & Ownership)
Signing in on the TV is great for features. But if your goal is “I want this TV officially tied to my account for tracking, service, and warranty lookups,” then register the product through Samsung’s registration flow.
Step-by-step: Register the TV online
- On your phone or computer, sign in to your Samsung account.
- Go to Samsung’s product registration area and choose the category for TVs/home theater.
- Enter the serial number (and model code if requested).
- Complete registration and check your My Products list to confirm it appears.
After registration, you can typically view product details and, in many cases, see warranty-related information within your account dashboard. If you’re prompted, upload or keep proof of purchase available.
Where to find your TV’s model code and serial number
You’ve got two main options:
- On-screen method: Settings → Support → About This TV. You should see the model code and serial number listed.
- Label method: Look for the sticker on the back of the TV (or sometimes on the packaging).
“It says it’s already registered.” Now what?
This happens more often than you’d thinkespecially if you signed into the Samsung account on the TV during setup or if the TV was previously linked. If you’re the rightful owner and you can access the account it’s registered to, you may simply need to manage it from the online dashboard.
If you bought an open-box unit or got the TV secondhand, you may need to remove old account ties (where possible) and sign in with your own Samsung account. In those cases, a full reset and then signing in cleanly can helpbut it won’t always “unregister” the product from a previous owner automatically.
Method 3: Add Your Samsung Smart TV to SmartThings (Phone-Based Setup + Control)
If you want your phone to act as a remote, or you want the TV to play nicely in a smart home routine (lights dim when Netflix starts, etc.), you’ll want SmartThings.
Step-by-step: Add the TV in the SmartThings app
- Install and open the SmartThings app on your phone.
- Sign in with the same Samsung account you used (or will use) on the TV.
- Tap + (Add) → Device.
- Select TV → Samsung, then tap Start.
- Choose your TV (or let it auto-detect).
- If prompted, enter the PIN shown on the TV screen to confirm pairing.
- Assign it to a location and room (helpful if you own multiple TVs).
Once linked, you can often power the TV on/off, change volume, launch apps, and use other controls from your phone. Bonus: it’s the best backup plan when your remote is “missing” (a.k.a. hiding under a blanket like it pays rent).
When SmartThings can’t find your TV
- Same Wi-Fi matters: Make sure your phone and TV are on the same local network.
- Refresh the device list: Pull down to refresh inside SmartThings.
- Power cycle: Turn the TV off, unplug for 30 seconds, plug back in, and try again.
- Update software: A quick TV firmware update can fix “why are you like this?” issues.
- Re-add the TV: Remove the device in SmartThings and add it again if pairing got stuck.
After Registration: Settings Worth Checking (So Your TV Doesn’t Become “That Roommate”)
1) Update the TV software
Keeping firmware updated can improve performance, fix bugs, and reduce weird behavior (like apps crashing right when the plot gets good). Look for updates in Settings → Support → Software Update (menu names vary).
2) Review privacy options (quickly, without reading a 40-page novella)
Many smart TVs include settings for viewing information services, interest-based ads, and voice features. If you prefer less tracking, check your TV’s privacy choices and disable options you don’t want. (You’ll still have a smart TVjust one with fewer “marketing hobbies.”)
3) Stop auto-launch chaos (optional but satisfying)
If your TV loves launching things you didn’t ask for, look for options that control autorun behavior (like automatically launching Samsung TV Plus, Smart Hub, or the last app). Your future self will thank you when the TV stops trying to make decisions on your behalf.
4) Confirm your apps and services work
Open the Apps area and download one or two services you actually use. If downloads fail, it’s often because the TV isn’t signed in, the network is unstable, or terms weren’t accepted during setup.
Troubleshooting: Common Samsung TV Registration Problems (and Fixes)
Problem: “I can’t sign in to my Samsung account on the TV.”
- Check the network: Confirm the TV is connected and has internet access (not just Wi-Fi connected, but actually online).
- Double-check time/date: Incorrect time settings can break logins on some devices.
- Reset your password: If you’re guessing your password like it’s a game show, it’s time to reset it.
- Two-step verification issues: Make sure your verification device is reachable and notifications are allowed.
Problem: “SmartThings won’t pair with my TV.”
- Same account + same Wi-Fi: Use the same Samsung account and the same local network.
- Look for the PIN prompt: Some setups require the PIN displayed on the TV screen.
- Remove and re-add: If the TV is half-added, it’s often faster to remove and start clean.
Problem: “I reset the TV, but it still shows as registered.”
A factory reset doesn’t always remove the TV from the list of registered devices tied to a Samsung account. In many cases, you manage registered products through your online Samsung account dashboard rather than from the TV itself.
Problem: “The remote isn’t working, so I can’t get to Settings.”
If the remote is acting up, try fresh batteries, re-pairing (model-dependent), or use SmartThings as a remote once the TV is on the network. If you’re truly stuck, some TVs have a physical button or joystick on the TV body to navigate basic menus.
FAQ: Quick Answers About Samsung Smart TV Registration
Do I need to register my Samsung Smart TV for the warranty?
Registration isn’t always required to have warranty coverage, but it can make warranty lookups and service requests much easier. Keeping proof of purchase is smart either way.
Can I register multiple Samsung TVs to one Samsung account?
Yes. If you have more than one Samsung TV (or other Samsung devices), using one account can simplify managementjust label each device clearly in SmartThings.
What if I’m giving the TV to someone else later?
Before selling or gifting, log out of your Samsung account on the TV, remove it from SmartThings, and do a factory reset. That protects your account and keeps your streaming apps from accidentally becoming a “surprise subscription program.”
Real-World Experiences and Pro Tips (Because Life Is Messier Than a Setup Wizard)
Registration steps look clean on paper. Real life, however, is full of distractionslike pets, kids, dinner timers, and the sudden urge to recalibrate the picture settings for the tenth time. Here are practical, experience-based tips (the kind you learn after your second setup, not your first).
Experience #1: The “I used the wrong email” classic
Many households have multiple emails floating aroundone for shopping receipts, one for personal use, and one ancient address you made in college that still receives newsletters from 2009. A common setup hiccup is signing into Samsung on the TV with Email A, then signing into SmartThings with Email B. The result? Your phone stares blankly at the TV like they’ve never met.
Pro tip: Decide your “official” Samsung account first (the one you can access easily), then use that same login everywhere: TV sign-in, SmartThings, and product registration. Consistency is boringbut it’s also magical.
Experience #2: Open-box and secondhand TVs can be… socially complicated
If you bought an open-box TV or got one from a friend, you might run into “already registered” messages or leftover settings. Even after a factory reset, the ownership trail in an online account system can be separate from what the TV shows you locally.
Pro tip: Before you mount the TV, grab the model and serial number, snap a photo of the label, and save it to a notes app. If you ever need to register online or request support, you’ll be glad you didespecially once the TV is mounted flush to a wall like a modern art exhibit.
Experience #3: The Wi-Fi password moment (a rite of passage)
Entering a Wi-Fi password with a remote is one of the universe’s tests of patience. If your password looks like it was generated by a keyboard falling down the stairs, consider temporarily enabling a simpler guest network for setupor use a phone-based onboarding option when available.
Pro tip: If SmartThings pairing is part of your plan, prioritize a stable network connection first. Many “registration” problems are actually “the TV is connected to Wi-Fi, but the internet is flaky” problems wearing a disguise.
Experience #4: Privacy settings aren’t just for the paranoid
Some people skip privacy settings because it feels like homework. But a few toggles can reduce tracking and cut down on overly personalized advertising. Others want the convenience of voice features and don’t mind the data trade-off. There’s no one-size-fits-all choicejust make the choice consciously.
Pro tip: After you register/sign in, take two minutes to review privacy choices and autorun behavior. It’s the easiest “quality of life” upgrade you can do without buying anything.
Experience #5: Registration is also a “future-proofing” move
Most people register only after something goes wrongan app breaks, a service request is needed, or a warranty question pops up. Doing it upfront means your Samsung account already has your TV details attached, and you’re not scrambling for serial numbers while support music plays in the background.
Pro tip: Save your purchase receipt in two places (email folder + cloud drive). If warranty verification ever comes up, you’ll be ready. Future-you will call present-you a genius. Or at least “not terrible.”
Conclusion
Registering your Samsung Smart TV isn’t hardit’s just one of those “adulting” chores that pays off later. The simplest path is:
- Sign in to your Samsung account on the TV so your apps and services work smoothly.
- Register the TV on Samsung.com to tie ownership details to your account for tracking and service convenience.
- Add the TV to SmartThings if you want phone control, smart home routines, and a backup remote.
Do those three things once, and you’ll spend more time enjoying your screen and less time muttering, “Why is the TV asking me this now?” while your popcorn gets cold.


