Table of Contents >> Show >> Hide
- Why Bike Pedals Can Be Confusing
- Tools You Need to Remove Bike Pedals
- Before You Begin: Identify the Right and Left Pedal
- How to Remove Bike Pedals with a Hex Key
- How to Remove Bike Pedals with a Wrench
- What to Do If the Pedals Are Stuck
- Common Mistakes to Avoid
- How to Reinstall Bike Pedals the Right Way
- When Should You Remove Bike Pedals?
- Quick Reference: Pedal Removal Directions
- Real-World Experience: What Actually Helps When Removing Bike Pedals
- Conclusion
- SEO Tags
Removing bike pedals sounds like a five-minute jobuntil one pedal refuses to move, your knuckles meet the chainring, and you begin questioning every life choice that led you to this garage. The good news? Learning how to remove bike pedals with a hex key or wrench is simple once you understand one very important trick: the left pedal does not follow the usual “lefty-loosey” rule.
Whether you are swapping flat pedals for clipless pedals, packing a bike for travel, replacing worn-out parts, or rescuing a squeaky drivetrain from embarrassment, this guide walks you through the full process. You will learn which tool to use, which direction to turn each pedal, how to handle stubborn pedals, and how to reinstall everything so future-you does not curse present-you.
Why Bike Pedals Can Be Confusing
Bike pedals are threaded into the crank arms, but the two sides are not identical. The right pedal, also called the drive-side pedal, has a standard right-hand thread. The left pedal, or non-drive-side pedal, has a reverse thread. This design helps prevent the pedal from loosening while you ride.
That small engineering detail is the reason many riders accidentally tighten the left pedal when they are trying to remove it. If you have ever leaned on a wrench, made dramatic mechanic noises, and achieved absolutely nothing, reverse threading may have been the villain.
Tools You Need to Remove Bike Pedals
Before you start, inspect your pedals. Different pedal models use different tool fittings, and choosing the right tool is half the battle.
1. Hex Key or Allen Wrench
Many modern pedals have a hex socket on the inner end of the pedal spindle, accessible from the back side of the crank arm. Common sizes are 6 mm and 8 mm, with 8 mm being very common on many road, mountain, hybrid, and clipless pedals.
A long-handled hex key gives better leverage than a tiny multi-tool. A compact trail tool can work in an emergency, but in the garage, longer is better. Think of leverage as the polite way of asking a stubborn pedal to leave.
2. 15 mm Pedal Wrench
Many flat pedals, older pedals, and budget pedals use wrench flats on the pedal spindle. These flats are usually sized for a 15 mm pedal wrench. A dedicated pedal wrench is thin enough to fit between the crank arm and pedal body, while still offering enough length for leverage.
A standard 15 mm open-end wrench may work if it is thin enough, but bulky household wrenches often do not fit well. Avoid using a loose adjustable wrench if possible because it can round the wrench flats.
3. Bike Grease and a Rag
Grease is mostly for reinstallation, but keep it nearby. After removing the pedals, you should clean the crank threads and apply a thin layer of grease before reinstalling pedals. This helps prevent corrosion, creaking, and future stuck-pedal drama.
4. Optional: Penetrating Oil and Gloves
If the pedals are old, rusty, or have not moved since the era when your playlist lived on an iPod, penetrating oil can help. Gloves are also wise because chainrings are basically tiny metal sharks waiting for a snack.
Before You Begin: Identify the Right and Left Pedal
Stand over the bike as if you are about to ride it. The right pedal is on the same side as the chain and gears. This is the drive side. The left pedal is on the opposite side.
Many pedals are marked with an “R” or “L” on the spindle or pedal body. If the markings are dirty, wipe them clean. If there are no markings, remember the rule based on bike sides:
- Right pedal: standard thread, loosens counterclockwise.
- Left pedal: reverse thread, loosens clockwise.
That is the classic rule when you are facing the pedal from the outside of the bike. However, when using a hex key from the back side of the crank, the tool position can make the direction feel reversed. To avoid confusion, use this simpler memory trick: to remove pedals, turn the tool toward the rear wheel. This works well when the wrench is positioned correctly beside the crank arm.
How to Remove Bike Pedals with a Hex Key
Using a hex key is clean and efficient, especially on modern clipless pedals and many performance flat pedals.
Step 1: Shift the Chain onto the Big Chainring
If your bike has multiple front chainrings, shift the chain onto the largest chainring before working. This may sound odd, but it covers the sharp teeth and can reduce the chance of slicing your hand if the tool slips. Your knuckles deserve a peaceful afternoon.
Step 2: Position the Crank Arm
Rotate the crank so the pedal you are removing is easy to reach. Many mechanics like placing the crank arm roughly forward and horizontal. This gives a stable working angle and makes it easier to apply pressure safely.
Step 3: Insert the Hex Key Fully
Insert the correct-size hex key into the socket at the inner end of the pedal spindle. Make sure it is fully seated. A partially inserted hex key can strip the socket, and once that happens, the job gets upgraded from “quick maintenance” to “why is everything pain?”
Step 4: Loosen the Right Pedal
For the right pedal, insert the hex key from the back side of the crank. The right pedal uses a standard thread. If facing the outside of the right pedal, it loosens counterclockwise. With the hex key inserted from the inner side, focus on applying force in the correct removal directiongenerally toward the rear of the bike when the tool is positioned for leverage.
Apply steady pressure. Do not jerk violently. If the pedal suddenly breaks free, you want control, not a surprise elbow performance.
Step 5: Loosen the Left Pedal
The left pedal is reverse-threaded. When facing the outside of the left crank arm, it loosens clockwise. Again, if using a hex key from the back side, pay attention to the tool orientation. The easiest practical rule remains: position the tool so you can push or pull toward the rear of the bike to loosen.
Step 6: Unscrew by Hand
Once the pedal breaks loose, continue turning the hex key a few rotations, then unscrew the pedal by hand. Be careful near the end so the pedal does not drop and scratch the crank arm, floor, or your toes.
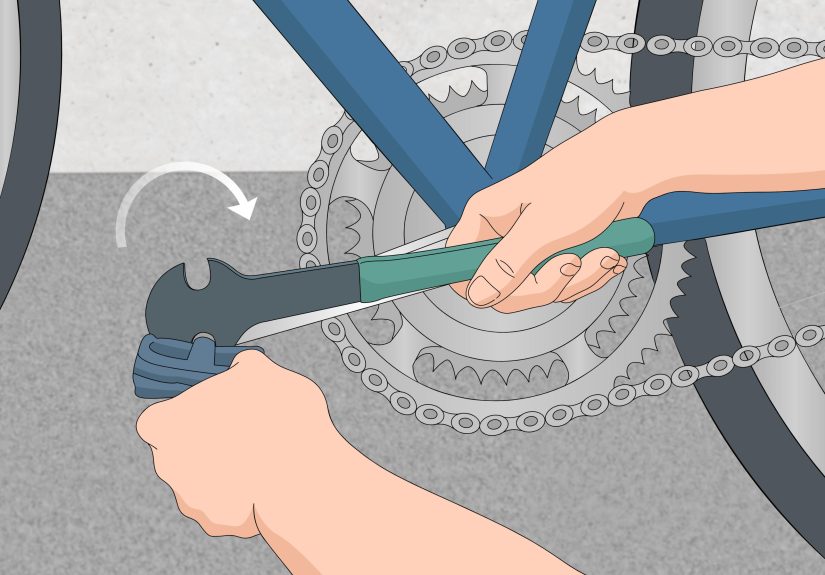
How to Remove Bike Pedals with a Wrench
A pedal wrench is the traditional tool for this job. It is especially useful for pedals with wrench flats and no hex socket.
Step 1: Place the Wrench on the Pedal Flats
Find the flat sections on the pedal spindle between the pedal body and the crank arm. Slide the 15 mm pedal wrench onto the flats. Make sure the wrench fits snugly and squarely.
Step 2: Turn the Right Pedal Counterclockwise
On the right side, turn the wrench counterclockwise to loosen the pedal. If possible, position the wrench so you can push down or push toward the back of the bike. Controlled body weight is safer and more effective than arm-only force.
Step 3: Turn the Left Pedal Clockwise
On the left side, remember that the pedal is reverse-threaded. Turn the wrench clockwise to loosen it when facing the pedal from the outside. This is the step that catches most beginners. The left pedal did not read the normal bolt handbook.
Step 4: Remove the Pedal by Hand
After the first tight turn, the pedal should spin out more easily. Keep unscrewing until it comes free from the crank arm. If it feels gritty, dry, or crunchy, clean the threads before reinstalling anything.
What to Do If the Pedals Are Stuck
Stuck bike pedals are common, especially on bikes exposed to rain, road salt, sweat, or years of neglect. Do not panic. Also, do not immediately grab a hammer like you are auditioning for a demolition show.
Check the Direction Again
Before adding force, confirm you are turning the correct way. Right pedal: counterclockwise to loosen. Left pedal: clockwise to loosen. If you are using a hex key from behind the crank, re-check the orientation because the tool can visually trick you.
Use More Leverage
A longer pedal wrench or long-handled hex key can make a huge difference. More leverage lets you apply force gradually instead of wrestling the bike across the room. Keep the tool fully engaged so you do not round off the pedal flats or hex socket.
Apply Penetrating Oil
If corrosion is likely, apply penetrating oil where the pedal spindle enters the crank arm. Let it sit for several minutes, or longer if the pedal is severely stuck. Wipe away excess oil before trying again so your tool does not slip.
Try a Small Tightening Motion First
Sometimes a tiny movement in the tightening direction helps break the initial bond. Do not crank it tighter with enthusiasm. Just a slight motion can help release corrosion or old dry grease, then you can loosen the pedal normally.
Use Heat Carefully
For metal crank arms, gentle heat can sometimes help expand the crank around the pedal threads. However, heat is risky near carbon parts, painted surfaces, seals, and plastic pedal bodies. If you are unsure, skip this step and visit a bike shop.
Common Mistakes to Avoid
Mistake 1: Forgetting the Left Pedal Is Reverse-Threaded
This is the champion mistake. The left pedal loosens clockwise. Repeat it like a tiny bike-shop mantra: left pedal, clockwise to loosen.
Mistake 2: Using the Wrong Tool Size
A 6 mm hex key in an 8 mm socket is not “close enough.” A loose tool can strip the fitting. Use the exact size and make sure the tool is fully seated before applying force.
Mistake 3: Pulling Toward Sharp Chainring Teeth
Plan your hand position before pushing hard. If the tool slips, your hand should not fly into the chainring. Shift onto the big ring for protection and keep your fingers clear.
Mistake 4: Reinstalling Pedals Dry
Dry pedal threads may creak, corrode, or seize. A thin coat of bike grease on the pedal threads makes future removal much easier. Your future self may even send a thank-you card.
How to Reinstall Bike Pedals the Right Way
After removal, inspect the pedal threads and crank arm threads. Wipe away dirt, old grease, and metal grit. If the threads look damaged, do not force the pedal back in. Cross-threading a crank arm can become an expensive mistake.
Grease the Threads
Apply a light layer of bicycle grease to the pedal threads. You do not need a frosting-thick coating. A thin, even layer is enough to prevent corrosion and make future service easier.
Start by Hand
Always thread pedals in by hand first. This helps prevent cross-threading. If the pedal does not turn smoothly after a few rotations, stop, back it out, and realign it.
Remember the Installation Direction
- Right pedal: tightens clockwise.
- Left pedal: tightens counterclockwise.
A helpful memory trick: to install pedals, rotate the top of the pedal spindle toward the front wheel. To remove pedals, rotate it toward the rear wheel.
Tighten Firmly, But Do Not Overdo It
Pedals need to be snug because they handle repeated force while riding. However, you do not need to summon superhero torque. If your pedal or crank manufacturer provides a torque specification, follow it. When in doubt, firm and secure is the goalnot welded by rage.
When Should You Remove Bike Pedals?
There are several good reasons to remove bike pedals, and none require you to be a professional mechanic.
- Changing pedal style: switching from flat pedals to clipless pedals, or the other way around.
- Travel: removing pedals helps protect the bike and saves space in a bike box.
- Maintenance: cleaning, greasing, and inspecting threads can prevent creaks and seizing.
- Replacing worn pedals: loose bearings, damaged bodies, or worn pins can make replacement necessary.
- Bike fitting: different pedals may change stance width, float, or shoe compatibility.
Quick Reference: Pedal Removal Directions
| Pedal Side | Bike Side | Thread Type | Loosen Direction | Common Tool |
|---|---|---|---|---|
| Right pedal | Drive side, chain side | Standard thread | Counterclockwise | 15 mm wrench or 6/8 mm hex key |
| Left pedal | Non-drive side | Reverse thread | Clockwise | 15 mm wrench or 6/8 mm hex key |
Real-World Experience: What Actually Helps When Removing Bike Pedals
Here is the part most instructions do not fully capture: removing bike pedals is less about brute strength and more about setup. The first time many riders try it, they put the bike on the ground, grab the nearest wrench, forget which side is reverse-threaded, and start pulling in a random direction. That approach sometimes works, but it also creates a perfect recipe for rounded bolts, scratched crank arms, and creative language.
In practice, the best experience starts with making the bike stable. A repair stand is wonderful, but not required. If you do not have one, lean the bike against a wall, place the opposite pedal against something solid, or have a friend hold the handlebars. The bike should not wobble while you apply force. A moving bike wastes your effort and increases the chance of slipping.
The second big lesson is that tool quality matters. A short multi-tool is great on a trail, but it can be frustrating at home. A long 8 mm hex key or a real pedal wrench gives you smoother leverage and better control. When a pedal is tight, do not bounce on the tool immediately. Apply steady pressure and let the leverage work. If the tool starts to flex or slip, stop and reposition it.
Another useful habit is to position the crank and wrench so your hands move safely. Before pushing hard, imagine what will happen if the pedal suddenly loosens. Will your hand hit the chainring? Will your elbow smack the frame? Will the bike leap forward like a startled deer? Adjust the crank angle until the answer is boring. Boring is excellent in bike repair.
For stubborn pedals, patience beats panic. A pedal that has been installed dry for years may need penetrating oil and time. Spray a small amount at the crank interface, wait, and try again. If the bike has aluminum crank arms and steel pedal spindles, corrosion can make the connection especially stubborn. More force may eventually work, but too much force with the wrong tool can cause damage.
One trick many home mechanics appreciate is using body weight rather than arm strength. With the wrench positioned correctly, you can press down in a controlled way instead of pulling upward with your back and shoulders. Pressing down is usually safer, more stable, and less dramatic. The pedal often releases with a sharp pop. That sound can be alarming, but it is usually just the threads breaking free.
After removal, take a moment to inspect the threads. This is where many people rush. If the old grease looks dry, black, or gritty, clean it off. If the threads look shiny and healthy, you are ready to reinstall. If they look flattened, torn, or crooked, do not force anything. A bike shop can often chase damaged threads, but a badly cross-threaded crank may need replacement.
The final experience-based tip is simple: grease the threads every time. It takes less than a minute and can save a lot of future frustration. Pedals live in a tough spot. They deal with water, sweat, dirt, road grime, and repeated pedaling force. A small amount of grease helps the pedal install smoothly and come out cleanly later. It also reduces the chance of creaks that make every ride sound like a haunted rocking chair.
Once you have removed and reinstalled pedals a couple of times, the job becomes easy. The scary part is not the techniqueit is remembering that the left pedal plays by its own rules. Keep the right tool handy, turn in the correct direction, protect your hands, and treat the threads kindly. Your bike will be happier, your pedals will behave, and your knuckles may survive the afternoon with dignity.
Conclusion
Knowing how to remove bike pedals with a hex key or wrench is one of the most useful bike maintenance skills you can learn. The process is straightforward: identify the tool fitting, remember the thread direction, use steady leverage, and clean and grease the threads before reinstalling. The right pedal loosens counterclockwise, while the left pedal loosens clockwise because it is reverse-threaded.
If a pedal refuses to move, do not rush. Recheck the direction, use a longer tool, apply penetrating oil if needed, and protect your hands from the chainring. With a little patience and the right technique, pedal removal becomes a quick garage task instead of a mechanical mystery novel.


