Table of Contents >> Show >> Hide
- Before You Start
- How to Set Up a Xbox 360 Controller on Project64 in 11 Steps
- Step 1: Install Project64 on Your Windows PC
- Step 2: Connect Your Xbox 360 Controller
- Step 3: Confirm That Windows Detects the Controller
- Step 4: Open Project64 and Load the Input Settings
- Step 5: Make Sure the Controller Is Enabled
- Step 6: Turn On XInput if That Option Appears
- Step 7: Map the Main N64 Buttons
- Step 8: Assign the Analog Stick and D-Pad
- Step 9: Decide How You Want to Map the C Buttons
- Step 10: Tweak Deadzone and Range Only if Necessary
- Step 11: Save the Profile and Test In-Game
- Troubleshooting Tips for Project64 Controller Setup
- Why an Xbox 360 Controller Works So Well with Project64
- Real-World Experience: What Setting Up an Xbox 360 Controller on Project64 Actually Feels Like
- Final Thoughts
- SEO Tags
If you have ever tried to play Nintendo 64 games on a keyboard, you already know the truth: some classics were clearly designed for thumbs, not for pecking at keys like a caffeinated woodpecker. The good news is that setting up an Xbox 360 controller on Project64 is usually pretty easy once you know where the important menus are and which settings actually matter.
This guide walks you through the full process in 11 simple steps, from connecting the controller to fine-tuning your button map inside Project64. Along the way, you will also learn how to fix common problems like buttons not registering, analog sticks feeling weird, and camera controls acting like they were designed by a mischievous gremlin. By the end, your Xbox 360 controller should feel right at home in Project64, whether you are jumping into Super Mario 64, battling in Super Smash Bros., or finally trying to beat that one level that mocked you as a child.
Before You Start
Before you open Project64, make sure you have the basics covered. You need a Windows PC, the latest stable or reasonably current build of Project64, and an Xbox 360 controller. A wired Xbox 360 controller is the easiest option because it is usually plug-and-play. A wireless Xbox 360 controller can also work, but you need the proper Xbox 360 wireless receiver for PC. The Play & Charge cable is for charging, not for magically turning a wireless pad into a true wired controller.
You should also have a legally obtained game backup ready to test with. Using a familiar game helps because you can immediately tell whether your button mapping feels natural or totally backwards in a “why is jump on the shoulder button?” kind of way.
How to Set Up a Xbox 360 Controller on Project64 in 11 Steps
Step 1: Install Project64 on Your Windows PC
First, install Project64 if you have not already. Since Project64 is a Windows-based emulator, it is best to use a current version instead of digging up an ancient build from the internet’s dusty attic. Newer versions generally offer better compatibility, better controller support, and fewer weird surprises.
Once installed, launch the emulator once so it can create its default folders and settings. Then close it again if you want a clean start. This is not strictly required, but it keeps things organized and avoids confusion later.
Step 2: Connect Your Xbox 360 Controller
Now connect your Xbox 360 controller to the PC. If you are using a wired controller, plug it into a working USB port and wait for Windows to recognize it. In most cases, Windows handles the driver setup automatically. If you are using a wireless Xbox 360 controller, plug in the wireless receiver first, let Windows detect it, and then sync the controller to the receiver.
This step sounds boring, but it matters. If Windows does not properly see the controller, Project64 cannot map it no matter how enthusiastically you click around the menus.
Step 3: Confirm That Windows Detects the Controller
Before blaming Project64 for everything, make sure Windows actually sees your controller. Open the Windows game controller settings or any reliable controller test utility and press a few buttons. Move the analog stick, tap the D-pad, and squeeze the triggers. If inputs show up correctly here, you are in good shape.
If nothing registers, try another USB port, reconnect the receiver, or restart the PC. This quick test saves a lot of time because it tells you whether the problem is with the controller itself or with Project64’s settings.
Step 4: Open Project64 and Load the Input Settings
Launch Project64 and head to the controller configuration area. Depending on the version and plugin you are using, this is usually under Options and then something like Configure Controller Plugin or Configure Input. That is the control center where the magic happens.
If this is your first time opening it, do not worry if the screen looks a little busy. Emulators love menus that look like they were built by engineers for other engineers. You only need a few important options to get started.
Step 5: Make Sure the Controller Is Enabled
Inside the controller configuration screen, make sure Player 1 is marked as plugged in or enabled. This tells Project64 to treat your Xbox 360 controller as an active N64 controller rather than a decorative suggestion.
While you are there, look for accessory options such as Mem Pak or Rumble Pak. If you are just trying to get basic gameplay working, you can leave this on the default setting for now. You can always return later and change it based on the game you are playing.
Step 6: Turn On XInput if That Option Appears
Xbox 360 controllers play nicest with XInput, so if your Project64 input plugin includes an XInput checkbox or toggle, enable it. This is one of the most useful settings for Xbox-style pads because it helps Project64 recognize the controller more cleanly.
If button assignment behaves strangely and you see bizarre keyboard entries instead of controller buttons, XInput is often the fix. In plain English: if Project64 starts acting like your gamepad is secretly a keyboard in disguise, this setting is worth checking first.
Step 7: Map the Main N64 Buttons
Now start assigning buttons one by one. Click the N64 button field you want to map, then press the matching button on your Xbox 360 controller. A practical starter layout looks like this:
N64 Start = Start
N64 A = A
N64 B = X or B
N64 L = Left Bumper
N64 R = Right Bumper
N64 Z = Left Trigger
This layout works well because it keeps the most-used actions under your fingers without forcing your hands into a pretzel. There is no single universal “perfect” map, though. For example, some players prefer B on the Xbox B button because it feels more literal, while others map it to X for better thumb flow in action games.
Step 8: Assign the Analog Stick and D-Pad
The N64 analog stick should almost always be mapped to the Xbox 360 left stick. This is the most natural fit for movement. Then map the N64 D-pad to the Xbox 360 D-pad.
After that, move the stick in all directions while assigning it if your input plugin requires directional binding. If diagonal movement feels wrong later, do not panic. That usually means you need a small deadzone or range adjustment, not that the universe has personally singled you out.
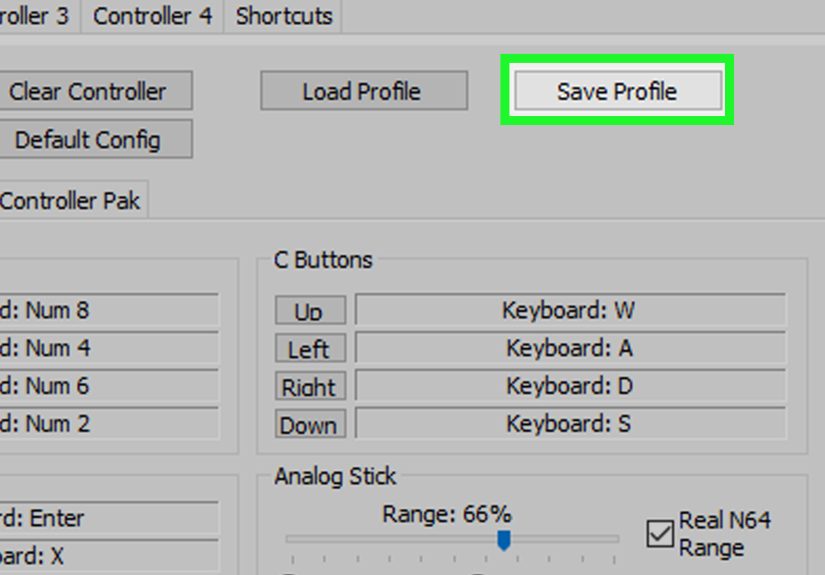
Step 9: Decide How You Want to Map the C Buttons
The C buttons are where things get interesting, because the N64 had four yellow camera buttons and the Xbox 360 controller does not come with a built-in time machine. You have two common options.
The first option is to map C-Up, C-Down, C-Left, and C-Right to the Xbox 360 right stick directions. This feels good in games where the C buttons behave like camera controls, such as Super Mario 64. The second option is to map the C buttons to the face buttons or another comfortable cluster if you want more precise digital presses.
If you are unsure, start with the right stick. It is intuitive for many 3D games. Then test it in a game and switch if needed. Emulation is part science, part personal taste, and part telling yourself, “Okay, that is weird, but I can work with it.”
Step 10: Tweak Deadzone and Range Only if Necessary
Many players never need to touch advanced stick settings. But if your character drifts, refuses to run properly, or acts awkward on diagonals, check the analog options in the input plugin. Settings such as deadzone, range, or real N64 range can affect how the stick behaves.
As a rule, make small changes and test after each one. A deadzone that is too high can make movement feel stiff and unresponsive. A range setting that feels off can make analog input feel too shallow or too twitchy. If the default plugin still gives you trouble, some players have better results with the N-Rage input plugin, especially when fine-tuning Xbox controllers.
Step 11: Save the Profile and Test In-Game
Once your layout feels good, save the controller profile if your plugin gives you that option. This is the step many people skip right before a crash, a reinstall, or an “I was sure I already set this up” moment. Save it now and spare your future self the headache.
Then load a game and test everything. Check movement, jumping, camera control, Start, and shoulder buttons. If a game uses the Controller Pak or supports rumble, revisit the accessory option and choose the one that matches your needs. For example, some games feel better with rumble, while others need memory-related settings to behave the way you expect.
Troubleshooting Tips for Project64 Controller Setup
When the Controller Is Not Detected
If Project64 does not detect the Xbox 360 controller at all, confirm that Windows detects it first. If Windows sees nothing, the emulator is not the real culprit. Reconnect the controller, swap USB ports, or re-pair the wireless controller to the receiver.
When Buttons Map Incorrectly
If Project64 keeps showing keyboard input instead of gamepad buttons, reopen the controller configuration and make sure XInput is enabled if available. That single option fixes a surprising number of Xbox 360 controller setup headaches.
When Analog Movement Feels Wrong
If Mario walks like he is sneaking through a library instead of sprinting across Peach’s castle, your stick settings probably need a little love. Lower or raise deadzone in small steps, and test range settings carefully. Do not change ten settings at once unless you enjoy troubleshooting by interpretive dance.
When Rumble or Pak Settings Seem Inconsistent
Accessory behavior can vary by plugin and version. If rumble does not stick after restarting Project64, go back and verify the setting again. In emulator land, “I already changed that” and “the setting actually stayed changed” are not always the same sentence.
Why an Xbox 360 Controller Works So Well with Project64
The Xbox 360 controller remains a favorite for Project64 because it is comfortable, durable, and familiar to many PC players. Its left stick works naturally for N64 movement, its shoulder buttons are perfect for L and R, and the triggers can handle Z without much fuss. The only truly awkward part is the C buttons, but that problem exists with almost every modern controller because the N64 was delightfully weird.
In practice, once the controller is mapped properly, the experience is far better than using a keyboard for most N64 games. Platformers feel smoother, racing games feel more natural, and multiplayer sessions stop feeling like an office productivity drill.
Real-World Experience: What Setting Up an Xbox 360 Controller on Project64 Actually Feels Like
The funny thing about setting up an Xbox 360 controller on Project64 is that the process usually starts with confidence and ends with fine-tuning. At first, it seems simple: plug in the controller, open the emulator, map a few buttons, and you are done. Then you load a game and discover that one tiny thing feels off. Maybe the camera spins too fast. Maybe Link walks like he is trying not to wake the neighbors. Maybe the C buttons are technically correct but emotionally wrong. That is the real Project64 experience.
For many players, the first big realization is that “working” and “feels right” are not the same thing. You can get every button to respond in five minutes, but making the setup feel natural can take a few extra rounds of testing. That is especially true with N64 games because the original controller was unique in all the best and strangest ways. Modern pads are more ergonomic, but they do not match the old layout one-to-one. So there is always a little translation involved.
One common experience is loading Super Mario 64 and immediately noticing whether the camera controls make sense. If the right stick is mapped to the C buttons, some players love it right away because it feels modern. Others hate it because the original C buttons were digital taps, not an analog stick. Neither camp is wrong. It just depends on how your hands and gaming brain want the controls to behave. The same thing happens in games like Ocarina of Time, where one player wants quick item access on face buttons while another wants consistency across every game.
Another very normal experience is chasing the “perfect” analog stick feel. This is where people lose an hour adjusting deadzone, changing range, testing movement, and then changing it all again because Mario is now either drifting or moving like he is stuck in molasses. The trick is not to overreact. Small changes usually beat dramatic ones. Most controller setup problems are solved by patience, not by randomly clicking every advanced option and hoping destiny sorts it out.
Wireless users have their own little adventure. Once the receiver is paired and the controller connects correctly, everything feels great. But getting to that point can feel like convincing two suspicious cats to become roommates. It works, but only after a few sync attempts, a USB port change, and a moment where you stare at blinking lights as though you are defusing a bomb.
Still, once the setup is done, the reward is absolutely worth it. N64 games feel better with a real controller. Racing is smoother, platforming is more precise, and multiplayer is much less chaotic than trying to share a keyboard. After that first successful setup, future controller profiles become much easier to manage. In other words, the first time is the learning curve. The second time, you feel like a wizard. A slightly nerdy wizard, sure, but a wizard nonetheless.
Final Thoughts
If you want the shortest version of this guide, here it is: connect the Xbox 360 controller properly, make sure Windows sees it, open Project64’s controller settings, enable XInput if available, map the buttons carefully, and adjust stick settings only when something feels wrong. That is the real formula.
Once you save a good profile, Project64 becomes much more enjoyable. The keyboard can go back to doing keyboard things, like typing passwords and pretending it was ever a good way to play Star Fox 64. Meanwhile, your Xbox 360 controller can do what it does best: make retro games feel like games again.


