Table of Contents >> Show >> Hide
- Why I Wanted to Combine Wire Wrapping and Crocheting
- Designing the Tree Bracelet: From Sketch to Wrist
- How I Built the Tree of Life Centerpiece
- Crocheting the Bracelet Band
- Why This Tree Bracelet Feels So Meaningful
- Tips If You Want to Make Your Own Tree Bracelet
- Bonus: My Personal Experiences Making This Tree Bracelet
If you had told me a few years ago that my happy place would be somewhere between a tangle of copper wire and a pile of yarn,
I’d probably have smiled politely and gone back to doomscrolling. Yet here we are: I designed a tree bracelet that literally
braids together my two favorite hobbieswire wrapping and crochetingand it turned out to be part jewelry project, part therapy,
and part “how is this not completely tangled?” magic trick.
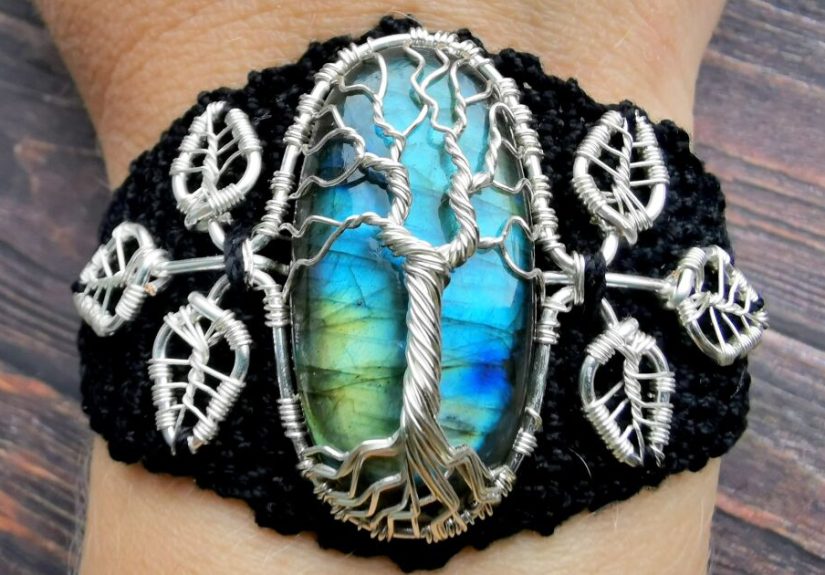
This Tree of Life bracelet is built around a wire-wrapped stone centerpiece and a soft, crocheted band that hugs the wrist.
The combo looks delicate, but it’s surprisingly sturdy, wearable, and comfortable. Even better, it carries all the symbolism
of a Tree of Lifegrowth, grounding, and connectionwhile also showcasing the calming, mindful joy that comes from
working with your hands.
Why I Wanted to Combine Wire Wrapping and Crocheting
From Loose Wire to Little Forests
My love affair with wire wrapping started with a single spool of copper and a tutorial video that promised a
“simple Tree of Life pendant.” Spoiler: my first attempt looked more like “Tree of Mild Confusion.” But wire wrapping
is one of those crafts that rewards patience. With each piece, I learned how different gauges of wire behavehow
thicker base wires create a strong frame while thinner wires can be twisted and teased into branches, roots,
and delicate details.
The Tree of Life motif quickly became an obsession. It’s a classic in jewelry because it’s more than just a cute design.
The roots represent grounding, the trunk symbolizes strength, and the branches reaching upward hint at growth, renewal, and
all the unexpected directions life can take. Putting that story into metal and stone makes each piece feel more like a tiny
personal talisman than just an accessory.
Crochet: The Cozy Counterweight
On the other side of my craft table sits my crochet hook. Crochet is my calm-down ritual: the soft rhythm of
yarn over, pull through, repeat until your shoulders drop away from your ears. Unlike wire, yarn forgives mistakes.
You can “frog” a projectrip it all backand start again with no one the wiser. That freedom to experiment is what
makes crochet so addictive and so comforting.
I’d already crocheted plenty of scarves, blankets, and the occasional wobbly stuffed animal. But at some point,
I started wondering: why not merge this soft, flexible fabric with the structure and shine of wire-wrapped jewelry?
Bracelets felt like the perfect place to experiment. They’re small, visible, and easy to customize for fit and comfort.
Designing the Tree Bracelet: From Sketch to Wrist
Picking the Stone and the Story
Every good Tree of Life bracelet begins with a stone that has something to say. You can go bold with labradorite,
amethyst, or jasper, or keep it simple with a smooth glass cabochon. I chose an oval cabochon with a subtle,
forest-like shimmersomething that looked like it could hide an entire tiny landscape in its depths.
The shape and size of the stone matter. An oval or round stone gives enough space to “grow” your tree,
while still being comfortable on the wrist. Too small, and your branches turn into a messy scribble.
Too large, and your bracelet becomes a wearable boulder. For my piece, I aimed for that bracelet sweet spot:
big enough to be a statement, small enough to wear while drinking coffee without knocking over the mug.
Choosing the Right Wire
Next came the wire. For the base frame and cuff edges, sturdier wire (around 16–18 gauge) gives the bracelet
its backbone. For the tree itselfroots, trunk, and branchesthinner wire (around 24–26 gauge) is easier to twist,
split, and shape without fighting your hands.
I went with warm-toned copper for a few reasons:
it’s relatively soft, easy to manipulate, and pairs beautifully with earthy stones and fiber. You can also oxidize and polish it
to bring out the details in the bark and branches, making your tree look more like something straight out of a fantasy novel.
Designing a Band That Deserved the Centerpiece
Once the stone and tree were planned, I had to face the biggest design question: what kind of band could possibly
match that level of drama without stealing the show? A plain metal cuff felt too rigid; a bead strand felt too fragile.
That’s when the idea clickedcrochet the band.
Crochet fabric is flexible, breathable, and endlessly customizable. Using a thin cotton or nylon cord, I designed
a band that was soft on the skin but firm enough to hold the wire centerpiece securely. It also meant I could
play with color: deep forest greens, earthy browns, or even a contrasting teal to make the stone pop.
How I Built the Tree of Life Centerpiece
Step 1: Creating the Base Frame
To start, I measured the stone and formed an oval frame from the thicker wire, shaping it carefully so the stone
sat snugly inside. I overlapped the ends and wrapped them tightly with thin wire to lock everything in place.
This frame acts like a picture frame around your gemstone forestit needs to be secure but not bulky.
Then I added a couple of short “bridge” wires across the back of the frame. These help hold the stone in place
and give more anchor points for the tree’s roots and trunk. It’s basically the jewelry version of reinforcing
a wall before you hang a heavy painting.
Step 2: Twisting Roots and Growing the Trunk
For the tree, I cut multiple lengths of thin wire, lined them up, and twisted them together in bundlesthese bundles
became the roots. I laid them along the bottom of the frame, then folded and wrapped them so they “grabbed” the frame
securely. Each twist added texture and the illusion of bark.
From there, I brought the twisted wires upward to form the trunk. Some strands stayed tightly twisted for a solid,
strong center; others branched off earlier to create smaller off-shoots. This is where the design becomes very personal.
You can keep the trunk straight and proud, or let it curve like a windswept tree clinging to a cliffside.
Step 3: Adding Branches and Optional “Leaves”
For the branches at the top, I separated the wires into smaller groups and twisted them more loosely to create a sense of movement.
Some branches reached outward and wrapped around the edge of the frame to anchor themselves; others curved inward over the stone,
like the tree was hugging its own little universe.
If you want extra sparkle, you can thread tiny gemstone chips or seed beads onto the wire before finishing the branches.
These become clusters of leaves, blossoms, or even glowing “fruit” depending on the color and placement. For this bracelet,
I kept the design fairly minimal so the stone could shine, but a few subtle beads at the branch tips added just enough magic.
Crocheting the Bracelet Band
Choosing Fiber and Hook Size
While the tree centerpiece cooled off (and so did my hands), I switched to crochet mode. For the band,
I chose a smooth, strong cord slightly thinner than standard worsted-weight yarnsomething that wouldn’t stretch out
too much but still felt soft against the skin.
A small hook size helped keep the stitches tight and consistent. Loose stitches can look sloppy and may stretch over time,
especially with a heavy centerpiece attached. Tight, neat stitches create a bracelet that keeps its shape and supports
the weight of the wire-wrapped stone.
Building a Simple, Comfortable Structure
For the actual band pattern, I kept things simple to complement the intricacy of the tree. A short row of foundation chains
in the bracelet length I wanted (minus the centerpiece width) became the starting point. Then I worked back and forth in
short, dense stitcheslike single crochet or half double crochetto create a slim, sturdy strap.
To add a bit of texture, I occasionally worked in the back loop only, which gives a subtle ribbed look. This tiny detail
catches light and makes the band look more finished, almost like a tiny piece of woven fabric instead of basic loops.
Attaching the Centerpiece to the Band
Once the crochet band and wire tree were ready, it was time to marry them into a single bracelet. I positioned the stone
in the middle and used the same crochet cord to stitch through the wire frame and into the edges of the band,
almost like sewing a patch onto a sleeve.
The trick is to pull the stitches snug but not too tight. You want the frame to sit flat and secure without distorting
the bracelet shape. When the stitching was done, I wove in all the crochet tails and checked the underside to make sure
nothing was scratchy or pokey. Comfort is non-negotiableif a bracelet is beautiful but painful, it will live in a drawer.
Why This Tree Bracelet Feels So Meaningful
A Symbol You Can Actually Wear Every Day
Symbolically, the Tree of Life is a powerhouse. It’s about roots and branches, past and future,
grounding and growthall the things we’re constantly juggling in real life. Wearing that symbol on your wrist,
right where you see it while typing, drawing, or making coffee, turns it into a quiet reminder of your own resilience.
Because this bracelet blends metal, stone, and fiber, it also feels like a tiny collaboration between elements:
earth (stone), fire (metal), and softness (fiber). It’s tactile, layered, and a little bit unconventionaljust like
most of our creative journeys.
The Mental Health Bonus of Crafting
Beyond the finished jewelry, the process of making this piece was incredibly grounding. Wire wrapping demands focus
and fine motor control; crochet adds a soothing, repetitive rhythm. Together, they create a meditative state where
worries fade into the background and time passes in that good, “oh wow, I forgot to check my phone” kind of way.
Crafts like this are more than hobbiesthey’re tiny, portable wellness rituals. You’re not just making a bracelet;
you’re giving your brain a break, your hands a workout, and your creativity a playground.
Tips If You Want to Make Your Own Tree Bracelet
Start Simple, Then Level Up
If this sounds like a fun challenge, here are a few things I learned (sometimes the hard way) while designing this piece:
- Practice the tree on a pendant first. A small Tree of Life pendant is a great way to get comfortable with twisting wires and shaping roots and branches before you commit to a full bracelet.
- Don’t be afraid of “messy” trees. Real trees are not perfectly symmetrical, and your wire one doesn’t have to be either. Slightly uneven branches can make your design look more natural.
- Choose comfortable fibers. If the band feels scratchy on your neck or hand, it will definitely feel scratchy on your wrist. Test the cord against your skin before you crochet the full strap.
- Adjust the fit as you go. Measure your wrist or the wearer’s wrist while making the band. It’s much easier to add or remove a few crochet rows than to fix a finished bracelet that’s too tight.
- Secure every wire end. Tuck, trim, and pinch down wire ends so they don’t snag on clothing or skin. Your future self will thank you.
Make It Personal
The best part about crafting your own bracelet is that you can customize everything. Use a birthstone-colored cabochon,
weave in colors that remind you of a favorite forest or season, or stitch in beads that represent important milestones.
Turn the tree into a family tree with different gemstones for each person, or lean into fantasy and design an
“elven” tree with sweeping branches and shimmering stones.
When you’re done, you don’t just have jewelry. You have a story you can literally fasten around your wrist.
Bonus: My Personal Experiences Making This Tree Bracelet
From “What If?” to “Wow, That Worked!”
The idea for this bracelet didn’t arrive as a lightning bolt. It was more of a quiet “what if?” that refused to leave.
I’d been wire wrapping pendants for a while and crocheting in the evenings to unwind. One day, I laid a finished pendant
on top of a scrap of crocheted fabric and thought, these two actually look really good together. The metal made
the yarn seem more intentional and refined; the yarn softened the intensity of the wire and stone.
My first attempt at merging them was hilariously awkward. I tried crocheting directly around the wire frame with a metal wire
instead of fiber, and it felt like wrestling a tiny, shiny octopus. Lesson learned: just because you can crochet with
wire doesn’t mean you should do it for a whole bracelet band. Switching to a soft cord turned everything around.
Learning to Trust the Process
One of the biggest takeaways from this project was learning to trust the middle stagethe part where everything looks
weird and half-finished. When the tree was only roots and a stubby trunk, it looked more like a tiny broom than anything mystical.
When the band was just a narrow strip of crochet, it seemed too plain. But experience kept whispering,
“Keep going, it’ll make sense,” and sure enough, once the branches started to spread and the band lengthened,
the design clicked into place.
That messy-middle phase shows up in a lot of creative work and in life in general. The sketch looks wrong,
the draft reads flat, the project feels like it’s going nowherebut if you push through, those rough edges often become
the most interesting parts of the final piece. This bracelet is my wearable reminder not to quit while things still look awkward.
How People React When They See It
Wearing the bracelet out in the world has been unexpectedly fun. People notice it quickly because it doesn’t look like
typical store-bought jewelry. I’ve had baristas lean over the counter to ask, “Is that crocheted?” and strangers on the bus
squint at it before saying, “Wait, is that a tree?” Once they realize the band is yarn and the centerpiece is wire wrapped,
the questions start flowing.
My favorite reactions are from fellow crafters. You can almost see their brains whirring:
“Okay, so if you can combine wire wrapping and crochet, what if I combine my two hobbies?”
Suddenly they’re talking about pairing embroidery with resin, or woodworking with macramé. The bracelet becomes less of a flex
and more of a conversation starter about creativity and trying weird mash-ups.
What This Project Taught Me About Hobbies
Making this tree bracelet showed me that hobbies don’t have to stay in separate lanes. It’s easy to think of
“wire wrapping” and “crocheting” as two unrelated skills, but once you experiment, they can support and elevate each other.
The structure from wire wrapping taught me to think about tension, balance, and durability. Crochet reminded me to keep things
soft, wearable, and comfortable.
On a deeper level, combining both crafts made me feel more confident about calling myself an artist. Not a “wire person”
or a “yarn person,” just someone who likes turning raw materials into little stories you can wear. Every time I fasten the clasp,
it feels like I’m putting on proof that experimenting is worth itthat blending passions can lead to something uniquely “you,”
even if the first few attempts are a glorious mess.
So if you’ve ever looked at your pile of craft supplies and thought, “I love all of this, but I don’t know how it fits together,”
consider this your sign. Try the strange combination. Twist the wire, pick up the hook, and see what happens.
Your own version of a tree bracelet might be waiting in that experiment.
SEO JSON


