Table of Contents >> Show >> Hide
- Why Flowy Dresses Make Travel Self-Portraits Look Magical
- Planning the Shot Before You Even Unzip Your Suitcase
- The Gear That Makes Solo Self-Portraits Actually Possible
- How I Choose Dresses That Travel Well (and Photograph Even Better)
- The Self-Portrait Setup That Saves Me From 47 Failed Frames
- Posing Without Feeling Like a Human Coat Rack
- Editing: Keep the Place Honest, Keep the Mood Consistent
- Ethics: Beautiful Photos Shouldn’t Cost the Place Its Beauty
- Permits, Rules, and “Can I Actually Do This Here?”
- Safety: How to Take Solo Photos Without Taking Solo Risks
- How to Make the Photos Feel Like a Story (Not Just a Pretty Background)
- Conclusion: The Dress Is Just the Beginning
- Extra: of Real-World Flowy-Dress Self-Portrait Experiences
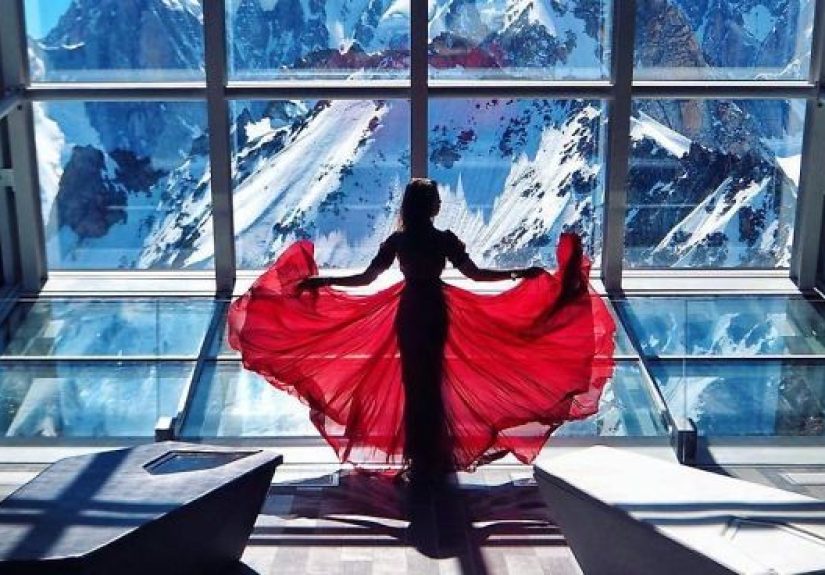
Some people collect fridge magnets. I collect wind. Specifically: the kind of wind that grabs a flowy dress, turns it into a sail, and makes a still photo look like it’s mid-sentence.
My travel routine is simple in theory: find a beautiful place, put on a dress that moves like a daydream, set up the camera, and step into the frame. In practice, it’s a glamorous dance between art and logisticslike ballet, but with more sunscreen and a higher chance of a tripod slowly sinking into sand.
This is the story (and strategy) behind traveling for self-portraits in dramatic dresseshow to plan it, shoot it, stay safe, respect the places you’re visiting, and come home with photos that feel like a movie still instead of “I ran 12 times back and forth for this one shot.”
Why Flowy Dresses Make Travel Self-Portraits Look Magical
A flowy dress is basically a portable special effect. It creates movement even when you’re standing still, adds scale against big landscapes, and turns “person in a pretty place” into “character in a story.” The fabric becomes a visual cue: romance, adventure, freedom, dramapick your vibe.
It’s also practical in a sneaky way. A maxi dress can simplify your styling (one piece, done), and it photographs well from a distancehandy when your camera is 20 feet away and you’re trying to look effortless while silently begging the self-timer not to betray you.
Planning the Shot Before You Even Unzip Your Suitcase
The best self-portraits usually happen before the camera turns onwhen you plan the “why” and “how” of the image. I think about four things:
1) The story you want the photo to tell
Are you the tiny human in a giant landscape? A bold pop of color in a quiet city street? A calm figure facing the ocean like you’re about to deliver the opening monologue of a prestige drama? Decide the mood firstyour outfit, pose, and location will follow.
2) Light (the ultimate mood manager)
Soft light makes everything feel expensive. Early morning and late afternoon often deliver that gentle, flattering glow. Midday sun can be gorgeous too, but it’s less forgivingstrong shadows, bright highlights, and that “why is my face two different colors” situation.
3) Timing (aka: crowds are not your supporting cast)
If you want an empty-looking scene, arrive early, go on weekdays, or choose less obvious angles. You don’t need to “own” a place to photograph it, but you do want to be considerateespecially when setting up a tripod.
4) Surface and surroundings
Pretty places are often fragile places. I plan shots that keep me on durable surfaces (trail, rock, sand where appropriate) and away from sensitive vegetation or restricted areas. If the only way to get the shot is to damage the place, the shot isn’t worth it.
The Gear That Makes Solo Self-Portraits Actually Possible
You don’t need a rolling studio to take strong travel self-portraits, but a few tools will save your sanity.
Tripod: your most loyal travel companion
A lightweight travel tripod is the classic choice. If you’re using a phone, even a small tripod plus a solid phone mount works. The main goal is stabilityespecially if you’re shooting in wind (which, to be fair, is the whole dress point).
Remote shutter, timer, or interval shooting
A remote shutter lets you trigger photos without sprinting like you’re late for a train. A self-timer works too, especially for minimal gear. Interval shooting is a game-changer for flowy dresses: set the camera to take repeated shots, then move through poses naturally while the camera does the busy work.
Phone perks: you’re carrying a tiny production team
Modern phones offer timers, burst modes, and remote triggering. If you use an Apple Watch, you can even use it as a remote viewfinder in some setups, which feels like cheating in the best way.
Tethering (optional, but powerful)
If you’re using a camera and want more precision, tethering to a phone or tablet can help you check framing and focus without guesswork. This is especially helpful in wide scenes where you’re small in the frame.
How I Choose Dresses That Travel Well (and Photograph Even Better)
Not all flowy dresses are created equal. Some pack beautifully; others emerge from a suitcase looking like they lost a fight with a vacuum sealer.
Fabric matters more than price
I look for lightweight materials that move easily and resist wrinkles. If a dress wrinkles easily, I pack a small travel steamer or plan for a hot shower “steam session” in the bathroom. (It’s not glamorous, but neither is editing out crease lines that look like topographical maps.)
Color strategy: be the focal point without yelling
In nature, bold colors can pop beautifullyred, mustard, cobalt, emerald. In cities, neutrals can look timelesscream, black, soft brown, muted pastels. I keep a small palette in mind so my photos look cohesive across a trip.
Movement test
If the dress doesn’t move when I spin once in my bedroom, it’s probably not going to float dramatically on a cliff. I’m not saying you need a “twirl rating,” but… you kind of do.
Respect the place and culture
Some locations (religious sites, local communities, memorials) call for modesty and restraint. I plan outfits that fit the setting and avoid anything that would feel disrespectful or attention-seeking for the wrong reasons.
The Self-Portrait Setup That Saves Me From 47 Failed Frames
Self-portraits are part photography, part problem-solving. Here’s the workflow I rely on when I’m alone in a big beautiful place with exactly one pair of hands.
Step 1: Lock the composition
I choose a frame that tells the story clearly: strong foreground/background separation, leading lines (paths, shoreline curves, streets), and a clean horizon. I also leave space for movementflowy dresses need “air” in the frame.
Step 2: Focus without guesswork
If autofocus struggles (common in low light or when you’re far away), I focus on a stand-in object where I’ll standlike a backpack or hatthen switch to manual focus to lock it. Another trick is marking your spot with something subtle (a small rock on a durable surface, never on vegetation) so you return to the same focus plane.
Step 3: Settings that flatter motion
Flowy dresses movesometimes a little, sometimes like a sailboat. If you want crisp fabric detail, use a faster shutter speed. If you want dreamy motion blur, slow it down slightly and let the dress paint movement into the frame. The key is choosing the look on purpose, not by accident.
Step 4: Shoot in sets
I shoot short bursts of “pose families”: still poses, walking poses, turning poses, and one dramatic spin (the crowd favorite). This keeps variety high and decision fatigue low.
Posing Without Feeling Like a Human Coat Rack
The easiest way to pose in self-portraits is to stop “posing” and start “doing.” Give yourself a simple action:
- Walk slowly toward the camera, then past it.
- Look away as if you’re noticing something in the distance.
- Adjust the dress, hold the skirt lightly, or let one hand trail along a railing (when allowed).
- Turn your shoulders, shift weight, breathesmall changes read as natural on camera.
Also: hands matter. If you don’t know what to do with them, give them a jobholding fabric, touching hair, holding a hat, resting on a strap, or gently clasped. Hands with a purpose look calm; hands with no mission look like they’re asking for directions.
Editing: Keep the Place Honest, Keep the Mood Consistent
Editing is where you turn a folder of “almost” into a series that feels intentional. My approach:
- Cull fast: delete obvious misses early (blur, awkward mid-step, closed eyes).
- Match the series: keep color and contrast consistent across the trip so your photos feel like a collection, not a random assortment.
- Protect skin tones: especially in sunrise/sunset light, avoid over-warming until you look like you’re auditioning for a role as “human candle.”
- Don’t erase reality: I’ll remove a distracting bottle or sensor dust, but I try not to “rebuild” a place. The beauty is already there.
Ethics: Beautiful Photos Shouldn’t Cost the Place Its Beauty
Travel photography comes with responsibilityespecially when social media can send thousands of people to the same spot. A few principles I stick to:
Stay on durable surfaces
If there’s a trail, I use it. If an area is roped off, closed, or visibly fragile, I treat it like it’s made of glassbecause sometimes it basically is. Photos are not a good reason to trample vegetation or widen trails.
Respect wildlife (no photo is worth stressing an animal)
I keep distance, avoid feeding wildlife, and don’t chase “the shot.” If an animal changes behavior because of me, I’m too close. Period.
Be considerate of other visitors
I keep my setup compact, don’t block viewpoints, and step aside quickly when others want their moment. A tripod doesn’t give anyone VIP status.
Think before you geotag
Sometimes sharing a general region is enough. If a location is fragile or overwhelmed, I avoid broadcasting the exact pin. If I do share details, I try to pair it with responsible guidancehow to visit respectfully, when to go, and what not to do.
Permits, Rules, and “Can I Actually Do This Here?”
Rules vary by location, and they can change. A good baseline approach:
- Assume visitor photos are fine in most public spacesuntil your setup becomes “organized,” disruptive, or commercial.
- Check park and site rules if you’re using extensive gear, lighting, multiple people, or anything that looks like a production.
- Drones are a special category and often restrictedespecially in protected areas. Even outside parks, aviation rules apply. If you’re tempted, do the homework first.
My personal rule: if I’m unsure, I ask. A quick email or a ranger station question beats a ruined day and a bad reputation for every photographer after you.
Safety: How to Take Solo Photos Without Taking Solo Risks
There’s a difference between “adventurous” and “reckless.” I keep my shoots safer with a few habits:
- Tell someone your plan: where you’re going, when you’ll be back, and what to do if you don’t check in.
- Watch the edges: cliffs, waves, slippery rocks, unstable dunesno photo is worth one wrong step.
- Keep gear close: a tripod can attract attention. I set up quickly, stay aware, and avoid flashing expensive equipment in isolated areas.
- Weather is the boss: wind, lightning, extreme heat/coldif conditions change, I change plans.
How to Make the Photos Feel Like a Story (Not Just a Pretty Background)
The difference between a nice shot and a memorable one is usually narrative. Here are story tricks that work:
- Sequence your images: wide establishing shot, medium shot with environment, close-up detail (fabric, hands, texture).
- Repeat a visual signature: the same dress color, the same pose type, or the same framing style across locations.
- Use scale: let yourself be small in grand places sometimes. It reads as wonder.
- Include “imperfect” frames: a laugh, a windy hair moment, a mid-step blurthese feel alive.
Conclusion: The Dress Is Just the Beginning
Yes, the flowy dresses are dramatic. Yes, the photos can look like a travel poster for a life that involves more sunsets than spreadsheets. But the real point isn’t perfectionit’s presence. Traveling with a camera and stepping into your own frame is a creative way to remember not just where you went, but how it felt to be there.
And if you ever see someone alone on a quiet overlook, adjusting a tripod while their dress tries to become a kiteplease know: they’re not being extra. They’re making art. (Also, they might be fighting a 10-second timer. Pray for them.)
Extra: of Real-World Flowy-Dress Self-Portrait Experiences
1) The Sunrise Sprint That Taught Me to Prep First
I once arrived at a viewpoint five minutes before sunrise and thought, “Plenty of time.” Reader, I had not extended the tripod legs. I had not chosen a frame. I had not checked whether my dress was quietly tucked into my backpack zipper like it was trying to escape. The light turned perfect while I wrestled with basic physics. I still got a photo, but the lesson stuck: set the scene before the sky starts performing. Now I arrive early, do a test shot, and only then change into the “main character outfit.” The sunrise doesn’t wait for anyoneespecially not someone trying to look effortless while speed-walking in sandals.
2) Windy Cliffs and the Myth of “Just One Take”
On a coastal cliff, the wind was so strong my dress behaved like a flag declaring independence. Gorgeous in theory, chaotic in practice. Half my frames looked like I was being gently attacked by fabric. That day I learned to work with wind instead of against it: I turned my body at an angle, held the skirt lightly to control the shape, and let the gusts create movement in bursts. I also switched to a faster shutter speed so the dress looked crisp instead of smeared. The final photo looked cinematic, but the behind-the-scenes truth was a negotiation with the atmosphere.
3) City Streets: How I Learned to Be Quick and Considerate
In a busy city, setting up a tripod can feel like putting a “hello, I am inconvenient” sign on the sidewalk. I used to freeze up, overthink, and take forever. Now I plan a corner with breathing room, keep my setup tight, and shoot in short sets. I’ll take a few frames, fold the tripod, step aside, and let the street keep moving. Oddly, the faster I work, the calmer I look in the photos. Also: cities taught me the power of a simple dressclean lines, soft movement, and a neutral tone can look timeless against loud architecture.
4) The Desert Dress That Became a Dust Magnet
A pale flowy dress in the desert sounds dreamy until you realize sand is basically glitter with an attitude. I sat down for one “casual” pose and stood up looking like a frosted donut. The experience upgraded my packing list: a small cloth for dust, a hair tie for sudden gusts, and shoes that don’t sink into the earth like a slow-motion tragedy. I also learned to choose poses that respect the landscapestaying on durable surfaces and avoiding fragile patches. The desert is stunning, but it’s not a studio floor. Treat it like the living place it is.
5) The Photo That Didn’t Happen (and Why I’m Glad)
One location was famous onlineepic view, dramatic drop, the classic “standing near the edge” shot. When I arrived, the wind was sharper, the footing was worse, and the crowd was bigger than expected. I could have forced it. I could have “just been careful.” Instead, I backed off, reframed from a safer angle, and made a different photoone that still showed the scale, but didn’t require flirting with danger or blocking others. That was the moment I realized the best travel photography habit isn’t a lens or a preset. It’s judgment. The internet forgets quickly. Your safety (and the place itself) deserves a longer memory.


