Table of Contents >> Show >> Hide
- Why the IKEA RAST Is a Makeover Favorite
- Plan First: Pick Your “Final Look” Before You Touch a Paintbrush
- Supplies That Actually Matter
- Step-by-Step: How to Do a RAST Makeover That Holds Up
- Step 1: Assemble smart (and strengthen early)
- Step 2: Prep the surface (yes, even unfinished pine)
- Step 3: Deal with knots (the “surprise espresso stain” problem)
- Step 4: Prime the whole piece
- Step 5: Add your upgrades (trim, fluting, cane, legs)
- Step 6: Paint like you mean it
- Step 7: Protect with a topcoat (optional, but often worth it)
- Step 8: Hardware and final tweaks
- Makeover Ideas You Can Steal (Respectfully)
- Common Mistakes (So You Don’t Become a Cautionary Tale)
- How Much Does a RAST Makeover Cost?
- Final Thoughts
- Extra: Real-World Makeover Experiences and Lessons (Read This Before You Start)
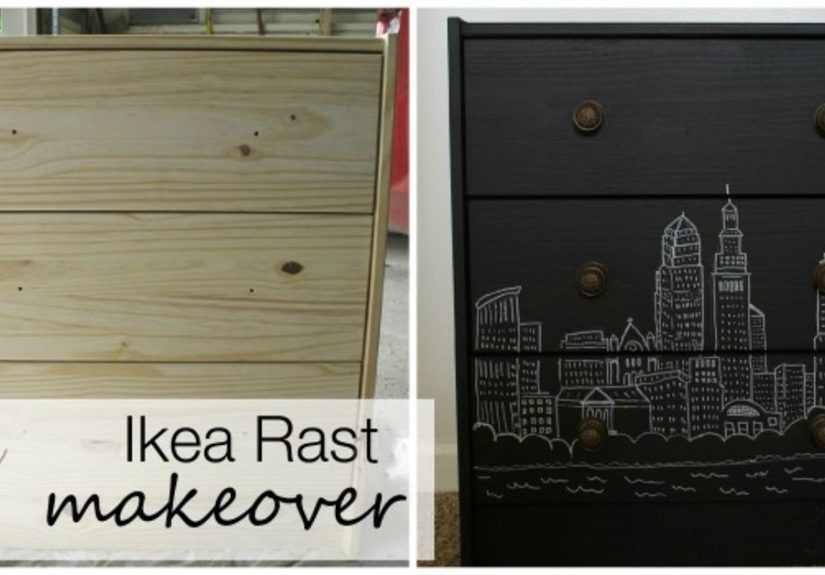
The IKEA RAST is the plain cheese pizza of furniture: simple, affordable, and wildly customizable.
Out of the box, it’s a basic pine dresser with “college apartment starter pack” energy. But with a little paint, a little trim,
and a tiny bit of patience (okay… sometimes a lot), a RAST makeover can look like a boutique piece that costs way more than it should.
In this guide, you’ll get a practical, real-world plan for upgrading a RAST dresserplus a menu of style directions
(modern farmhouse, mid-century, fluted, cane-webbed, wallpapered, and more). The goal: a finish that looks intentional,
survives daily life, and doesn’t scream “I did this at 1 a.m. with leftover wall paint.”
Why the IKEA RAST Is a Makeover Favorite
The RAST hits a rare DIY sweet spot: it’s made of solid pine, sold unfinished, and built with clean, basic lines.
That means you can paint it, stain it, wax it, wallpaper it, carve it, or dress it up with hardware until it looks like it has a fancy last name.
The size is also friendlybig enough to be useful, small enough to move without negotiating with your lower back.
What makes it “hackable”
- Unfinished wood: Paint and stain absorb well when prepped correctly.
- Simple geometry: Flat faces are perfect for trim, fluting, cane webbing, and overlays.
- Modular potential: One RAST can be a nightstand; two can be a low dresser; three can become a “custom built-in” moment.
- Budget-friendly base: You can spend money on the upgrades (legs, pulls, paint) where it shows.
Plan First: Pick Your “Final Look” Before You Touch a Paintbrush
The easiest way to waste a weekend is to start painting without deciding what you’re building.
Before you buy supplies, choose a direction and commit to a short list of design moves.
A good makeover usually uses two hero upgrades plus one supporting detail.
Style recipes that work
- Modern farmhouse: Simple trim on drawer fronts + stain or warm neutral paint + black pulls.
- Mid-century: Tapered legs + saturated color (olive, navy, rust) + minimal hardware.
- Fluted front: Half-round dowels or fluted panels + sleek pulls + a crisp paint finish.
- Cane webbing: Cane inserts + wood frame + natural or creamy paint + warm brass knobs.
- Wallpaper pop: Paint the frame + wallpaper the drawer fronts + clear topcoat for durability.
Supplies That Actually Matter
You don’t need a garage full of tools, but you do need the right prep materials.
Most “my paint chipped” stories start with skipping primer, skipping sanding, or rushing dry time.
Core tools
- Screwdriver or drill/driver
- Sandpaper (120–220 grit) or sanding sponge
- Tack cloth or microfiber cloth
- Wood filler (for gaps and dents)
- Painter’s tape
- Foam roller (smooth finish) + quality brush (corners)
Finishing essentials
- Primer: A stain-blocking or bonding primer is your insurance policy.
- Paint: Cabinet/trim enamel or durable furniture paint for high-touch surfaces.
- Topcoat (optional but smart): Water-based polyurethane or a compatible clear coat for extra protection.
Step-by-Step: How to Do a RAST Makeover That Holds Up
Step 1: Assemble smart (and strengthen early)
Build the dresser carefully and square it up. If the frame is slightly twisted, drawers will never glide nicely
(and you’ll blame the drawers, the moon phase, and IKEAwhen it was really alignment).
- Don’t overtighten screws into soft pine.
- Check for wobble and correct it before finishing.
- Consider wood glue in key joints if you want extra rigidity (wipe squeeze-out immediately).
Step 2: Prep the surface (yes, even unfinished pine)
Light sanding helps smooth rough grain and improves adhesion. Focus on edges and drawer frontsthose are the spots
your hands will touch daily.
- Sand with 120–150 grit to smooth surfaces and soften sharp edges.
- Finish with 180–220 grit for a paint-ready feel.
- Remove dust thoroughly (vacuum + damp cloth + dry cloth).
Step 3: Deal with knots (the “surprise espresso stain” problem)
Pine knots can bleed tannins and resin through paint, especially light colors.
If you want a crisp white, a pale neutral, or a soft pastel, treat knots like tiny troublemakers who need supervision.
- Spot-prime knots with a stain-blocking primer or shellac-based sealer.
- Let it dry fully, then lightly sand smooth.
- If you still see yellowing later, re-spot prime and repaint that area.
Step 4: Prime the whole piece
Primer creates a consistent base, improves adhesion, and helps your topcoat look even.
Use thin coatsthick primer tends to texture and drip, and nobody wants “orange peel chic.”
- Apply one thin coat of primer with a foam roller for flat areas.
- Use a brush for corners, edges, and inside lips.
- Let it dry fully, then sand lightly with 220 grit for a smooth finish.
- Apply a second coat if the wood is blotchy or knots are dramatic.
Step 5: Add your upgrades (trim, fluting, cane, legs)
This is where your RAST stops being a RAST and starts being “a custom piece I definitely did not buy online at 2 a.m.”
Add upgrades before final paint whenever possible so everything looks integrated.
Option A: Fluted drawer fronts
- Attach half-round dowels evenly spaced (wood glue + brad nails if you have them).
- Fill nail holes, sand lightly, then prime again to unify textures.
- Use a slightly higher-sheen paint for a crisp, modern look.
Option B: Cane webbing inserts
- Cut a center window in each drawer front (measure twice, cut once, sigh zero times).
- Add a thin wood frame on the back to staple or secure cane webbing.
- Prime and paint the frame; keep cane natural or tone it with a light finish.
Option C: Furniture legs + a base
- Add a plywood base underneath so legs have a solid mounting surface.
- Choose tapered legs for mid-century, block legs for modern, or bun feet for cottage vibes.
- Keep the leg height practical: enough to feel airy, not so tall it looks like it’s on stilts.
Option D: Wallpaper drawer fronts
- Paint the dresser body first.
- Apply wallpaper to drawer fronts (smooth out bubbles carefully).
- Seal with a clear topcoat so it can handle fingerprints and cleaning.
Step 6: Paint like you mean it
Two thin coats usually beat one thick coat every time. Thick coats look okay for 30 seconds,
then they sag, wrinkle, and make you question all your life choices.
- Apply the first coat thinly and evenly; let it dry fully.
- Lightly sand with 220 grit between coats for a smoother finish.
- Apply a second coat (and a third if you’re changing from dark to light).
Step 7: Protect with a topcoat (optional, but often worth it)
If your RAST is a nightstand that only holds a lamp and your emotional support water bottle, you might skip a topcoat.
But for kids’ rooms, entryways, or anywhere things get dragged, bumped, and spilledseal it.
- Use a compatible clear coat (water-based poly is popular for minimal yellowing).
- Apply thin coats and avoid overbrushing.
- Let it cure before heavy use (dry-to-touch is not the same as fully cured).
Step 8: Hardware and final tweaks
Hardware is the jewelry. It’s also the easiest way to make your piece look expensive.
Oversized pulls can modernize a small dresser; knobs can keep it sweet and classic.
- Use a drilling template so holes line up.
- Upgrade drawer glide feel with careful alignment and wax on friction points if needed.
- Add felt pads under legs and soft-close bumpers if drawers slam.
Makeover Ideas You Can Steal (Respectfully)
1) The “Upside-Down” Trick for Extra Storage
One of the cleverest RAST ideas floating around is flipping the dresser so the base becomes a functional shelf area.
It changes the proportions, adds visual interest, and creates bonus space for baskets or books.
If you like furniture that multitasks, this one’s a winner.
2) Triple RAST: The Long Dresser Illusion
Lining up multiple RAST units side-by-side creates a long, low dresser effectespecially if you add a single continuous top.
The key is making it look like one piece: unify the legs, use consistent hardware, and add trim that spans across.
3) Modern Farmhouse Trim That Doesn’t Feel Overdone
Simple picture-frame molding on drawer fronts can transform the whole vibe.
Keep the trim slim, use a warm stain or soft neutral paint, and pick hardware with clean lines.
The result is cozy without looking like it came with a free “Live Laugh Love” sign (no offense to anyone’s aunt).
4) Mid-Century Color + Legs = Instant Personality
If you want maximum impact with minimal effort, add tapered legs and paint the body a confident color.
Think olive green, deep navy, charcoal, or a warm clay tone. Pair with simple pullslet the silhouette and color do the talking.
Common Mistakes (So You Don’t Become a Cautionary Tale)
- Skipping knot sealing: Knots can bleed through and “ghost” your paint job weeks later.
- Rushing dry time: Paint that feels dry can still be soft underneath.
- Painting thick: Thick coats create drips, texture, and sticky drawers.
- Forgetting safety: Dressers should be secured to the wall, especially in homes with kids or pets.
- Ignoring drawer alignment: A slightly crooked frame can turn drawers into daily frustration.
How Much Does a RAST Makeover Cost?
The fun (and the trap) is that a RAST makeover can be cheap or “suddenly I own a miter saw” expensive.
A simple paint-and-hardware upgrade might stay modest. A fluted-front, new-top, designer-leg makeover can climbfast.
The sweet spot is choosing one splurge that shows (hardware or legs) and keeping the rest smart and simple.
Final Thoughts
A great IKEA RAST makeover isn’t about fancy toolsit’s about good decisions:
prep well, seal the knots, use the right primer, and don’t rush the finish.
Pick a clear style direction, keep your upgrades intentional, and you’ll end up with a piece that looks custom and feels solid.
Bonus: every time someone asks where you bought it, you get to say, “Oh, this? I made it.”
Extra: Real-World Makeover Experiences and Lessons (Read This Before You Start)
The internet makes RAST makeovers look like a breezy “before lunch” project. In real life, the dresser has opinions.
Here are the most common experiences DIYers reportplus what they wish they’d knownso you can get the pretty result
without the “why is my drawer glued shut?” subplot.
1) The knot-bleed plot twist is real
The first surprise many people hit is that pine knots don’t always behave. You can paint a perfect creamy white,
feel like a design genius, and thendays latersee faint yellow-brown circles trying to re-enter the conversation.
The fix is rarely dramatic, but it is specific: spot-seal knots early, and don’t assume one quick coat of primer
will overpower a knot that has spent years storing resin like it’s prepping for winter.
If you’re going light, treat knots like a separate step, not a “maybe later” problem.
2) “Dry” and “cured” are not the same thing
A makeover can look finished while the paint is still soft. That’s when drawers stick, fingerprints imprint,
and the top surface turns into a record of every object you’ve ever loved. The best experience reports sound boring:
“I waited an extra day.” But boring is the point. Patience is the cheapest upgrade you can add.
If you can, let the piece sit before heavy useespecially before sliding drawers in and out repeatedly.
3) Assembly quality affects everything
People often blame drawer rails when drawers feel rough, but the bigger culprit is alignment.
If the frame is even slightly out of square, drawers will rub, stick, or sit unevenly.
DIYers who have the best outcomes usually do one not-so-glamorous thing: they keep checking for square during assembly.
They tighten gradually, re-check, and adjust before the build is “final.”
It’s not exciting, but it prevents the kind of daily annoyance that makes you regret your entire hobby.
4) The “two hero upgrades” rule saves budgets and sanity
A common experience is upgrade creep: first it’s new knobs, then it’s legs, then it’s fluting,
then suddenly you’re pricing specialty saw blades like a person who runs a small cabinetry business.
The makeovers that look most professional tend to be simple and intentionalfluted fronts or cane inserts,
not both; statement hardware or dramatic paint, not five competing focal points.
Pick two hero moves and a supporting detail (like a crisp topcoat or a clean trim line) and stop there.
Your finished piece will look calmerand you’ll actually finish it.
5) “Painted furniture” lives better with a few practical habits
After the makeover glow fades, real life begins. The best long-term experiences usually include little protection moves:
felt pads under decor, coasters for drinks, and a soft cloth for cleaning instead of harsh scrubbers.
If it’s a nightstand, remember that lotions, perfumes, and hand sanitizer can be surprisingly hard on finishes.
A small tray on top isn’t just cuteit’s defensive interior design.
6) The proudest moment is the second compliment
The first compliment is nice: “That looks amazing!” The second one is the real win: “Wait… that’s an IKEA RAST?”
That’s when you know you didn’t just paint a dresseryou changed the silhouette, the vibe, and the perceived price tag.
And that’s the secret payoff of a RAST makeover: it teaches you the DIY formula you can repeat on other pieces.
Prep, prime, upgrade intentionally, finish patiently. The RAST is just the training ground.


