Table of Contents >> Show >> Hide
- Why Raised Beds Are the Cheat Code of Gardening
- Pick the Perfect Spot (Before You Pick Up a Screwdriver)
- Choose a Size That Your Arms Can Actually Handle
- Materials: The “Don’t Overthink It” Shopping List
- Step-by-Step: Build a Super Easy 4×8 Raised Garden Bed
- Step 1: Decide your height (one board tall or stacked)
- Step 2: Cut your boards (or let the store do it)
- Step 3: Assemble the rectangle (square corners = happier life)
- Step 4: Add bracing (especially if you go taller)
- Step 5: Place it and level it
- Step 6: Protect the bottom (without choking drainage)
- Step 7: Cap it (optional, but your knees will applaud)
- Soil: What to Fill a Raised Bed With (Without Selling a Kidney)
- Planting Plan: Make It Productive (and Instagram-Friendly)
- Watering & Maintenance: Keep It Thriving, Not Just Existing
- Common Mistakes (and How to Avoid the “Why Is Everything Dying?” Phase)
- Easy Upgrades If You Feel Fancy
- Field Notes: of Real-World Raised-Bed Wisdom
- Conclusion
Want a garden that looks like you have your life togethereven if you still can’t find the matching sock to your favorite pair? A raised garden bed is basically the “cheat code” of home gardening: cleaner, tidier, easier on your back, and far more forgiving than digging up your yard like you’re auditioning for a pirate movie.
In this guide, you’ll build a super easy DIY raised garden bed (the classic 4×8), fill it with a smart soil mix, and plant it in a way that makes your neighbors suspicious that you hired a secret gardener named “Chad.” You didn’t. You just used screws and common sense. Let’s do this.
Why Raised Beds Are the Cheat Code of Gardening
Raised beds let you control the soil (the #1 reason gardens succeed or faceplant). They warm up faster in spring, drain better than soggy ground, and keep your planting area clearly definedso your tomatoes don’t slowly annex the lawn like a leafy empire.
- Better soil, faster growth: You’re not stuck with whatever clay/sand/ancient mystery mix your yard came with.
- Less bending, less drama: Even a 12-inch-high bed feels nicer than kneeling on gravel like you’re paying off a gardening debt.
- Weed reduction: Not weed-proof (nothing is), but fewer weeds and easier pulling.
- Neater watering and feeding: The bed is a defined “zone,” which makes drip lines and mulch way more effective.
Pick the Perfect Spot (Before You Pick Up a Screwdriver)
Sunlight: the plant’s love language
Most vegetables want lots of sun. If you’re growing leafy greens, you can get away with less, but for tomatoes, peppers, cucumbers, and friends, aim for a bright location. If your yard is shady, don’t panicjust adjust your crop choices.
Level ground: your future self says thank you
A slightly uneven bed is fine, but a seriously sloped bed means water runs to one side and plants on the high end act like they’re living in a drought. Spend a few minutes leveling the area (rake, shovel, or add/remove soil) and you’ll avoid a whole season of “Why is THIS corner always thirsty?”
Access: build it so you can actually reach the middle
The easiest rule: keep the bed narrow enough to reach the center without climbing in it like a raccoon. Many extension guides recommend a maximum width around 4 feet for adults so you can comfortably reach into the middle. Pathways matter toogive yourself room to maneuver a wheelbarrow or at least your own two feet without doing a sideways shuffle.
Choose a Size That Your Arms Can Actually Handle
The classic 4×8 raised bed (AKA: “Lumber’s favorite shape”)
A 4×8 raised garden bed is popular because standard boards come in 8-foot lengths, and the footprint is big enough to grow a real amount of food without becoming an entire part-time job. It’s also a friendly size for simple layouts and trellises.
How deep should a raised bed be?
Depth depends on what you grow. Shallow-rooted herbs can manage with less soil, but many vegetables appreciate more room. If you build a 12-inch bed, you can boost root space by loosening the soil underneath before filling. Want to grow deeper-rooted crops or skip bending altogether? Consider stacking boards for 18–24 inches, but be ready to reinforce the walls because tall beds hold a lot of soil pressure.
Materials: The “Don’t Overthink It” Shopping List
You can absolutely build a raised bed with fancy joinery and artisanal wooden pegs. You can also build one with straight boards and exterior screws. We’re doing super easythe “weekend-win” version.
Wood choices (safe, sturdy, and not wildly dramatic)
- Rot-resistant woods: Cedar and redwood are popular for longevity. Other decay-resistant woods are used regionally, too.
- Modern pressure-treated lumber: If you choose pressure-treated boards, buy residential-rated material with an end tag/label. Avoid old salvaged treated wood of unknown history.
- Avoid reclaimed “mystery” timber: Railroad ties and older treated lumber can involve chemicals you do not want near food crops.
Simple hardware + tools
- Exterior-rated screws: Coated deck screws or similar outdoor screws resist rust and hold tight.
- Optional braces: Corner or mid-span bracing reduces bowing, especially on taller beds.
- Tools: Drill/driver, measuring tape, square, level, and a saw (or have boards cut at the store).
Step-by-Step: Build a Super Easy 4×8 Raised Garden Bed
This is the “adult LEGO” method: measure, screw, level, fill, plant. You’re building a sturdy box, not a yacht.
Step 1: Decide your height (one board tall or stacked)
For a 12-inch-tall bed, a common approach is using 2×12 boards. You can also use 2×8 or 2×10 for a slightly shallower bed. If you want an 18–24 inch bed, stack boards (and reinforce the long sides).
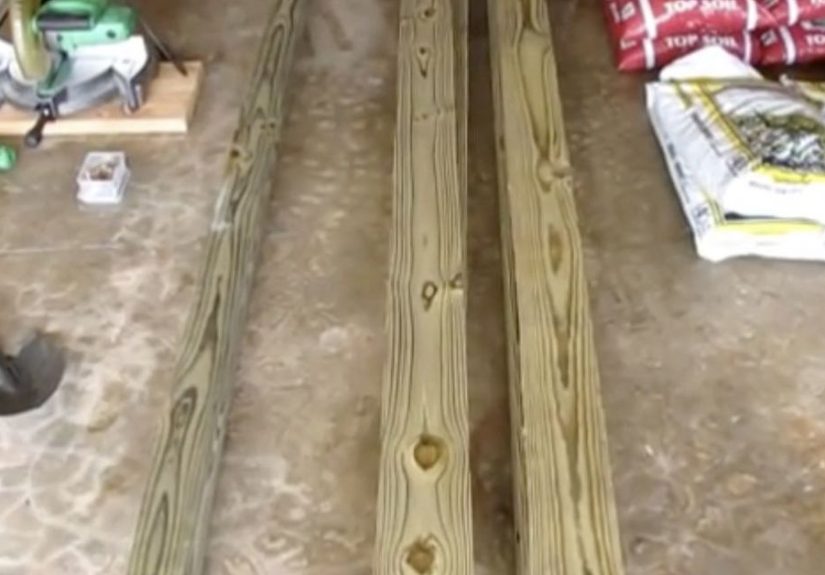
Step 2: Cut your boards (or let the store do it)
For a single-layer 4×8, a simple plan is:
- (2) boards at 8 feet long for the sides
- (2) boards at 4 feet long for the ends
A super quick approach: buy three 8-foot boardsuse two as the long sides, and cut the third into two 4-foot ends. That’s it. (Yes, it’s really that simple.)
Step 3: Assemble the rectangle (square corners = happier life)
- Lay out boards in a rectangle on the ground.
- Pre-drill if your wood tends to split (especially near the ends).
- Screw the corners together with exterior-rated screws.
- Check for square by measuring diagonals (if they match, you’re square).
Step 4: Add bracing (especially if you go taller)
Soil is heavy. When the bed is full and wet, the long sides can bow outward. If your bed is taller than one board, or if you’re using thinner lumber, add a brace in the middle of the long sides. A simple interior stake or brace helps the bed stay straight for years.
Step 5: Place it and level it
Move the frame into position. Use a level. If one side is high, scrape soil away; if it’s low, add soil and tamp it. Perfection isn’t required, but “reasonably level” prevents watering weirdness.
Step 6: Protect the bottom (without choking drainage)
You usually do not need a solid bottom. Plants like drainage, and earthworms like joining your garden party. Instead, do this:
- Weed suppression: Lay cardboard (plain, non-glossy) or thick layers of newspaper over grass/weeds before filling.
- Critter defense: If you have burrowing pests, staple hardware cloth to the bottom of the frame before setting it down.
- Avoid plastic sheeting as a base: It can trap water and mess with soil biology and drainage.
Step 7: Cap it (optional, but your knees will applaud)
If you want a built-in “garden bench,” add a 1×4 (or similar) cap board around the top. It looks finished, feels comfortable, and gives you a place to set toolsor your iced tea while you admire your masterpiece.
Soil: What to Fill a Raised Bed With (Without Selling a Kidney)
The biggest raised-bed myth is that you can fill the whole thing with compost. Compost is amazingbut it’s more like a powerful ingredient than the entire recipe. A raised bed works best with a soil mix that balances structure (mineral soil), nutrients (compost), and aeration (something fluffy so roots can breathe).
A reliable raised bed soil recipe
Try a simple, popular blend:
- 60% quality topsoil or garden soil (for structure)
- 30% compost (for fertility)
- 10% aeration (coconut coir, perlite, or vermiculite) for drainage + moisture balance
If you want to keep it even simpler, a “thirds” mix also works well in many gardens: one-third native/topsoil, one-third compost, one-third moisture/aeration component. Think “soup,” not “baking”you’re in the right ballpark if the mix drains well but doesn’t dry out instantly.
How much soil do you need for a 4×8 raised bed?
Use this quick math:
- Volume (cubic feet) = length × width × depth
- 4 ft × 8 ft × 1 ft (12 inches) = 32 cubic feet
If you’re buying bagged soil, common bag sizes are 1.5–2 cubic feet (small) or 3 cubic feet (bigger). For 32 cubic feet, that’s roughly 11 bags of 3 cu ft, or 16–22 bags in the smaller sizes. Also: soil settles after watering, so slightly overfill and top off later.
Pro move: loosen the soil underneath
Before you fill, loosen the ground under the bed with a shovel or fork. This improves drainage and gives roots more roomespecially helpful if you’re building a 12-inch bed but growing deeper-rooted vegetables.
Planting Plan: Make It Productive (and Instagram-Friendly)
A 4×8 bed can grow a surprising amount if you plant with intention. If you’ve ever heard of “square foot” spacing, that idea works great here: mentally divide the bed into 1-foot squares, then plant each square based on crop size.
A simple 4×8 starter layout
- North side (trellis zone): tomatoes, cucumbers, pole beans (keep tall plants from shading everything else)
- Middle: peppers, bush beans, eggplant, basil
- Edges: lettuce, spinach, scallions, radishes (easy harvest, quick wins)
Want a trellis on the end? A basic PVC trellis works, or you can install metal conduit/wood posts. Keep it sturdyvines don’t look heavy until they’re loaded with cucumbers and suddenly the trellis is doing CrossFit.
Watering & Maintenance: Keep It Thriving, Not Just Existing
Mulch like you mean it
A 2–4 inch layer of straw or wood chips reduces evaporation, suppresses weeds, and keeps soil temperatures steadier. Bonus: it makes the bed look “finished,” like you definitely know what you’re doing.
Drip irrigation (optional, but ridiculously convenient)
If your summers get hot or you travel, drip irrigation is a game-changer. Run the line on the soil surface and cover it with mulch. You’ll water roots more efficiently and waste less water to evaporation.
Feed the bed each year
Compost breaks down over time, and plants use nutrients (rude, honestly). Each season, top-dress with compost and mix it lightly into the top few inches. If you want maximum precision, do a soil test and adjust based on resultsbut even a simple annual compost refresh helps a lot.
Common Mistakes (and How to Avoid the “Why Is Everything Dying?” Phase)
- Making it too wide: If you can’t reach the middle, you’ll step in the bed and compact the soil.
- Filling with compost only: Compost is great, but a balanced mix performs better long-term.
- Using plastic at the bottom: Drainage matters; let water move through.
- Skipping braces on tall beds: Bowed sides happen slowly… then suddenly. Reinforce early.
- Putting it in shade “because it’s convenient”: Convenient shade grows excellent disappointment.
Easy Upgrades If You Feel Fancy
- Top cap: Add a board around the top for comfort and a polished look.
- Pathway border: Use gravel, mulch, or pavers to keep mud from becoming a lifestyle.
- Season extension: Low hoops + frost cloth can buy you extra weeks in spring and fall.
- Companion planting: Mix flowers like marigolds or nasturtiums for pollinators and pest distraction.
Field Notes: of Real-World Raised-Bed Wisdom
Here’s the part nobody tells you in the “perfect garden” photos: your first raised bed is less like a flawless home project and more like a friendly relationshipyou learn what it needs by living with it for a while. And by “living,” I mean occasionally staring at it with your hands on your hips like you’re negotiating with a stubborn tomato plant.
First lesson gardeners report again and again: soil settles. You fill the bed to the brim, water it, and the next morning it looks like someone scooped out two inches with an ice cream spoon. Totally normal. Plan to top off after the first few soakings. This is also why mixing ingredients before filling (or layering and blending inside the bed) mattersyour “perfect ratio” turns into a layered cake if you just dump everything in one pile. And unlike cake, plants are not impressed by uneven layers.
Second lesson: the bed gets drier than you expect. Raised beds drain wellthat’s part of their charmbut they also dry out faster than in-ground plots, especially when it’s hot and windy. Mulch helps a ton. So does watering in the morning so plants aren’t trying to drink at high noon like a tourist with no sunscreen. If you add drip irrigation under mulch, many gardeners say it’s the moment raised-bed life goes from “fun hobby” to “why didn’t I do this years ago?”
Third lesson: critters read your garden as a buffet sign. If you’ve got voles, gophers, or other underground snack enthusiasts, the hardware cloth step is worth it. People who skip it sometimes discover the problem when carrots mysteriously vanish like a magic trick nobody asked for. The “good news” is that prevention is easier than revenge. (Also: revenge rarely works on rodents. They do not respect your feelings.)
Fourth lesson: you’ll change your mind about what you grow. That’s normal. A raised bed is incredibly flexibleswap crops each season, try new varieties, and learn what thrives in your microclimate. Some gardeners start with tomatoes and end up falling in love with greens because lettuce rewards you quickly and doesn’t demand a trellis, a pep talk, and a full-time therapist. Others discover herbs are the ultimate ROI crop: small footprint, big flavor, and they make you feel like a cooking show host even if dinner is boxed pasta.
Final lesson: raised beds make gardening feel more doable. The clean edges, the improved soil, and the “one defined space” concept remove a lot of the overwhelm. You don’t have to fix the whole yard. You just build one box, fill it with good soil, and start. Then you harvest somethinganythingand suddenly you’re the kind of person who says sentences like, “These are my cherry tomatoes,” which is a surprisingly powerful flex.
Conclusion
A super easy DIY raised garden bed is one of the fastest ways to upgrade your gardening successwithout upgrading your stress level. Keep the bed reachable (about 4 feet wide), use safe, sturdy materials, reinforce taller walls, skip plastic bottoms, and fill with a balanced soil mix that drains well but stays moist. After that, it’s just planting, watering, and enjoying the small miracle of food growing where grass used to be. Not bad for a weekend project and a handful of screws.


