Table of Contents >> Show >> Hide
- Why Kitchen Cabinets Get So Greasy in the First Place
- The Best Way to Clean Greasy Kitchen Cabinets
- When Dish Soap Alone Is Not Enough
- How to Clean Different Types of Kitchen Cabinets
- What Not to Do When Cleaning Greasy Cabinets
- How Often Should You Clean Kitchen Cabinets?
- How to Prevent Grease Buildup on Kitchen Cabinets
- Specific Example: Cleaning the Worst Cabinet in the Kitchen
- My Experience Cleaning Greasy Kitchen Cabinets
- Final Thoughts
- SEO Tags
Note: This article is written for web publishing in standard American English and fully rewritten in a natural style.
Kitchen cabinets have a special talent for looking innocent from across the room and sticky from two feet away. One minute your kitchen feels fresh and organized. The next, you touch a cabinet door near the stove and realize it has the texture of a glazed doughnut. That greasy film is not your imagination. It is a very real mix of cooking oils, steam, dust, and tiny airborne food particles that settle on cabinet surfaces and quietly form a grimy layer over time.
The good news is that the best way to clean greasy kitchen cabinets is not complicated, expensive, or dramatic enough to deserve a training montage. In most cases, the smartest method is also the gentlest one: warm water, grease-cutting dish soap, a soft microfiber cloth, and a little patience. For heavier buildup, you can step up to a diluted vinegar solution or a light baking soda paste, but the golden rule stays the same: clean gently, do not oversaturate the surface, and dry everything well.
If you have been wondering how to degrease kitchen cabinets without wrecking the finish, fading the paint, or turning your wood doors into a sad science experiment, this guide walks you through the full process.
Why Kitchen Cabinets Get So Greasy in the First Place
Grease does not stay politely inside your skillet. Every time you fry bacon, sear chicken, sauté onions, or simmer sauce without a lid, tiny oil particles travel through the air. Those particles settle on nearby surfaces, especially cabinet doors around the stove, the range hood area, upper cabinet trim, and the tops of cabinets. Once grease lands, it acts like a magnet for dust. That is how you end up with a sticky, dull coating that regular dry dusting cannot fix.
This buildup is usually worst in a few predictable spots:
- Cabinet doors next to or above the stove
- Pulls, knobs, and edges where hands frequently touch
- Upper cabinet tops where grease and dust collect quietly
- Cabinets near the coffee maker, toaster, or air fryer
- Areas around the sink where grease meets moisture and turns into a weird kitchen paste
That is why the right cabinet cleaning method is less about brute force and more about breaking down oily residue safely.
The Best Way to Clean Greasy Kitchen Cabinets
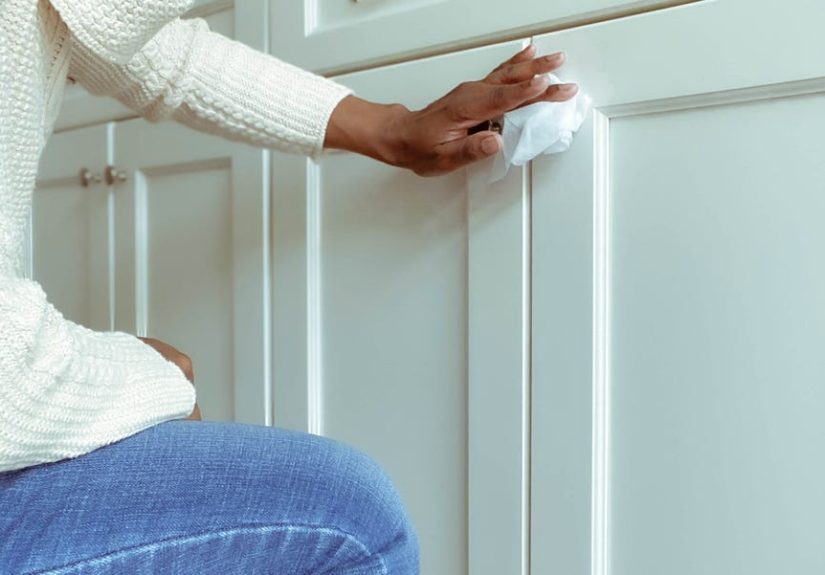
If you only remember one thing from this article, make it this: the best all-around method for cleaning greasy kitchen cabinets is a soft microfiber cloth dipped in warm water mixed with a small amount of grease-cutting dish soap, followed by a rinse wipe and immediate drying.
Why does this work so well? Dish soap is made to break up grease on plates, pans, and cookware, so it is naturally effective on cabinet grime too. It is strong enough to loosen oily residue, but gentle enough for many painted, finished wood, laminate, and factory-coated cabinet surfaces when used correctly.
What You Need
- Warm water
- Mild grease-cutting dish soap
- Two to four microfiber cloths
- A soft sponge
- A dry towel or dry microfiber cloth
- A soft toothbrush for corners and hardware
- Optional: white vinegar
- Optional: baking soda
The Core Cleaning Method
- Dust first. Use a dry microfiber cloth to remove loose dust and crumbs. If you skip this step, you may just rub dirt into the grease and create cabinet mud. No one needs that.
- Mix your cleaner. Fill a bowl or small bucket with warm water and add a few drops of dish soap. You want a light soapy solution, not a bubble party.
- Dampen, do not soak, your cloth. Dip a microfiber cloth into the solution and wring it out well. The cloth should be damp, not dripping.
- Wipe from top to bottom. Start at the upper sections and work downward so dirty drips do not land on areas you already cleaned.
- Focus on greasy zones. Spend extra time around handles, lower edges of upper cabinets, and doors closest to the stove.
- Use a soft toothbrush for details. Gently clean grooves, trim, and the area around hardware.
- Rinse wipe. Take a second clean cloth dampened with plain water and wipe away any soap residue.
- Dry immediately. Use a dry microfiber cloth to buff and dry the cabinet surface right away.
This method is effective because it removes grease without flooding the cabinet finish with moisture. That matters especially for wood cabinets, painted cabinetry, and any surface with seams, edges, or aging finish.
When Dish Soap Alone Is Not Enough
Sometimes kitchen grease has been building up since the era of your last good intention. If the sticky film laughs at your first pass with soapy water, do not panic. You have options.
Option 1: A Diluted Vinegar Solution
For tougher grease, many homeowners use a simple mix of equal parts warm water and white vinegar, often with a drop or two of dish soap added. This can help cut through stubborn residue on many cabinet surfaces.
Here is the catch: vinegar is useful, but it is not universally beloved by every finish. On some older, delicate, hand-painted, or worn wood surfaces, it can be too harsh if overused or left sitting too long. Always test it in a hidden area first.
Use it like this:
- Mix 1:1 warm water and white vinegar
- Add a small drop of dish soap if needed
- Apply to a cloth rather than soaking the cabinet
- Let it sit briefly on greasy spots, about one to two minutes
- Wipe clean and dry immediately
Option 2: Baking Soda Paste for Stubborn Spots
If grease has turned into a sticky, brownish film that feels almost glued on, a baking soda paste can help. Mix baking soda with just enough water to form a paste, dab it onto the problem area, and gently rub with a soft cloth or toothbrush.
This is best for spot treatment, not an all-over cabinet facial. Baking soda is mild, but it still adds abrasion. Use a light hand, then wipe the area with a damp cloth and dry thoroughly.
Option 3: A Gentle Commercial Degreaser
For very heavy buildup, a cabinet-safe degreaser may save time. Look for a cleaner labeled safe for your cabinet material, and avoid anything that sounds like it belongs in an industrial garage or on a reality show about chemical spills. Test in an inconspicuous spot first, follow the label, and never assume stronger means smarter.
How to Clean Different Types of Kitchen Cabinets
Not all cabinets respond the same way to cleaning, so the best way to clean greasy kitchen cabinets depends partly on the material and finish.
Wood Cabinets
Use the gentlest method first. A damp microfiber cloth with warm water and a little dish soap is usually your safest starting point. Avoid soaking the wood and do not let moisture sit on the surface. Dry immediately. If you use vinegar, test first because some wood finishes do not appreciate acidic cleaners.
Painted Cabinets
Painted cabinets can be a little fussy. Too much scrubbing can dull the finish, especially on older paint. Stick with soft cloths, a mild cleaning solution, and quick drying. Spot test stronger methods before using them widely.
Laminate Cabinets
Laminate usually handles dish soap and diluted vinegar well, but you still want to avoid abrasives and heavy moisture. Microfiber is ideal because it cleans effectively without scratching. Wipe with the grain or direction of the finish when possible.
Cabinets With Decorative Details
If your cabinet doors have trim, grooves, beadboard-style panels, or ornate molding, grease will hide there like it pays rent. Use a soft toothbrush or cotton swab to reach into crevices, then wipe everything dry.
What Not to Do When Cleaning Greasy Cabinets
Sometimes cabinet damage comes not from the grease, but from the cleaning attempt. Here are the biggest mistakes to avoid:
- Do not use abrasive scrubbers. Steel wool, harsh scouring pads, and gritty cleaners can scratch and dull the finish.
- Do not soak the cabinets. Excess water can seep into seams, edges, and joints.
- Do not let cleaner sit too long. Even mild solutions can cause issues if left on delicate finishes.
- Do not use bleach, ammonia, or strong solvents unless the manufacturer says it is safe. These can damage finishes and leave discoloration behind.
- Do not skip drying. Air-drying sounds easy, but wiping dry is safer and leaves a better finish.
- Do not ignore the tops of cabinets. That hidden ledge above your cabinets may be hosting a grease convention.
How Often Should You Clean Kitchen Cabinets?
There is no need to deep clean your cabinets every weekend unless frying is your love language. For most kitchens, a smart schedule looks like this:
- Weekly: Wipe cabinet fronts near the stove and sink
- Monthly: Clean all visible cabinet doors and handles
- Every few months: Deep clean problem spots, edges, trim, and tops of cabinets
- As needed: Clean splatters right away before they harden into kitchen archaeology
Regular light cleaning is easier and safer than waiting for a thick greasy film to build up.
How to Prevent Grease Buildup on Kitchen Cabinets
The easiest grease to remove is the grease that never gets cozy on your cabinets.
Turn On the Range Hood
Use your vent fan every time you cook, especially when frying, sautéing, or searing. It helps pull airborne grease and steam away before they settle.
Wipe Spatters Fast
If oil pops onto cabinet fronts, wipe it up the same day. Fresh grease is easy. Old grease behaves like it signed a lease.
Cover Pans When You Can
A splatter screen or lid can dramatically reduce the amount of airborne oil in your kitchen.
Clean Handles Frequently
Cabinet pulls collect grease from hands, cooking, and daily traffic. A quick wipe keeps them from becoming sticky little evidence lockers.
Do Not Forget Cabinet Tops
If your cabinets do not reach the ceiling, the tops collect dust mixed with grease. Cleaning them occasionally prevents that gummy layer from becoming harder to remove later.
Specific Example: Cleaning the Worst Cabinet in the Kitchen
Let us say the cabinet above and beside your stove is the problem child. It looks fine in dim light, but under daylight it has a greasy haze and tacky feel.
- Dust it with a dry microfiber cloth.
- Wipe it with warm water and a few drops of dish soap.
- Repeat once for stubborn film.
- If residue remains, use a cloth with diluted vinegar and water on the greasy sections only.
- Use a toothbrush around trim and hardware.
- Rinse wipe with plain water.
- Dry fully with a fresh microfiber cloth.
In many kitchens, that sequence handles the problem without needing anything harsher.
My Experience Cleaning Greasy Kitchen Cabinets
I once moved into a kitchen that looked spotless in listing photos and mysteriously sticky in real life. The cabinets were a cheerful white color, which should have been a clue. White does not hide grease. It showcases it like a gallery wall. The area above the stove had a yellowish film, the cabinet pulls felt tacky, and the top edge of one upper cabinet had gathered enough grime to qualify as a texture sample.
At first, I made the classic mistake of trying to “win” with a stronger cleaner. I grabbed a random all-purpose spray, attacked the cabinet door like I was scrubbing a sidewalk, and achieved exactly two things: a streaky finish and a strong desire to sit down. The grease looked slightly offended, but not defeated.
So I reset and tried the gentler method. Warm water. A few drops of dish soap. Microfiber cloth. That was it. The first wipe did not create a miracle, but it did something better: it started loosening the film without damaging the surface. On the second pass, I could actually feel the difference. The cloth glided instead of dragging. The cabinet changed from sticky to smooth. That is when I realized greasy cabinets are less about brute force and more about repetition, patience, and not going full action hero on your woodwork.
The worst spot was the cabinet trim near the stove. Grease had settled into little grooves where a flat cloth could not reach. A soft toothbrush solved that problem in about two minutes. It felt weirdly satisfying, like detail-cleaning a tiny kitchen crown molding no one notices until it is dirty.
I also learned that drying is not optional. On one door, I cleaned and got distracted. When I came back, the surface had dried unevenly and looked dull. A quick buff with a dry microfiber cloth fixed it, but the lesson stuck. Clean, rinse, dry. That three-step rhythm is the difference between “freshly cleaned” and “why does this look worse than before?”
Another lesson came from the top of the cabinets. I had ignored it because it was out of sight, which is exactly how grease wins. When I finally checked, I found a sticky layer mixed with dust that could only be described as kitchen lint jam. A damp cloth with soapy water took it off, but I had to rinse the cloth over and over because the residue was so thick. Since then, I have treated cabinet tops like the forgotten attic of the kitchen: not glamorous, but absolutely real.
The biggest surprise was how much easier the whole job became once I started wiping problem areas regularly. Instead of waiting until the cabinets felt tacky, I began doing a quick weekly pass around the stove and handles. It takes a few minutes, uses almost no product, and prevents the kind of buildup that turns a basic cleaning session into a personality test.
So if your kitchen cabinets are greasy, my honest experience is this: start simple, stay gentle, and do not underestimate the power of dish soap. It is not flashy, but neither is replacing damaged cabinet finishes. And between a humble microfiber cloth and a cabinet refinishing bill, I know which one I would rather invite into my Saturday.
Final Thoughts
The best way to clean greasy kitchen cabinets is not the harshest method. It is the most effective method that still protects the finish. For most homes, that means starting with warm water, a few drops of dish soap, and a soft microfiber cloth, then moving up only when needed. Add careful spot treatment for stubborn grease, dry everything thoroughly, and keep up with light maintenance so the grime never gets a long-term mailing address.
Your cabinets do not need punishment. They need the right cleaner, the right cloth, and a little consistency. Once you get into the habit, the whole job becomes faster, easier, and a lot less dramatic. Which is great, because your kitchen already has enough chaos coming from the skillet.


