Table of Contents >> Show >> Hide
- Why a floating headboard is the bedroom upgrade that doesn’t fight you
- Plan first, cut second (because “measure once” is funny until it’s expensive)
- Materials and tools
- Build steps (and how to make them look great on video)
- Step 1: Break down the plywood sheet without wrestling it like an alligator
- Step 2: Create the “float” with a spacer frame
- Step 3: Make a French cleat (aka the “hang it once, trust it forever” method)
- Step 4: Add modern detailing (choose one)
- Step 5: Sanding and edge details (where “nice” becomes “wow”)
- Step 6: Finish it like you mean it
- Step 7: Mount the headboard securely (no drywall anchors, please and thank you)
- Step 8: Optional upgrades that make it look custom
- How to make the build video actually fun to watch
- Troubleshooting (because walls are rarely as straight as they pretend)
- Cost and build time (realistic, not “influencer math”)
- Conclusion
- Extra: of real-world “experience” from DIYers who’ve built floating plywood headboards
- SEO Tags
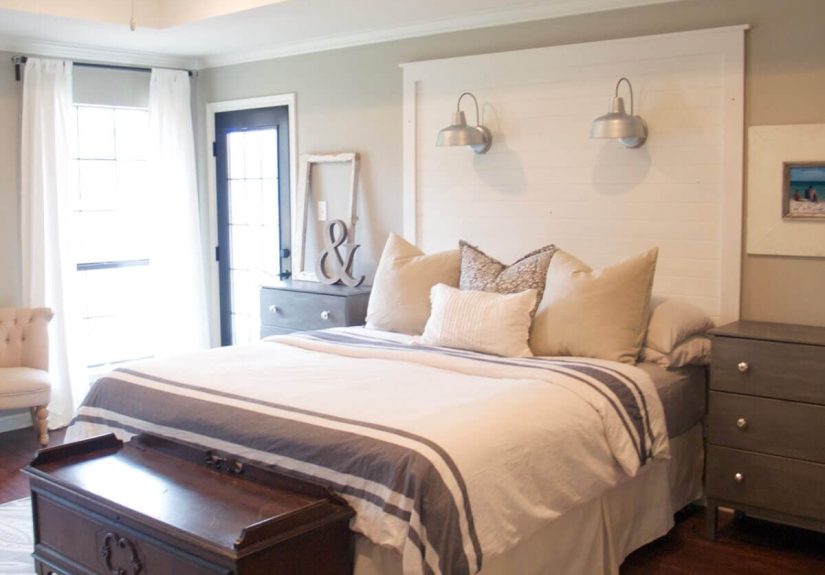
Want your bedroom to look “designer” without spending “designer money”? A modern floating headboard is basically the
cheat code. It’s clean, minimal, and makes your bed look like it belongs in a magazinewhile still letting you keep
your rent money (or your snack budget… no judgment).
In this build, you’ll turn one sheet of plywood into a sleek, wall-mounted headboard that appears to
hover behind the bed. The secret sauce is a hidden mounting systemmost commonly a French cleat or
interlocking Z-clipsso the headboard hangs flat, secure, and stylish.
Why a floating headboard is the bedroom upgrade that doesn’t fight you
A traditional headboard bolts to a bed frame. A floating headboard anchors to the wall, which means:
- Instant modern vibe: Clean lines, no chunky legs, no awkward gaps.
- Easier cleaning: Vacuuming behind the bed stops being an Olympic event.
- Flexible placement: You can hang it exactly where it looks best, not where the frame dictates.
- Big visual impact: The wall becomes part of the designlike a built-in feature.
What “floating” actually means (and what it doesn’t)
“Floating” doesn’t mean magic. It means the headboard is mounted with hardware that’s hidden from viewtypically
a beveled wood cleat (French cleat) or metal Z-clipsso the face panel sits snug to the wall, often with a slight
“shadow line” for that intentional, high-end look.
Plan first, cut second (because “measure once” is funny until it’s expensive)
Pick your headboard size like a reasonable adult
A good rule: build the headboard as wide as your mattress or up to a few inches wider on each side
for a bolder, more “built-in” feel. Typical mattress widths:
- Twin: ~38″
- Full: ~54″
- Queen: ~60″
- King: ~76″
Height is style-driven. Many modern headboards land between 24″ and 36″ tall above the mattress.
If you like a dramatic statement, go tallerjust remember you’re mounting a panel, not auditioning for a sailboat.
Choose plywood like you’re choosing a haircut: quality shows
Since the headboard is a focal point, use 3/4″ plywood that’s flat and stable. For a clean,
furniture-grade look, look for smoother face veneers (often labeled A or B faces). “Cabinet-grade” plywood usually
has a nicer surface and fewer voids than construction plywood.
If you want crisp edges (especially for a modern slab look), baltic birch is popular because its
layered edge can look intentional and its face veneer tends to be more consistent. If your big-box plywood face veneer
is very thin, sand gentlynobody wants a surprise bald spot on their headboard.
Pick a modern style: slab, slats, or grooves
With one sheet of plywood, you can build several looks:
- Modern slab: One clean panel with a shadow gap. Minimalist and fast.
- Slatted look: Rip plywood into strips and apply them to a backer for texture.
- Grooved panel: Cut shallow channels for a geometric, architectural feel.
For this article (and your video), we’ll focus on a versatile approach that works as a slab headboard and can be
upgraded with slats or grooveswithout needing a second sheet.
Materials and tools
Materials
- 1 sheet of 3/4″ plywood (4′ x 8′)
- Wood glue
- 1-1/4″ wood screws (for plywood assembly)
- 2-1/2″ to 3″ screws (for wall studs)
- Wood filler (optional)
- Finish: water-based polyurethane, oil-based polyurethane, or polycrylic (your call)
- Sandpaper (120, 180, 220 grit)
- Mounting hardware: shop-made French cleat (from plywood) or metal Z-clips
- Felt pads / rubber bumpers (keeps things from scuffing and rocking)
- Optional: iron-on edge banding, LED strip lighting, cable clips, stain or paint
Tools
- Circular saw (or track saw)
- Saw guide / straightedge + clamps (your cuts will thank you)
- Drill/driver + bits
- Stud finder
- Level
- Random orbit sander (or sanding block and patience)
- Measuring tape, pencil, square
- Optional: router (for grooves / eased edges), brad nailer (for slats), edge trimmer (for banding)
A one-sheet cut plan (Queen example)
Here’s a practical cut strategy that stays within one 4′ x 8′ sheet and leaves you with everything needed for the
headboard face, mounting cleat, and spacer frame:
- Face panel: 60″ wide x 30″ tall (adjust to taste)
- Spacer frame strips: rip (3) strips at 2-1/2″ wide x 60″ long and (2) strips at 2-1/2″ wide x 27″ long
- French cleat: rip (1) strip 4″ wide x ~54″–60″ long, then cut it lengthwise at 45° to create two mating pieces
- Optional slats: remaining plywood can be ripped into 1-1/2″ to 2″ strips for a slatted face
Translation: you can build a clean slab headboard with a floating shadow gap using only plywood, then choose
texture later (slats or grooves) if you want extra drama.
Build steps (and how to make them look great on video)
Step 1: Break down the plywood sheet without wrestling it like an alligator
Full sheets are awkward. Support the plywood on foam insulation or a sacrificial surface so the offcut doesn’t tear
out at the end of the cut. Use a saw guide or a clamped straightedge so your cuts are crisp. A sharp blade makes a
bigger difference than people want to admit.
Video tip: Film an overhead shot of the first “perfectly straight cut.” People love that moment.
It’s woodworking ASMR.
Step 2: Create the “float” with a spacer frame
The floating look often comes from a subtle shadow line: the headboard sits slightly off the wall, or the face panel
has a recessed back frame that hides the mounting hardware. The easiest way is a spacer frame built
from ripped plywood strips.
- Lay the face panel down on a flat surface (good side down).
- Build a rectangle frame near the perimeter using your ripped strips (leave a margin so the frame is hidden from the front).
- Glue and screw the frame to the back of the face panel.
This frame stiffens the headboard, gives you a place to mount the cleat, and helps the headboard sit consistent and
flat on the wall. It’s like giving your headboard a backbone. (Not a spine. That’s a different aisle.)
Step 3: Make a French cleat (aka the “hang it once, trust it forever” method)
A French cleat uses two matching beveled pieces: one mounts to the wall (bevel up and away), the other mounts to the
headboard (bevel down and toward). They interlock and hold heavy panels securelyespecially when screwed into studs.
- Rip a 4″ wide strip of plywood.
- Cut it lengthwise at a 45° angle to create two mating cleats.
- Mount the wall cleat into studs using a level and long screws.
- Mount the headboard cleat to the headboard’s spacer frame (centered and level).
Pro tip: Make the cleat length substantialoften around 75% of the headboard widthfor stability.
For a queen, something like 48″–60″ is a nice range.
If you don’t want to make a wood cleat, metal Z-clips can do the same job with a slimmer profile. They’re common for
cabinets and panels and can be very sturdy when installed correctly.
Video tip: Show the two cleat halves clicking together. It’s the woodworking equivalent of a
satisfying zipper.
Step 4: Add modern detailing (choose one)
Option A: Clean slab (fastest, most modern)
If you love minimalism, you can stop here. A smooth face panel with eased edges and a great finish looks expensive
even when it’s literally… plywood.
Option B: Grooves (architectural look without extra materials)
Mark a repeating pattern (vertical, horizontal, or geometric). Then cut shallow grooves with a router, or create
narrow kerfs using a circular saw with a guide. Keep the grooves consistent and evenly spaced for that crisp modern
vibe.
Option C: Slats (texture + shadow = instant upgrade)
Rip remaining plywood into 1-1/2″ to 2″ strips. Attach them to the face panel with glue and brads (or glue and clamps)
in even spacing. This creates depth and makes the headboard look like a high-end wall feature.
Step 5: Sanding and edge details (where “nice” becomes “wow”)
Sand the face with 120, then 180, then 220 grit. Ease the edges with light sanding or a small roundover bit.
Be gentle: many plywood face veneers are thin. If you sand through, you can’t “un-sand” it. (Trust me, the wood does
not accept apologies.)
Want ultra-clean edges? Apply iron-on edge banding, trim flush, and sand lightly. Suddenly your plywood looks like it
went to finishing school.
Step 6: Finish it like you mean it
For a headboard, durability mattershands, hair products, and the occasional “lean back and scroll for two hours” all
count as real-world wear.
- Water-based polyurethane: dries clear and fast, lower odor, keeps lighter wood from yellowing as much.
- Oil-based polyurethane: very durable, warmer tone, longer dry time, stronger fumes.
- Polycrylic: common for indoor projects; dries quickly and stays clear, but can be less heat/water resistant than some polys.
Apply thin coats. Let dry. Lightly sand between coats with 220 grit for a smoother finish. Two to three coats is a
solid target for most indoor furniture projects.
Video tip: Film the first coat going onit’s the “transformation moment.” Viewers love seeing wood
come alive. It’s basically a makeover montage for plywood.
Step 7: Mount the headboard securely (no drywall anchors, please and thank you)
Find studs. Mark them. Confirm with a second method if you can (stud finders are helpful, but they also occasionally
“find” plumbing like they’re trying to spice up your day).
- Determine headboard height: typically a few inches above the mattress, or aligned to your pillows and style preference.
- Level and screw the wall cleat into studs with 2-1/2″ to 3″ screws.
- Lift and hang the headboard onto the cleat.
- Add small bumpers at the lower back corners so it sits evenly and doesn’t scuff the wall.
If you want extra security (especially if kids might pull on it), you can add a discreet screw through the headboard
frame into a stud near the bottom. Hidden safety is still safety.
Step 8: Optional upgrades that make it look custom
- LED backlighting: Add a warm LED strip behind the face panel for a hotel vibe. Route a channel for wires and use cable clips.
- Floating nightstands or shelves: Build small wall-mounted shelves that align with the headboard edges.
- Charging station: If you add outlets/USB, keep wiring safe and code-compliant (or use a plug-in solution with tidy cable management).
How to make the build video actually fun to watch
A great headboard deserves a great video. Not a shaky, 37-minute documentary where nothing happens until minute 29.
Here’s a simple structure that keeps viewers engaged.
A simple shot list
- Hook (first 5 seconds): show the finished headboard mounted and lit.
- Materials + plywood reveal: one sheet on sawhorses, quick overview.
- Cutting sequence: straight cuts with a guide, satisfying close-ups.
- Assembly: spacer frame going on, clamps, screws, glue squeeze-out (the honest kind).
- Mounting moment: cleat install + headboard hang (the payoff shot).
- Final styling: bed made, pillows placed, lights on, slow pan.
Voiceover lines that keep people watching
- “This is one sheet of plywood… and in a few hours it’s going to look like custom built-ins.”
- “The mounting is hidden, so it looks like it’s floatingno brackets ruining the vibe.”
- “If your cuts are straight, your life is easier. If not… welcome to the sanding montage.”
Edit like a human
Show repetitive steps faster (sanding, multiple cuts), and slow down where the viewer could mess up (cleat angle,
stud mounting, layout). If you made a mistake, briefly show itthen show the fix. That’s not weakness; that’s
teaching. And it’s weirdly comforting to viewers.
Troubleshooting (because walls are rarely as straight as they pretend)
The headboard rocks or won’t sit flush
Walls can be uneven. Add bumpers or felt pads to the lower back corners so the panel rests evenly. If the cleat is
slightly out of level, fix that firstevery other adjustment is just you negotiating with gravity.
Your plywood edges look rough
Edge banding is the cleanest fix. Alternatively, embrace the layered plywood edge as a design detailespecially with
birch-style pliesand finish it smoothly. “Intentional” is a powerful word.
The finish looks streaky or dusty
Apply thinner coats, use a quality brush or foam applicator, and keep your finishing area as dust-free as possible.
Light sanding between coats (220 grit) helps the next coat lay down smoother. Also: don’t finish right after you just
sanded like a maniacgive dust time to settle.
Worried about weight?
A plywood headboard can be fairly heavy, especially at 3/4″ thickness. That’s why stud attachment is non-negotiable.
A properly installed French cleat or Z-clip system into studs is a standard approach for hanging heavy panels and
cabinetry-style loads. If you’re unsure, reduce panel height, add internal framing, and always prioritize secure fasteners.
Cost and build time (realistic, not “influencer math”)
- Plywood: varies widely by region and grade; budget for the quality you want to see every day.
- Finish + sandpaper: modest cost, big visual payoff.
- Mounting hardware: DIY cleat is cheapest; metal clips add convenience and consistency.
- Optional LEDs: small add-on that looks expensive.
Build time for most DIYers: half a day to a weekend, depending on detailing and finish dry time.
The build is quick; the finish is what makes you practice patience like it’s a sport.
Conclusion
A modern floating headboard built from a single sheet of plywood is one of those rare DIY projects that checks every
box: high impact, reasonable cost, beginner-friendly steps, and the kind of finished look that makes people ask,
“Where did you buy that?” (You can answer honestly or just smile mysteriously. Both are valid.)
Film it, hang it, flip on the lights, and enjoy the smug satisfaction of sleeping next to something you built with
your own handswithout drilling a single hole into your bed frame.
Extra: of real-world “experience” from DIYers who’ve built floating plywood headboards
Here’s what tends to happen after someone builds their first floating headboard: they immediately become a headboard
critic. Not in a mean waymore like a person who can suddenly spot every crooked picture frame in a restaurant. The
project teaches you a bunch of small lessons that don’t show up on a materials list.
Lesson #1: The wall is the boss. People plan headboards like the wall is perfectly flat and square.
Then they hold up a 60-inch panel and discover the wall has opinions. Dry-fit early. Use bumpers. And if the headboard
doesn’t sit perfectly flush everywhere, don’t panicmost “pro” installs quietly rely on spacers to make the face look
straight even when the wall isn’t.
Lesson #2: Height is a lifestyle choice. Many first-timers mount the headboard too low, then realize
their pillows cover half the design. A common trick is to stack pillows as you normally would, step back, and mark
where you want the top of the headboard to land visually. The tape measure is helpful, but your eyeballs are the final
judge. (Just make sure your eyeballs also own a level.)
Lesson #3: The “one sheet” promise is real… if you plan your cut order. DIYers often discover that
ripping thin slats first can leave you struggling to get a clean, full-size face panel afterward. The smoother move:
cut the face panel first, then rip the remaining sheet into frame strips, cleats, and optional slats. Think of it like
cooking: you don’t dice the parsley before you’ve found the cutting board.
Lesson #4: Plywood edges need a plan. Some people love the layered edge look (especially with birch ply).
Others want a seamless “solid wood” illusion. Either way, decide before finishing. If you want clean edges, edge banding
is the easy win. If you want the layered look, sand it smooth and finish it carefully so it looks intentional, not like
a science fair volcano of splinters.
Lesson #5: The finish is where confidence goes to get humbled. The build can feel straightforward:
cut, screw, hang, done. But finishing teaches patience. Thin coats look better. Sanding between coats feels tedious but
pays off. And dust is a tiny airborne gremlin that appears the second you whisper, “This is my final coat.” A lot of
DIYers end up creating a simple “finish zone” in a garage or spare roomvacuumed, wiped down, with a fan moving airjust
to avoid the dreaded “cat hair fossilized in polyurethane” effect.
Lesson #6: Hardware placement is everything. A French cleat or Z-clip system is forgiving in use, but not
forgiving in installation. DIYers often recommend marking stud locations clearly, predrilling, and using a long level
(or at least a straight board with a level on it) to keep the cleat perfectly aligned. Once it’s up, the headboard will
hang smoothly and feel surprisingly “professional.” That momentwhen the headboard clicks onto the cleatis usually when
people start planning the next project. Suddenly, everything in the house looks like it could be “floating.”
The best takeaway: this project doesn’t just upgrade your bed. It upgrades your confidence. And that’s a pretty great
return on a sheet of plywood.


