Table of Contents >> Show >> Hide
- Tip #1: Start with high-quality bulbs (because you can’t “encourage” a moldy onion)
- Tip #2: Match bulbs to your climateand plan for chilling if you live warm
- Tip #3: Plant at the right timewhen the soil cools, not when you feel inspired
- Tip #4: Prioritize drainagebulbs hate “wet socks”
- Tip #5: Pick the right lightmost spring bulbs want sun (with a little flexibility)
- Tip #6: Prep soil like you mean itloosen, amend, and make room for roots
- Tip #7: Plant at the correct depthuse the “2–3 times” guideline (and adjust for soil type)
- Tip #8: Space bulbs for both beauty and plant health (skip the “soldier rows”)
- Tip #9: Plant bulbs pointy-side up… but don’t lose sleep if you can’t tell
- Tip #10: Water right after plantingthen switch to “steady, not soggy”
- Tip #11: Feed wiselythink “gentle support,” not “energy drink chug”
- Tip #12: Mulch for insulation and fewer weedswithout burying your bulbs alive
- Tip #13: Label your planting spots (future you is not a mind reader)
- Tip #14: Protect bulbs from critters and plan your spring aftercare
- Common Bulb-Planting Mistakes to Avoid
- A Quick Planting Plan (If You Want This to Be Easy)
- of Real-World Experiences: Lessons Gardeners Learn After Planting Bulbs
- Conclusion
Planting bulbs is the closest thing gardening has to a “schedule it now, enjoy it later” life hack.
You tuck little floral time capsules into the soil, forget about them (mostly), and thenmonths lateryour yard pops
like it got dressed up without telling you.
But bulbs also have opinions. Plant them too early, too shallow, too soggy, or where squirrels host nightly snack
meetings, and your “spring masterpiece” can turn into “spring… mystery.” The good news: bulb success isn’t hard.
It’s mostly about timing, drainage, depth, and a few practical tricks that experienced gardeners swear by.
Below are 14 key tips for planting bulbswritten for real-life gardeners (busy, imperfect, occasionally confused by
which end is “up”). You’ll get clear guidelines, specific examples, and a few pro moves that boost blooms without
turning your weekend into a shovel-themed endurance sport.
Tip #1: Start with high-quality bulbs (because you can’t “encourage” a moldy onion)
Bulbs are living storage organs. When you buy them, you’re basically buying pre-packaged potentialso pick bulbs
that look like they actually want to live.
- Choose firm bulbs with intact skins (papery coating is normal; mushy is not).
- Avoid bulbs that are soft, moldy, shriveled, or smell “off.”
- Size matters (sometimes): for many spring-flowering bulbs, larger bulbs often produce bigger or more reliable blooms.
If you’re ordering online, reputable sellers usually ship at the right planting time for your region. If you’re buying
in-store, inspect the bagbulbs can sit under bright lights and warm conditions longer than they’d prefer.
Tip #2: Match bulbs to your climateand plan for chilling if you live warm
Before you fall in love with a tulip photo, check whether that bulb is likely to thrive in your USDA hardiness zone.
Many classic spring bulbs need a sustained cold period to bloom well. In colder regions, winter handles that for you.
In warmer areas (often zones 8–11), you may need to pre-chill certain bulbs (especially tulips and some hyacinths).
Practical example: If you’re in a mild-winter region, you can chill tulip bulbs in a ventilated bag in
the refrigerator for several weeks (often 12–16 weeks for many tulips), then plant when your seasonal window opens.
Keep bulbs away from ripening fruit in the fridge, since ethylene can damage flower development.
If chilling sounds like too much work, pick bulbs that are naturally more forgiving in your climatelike many daffodils,
species tulips suited to warmer zones, or regionally recommended varieties from local garden centers.
Tip #3: Plant at the right timewhen the soil cools, not when you feel inspired
Timing is one of the biggest differences between “hello, spring!” and “hello… leaves.” Most spring-flowering bulbs
are planted in fall, after summer heat fades and soil temperatures cool, but before the ground freezes solid.
- Rule of thumb: plant about 6–8 weeks before hard freeze in colder regions.
- Watch nighttime temps: when nights reliably drop into the 40s–50s°F, you’re often in the bulb sweet spot.
- Don’t panic if you’re late: many bulbs are surprisingly resilient. If you can still dig, you can often still plant.
Why it works: cool soil encourages root growth without triggering leafy top growth that can get zapped by winter.
Tip #4: Prioritize drainagebulbs hate “wet socks”
If bulbs could text you, they’d say: “Thanks for the blanket of soil. Please don’t drown me.”
Most bulbs rot in soggy conditions, especially during dormancy. Your best planting spot is typically:
well-drained soil with decent air movement and no standing water after rain.
Quick test: After a good rain, check your planting area. If water sits for hours, choose another spot
or improve drainage with raised beds, amended soil, or a slope-friendly planting design.
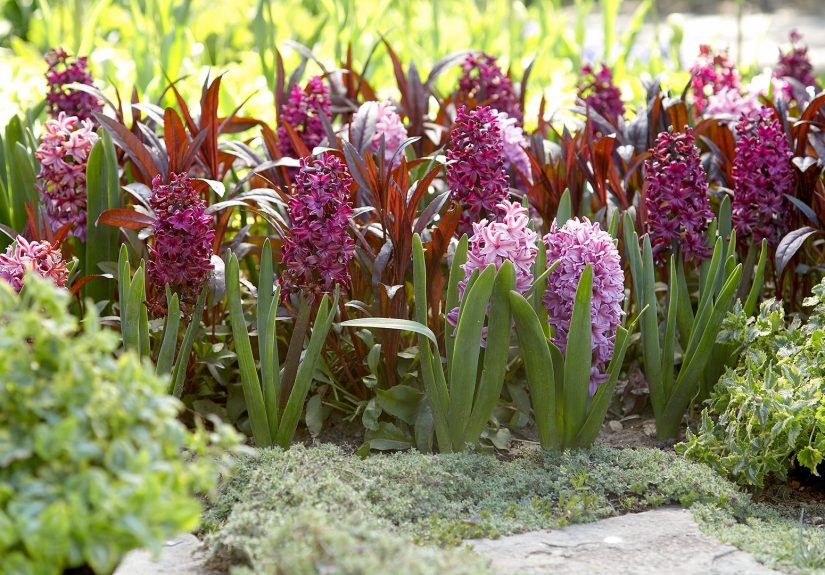
Tip #5: Pick the right lightmost spring bulbs want sun (with a little flexibility)
Many spring-flowering bulbs bloom best with at least 6 hours of sun during their growing season.
That said, early spring light can be sneaky-helpful: bulbs planted under deciduous trees often get plenty of sun
before the canopy fully leafs out.
Example: Daffodils, crocus, and snowdrops can do beautifully along woodland edges where spring sun is bright,
but summer shade keeps soil a bit cooler.
Tip #6: Prep soil like you mean itloosen, amend, and make room for roots
Bulbs aren’t picky divas, but they do appreciate a good foundation. Prep is especially important in heavy clay or
compacted soil.
- Loosen the soil so roots can spread (a wider loosened area is often more helpful than a deep, narrow hole).
- Mix in compost to improve structure and drainage.
- Avoid “hot” amendments directly touching bulbs (fresh manure and overly strong fertilizers can backfire).
Clay soil tip: Improve drainage with organic matter and consider raised beds. Bulbs generally prefer
“moist but not wet”think wrung-out sponge, not soup.
Tip #7: Plant at the correct depthuse the “2–3 times” guideline (and adjust for soil type)
Correct depth helps bulbs withstand temperature swings, anchor roots, and bloom reliably.
A widely used guideline is to plant bulbs at a depth about two to three times the bulb’s height
(measured from the bottom of the bulb).
- Large bulbs (tulips, daffodils, hyacinths): commonly around 6–8 inches deep.
- Small bulbs (crocus, snowdrops, squill): often around 3–4 inches deep.
Adjust for your soil: In sandy soil, you can plant slightly deeper; in heavy clay, slightly shallower can reduce rot risk.
Always treat bulb packaging as the final authority for that specific variety.
Tip #8: Space bulbs for both beauty and plant health (skip the “soldier rows”)
Bulbs look most natural when planted in drifts, clusters, or loose groupings rather than one-by-one in straight lines.
Spacing depends on bulb size, but the goal is to give each bulb enough room to root and multiply over time.
- Larger bulbs: often 4–6 inches apart.
- Smaller bulbs: often 2–3 inches apart.
Design trick: Toss a handful of bulbs gently onto the bed and plant them where they land (within reason).
It creates a more natural looklike your garden hired a landscape designer instead of a grid engineer.
Tip #9: Plant bulbs pointy-side up… but don’t lose sleep if you can’t tell
Most bulbs have a pointed tip (the future shoot) and a flatter base (where roots emerge). Plant with the
pointed end up and the base down. If you truly can’t tell, planting on its side usually worksmany bulbs
can correct themselves as they grow.
Exception notes: Some “bulb-like” plants are technically corms or tubers and may have different orientation rules.
When in doubt, follow the package directions for that specific plant.
Tip #10: Water right after plantingthen switch to “steady, not soggy”
Watering is crucial at planting time because it settles soil and helps bulbs start rooting.
After that, most fall-planted bulbs don’t need constant babysitting unless your autumn is unusually dry.
- Water in thoroughly after planting.
- In dry spells: water occasionally so soil stays lightly moist.
- Avoid overwatering: cold + wet is the fastest route to bulb rot.
Container note: Pots dry out faster than in-ground beds, so container bulbs may need more monitoring
(especially in windy spots).
Tip #11: Feed wiselythink “gentle support,” not “energy drink chug”
Bulbs store a lot of energy, and many will bloom fine without heavy feeding. But nutrients can help with root development
and long-term performance, especially in poor soils.
- Compost is a safe, soil-building option.
- Bulb fertilizer (used according to label directions) can support stronger roots and blooms.
- Don’t overdo nitrogen: too much can push leafy growth at the expense of flowers.
Best practice: If you’re serious about dialing it in, a soil test helps you fertilize with confidence instead of guesswork.
Tip #12: Mulch for insulation and fewer weedswithout burying your bulbs alive
A light layer of mulch can help moderate temperature swings, retain moisture, and reduce weeds.
It’s especially helpful after the ground cools in fall.
- Use 1–2 inches of mulch over planted areas in many garden beds.
- Keep mulch loose so shoots can emerge easily in spring.
- In lawns: naturalizing bulbs often works best without heavy mulchlet grass be the “cover.”
Tip #13: Label your planting spots (future you is not a mind reader)
In fall, you’ll remember exactly where you planted everything. In spring, you’ll look at a blank patch of soil and think,
“I definitely planted something here… right?” Save yourself the seasonal mystery novel.
- Use weatherproof markers or discreet plant labels.
- Make a simple map (phone notes count) with bulb types and locations.
- Record bloom times so you can layer early-, mid-, and late-season color next year.
This is especially useful if you mix bulbs into perennial beds where emerging foliage can be hidden later by other plants.
Tip #14: Protect bulbs from critters and plan your spring aftercare
Two things love bulbs: gardeners and squirrels. Only one of them is trying to turn your tulips into lunch.
If critters are an issue, plan protection from day one.
Critter-proofing options
- Hardware cloth or wire mesh: line the planting area or cover it temporarily after planting.
- Gravel or sharp grit: a layer can discourage digging (and can help drainage in some soils).
- Choose resistant bulbs: daffodils and alliums are often less appealing to many animals than tulips.
- Plant in groups: large drifts are harder for pests to wipe out completely than one “perfect” row.
Spring aftercare that makes bulbs come back stronger
- Deadhead spent flowers (snip the bloom) so energy goes back to the bulb rather than seed production.
- Let foliage die back naturally: keep leaves until they yellow and collapse; they’re recharging next year’s bloom.
- Naturalizing in lawns: delay mowing until foliage fades, or your bulbs may weaken over time.
- Divide when crowded: if clumps bloom less over the years, dividing and replanting can restore vigor.
Container & forcing bonus: If you want blooms indoors, many bulbs can be forced by chilling and then potting
up for indoor flowering. Outdoors, container bulbs may need protection from freeze-thaw cycleslike moving pots to an unheated
garage or insulating them in a sheltered spot.
Common Bulb-Planting Mistakes to Avoid
- Planting in soggy soil (rot is not a vibe).
- Planting too early in warm soil (can trigger growth at the wrong time).
- Ignoring depth and spacing (shallow bulbs can heave; crowded bulbs can compete).
- Skipping the “water-in” step (roots need moisture to get started).
- Cutting foliage too soon after bloom (that’s next year’s flower budget you’re deleting).
A Quick Planting Plan (If You Want This to Be Easy)
- Choose a sunny, well-drained spot and loosen soil.
- Mix in compost; check package directions for depth and spacing.
- Plant bulbs pointy-side up at 2–3 times bulb height.
- Water thoroughly, mulch lightly, and mark locations.
- In spring, deadhead blooms and let foliage fade naturally.
of Real-World Experiences: Lessons Gardeners Learn After Planting Bulbs
Garden advice is great on paper, but bulbs teach their best lessons in the dirtusually while you’re holding a trowel
and wondering why the ground feels like it’s made of concrete. One common experience is learning the difference between
“I’ll plant them this weekend” and “It’s suddenly December.” Plenty of gardeners have planted bulbs later than planned,
especially in years when fall stays warm. The reassuring pattern: if the ground is still workable, bulbs often still
root and bloomsometimes a little later in spring, but still beautifully. The bigger takeaway isn’t perfection; it’s
simply getting them in the ground before deep freeze (or before they dry out in the garage).
Another frequent lesson comes from heavy soil. In clay-heavy yards, bulbs can struggle if the planting area holds water.
Gardeners often report that the same tulips that rotted in a low spot thrive just a few feet away in a raised bed or
a spot amended with compost. The “aha” moment is realizing that drainage is less about what you planted and more about
where you planted it. A small tweaklike lifting the bed a couple inches, adding organic matter, or choosing a slope
can turn bulbs from inconsistent to reliably spectacular.
Then there’s the wildlife chapter, usually starring squirrels. Many gardeners can describe the exact emotion of spotting
tiny holes the morning after planting: a mix of disbelief, annoyance, and a sudden interest in hardware cloth. Over time,
experienced bulb planters often shift strategies rather than giving up. They’ll plant more daffodils (less tempting),
use temporary wire coverings, or focus tulips in fenced areas and containers. Some even lean into quantityplanting
larger driftsso a little nibbling doesn’t erase the whole show.
Grouping bulbs is another “why didn’t I do this sooner?” experience. Gardeners who start with a few scattered bulbs
often feel underwhelmed: the flowers look lonely, like they showed up to the party first. But once they try planting
clusters of five, seven, or more, the impact changes dramatically. The blooms read as intentional design instead of
botanical confetti. This is also where layering becomes addictiveearly crocus followed by daffodils, then tulipsso
the same bed keeps performing like a playlist with no bad tracks.
Finally, many gardeners learn that bulb success is a multi-season habit, not a single-day event. The first year can be
impressive even with minimal care, but the second and third years reward good aftercare. The gardeners who get the best
repeat blooms are usually the ones who resist the urge to “clean up” too soonleaving foliage until it yellows, then
tidying it away. It feels messy for a couple weeks, but it’s a small price for the kind of spring color that makes
neighbors slow down on their walks. In the end, bulbs are generous teachers: give them decent drainage, proper depth,
and a little patience, and they’ll keep paying you backoften when you least expect it.
Conclusion
Planting bulbs isn’t about having the fanciest tools or memorizing a thousand rulesit’s about getting the fundamentals
right: choose good bulbs, plant at the right time, prioritize drainage, use the proper depth and spacing, and protect
your investment from pests and premature “tidying.” Do that, and you’ll get a spring garden that looks like it planned
itself (even if you were out there in fall wearing mismatched socks and bargaining with squirrels).


