Table of Contents >> Show >> Hide
- Before You Organize: The 3 Rules That Make Any System Work
- Wall & Vertical Storage Ideas (Because Floors Are Not Shelves)
- 1) The “Pretty Pegboard” Command Center
- 2) Clear Wall Bins for Tiny Supplies
- 3) A Magnetic Strip for Metal Tools
- 4) Floating Shelves + Matching Bins = Instant Calm
- 5) Curtain Rods for Rolls (Ribbon, Wrap, Vinyl, Kraft Paper)
- 6) Over-the-Door Organizers That Actually Earn Their Keep
- 7) A Dowel Rack for Spools and String
- Drawer & Desktop Solutions (Where Supplies Go to Get Lost)
- Big Storage Wins (Furniture That Pulls Double Duty)
- Smart Storage for Specific Supplies (Because Not Everything Behaves)
- 20) Photo Storage Cases for Beads, Buttons, and Embellishments
- 21) Binders for Stickers, Stencils, and Vinyl Scraps
- 22) Magazine Files for Cutting Mats and Large Paper
- 23) Paint Bottle Storage with Risers or a Wall Rack
- 24) Thread, Floss, and String on Bobbins (Tangle Prevention 101)
- 25) Fabric Stored Like a Boutique (Folded or Rolled)
- 26) Under-Bed Bins for Bulky, Flat, or Seasonal Supplies
- 27) The Label + Inventory Combo (Low Effort, High Reward)
- Quick Setup Blueprint (So You Can Start Today)
- Craft Storage Lessons From Real Life (Bonus Experience Section)
- Conclusion
If your craft supplies currently live in a “creative pile” (also known as: a glittery avalanche waiting to happen),
you’re in the right place. The best craft storage ideas don’t just hide the chaosthey make your
tools easy to grab, simple to put away, and hard to lose behind a rogue roll of ribbon.
This guide is built for real life: tiny corners, shared rooms, “I swear I had three pairs of scissors” moments,
and projects that multiply overnight. You’ll find practical, good-looking craft room organization
solutions you can mix and matchwhether you have a full studio or a folding table next to the laundry basket.
Before You Organize: The 3 Rules That Make Any System Work
1) Store by “how you use it,” not by “what it is.”
Keep supplies together based on the projects you actually make. If you scrapbook, your paper trimmer, cardstock,
adhesives, and embellishments should be neighbors. If you paint, keep brushes, palettes, and paint bottles within
arm’s reach. This is the secret sauce behind every great art supply storage setup.
2) Use the “one-step put-away” test.
If putting something away takes more than one step (open a lid, unstack a bin, move three things, find the label),
you’ll start “temporarily setting it down” forever. The best DIY storage solutions make cleanup almost automatic.
3) Label like you’re future-you’s best friend.
Future-you is tired, holding wet paint, and already thinking about snacks. Labels prevent messy rummaging and help
everyone in the house put things back where they belong. (Yes, even the person who thinks “random drawer” is a system.)
Wall & Vertical Storage Ideas (Because Floors Are Not Shelves)
1) The “Pretty Pegboard” Command Center
A pegboard with hooks, cups, and mini shelves is the ultimate vertical win. Paint it, frame it, or go neutralthen
hang scissors, rulers, ribbon spools, glue guns, and small baskets. Bonus: you’ll feel like a professional maker even
if you’re hot-gluing at midnight.
2) Clear Wall Bins for Tiny Supplies
Beads, brads, googly eyes, and jump rings love to vanish. Mount clear bins or pocket containers on a wall strip so
you can see what you have at a glance. This is especially handy for small craft room ideas where
every inch counts.
3) A Magnetic Strip for Metal Tools
Mount a magnetic knife strip (or magnetic tool rail) to hold metal scissors, craft knives, and small rulers. It keeps
sharp tools off the table and out of random drawersjust be mindful if kids or pets have access.
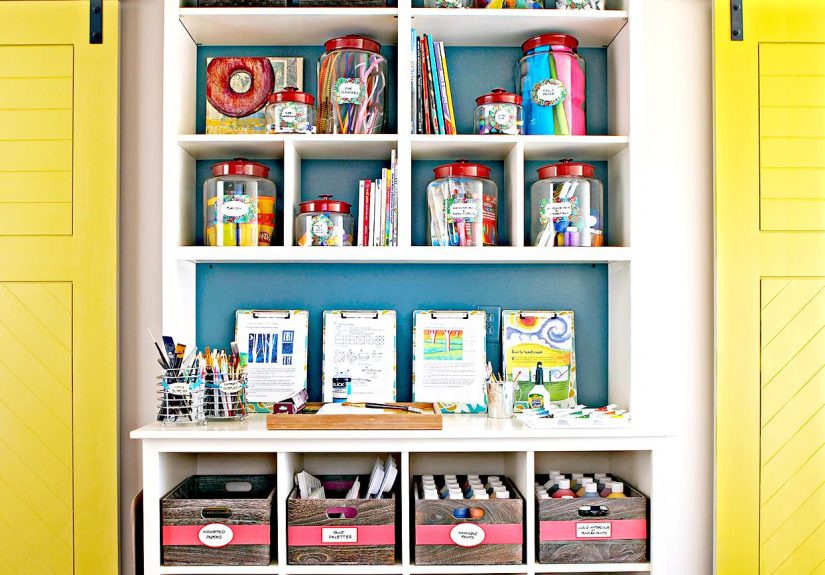
4) Floating Shelves + Matching Bins = Instant Calm
Install a row of floating shelves and line them with identical bins. Uniform containers reduce visual clutter, even
when the inside is pure chaos. Use labels for categories like “Vinyl,” “Paint,” “Paper,” “Sewing,” or “Holiday Crafts.”
5) Curtain Rods for Rolls (Ribbon, Wrap, Vinyl, Kraft Paper)
Mount a curtain rod under a shelf or inside a cabinet to hold rolls. Add S-hooks for tape dispensers or small pouches.
It’s a clean way to keep long, bendy supplies from becoming a tangled noodle situation.
6) Over-the-Door Organizers That Actually Earn Their Keep
The back of a door is prime real estate. Use an over-the-door pocket organizer for paint tubes, markers, punches,
sewing notions, or ribbon. Choose clear pockets if you’re a “out of sight, out of existence” type of crafter.
7) A Dowel Rack for Spools and String
Mount dowels on brackets (or use a wall shelf with rods) to store ribbon, twine, and yarn spools. You can pull what you
need without dumping a whole bin on the floor like you’re starting a tiny textile parade.
Drawer & Desktop Solutions (Where Supplies Go to Get Lost)
8) Drawer Dividers for Pens, Markers, and Tools
Shallow drawers become magic with dividers. Sort by type (brush pens, fine liners, gel pens) or by color family.
Your future blending will improve, and your present sanity will, too.
9) Acrylic Trays for “Daily Drivers”
Use clear trays for the items you reach for every sessionscissors, tape runner, bone folder, adhesive, erasers.
When it’s time to clean up, you’re basically just parking your tools back in their spots.
10) A Lazy Susan for Bottles and Jars
Paint, glue, inks, sprays, and mediums love a turntable. A lazy Susan keeps everything visible without knocking over
a tower of bottles. It’s one of the simplest creative supplies storage upgrades you can make.
11) A Desktop “Inbox” for Active Projects
Keep a slim bin or tray labeled “In Progress” for the project you’re currently working on. This prevents half-finished
pieces from spreading across every surface like crafty confetti.
12) Stackable Mini Drawers for Micro-Mess
Tiny drawer units are perfect for eyelets, findings, sewing machine feet, spare blades, or stamp inks. Label each drawer
and keep the unit on a shelf or desk corner so you can grab-and-go.
13) A Brush Cup That Protects Your Tips
Store brushes bristles-up and markers tip-down only if the brand recommends it. The goal is to avoid crushed bristles,
dried tips, and that one marker that always sounds “crunchy” when you uncap it.
Big Storage Wins (Furniture That Pulls Double Duty)
14) Cube Shelves with Fabric Bins for Easy Sorting
Cube shelving is a craft-room classic for a reason: it’s modular, scalable, and friendly to labels. Assign each cube a
category (paper, fabric, yarn, kids’ crafts, Cricut tools) and use bins to keep things tidy.
15) Cardstock & Paper Stored Vertically (So It Stays Flat)
Store cardstock upright with dividers so you can flip through colors like a file cabinet. Magazine holders, vertical
paper slots, or cube-shelf dividers prevent “paper pancake” stacks that curl and crease over time.
16) Convert a Closet into a Mini Craft HQ
A closet can become a powerhouse with shelves, drawers, and a door-mounted organizer. Add a small work surface if it fits,
or store your tools inside and craft at a nearby table. This is a game-changer for craft room organization
in shared spaces.
17) Repurpose a Hutch or Cabinet for a One-Stop Station
A hutch gives you a mix of open shelves and closed storageperfect for supplies you want accessible but not visually loud.
Add baskets, flat boxes, and small bins to keep categories separated.
18) Tool Chests Aren’t Just for Garages
A rolling tool chest with shallow drawers is fantastic for heavy-duty craft tools, heat tools, adhesives, and hardware.
It’s sturdy, mobile, and oddly satisfying to open and close (try it onceyou’ll get it).
19) A Rolling Cart for Your “Current Obsession”
Three-tier carts shine for supplies you rotate frequentlyjournaling, sewing, watercolor, or vinyl crafting. Use small
containers on each tier to prevent a rolling “junk shelf.”
Smart Storage for Specific Supplies (Because Not Everything Behaves)
20) Photo Storage Cases for Beads, Buttons, and Embellishments
Those multi-case photo boxes are perfect for sorting small items by color, size, or project. They’re portable, stackable,
and make you feel like you have your life togethereven if you’re wearing paint-stained pajamas.
21) Binders for Stickers, Stencils, and Vinyl Scraps
Slip stickers and die cuts into page protectors. Use specialty sleeves for stencils. For vinyl scraps, store sheets in
binder pockets or document sleeves by color familyno more mystery scraps wadded into a sad ball.
22) Magazine Files for Cutting Mats and Large Paper
Stand cutting mats, sketch pads, and oversized paper in magazine files or vertical organizers. It prevents bending and
makes it easy to grab what you need without unstacking a whole tower.
23) Paint Bottle Storage with Risers or a Wall Rack
Acrylic paint collections multiply fast. Use tiered risers in a cabinet so you can see every label, or dedicate a wall rack
to keep bottles upright and visible. This reduces duplicate purchases (and the guilt that follows).
24) Thread, Floss, and String on Bobbins (Tangle Prevention 101)
Wind floss and thin ribbon onto bobbins or cards, then store them in a divided box. For sewing thread spools, use a thread
organizer tray or a drawer insert so colors don’t roll into each other like they’re speed dating.
25) Fabric Stored Like a Boutique (Folded or Rolled)
Fold fabric uniformly and stack by color or type, or roll fabric and stand it upright in bins. Either method makes it easier
to see what you ownand harder to forget the gorgeous yardage you bought “for a specific project” in 2019.
26) Under-Bed Bins for Bulky, Flat, or Seasonal Supplies
Slide flat bins under the bed for felt sheets, foam boards, large rolls, seasonal craft kits, or extra paper pads. Choose
containers with lids to keep dust and pet hair from becoming “mixed media.”
27) The Label + Inventory Combo (Low Effort, High Reward)
Label containers with removable tape or printed labels. Then keep a simple notes app list for your “big categories”:
paint colors, vinyl types, cardstock neutrals, or specialty tools. It’s not fancyit’s functional. And it keeps you from
buying your third bottle of the same glue because you couldn’t find the first two.
Quick Setup Blueprint (So You Can Start Today)
- Pick 3 zones: make (workspace), store (shelves/drawers), stage (in-progress bin/cart).
- Choose containers that match your habits: clear if you forget; opaque if you crave calm.
- Group by project type: paper crafts, painting, sewing, kids’ crafts, tools/adhesives.
- Label immediately: if you wait “until later,” later becomes never.
- Do a 10-minute reset: once a week, return strays to their homes.
Craft Storage Lessons From Real Life (Bonus Experience Section)
I’ve learned that organizing craft supplies is less like building a bookshelf and more like training a very enthusiastic
puppy. You can have the best intentions, the cutest containers, and a color-coded label system… and still find sequins in
places sequins have no business being. The trick is to design storage that survives your actual crafting styleespecially
on days when you’re tired, distracted, or running on iced coffee and optimism.
My first big lesson: pretty bins aren’t a plan. I once bought a stack of gorgeous matching containers, lined them up like a
home organization influencer, and felt unstoppable. Two weeks later, every bin was a mystery. One held ribbons, but also
a lone paintbrush, three stickers, and a screwdriver (??). That’s when I realized labels aren’t optional. Labels are
what turn containers into a system instead of a decorative game of “guess what’s inside.”
Second lesson: “out of sight” can become “gone forever.” If you tend to forget what you own, clear storage is your best friend.
When I switched my small suppliesbeads, buttons, blades, little hardwareinto clear cases, I stopped panic-buying duplicates.
I also stopped opening five drawers to find one thing, which is a surprisingly effective way to reduce crafting rage.
Third lesson: your “hot zone” deserves special treatment. The area where you craft most often (your desk, your table, your cart)
will always get messy first. Instead of fighting that, I gave the hot zone its own mini-rules: one tray for daily tools, one bin
for works-in-progress, and one small cup for the “I’ll put this away in a second” items. That last cup is basically a tiny
containment unit for chaos. Once it’s full, it’s my cue to reset before the mess becomes a lifestyle.
Fourth lesson: some supplies are divas. Paper hates humidity, fabric attracts dust, and glue will absolutely betray you if it’s
stored upside down and decides to leak during the night. I now keep paper flat or upright with support, store fabric in lidded
bins or closed cabinets, and corral liquids on a tray (preferably something wipeable). It’s not glamorous, but it saves supplies
and prevents that “why is everything sticky?” mystery.
And finally: organization is not a one-time event. It’s maintenancelike brushing your teeth, but with more washi tape.
The biggest improvement I ever made wasn’t buying a new shelf; it was committing to a short weekly reset. Ten minutes. Set a timer.
Put the stray items back. Toss dried-out pens. Return tools to their homes. Your future self will thank you, and your next creative
session will start with making art instead of excavating your workspace like an archaeologist.
Conclusion
Great craft storage isn’t about having a perfect Pinterest roomit’s about building a setup that makes creativity easier.
When your supplies are visible, categorized, and easy to return, you spend less time hunting and more time making. Start with
one upgrade (a pegboard, a rolling cart, or labeled bins), then let your system evolve with your hobbies. Your creativity
deserves a home that doesn’t fight back.


