Table of Contents >> Show >> Hide
- Why DIY Fall Gnomes Work So Well in Autumn Decor
- DIY Fall Gnome #1: The Sweater-Sleeve Shelf Gnome
- DIY Fall Gnome #2: The Rustic Pinecone Mantel Gnome
- DIY Fall Gnome #3: The No-Carve Pumpkin Porch Gnome
- Color Palettes and Materials That Make Fall Gnomes Look Better
- Mistakes to Avoid When Making DIY Fall Gnomes
- How to Display Your Fall Gnomes Throughout the Season
- My Experience Making All 3 DIY Fall Gnomes in One Weekend
- Conclusion
There are two kinds of people in fall: the ones who casually put a pumpkin on the porch and call it a day, and the ones who look at a pinecone, a scrap of felt, and a rogue wooden bead and think, I can turn this into a tiny bearded legend. This article is for the second group. Or the first group who are ready to become the second.
DIY fall gnomes are the sweet spot between cozy and quirky. They are charming without being too precious, festive without screaming for attention, and forgiving enough that even a slightly lopsided nose somehow becomes “part of his personality.” Better yet, they fit beautifully into the visual language of autumn: warm textures, earthy colors, pumpkins, acorns, plaid, leaves, and all the other seasonal things that make your home feel like it wants to hand you apple cider at the door.
Below, you will find three easy and stylish fall gnome projects you can actually make at home: a soft sweater-sleeve shelf gnome, a rustic pinecone mantel gnome, and a no-carve pumpkin porch gnome. Each one uses simple materials, looks genuinely cute, and can be adapted to your space, budget, and craft confidence level. In other words, this is not a glitter explosion disguised as a tutorial. This is practical autumn decorating with a wink.
Why DIY Fall Gnomes Work So Well in Autumn Decor
Fall decorating is all about texture and mood. Think chunky knits, felt, twine, dried leaves, mini pumpkins, wood tones, and muted colors that make your home feel layered and warm. Gnomes fit right into that world. Their oversized hats add height, their beards add softness, and their tiny noses bring just enough whimsy to keep the whole thing from looking too serious.
They are also wonderfully versatile. A large gnome can sit by the fireplace or front door. A medium one can perch on a shelf or entryway table. A mini version can be tucked into a centerpiece, displayed next to candles, or added to a tiered tray. Once you make one, you will start seeing possible gnome real estate everywhere. This is how it begins.
The best part is that fall gnomes are easy to style with what you already have. Pair them with pumpkins and mums on the porch, nestle them among dried leaves and lanterns on a console, or place them near acorns, wheat stems, and candles on a dining table. If you arrange your decor in groups of three or five, the display tends to look naturally balanced and intentional instead of random and “I panic-bought this at 8 p.m.”
DIY Fall Gnome #1: The Sweater-Sleeve Shelf Gnome
If you have an old sweater hiding in the back of a drawer, congratulations: you are already halfway to a cozy autumn gnome. This version is soft, simple, and perfect for shelves, mantels, bookshelves, or an entry table.
What You’ll Need
- An old sweater sleeve or chunky knit sock
- Rice, dried beans, or polyfill for stuffing
- A rubber band or twine
- Faux fur, yarn, or wool roving for the beard
- One wooden bead or small fabric-covered ball for the nose
- Felt in rust, mustard, olive, plaid, or cream for the hat
- Hot glue gun or fabric glue
- Scissors
- Optional: mini leaves, tiny buttons, cinnamon stick, raffia bow
How to Make It
Start by cutting the sweater sleeve to the height you want. For a shelf gnome, about 10 to 14 inches works nicely. Tie or glue one end closed, then fill the body with rice, beans, or stuffing until it feels soft but stable. Secure the top with twine or a rubber band. You want it to sit upright without looking like it just gave up on life.
Next, create the beard. If you are using faux fur, cut from the back with small snips so you do not shear off the fluff and create a blizzard in your kitchen. Shape it into a rounded or slightly pointed beard and glue it to the front of the body. If you are using yarn, cut several strands, fold them in half, and glue them in layers until the beard looks full and cozy. Wool roving gives the softest, most storybook result.
Glue the wooden bead or soft nose right above the beard. This is the face. There are no eyes. Gnomes are mysterious like that, and frankly, it saves a lot of pressure.
For the hat, cut a felt semicircle, roll it into a cone, and glue the seam. Slip it over the body so the hat dips slightly over the nose. That little overhang is the whole charm. Add a plaid cuff, a mini leaf, or a raffia tie if you want more fall personality.
Why This One Is Great
This gnome looks expensive even when it is made from leftovers. The knit body instantly adds warmth, and the soft materials make it ideal for living rooms, bedrooms, or reading nooks. It also photographs beautifully, which matters if your autumn decor occasionally ends up in your camera roll more than your actual home life.
Best Styling Ideas
- Place one on a stack of vintage books with a mini pumpkin nearby.
- Group three in different heights for a fuller mantel display.
- Use neutral sweaters for a modern farmhouse look, or plaid felt for a more playful cabin vibe.
DIY Fall Gnome #2: The Rustic Pinecone Mantel Gnome
This project is tiny, fast, and almost offensively cute. A pinecone already has natural texture and shape, so it makes a perfect gnome body. This one is ideal for mantels, trays, place settings, windowsills, or adding to a fall centerpiece.
What You’ll Need
- Large pinecones, cleaned and dried
- Small wooden beads for noses
- Wool roving, faux fur scraps, or yarn for beards
- Felt for hats
- Hot glue gun
- Scissors
- Optional: acorn caps, jute twine, tiny faux leaves, gold paint for accents
How to Make It
First, make sure your pinecones are dry and free of debris. If they came from the yard, give them a gentle shake outdoors and let them fully dry before crafting. You do not want your cute little gnome bringing in surprise roommates from the backyard.
Cut a small beard from wool roving or faux fur. Because the pinecone is already textured, you do not need a huge beard; a small fluffy shape works best. Glue the beard to the upper front of the pinecone, then attach the wooden bead nose at the top center.
Create a hat from felt using the same cone method as the first gnome, but make it smaller and slightly taller. A long, floppy cone hat looks especially whimsical here. Glue it so it rests just over the nose.
That is the basic version, and honestly, it is adorable as-is. But you can take it further by gluing on a tiny twine scarf, brushing the pinecone tips with a little gold or copper paint, or nestling the finished gnomes onto a wood slice with acorns and preserved leaves for a mini woodland display.
Why This One Is Great
This project is perfect when you want a lot of visual payoff with very little effort. Pinecones already bring that organic autumn texture decorators love, so your gnome starts with a head start. It is also a great craft for a family afternoon because the pieces are small, the design is forgiving, and the finished result looks polished without demanding perfection.
Best Styling Ideas
- Use them as place card companions for Thanksgiving dinner.
- Arrange a trio on a tray with candles, acorns, and mini gourds.
- Tuck a few into a wreath, garland, or bookshelf display for subtle seasonal charm.
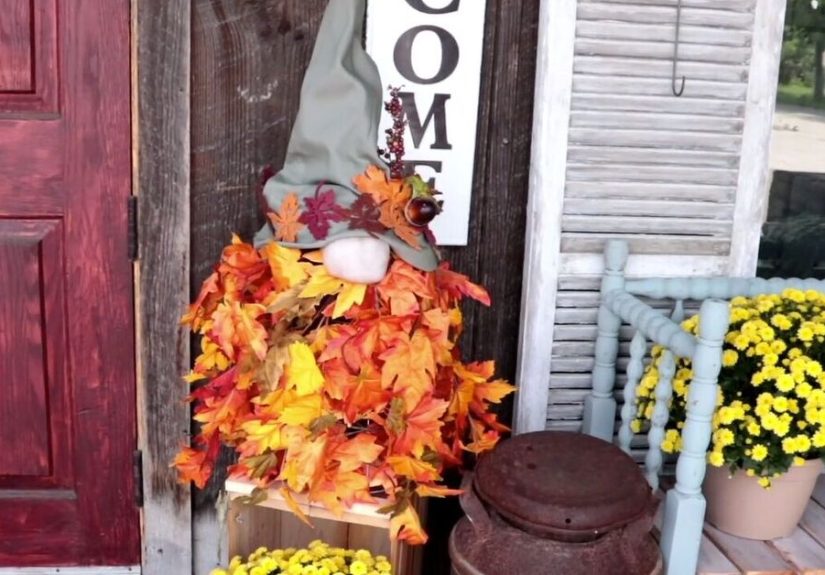
DIY Fall Gnome #3: The No-Carve Pumpkin Porch Gnome
If you want a showstopper, this is your gnome. A no-carve pumpkin gnome is playful, porch-friendly, and much less messy than traditional pumpkin carving. It is also a smart option if kids want to help decorate without anyone handing over sharp tools and pretending that is a calm family activity.
What You’ll Need
- One real or faux pumpkin
- Yarn, faux fur, or thick jute for the beard and brows
- One wooden bead or wood ball for the nose
- Felt, fabric, or wool for a tall cone hat
- Batting or stuffing to help the hat stand up
- Hot glue or craft glue
- Optional: dried florals, plaid ribbon, faux leaves, mini mums, lanterns
How to Make It
Choose your pumpkin first. A medium or large pumpkin gives the beard room to shine. Faux pumpkins are especially useful if you want to reuse the project next year, but a real pumpkin works beautifully for a temporary display.
Make the hat by cutting fabric or felt into a large cone. If you want it to stand upright instead of collapsing into pumpkin melancholy, lightly fill it with batting. Glue the cone seam together, then set the hat on top of the pumpkin to check size and angle before attaching anything else.
Next, create the beard. Thick yarn gives a cozy, homespun look; faux fur looks fuller and a little more dramatic. Glue the beard to the front of the pumpkin, then attach the wooden bead nose where the hat brim will overlap slightly. Add short yarn eyebrows if you want a little extra expression. Apparently, even gnomes can benefit from eyebrow definition.
Secure the hat so it sits low over the nose. Then style around the gnome instead of overworking the gnome itself. A plaid ribbon around the hat base, a cluster of mini pumpkins at the feet, a lantern on one side, and a pot of mums on the other can make the whole porch arrangement feel intentional and warm.
Why This One Is Great
This is the fall gnome that gets noticed. It has height, shape, and enough charm to anchor a front porch, stair landing, or entry bench. Because it is no-carve, it also stays cleaner-looking longer than a carved jack-o’-lantern, especially if you choose a faux pumpkin for a reusable version.
Best Styling Ideas
- Place one beside stacked pumpkins and lanterns at your front door.
- Create a pair in different sizes for a balanced porch display.
- Use muted florals and soft plaid if you want a look that transitions from Halloween into Thanksgiving.
Color Palettes and Materials That Make Fall Gnomes Look Better
Not all cute crafts need color strategy, but this one benefits from it. If you want your DIY fall gnomes to look styled rather than random, stick to a simple autumn palette. Think burnt orange, rust, mustard, olive, deep brown, cream, oatmeal, charcoal, dusty green, and muted burgundy. You do not need every color at once. In fact, you absolutely should not. Pick three or four and repeat them.
Texture matters just as much as color. Felt keeps shapes crisp. Wool and faux fur add softness. Pinecones and acorns introduce natural variation. Plaid fabric adds instant seasonal energy. Twine, raffia, dried leaves, and wood beads help the gnomes blend into other fall decor without looking disconnected from the room.
If your home is modern, use neutral hats and minimal embellishment. If your style leans farmhouse, embrace plaid, chunky yarn, and worn wood. If you love cottage-inspired decor, add dried florals, mushrooms, and soft earthy tones. Gnomes are surprisingly accommodating little roommates.
Mistakes to Avoid When Making DIY Fall Gnomes
Making the Hat Too Small
The hat should feel oversized and slightly dramatic. A tiny hat makes the gnome look confused. A generous hat makes it look intentional.
Using Too Many Embellishments
A beard, nose, and hat already do most of the work. You do not need to add every leaf, ribbon, button, bell, and glitter pumpkin in the county. A few thoughtful accents always look better.
Ignoring Proportion
If the beard is too short, the gnome can look unfinished. If the nose is too large, it becomes a different craft entirely. Test placement before gluing permanently.
Forgetting the Display Context
A gnome on its own can be cute. A gnome styled with pumpkins, candles, leaves, or mums looks like decor. Always think about where it will live once it is made.
How to Display Your Fall Gnomes Throughout the Season
One of the best things about these DIY fall gnomes is how easy they are to move around your house as the season unfolds. In early fall, pair them with apples, wheat stems, and neutral pumpkins for a harvest look. In October, layer in lanterns, black accents, or a moodier plaid for a more Halloween-leaning setup. By November, shift toward warm candles, amber glass, mini gourds, and dried florals for a softer Thanksgiving mood.
You can also rotate the same gnome through several spaces. A sweater gnome can start on the entry table, move to the mantel for a party, and end up on a bookshelf next to a candle and a ceramic mug. A pinecone gnome can become part of a centerpiece, then join a place setting, then land in a kitchen tray with acorns and cinnamon sticks. A pumpkin gnome can own the porch until the weather or squirrels negotiate otherwise.
That flexibility is part of the appeal. These are not one-night crafts you make and immediately regret. They are useful, displayable pieces that can carry your home from the first cool evening of the season right through the Thanksgiving leftovers stage.
My Experience Making All 3 DIY Fall Gnomes in One Weekend
I made all three of these fall gnomes over one weekend, which sounded wildly efficient in theory and slightly chaotic in practice. It started with confidence, coffee, and the classic lie every crafter tells themselves: “This should only take a couple of hours.” Several hours later, I was surrounded by felt scraps, pinecones, bits of yarn, one wooden bead that rolled under the table three separate times, and enough hot glue strings to suggest I had accidentally crocheted with the glue gun.
The sweater-sleeve gnome was the easiest one to love immediately. The second I added the beard and pulled the hat low over the nose, it looked finished in that magical way simple crafts sometimes do. I used an old oatmeal-colored sweater, a rust felt hat, and a chunky cream yarn beard, and the result looked far more charming than it had any right to. It ended up on a shelf next to a brass candleholder and a tiny white pumpkin, and suddenly that whole corner of the room looked like it had a personality.
The pinecone gnomes were my surprise favorites. I expected them to be cute, but I did not expect them to have so much character. One leaned slightly to the left and somehow looked thoughtful. Another had a beard that fluffed out more on one side and looked like he had strong opinions about cider. They were tiny, quick to make, and ridiculously effective in a centerpiece. Once I tucked them among acorns and dried leaves on a wooden tray, the whole arrangement looked layered and seasonal without being fussy.
The pumpkin porch gnome was the most dramatic transformation. Before the beard and hat, it was just a pumpkin sitting on the table minding its business. Afterward, it had become a full-blown porch personality. I used thick yarn for the beard, a wooden ball for the nose, and a plaid cone hat stuffed just enough to stand upright. Then I placed it next to a lantern and a pot of mums. That one detail changed the entire entryway. It felt welcoming, cheerful, and a little bit storybook, which is exactly what I want from fall decor.
I also learned a few useful things the messy way. First, proportions matter more than perfection. If the hat is too short or the beard is too skimpy, the gnome loses some of its charm. Second, texture does most of the heavy lifting. Even the simplest shape looks better when you mix soft yarn, sturdy felt, rough pinecone scales, and natural autumn elements. Third, not every project needs more embellishment. A gnome usually looks best when you stop one step before “maybe I should glue on one more thing.” That impulse is rarely your friend.
Most of all, the weekend reminded me why seasonal crafts are worth making in the first place. They change the feeling of your home. Not in a huge, expensive, renovation-level way, but in a small, immediate, human way. A handmade gnome on a shelf makes the room feel lived in. A tiny pinecone gnome at a place setting makes dinner feel more fun. A pumpkin gnome on the porch makes coming home a little sweeter. That is the real payoff. Not perfection. Not virality. Just the quiet joy of making your space feel warm, personal, and unmistakably autumn.
Conclusion
If you are looking for a cozy, low-pressure way to refresh your fall decor, DIY fall gnomes are a very good place to start. They are affordable, adaptable, and oddly addictive in the best way. Make a sweater gnome for your shelf, a pinecone gnome for your table, and a pumpkin gnome for your porch, and suddenly your home feels like it got the memo that autumn has arrived.
And if one gnome turns into seven? That is not a crafting problem. That is seasonal success.


