Table of Contents >> Show >> Hide
- Why Oily Bottles Are So Hard to Clean
- Method 1: Use Dish Soap, Warm Water, and a Bottle Brush
- Method 2: Use Uncooked Rice or Coarse Salt for a Narrow-Neck Bottle
- Method 3: Use a Baking Soda Soak for Lingering Odor and Light Residue
- Common Mistakes That Keep an Oily Bottle Gross
- How to Keep an Oily Bottle Clean Longer
- Which Method Should You Choose?
- Real-World Experiences With Cleaning an Oily Bottle
- Conclusion
Cleaning an oily bottle sounds like one of those tiny household tasks that should take 30 seconds and zero emotional damage. Then reality arrives. You rinse the bottle, swirl some water around, and somehow it still smells like old salad dressing and bad decisions. The inside looks slick, the neck is too narrow for your hand, and the cap seems to be hoarding grease like it pays rent.
The good news is that cleaning an oily bottle is not complicated once you stop treating oil like regular grime. Oil sticks, coats, and lingers. Plain water alone is basically a polite suggestion. What actually works is a combination of grease-cutting soap, warm or hot water, physical scrubbing, and the right backup plan when a bottle is too narrow for a brush.
In this guide, you’ll learn three practical ways to clean an oily bottle, when to use each method, and which common mistakes make the problem worse. Whether you’re dealing with an olive oil bottle, a reusable dressing bottle, a blender bottle that hosted a suspiciously creamy vinaigrette, or a kitchen bottle with a lingering greasy film, these methods will help you get it truly clean, not just “looks fine from a distance” clean.
Why Oily Bottles Are So Hard to Clean
Before jumping into the methods, it helps to understand why oily residue is so stubborn. Oil does not mix with water, so a quick rinse leaves a slick coating behind. That coating can trap dust, hold onto odors, and eventually turn rancid. In bottles with narrow necks, the real trouble spots are usually the shoulder of the bottle, the threads near the cap, the pour spout, and any silicone gasket hiding in plain sight like a tiny grease bunker.
That is why the best approach is not just “add water and hope for character development.” You need something that can break up grease, plus friction to loosen the film. In some cases, you also need a deodorizing step to get rid of the stale smell that likes to hang around long after the visible oil is gone.
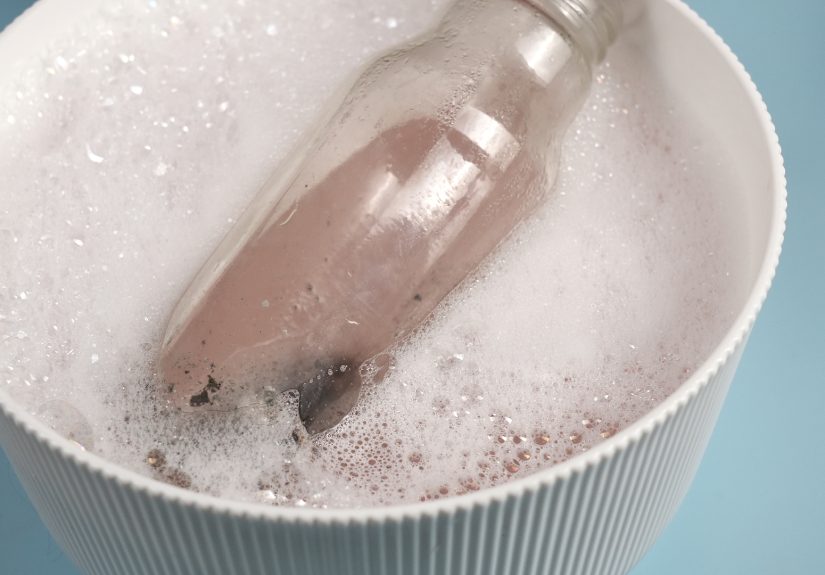
Method 1: Use Dish Soap, Warm Water, and a Bottle Brush
Why this method works
If you want the most reliable way to clean an oily bottle, start here. Dish soap is designed to break down grease. Warm water helps loosen the residue. A bottle brush adds the friction needed to scrub the interior, especially around the bottom and shoulders of the bottle.
This is the best method for most everyday greasy messes, especially if the bottle recently held olive oil, cooking oil, vinaigrette, flavored syrups with oil, or any homemade mixture that separated into a glossy little science experiment.
How to do it
- Empty the bottle completely.
- If there is a heavy layer of oil, wipe out as much as possible with a paper towel first.
- Fill the bottle partway with warm to hot water.
- Add a few drops of grease-cutting dish soap.
- Close the bottle and shake well.
- Open it, insert a bottle brush, and scrub the inside thoroughly.
- Pay attention to the neck, shoulder, and bottom of the bottle.
- Wash the cap, lid, pour spout, straw, gasket, or stopper separately.
- Rinse several times with clean warm water until there is no soap film left.
- Let everything air-dry completely before putting the bottle back together.
Best for
- Reusable kitchen bottles
- Oil dispensers
- Salad dressing bottles
- Shaker bottles
- Most plastic, stainless steel, and glass bottles
Helpful tip
If the bottle is especially greasy, do not be shy about repeating the wash. The first round loosens the oil. The second round often removes what the first one merely annoyed. Also, if the bottle is dishwasher-safe, check the care instructions before using the dishwasher. Some bottles handle machine cleaning beautifully, while others act like you personally betrayed them.
Method 2: Use Uncooked Rice or Coarse Salt for a Narrow-Neck Bottle
Why this method works
Sometimes the bottle opening is so narrow that even a slim brush struggles to reach the residue properly. That is where the shake method helps. A small amount of uncooked rice or coarse salt creates gentle abrasion inside the bottle, helping scrub away the oily film as you shake it with warm water and dish soap.
Rice is usually the safer choice for glass and delicate interiors because it is less aggressive than coarse salt. Salt can work well on tough residue, but it may be too harsh for certain finishes or softer plastic. When in doubt, go with rice first.
How to do it
- Add 1 to 2 tablespoons of uncooked rice or coarse salt to the empty bottle.
- Add a few drops of dish soap.
- Pour in enough warm water to cover the bottom and create movement.
- Seal the bottle tightly.
- Shake vigorously for 30 to 60 seconds.
- Let it sit for a few minutes if the residue is stubborn.
- Shake again, then pour everything out.
- Rinse thoroughly and inspect the interior.
- Repeat once if needed, then finish with a final soap-and-water rinse.
Best for
- Narrow-neck glass bottles
- Decorative kitchen bottles
- Oil cruets with limited access
- Bottles with greasy film near the bottom
Helpful tip
Do not use this method on fragile, cracked, or heavily decorated bottles. And if you choose salt, remember that its job is to help scrub, not to audition as a demolition crew. Gentle shaking is enough. You are cleaning a bottle, not trying to wake the neighbors.
Method 3: Use a Baking Soda Soak for Lingering Odor and Light Residue
Why this method works
Baking soda is especially useful when the bottle is mostly clean but still smells faintly oily, stale, or weird in a way that makes you suspicious. It is not the superhero for thick grease buildup, but it is excellent for deodorizing and helping freshen a bottle after the main grease has already been removed.
This method works best as a follow-up step or for bottles with a light film and a lingering odor. If the bottle is truly greasy, wash with dish soap first and use baking soda afterward.
How to do it
- Wash the bottle once with warm water and dish soap.
- Add 1 to 2 teaspoons of baking soda to the bottle.
- Fill it with warm water.
- Let it soak for at least 1 hour, or overnight for a stronger odor.
- Shake gently before pouring it out.
- Rinse well and wash again lightly with soap if needed.
- Air-dry completely.
Best for
- Bottles with lingering oil smell
- Plastic containers that hold onto odors
- Light residue after the main wash
- Routine deep cleaning
Helpful tip
People love a fizzy baking soda and vinegar volcano because it looks productive. It is fun, dramatic, and deeply popular on the internet. But for an oily bottle, the smarter move is usually soap for grease and baking soda for odor. The bottle needs cleaning, not a middle-school science fair callback.
Common Mistakes That Keep an Oily Bottle Gross
- Using only cold water: Cold water does very little against oily residue.
- Skipping the cap and spout: The bottle may be clean while the lid still smells like old canola oil.
- Not drying fully: Moisture trapped inside encourages odor and grime to come back.
- Using too little friction: Grease often needs scrubbing or agitation, not just soaking.
- Assuming vinegar alone fixes everything: Vinegar can help in some cleaning jobs, but dish soap is the better first move for grease.
- Mixing cleaning chemicals: Never combine bleach with vinegar or other cleaners. That is not a cleaning hack. That is a bad idea wearing a confident outfit.
How to Keep an Oily Bottle Clean Longer
Once you finally get the bottle clean, keeping it that way is much easier than rescuing it later. A few simple habits make a big difference:
- Rinse the bottle soon after it is empty.
- Wash it the same day if possible.
- Store it uncapped until fully dry.
- Clean lids, seals, and pour inserts separately.
- Deep clean once a week if you use the bottle often.
- Do not let old oil sit for weeks unless your hobby is creating mystery smells.
If the bottle is made of stainless steel, insulated plastic, or specialty glass, follow the manufacturer’s care instructions. Some bottles are dishwasher-safe. Others prefer hand washing. And some react to boiling water like drama club leads hearing the word “understudy.”
Which Method Should You Choose?
If you want the short answer, here it is:
- Use Method 1 for most oily bottles and everyday grease.
- Use Method 2 when the bottle is narrow and hard to scrub inside.
- Use Method 3 when the grease is mostly gone but the odor refuses to leave politely.
In many cases, the best result comes from combining methods. For example, wash with soap and warm water first, then follow with a baking soda soak if the smell remains. Or use the rice method to loosen stuck film, then finish with a proper soap wash. Cleaning is not cheating when you use two good ideas in a row. It is called strategy.
Real-World Experiences With Cleaning an Oily Bottle
One of the most common experiences people have with an oily bottle is thinking the bottle looks clean long before it actually is. You hold it up to the light, see no obvious puddles, and assume the job is done. Then you screw the cap back on, open it the next day, and get hit with that stale, greasy smell that says, “Nice try.” The lesson is simple: oily residue is sneaky. It hides in threads, seams, and little shoulders inside the bottle where a quick rinse never reaches.
Another familiar experience is discovering that the cap is often dirtier than the bottle. This happens a lot with olive oil dispensers, squeeze tops, sports bottle lids, and dressing bottles with tiny pour spouts. The bottle body may come out looking respectable, but the lid still has a slick ring around the opening. People often scrub the big visible part and forget the tiny parts that do the actual pouring. That is usually where the smell lives.
Many people also find that timing matters more than they expected. A bottle washed right after use is usually easy to clean. A bottle left on the counter for three days becomes a completely different personality. The oil thickens, dust sticks to it, and the inside starts to smell old. What could have been a two-minute wash turns into a whole event with a brush, rice, soap, and a muttered promise to “never let this happen again,” which, of course, lasts until the next busy week.
There is also the classic narrow-neck frustration. You can see the grime, but you cannot reach it. This is where people get creative. Some try shaking warm soapy water and hoping for the best. Others discover the rice method and suddenly feel like they unlocked a secret level in home cleaning. That little rattling swirl of rice and soap can be surprisingly effective, especially in glass bottles that are too slim for a normal sponge or hand.
Plastic bottles create their own special category of drama because they may stop looking greasy before they stop smelling greasy. That is where baking soda often earns its keep. A lot of people report that after the main wash, the bottle is visibly clean but still smells faintly like old dressing, old protein shake, or old “I meant to wash this sooner.” A baking soda soak helps freshen the bottle so it smells clean instead of merely technically acceptable.
Perhaps the most useful real-life takeaway is this: the best cleaning method is the one you will actually repeat. A simple routine of soap, warm water, brush, rinse, and air-dry beats a complicated deep-cleaning plan you only do once every presidential administration. Oily bottles do not need magic. They need the right method, done thoroughly, before the grease gets comfortable.
Conclusion
When it comes to how to clean an oily bottle, the answer is refreshingly practical. Start with dish soap, warm water, and a bottle brush. Use rice or coarse salt when the bottle is narrow and hard to scrub. Bring in baking soda when odor lingers after the grease is gone. Clean the lid, rinse thoroughly, and let everything dry all the way before storing it.
That is really the secret. Not a miracle spray. Not a viral hack. Not a mystical lemon wedge blessed by the kitchen gods. Just smart degreasing, solid technique, and enough patience to clean the parts you cannot see at first glance. Do that, and your bottle can go back to holding oil instead of holding grudges.


