Table of Contents >> Show >> Hide
- First, the 20-second keyboard reality check
- Way #1: Learn “Keyboard Geography” (Find notes by black-key landmarks)
- Way #2: Use “Landmark Notes” on the Staff (Connect sheet music to keys)
- Way #3: Drill Smart (Games, flashcards, and real songsaka “make it stick”)
- The best practice formula: short + frequent + mixed
- Three drill types that work
- 1) Note-identification bursts (keyboard + staff)
- 2) “Landmark expansion” drills
- 3) Real-music reading (the ultimate test)
- A simple 10-minute daily plan (no fluff, no guilt)
- How to know you’re improving (real signs)
- Common mistake to avoid
- Which way should you choose?
- Conclusion
- Experience-Based Add-On: What Practice Feels Like in the Real World (and why that’s normal)
Learning keyboard notes is like learning a city: at first everything looks the same, and then one day you
realize, “Oh… the coffee shop is always next to the weird statue.” On a piano, that “weird statue” is the
repeating pattern of two black keys and three black keys. Once you can spot those landmarks,
note names stop feeling like a pop quiz and start feeling like… directions.
This guide gives you three practical ways to learn keyboard notes (the white keys and the black keys),
plus exactly how to practice each method without turning your practice time into an emotional support
session for your metronome.
First, the 20-second keyboard reality check
The keyboard is built on a repeating pattern:
the white keys use the musical alphabet A–G, over and over. Black keys live in groups of two and three,
and they’re the reason beginners can find notes quickly without counting 47 keys like it’s a math test.
What “learning keyboard notes” really means
- Instant recognition: you see a key and know its name (no counting, no panic).
- Context awareness: you can find the same note in different octaves.
- Translation skill: you can connect keyboard notes to the notes you see on the staff (sheet music).
With that in mind, here are three ways to learn notes that actually stick.
You can use one method or combine all three (spoiler: combining is the cheat code).
Way #1: Learn “Keyboard Geography” (Find notes by black-key landmarks)
If the keyboard were a hiking trail, the black keys would be the trail markers. This method teaches you
to identify notes by recognizing patternsfast, reliable, and wonderfully low-drama.
The core landmark trick: C and F are your home base
- C is the white key immediately to the left of a group of two black keys.
- F is the white key immediately to the left of a group of three black keys.
Once you find C, the rest is just the musical alphabet marching forward:
C–D–E–F–G–A–B… and then it loops back to C again.
Step-by-step practice (5 minutes)
-
Scan for two black keys. Touch the white key just to the left: say “C” out loud.
Do this in multiple places on the keyboard. - Scan for three black keys. Touch the white key just to the left: say “F” out loud.
-
Build the neighborhood. From each C, name the next white keys ascending:
C–D–E–F–G–A–B. Then do it descending: C–B–A–G–F–E–D. -
Time yourself. Pick a random area, find C in under 2 seconds. Repeat.
You’re training instant recognition, not “slow counting with feelings.”
Where black keys fit (sharps and flats, without the headache)
Black keys are usually named as sharps or flats depending on context. For example, the black key between
C and D can be called C♯ (C sharp) or D♭ (D flat). You don’t need to master both names on day one,
but you should understand the idea: black keys are “in-between” notes.
Mini-drill: “Find it, name it, move it”
- Find any C. Now find the next C above it (same letter, higher pitch). That’s an octave.
- Pick any F. Find all F’s on the keyboard. (Yes, there are many. F gets around.)
- Choose a note: G. Find it in three different octaves without counting white keys one-by-one.
Common mistake to avoid
Don’t “learn notes” only in one spot (like middle C) and treat the rest of the keyboard like a mysterious
wilderness. Keyboard geography is about recognizing the repeating map everywhere.
Way #2: Use “Landmark Notes” on the Staff (Connect sheet music to keys)
If Way #1 teaches you the physical map, Way #2 teaches you the translator.
You’ll learn a handful of landmark notes on the grand staff (treble + bass clef), then “walk” to nearby notes
by intervals instead of memorizing every single note like it’s a password.
Why landmark notes work better than pure memorization
Your brain loves anchors. Landmark notes give you a few easy, recognizable “checkpoints,” and then you
calculate nearby notes by moving up or down step-by-step (seconds) or skipping (thirds).
This is closer to how fluent readers actually read music: they recognize patterns and relationships.
The classic landmarks to start with
- Middle C: the “bridge” between treble and bass clef (and the most famous note in beginner lessons).
- Treble G: the note the treble clef curls around (a handy visual clue).
- Bass F: the note marked by the two dots on the bass clef.
Once you know Middle C, Treble G, and Bass F, you can reach nearby notes by counting lines/spaces
(or better: thinking in intervals).
Friendly mnemonics (use them, then graduate)
Mnemonics are training wheels. They’re helpful, and no one is judging your training wheelsexcept maybe
that one musician friend who “learned everything by ear” and also can’t find their own car in a parking lot.
- Treble clef lines (bottom to top): E–G–B–D–F (“Every Good Boy Deserves Fudge” or similar).
- Treble clef spaces: F–A–C–E (“FACE”).
- Bass clef lines: G–B–D–F–A (“Good Boys Do Fine Always” or similar).
- Bass clef spaces: A–C–E–G (“All Cows Eat Grass”).
Step-by-step practice (7 minutes)
- Pick one landmark. Start with Middle C. Find it on your keyboard (using Way #1), and find it on the staff.
-
Practice “one step away.” On the staff, notes move by step from line-to-space or space-to-line.
Practice naming the notes one step above and one step below Middle C. - Practice “one skip away.” A skip jumps line-to-line or space-to-space. Name a note a third above and below.
-
Play what you name. Each time you name a note on the staff, play it on the keyboard immediately.
You’re building a fast mental link between symbol and sound.
Specific example: building fluency from Middle C
Suppose Middle C is your anchor. One step up on the staff is D. One step down is B.
If you can do that quickly, you’ve stopped “memorizing random notes” and started reading relationships.
Do this with Treble G and Bass F next, and suddenly you can decode a big chunk of beginner music.
Common mistake to avoid
Don’t rely on mnemonics forever. Your goal is to recognize notes by shape and position,
then read by intervals and patterns. Mnemonics are the launchpad, not the destination.
Way #3: Drill Smart (Games, flashcards, and real songsaka “make it stick”)
You can understand a concept and still freeze when asked to name a note quickly. That’s not failurethat’s
just your brain saying, “I need repetition… but could you make it less boring?”
This method is about fast recall through short, consistent practice. Think “snack-sized drills,” not
“two hours of flashcards that end in existential questions.”
The best practice formula: short + frequent + mixed
- Short: 3–10 minutes per drill keeps attention high.
- Frequent: daily beats weekly marathons almost every time.
- Mixed: rotate keyboard naming, staff naming, and playing simple music.
Three drill types that work
1) Note-identification bursts (keyboard + staff)
Use online note-identification exercises or flashcards. Set a timer for 90 seconds and go for speed with accuracy.
Aim to improve graduallyyour “score” is consistency, not perfection.
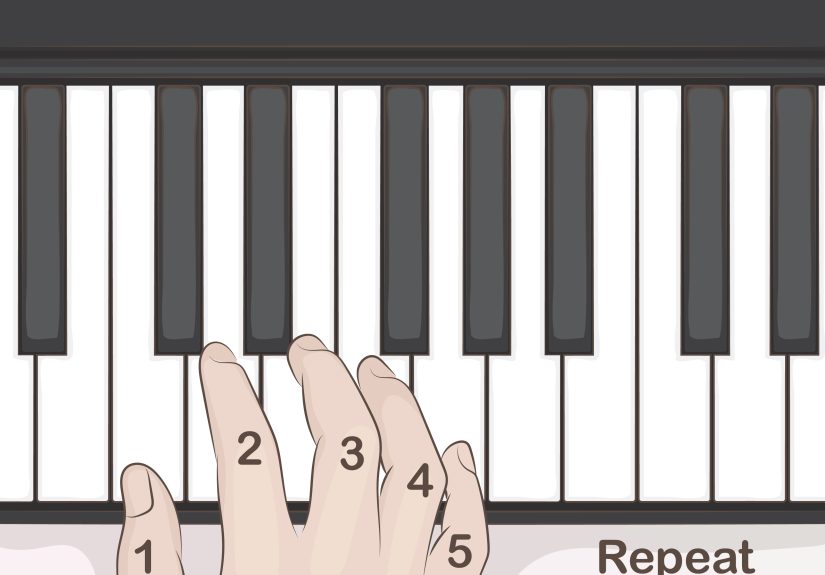
2) “Landmark expansion” drills
Pick one landmark note (Middle C, Treble G, Bass F). Then practice naming and playing notes within a
five-note range around it. Expand the range as it gets easy. This builds confidence without overload.
3) Real-music reading (the ultimate test)
Choose very easy pieces that stay near a landmark range. Read slowly, hands separate, and keep going.
Real music is where note recognition becomes automatic, because your brain starts chunking patterns
instead of reading single notes like separate words.
A simple 10-minute daily plan (no fluff, no guilt)
- 2 minutes: Keyboard geography speed round (find C’s and F’s; name nearby notes).
- 3 minutes: Staff landmarks (Middle C + one step/skip drills; say notes out loud).
- 3 minutes: Flashcards/app note identification (timed).
- 2 minutes: Play a tiny excerpt of easy music (slow, steady, accurate).
How to know you’re improving (real signs)
- You stop counting white keys and start “seeing” C, F, and G instantly.
- You recognize common clusters (like C–E–G) without naming each note separately.
- You can read a beginner line and keep movingeven if you’re not fast yet.
Common mistake to avoid
Don’t practice note reading only with isolated flashcards. Flashcards build recognition, but songs build fluency.
You need both: the gym and the actual game.
Which way should you choose?
If you want the shortest path, here’s the truth: most people do best when they combine them.
But if you’re choosing a starting point:
- If you feel “lost on the keyboard”: start with Way #1 (keyboard geography).
- If sheet music looks like secret code: start with Way #2 (landmark notes on the staff).
- If you know it but freeze under pressure: lean into Way #3 (short recall drills + simple songs).
The goal isn’t to “memorize all notes forever.” The goal is to build a fast, reliable system:
landmarks → nearby notes → patterns → fluent reading.
Conclusion
Learning keyboard notes doesn’t require superpowers, perfect pitch, or a childhood spent at a grand piano.
It requires a map (keyboard geography), a translator (landmark notes on the staff), and a routine that turns
knowledge into reflex (smart drills and real songs).
Start small, stay consistent, and celebrate the moment when your hands go to the right keys before your
brain finishes the sentence. That’s not luckthat’s your system working.
Experience-Based Add-On: What Practice Feels Like in the Real World (and why that’s normal)
Here’s something almost every beginner experiences: the keyboard makes sense intellectually, but your hands
don’t “believe” you yet. You can explain that C is left of two black keys… and then still hunt for C like it’s
hiding behind witness protection. That gap is normal. Your brain is building a new kind of memoryfast visual
recognitionsimilar to how you recognize a friend’s face without listing their features.
In the first week, most learners have an “aha” moment with Way #1. They stop counting and start scanning.
The fun part is how quickly the keyboard stops looking random. People often report that they begin to notice
the two-and-three black key pattern everywhereon digital keyboards, on printed diagrams, even in piano
videos. It’s like learning a new word and suddenly hearing it in every conversation.
Week two is when Way #2 can feel both magical and mildly irritating. Magical because Middle C finally acts
like a bridge between the staffs; irritating because you realize you can’t “just memorize” your way through
sheet music at speed. This is where landmark notes shine. Instead of trying to recall every note instantly,
you lean on anchors and move by steps and skips. Many students describe it as switching from “guessing” to
“solving.” It’s slower at first, but it’s dependableand dependable wins long-term.
Week three is usually the moment you discover why Way #3 exists. You’ll think you know the notes… until you
try to name them quickly. Suddenly your brain turns into a spinning loading icon. The solution isn’t more
willpower; it’s more tiny reps. This is why 90-second drills are so effective: you practice recall without
draining your attention. And because they’re short, you’re more likely to do them dailywhich matters more
than one heroic Saturday session that ends with you bargaining with yourself.
A super common “real life” pattern is the two-step progress: (1) you learn landmarks, then (2) your eyes begin
to recognize chunks. For example, you stop reading C–E–G as three separate notes and start seeing it as a
familiar shape. Or you stop decoding every staff note individually and start feeling interval movementup a
step, down a third, repeat the same note. This is the beginning of true fluency, and it’s why beginner music
sometimes gets easier suddenly, not gradually.
Another real-world observation: your accuracy improves faster when you say note names out loud.
It feels silly at first (“I’m an adult, why am I narrating my fingers?”), but it forces your brain to complete the
identification loop: see → name → play. That loop is the entire skill. Quiet practice is fine, but “out loud”
practice is often faster.
Finally, you’ll probably have days when everything clicks and days when nothing clicks. That doesn’t mean
you’re backsliding. It usually means you’re tired, distracted, or practicing too long in one sitting. If you hit a
wall, shrink the task: find all the C’s, then quit. Do one landmark drill, then quit. “Small and consistent” is
not a motivational posterit’s how the brain actually wires recognition skills.
If you want a simple, realistic promise: after a few weeks of combining these three methods, you’ll spend far
less time searching for notes and far more time actually playing music. And that’s the whole point.


