Table of Contents >> Show >> Hide
- What You Need Before Threading the Brother LS 2125i
- Way 1: Wind the Bobbin Correctly
- Way 2: Insert the Bobbin Into the Bobbin Case
- Way 3: Thread the Upper Thread Path
- Way 4: Draw Up the Lower Thread and Test the Stitch
- Troubleshooting Threading Problems on the Brother LS 2125i
- Helpful Threading Tips for Beginners
- Real-World Experience: What Threading the Brother LS 2125i Teaches You
- Conclusion
Threading a sewing machine can feel a little like solving a tiny mechanical mystery: one loop goes left, another guide hides in plain sight, and somehow the bobbin has opinions. The good news? The Brother LS 2125i is a friendly, beginner-focused mechanical sewing machine, and once you understand the correct thread path, it becomes much less mysterious and much more “let’s hem these pants before dinner.”
This guide breaks the process into four practical ways to thread a Brother LS 2125i sewing machine: winding the bobbin, loading the bobbin case, threading the upper thread, and drawing up the lower thread before sewing. Each part matters. Skip one tiny guide or load the bobbin backward, and your machine may reward you with skipped stitches, thread nests, or that dramatic clunk that makes every beginner freeze.
Before you start, turn the machine off, raise the presser foot, and move the needle to its highest position by turning the handwheel toward you. That one habit can save thread, fabric, needles, and nerves.
What You Need Before Threading the Brother LS 2125i
Before threading your Brother LS 2125i, gather the basics: quality all-purpose sewing thread, the correct bobbin, sharp scissors, a compatible sewing machine needle, and a scrap of fabric for testing. The LS 2125i uses a front-loading bobbin case system, so the bobbin must be inserted correctly into the removable metal bobbin case before sewing.
Use bobbins designed for this machine type. A bobbin that looks “close enough” can still cause uneven tension, noisy stitching, thread jams, or needle breakage. Sewing machines are surprisingly picky for devices that spend their lives making straight lines.
Way 1: Wind the Bobbin Correctly
The bobbin supplies the lower thread. If it is wound unevenly, too loosely, or with thread tangled around the bobbin shaft, your stitches may look messy before you even begin. A neat bobbin is the quiet hero of smooth sewing.
Step-by-Step Bobbin Winding
- Place your spool of thread on the spool pin at the top of the machine.
- Guide the thread around the bobbin winding pre-tension disc or thread guide.
- Pass the thread end through the small hole in the bobbin from the inside to the outside.
- Place the bobbin onto the bobbin winder shaft.
- Push the bobbin winder shaft to the right so the machine enters bobbin-winding mode.
- Hold the thread tail and gently press the foot controller to wind several turns.
- Stop, trim the excess thread tail close to the bobbin, then continue winding.
- When the bobbin is full or begins slowing down, stop the machine.
- Cut the thread, push the bobbin winder shaft back to the left, and remove the bobbin.
A properly wound bobbin should look smooth and even, not lumpy, loose, or cone-shaped. If the thread piles up on one side, unwind it and try again. Yes, it feels annoying. No, it is not wasted time. A bad bobbin is basically a tiny spool of future frustration.
Common Bobbin Winding Mistakes
The most common mistake is forgetting to pass the thread around the pre-tension disc before winding. Without that tension, the bobbin may wind loosely and create loops under the fabric. Another common issue is leaving a long thread tail sticking out from the bobbin. Trim it after the first few turns so it does not wrap around the mechanism.
Also remember to push the bobbin winder shaft back to the left after winding. If it stays to the right, the needle bar may not move for normal sewing. This is not the machine being dramatic; it is simply still in bobbin-winding mode.
Way 2: Insert the Bobbin Into the Bobbin Case
The Brother LS 2125i uses a removable bobbin case behind the shuttle cover. This is different from many newer drop-in bobbin machines, so the direction of the thread and the bobbin case placement are especially important.
How to Load the Bobbin Case
- Turn the machine off.
- Raise the needle to its highest position by turning the handwheel toward you.
- Raise the presser foot lever.
- Open the shuttle cover at the front of the machine.
- Pull the bobbin case latch toward you and remove the bobbin case.
- Unwind about 4 inches of thread from the full bobbin.
- Insert the bobbin into the bobbin case so the thread unwinds in the correct direction.
- Pull the thread through the slot in the bobbin case.
- Guide it under the tension spring until it exits through the delivery eye.
- Hold the latch, insert the bobbin case fully into the shuttle race, then release the latch.
The bobbin case should click or settle securely into place. If it feels loose, remove it and try again. The bobbin case finger must fit into the notch at the top of the shuttle race. If it is not seated properly, the machine may jam, make noise, or fail to pick up the lower thread.
Why Bobbin Direction Matters
The bobbin thread must feed through the bobbin case tension spring properly. If the bobbin unwinds in the wrong direction, the lower thread tension can become uneven. This may cause thread loops, puckered seams, broken needles, or stitches that look like they were assembled during an earthquake.
When in doubt, remove the bobbin and reload it slowly. You should feel gentle resistance when pulling the thread through the bobbin case. If it slides out too freely or catches sharply, recheck the path.
Way 3: Thread the Upper Thread Path
The upper thread forms the top half of the stitch. On the Brother LS 2125i, it travels from the spool pin through the thread guides, down around the upper tension control dial, up through the take-up lever, down behind the needle bar thread guide, and finally through the needle from front to back.
How to Thread the Top of the Brother LS 2125i
- Raise the presser foot. This opens the tension discs so the thread can seat correctly.
- Raise the needle and thread take-up lever to the highest position by turning the handwheel toward you.
- Place the spool on the spool pin.
- Feed the thread through the rear thread guide first, then the front thread guide.
- Pull the thread down and around the upper tension control dial from right to left.
- Make sure the thread catches the thread check spring.
- Bring the thread up and pass it through the take-up lever from right to left.
- Bring the thread down and place it behind the needle bar thread guide above the needle.
- Thread the needle from front to back.
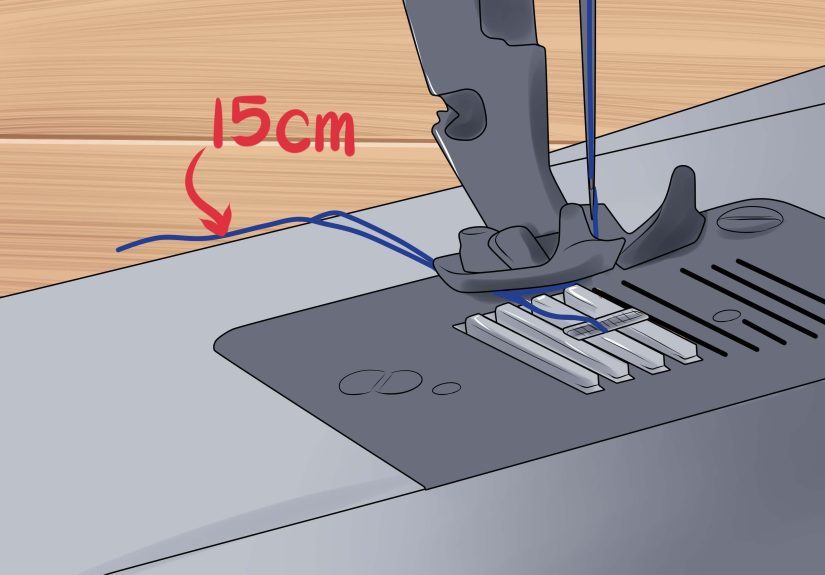
- Pull about 2 inches of thread through the needle.
The take-up lever is easy to miss if it is not raised. If the take-up lever is hidden low inside the machine, the thread cannot wrap around it properly. That small skipped step can cause the upper thread to jump, snap, or form a nest under the fabric.
Presser Foot Up or Down?
Raise the presser foot while threading the upper path. When the presser foot is up, the tension discs open and allow the thread to slide into place. When the presser foot is down, the discs close. If you thread with the presser foot down, the thread may sit outside the tension discs, leading to loose stitches, looping, or bunching underneath the fabric.
After threading, lower the presser foot before sewing. The raised-foot position is for threading and fabric placement; the lowered-foot position is for stitching. Sewing with the presser foot up is like driving with the door open: technically something may move, but it will not be graceful.
Way 4: Draw Up the Lower Thread and Test the Stitch
Once the upper thread and bobbin are in place, you need to draw the lower thread up through the needle plate. This step connects the top and bottom thread systems so the machine can form balanced lockstitches.
How to Bring Up the Bobbin Thread
- Hold the end of the upper thread lightly with your left hand.
- Turn the handwheel toward you one full turn so the needle goes down and comes back up.
- Gently pull the upper thread. A loop of lower thread should come up through the needle plate.
- Use scissors, a pin, or your fingers to pull the bobbin thread loop out fully.
- Pull both thread tails under the presser foot and toward the back of the machine.
- Leave about 4 to 6 inches of thread tail before beginning to sew.
Do not turn the handwheel away from you. On most home sewing machines, including this style of Brother machine, turning the handwheel backward can disturb the stitch cycle and create thread tangles. Always turn it toward you, slowly and confidently, as if you know exactly what you are doingeven if this is your first sewing day.
Test Before Sewing Your Project
Before sewing your actual fabric, test on a scrap of similar material. A good stitch should look balanced on both sides, with no loops, knots, puckers, or thread nests. If the upper thread shows heavily underneath, rethread the upper path and check the tension. If the bobbin thread pulls to the top, the upper tension may be too tight or the bobbin may not be seated correctly.
For many everyday sewing projects, a middle upper tension setting works well, but fabric, thread, and needle size can change the results. Lightweight cotton, denim, knit fabric, and thick seams each behave differently. Test stitching is not a beginner crutch; it is what experienced sewists do so they do not accidentally decorate a project with chaos.
Troubleshooting Threading Problems on the Brother LS 2125i
Problem: Thread Bunches Under the Fabric
Thread bunching underneath often looks like a bobbin problem, but it is frequently caused by incorrect upper threading. Remove the upper thread completely and rethread the machine with the presser foot raised. Make sure the thread passes through the tension discs, take-up lever, and needle bar thread guide.
Problem: Machine Will Not Pick Up the Bobbin Thread
If the Brother LS 2125i will not pick up the lower thread, check that the needle is installed correctly with the flat side facing the back. Make sure the needle is not bent or dull. Confirm that the bobbin case is fully inserted and that you are holding the upper thread lightly while turning the handwheel toward you.
Problem: Needle Thread Keeps Breaking
Needle thread can break when the machine is threaded incorrectly, the upper tension is too tight, the spool is catching, or the needle is damaged. Replace the needle, rethread the upper path, and inspect the thread for knots or rough spots. Cheap old thread can also snap easily, especially if it has been sitting in a sunny drawer since the era of questionable wallpaper.
Problem: Stitches Skip or Look Uneven
Skipped stitches may come from the wrong needle type, a dull needle, poor threading, mismatched thread and fabric, or a bobbin that is not wound evenly. Use a universal needle for woven cotton, a ballpoint or stretch needle for knits, and a stronger needle for heavier fabrics. Match the thread weight to the fabric whenever possible.
Helpful Threading Tips for Beginners
Threading gets easier when you build a routine. First, turn off the machine. Second, raise the needle. Third, raise the presser foot. Fourth, follow the guides in order. Fifth, pull both thread tails to the back before sewing. That simple checklist prevents most beginner threading problems.
Keep the bobbin area clean, too. Lint, broken thread pieces, and fabric fuzz can collect around the shuttle race. Use a small brush to clean the area regularly, especially after sewing flannel, fleece, denim, or other lint-producing fabrics. Do not blow into the machine; moisture from your breath can push lint deeper into the mechanism.
Another smart habit is changing the needle more often than you think. A dull needle can cause skipped stitches, popping sounds, fabric snags, and thread shredding. If your sewing suddenly gets ugly after everything was working fine, the needle is one of the first things to check.
Real-World Experience: What Threading the Brother LS 2125i Teaches You
The first time you thread a Brother LS 2125i sewing machine, it may feel like the machine has too many small hooks and not enough mercy. The spool pin is simple enough, the upper guides seem friendly, and then suddenly you are staring at the bobbin case like it just asked you a riddle. That learning curve is normal. In fact, threading this type of mechanical machine is one of the best ways to understand how sewing really works.
One practical lesson is that sewing machines reward patience. Rushing the upper thread through the guides often leads to missed tension discs or a skipped take-up lever. The machine may still move, but the stitch quality will complain immediately. When you slow down and thread in the correct order, the LS 2125i becomes much more predictable. The thread glides smoothly, the needle catches the bobbin thread, and the first seam looks less like spaghetti and more like actual sewing.
Another experience many beginners share is blaming the bobbin too quickly. When thread bunches underneath, it feels logical to accuse the bobbin because the mess is under the fabric. But many times, the real culprit is the upper thread not seated in the tension discs. This is why rethreading the top thread with the presser foot raised is such a powerful fix. It takes less than a minute and solves a surprising number of problems.
The front-loading bobbin case also teaches careful handling. Unlike drop-in bobbins, this system asks you to remove the bobbin case, place the bobbin inside, guide the thread through the slot and spring, and insert the case back into the shuttle race. At first, that seems fussy. After a few tries, it becomes satisfyinglike clicking a puzzle piece into place. The key is not forcing anything. If the case does not seat correctly, remove it and try again rather than pushing harder.
Testing on scrap fabric is another habit that comes from experience. Beginners often want to jump straight into the real project, especially when the fabric is pretty and the idea is exciting. But one test seam can reveal tension issues, needle problems, or threading mistakes before they ruin your actual piece. A scrap test is the sewing version of tasting soup before serving it. It is quick, smart, and occasionally saves the whole meal.
Over time, threading the Brother LS 2125i becomes muscle memory. You will know the sound of a properly seated bobbin case. You will notice when the thread feels too tight. You will recognize the difference between a tension issue and a dull needle. Most importantly, you will stop fearing the machine. Threading is not just setup; it is a small conversation with the tool. Once you understand what the machine is asking for, it answers with clean seams, tidy hems, and the quiet confidence of fabric behaving itself.
Conclusion
Learning how to thread a Brother LS 2125i sewing machine is really about mastering four connected steps: winding the bobbin evenly, inserting the bobbin case correctly, threading the upper path in the right order, and drawing up the lower thread before sewing. Each step supports the next. When all four are done properly, the machine can form strong, balanced stitches without bunching, skipping, or snapping thread.
The most important habits are simple: turn the machine off before threading, raise the presser foot, raise the needle and take-up lever, use the correct bobbin, thread the needle from front to back, and always test on scrap fabric. Once you repeat the process a few times, threading the Brother LS 2125i stops feeling intimidating and starts feeling like the opening move of every good sewing project.
Note: This article is based on real Brother LS 2125i threading procedures, standard sewing-machine setup practices, and practical beginner troubleshooting experience. Always consult your machine’s official manual for model-specific safety and maintenance instructions.


