Table of Contents >> Show >> Hide
- What a Pilot Hole Does (and Why Your Wood Cares)
- Quick Tool Checklist for Clean, Confident Pilot Holes
- 7 Pro Tips for Drilling Perfect Pilot Holes
- Tip 1: Mark the Spot Like You Mean It (Pencil or Painter’s Tape Works)
- Tip 2: Make a Starter Dimple So the Bit Doesn’t Skate
- Tip 3: Choose the Right Drill Bit Size (Match the Shank, Not the Ego)
- Tip 4: Clamp the Boards So Nothing Shifts Mid-Drill
- Tip 5: Keep the Bit Perpendicularand Start Slow
- Tip 6: Control Depth So You Don’t Drill to the Center of the Earth
- Tip 7: No Drill? You Can Still Make a Pilot Hole in a Pinch
- Common Pilot Hole Problems (and Fast Fixes)
- Pro Notes for Special Situations
- Real-World Experience Notes (500+ Words): Where Pilot Holes Pay Off Fast
- Conclusion
Pilot holes are the unsung heroes of woodworking: small, simple, and weirdly capable of saving your project from a split-board meltdown.
If you’ve ever driven a screw near the end of a board and heard that tiny “crack” that sounds like your weekend plans breaking in halfwelcome.
The cure is usually a pilot hole.
The best part? Drilling pilot holes doesn’t require wizard-level tool skills. It just requires doing a few small things on purpose
(a bold concept in DIY). Below are seven pro-approved tipsbased on the classic Bob Vila guidance and expanded with shop-tested
techniquesso your screws go in straight, your wood stays intact, and your future self stops side-eyeing every fastener.
What a Pilot Hole Does (and Why Your Wood Cares)
A pilot hole is a small pre-drilled hole that guides a screw or nail into place. It reduces the force needed to drive the fastener,
helps prevent wood from splitting (especially near edges), and improves accuracy so the fastener doesn’t wander off at a dramatic angle.
It’s also a quiet confidence boost: you’re basically telling the screw, “This is your lane. Please stay in it.”
Pilot Hole vs. Clearance Hole vs. Countersink (Quick, Useful Definitions)
- Pilot hole: Sized so the screw’s threads can bite into wood while the screw goes in without splitting the board.
- Clearance hole: A larger hole in the top piece so the screw can pass through freely and pull the boards tightly together.
- Countersink: A cone-shaped recess so a flat-head screw sits flush (or slightly below) the surface.
You don’t need all three every time. But knowing the difference helps you choose the right “level” of prepanything from quick-and-clean
to furniture-grade perfection.
Quick Tool Checklist for Clean, Confident Pilot Holes
- Drill/driver with variable speed (cordless is fine)
- Drill bits (a basic set plus a few common sizes you use often)
- Awl, nail, or center punch (for starter dimples)
- Painter’s tape and a pencil (layout + depth marking)
- Clamps (even one clamp helps more than you’d think)
- Countersink bit or combo drill/countersink bit (optional, but very satisfying)
- Scrap wood (for testingbecause “measure twice” also means “practice once”)
7 Pro Tips for Drilling Perfect Pilot Holes
Tip 1: Mark the Spot Like You Mean It (Pencil or Painter’s Tape Works)
Pilot holes are tiny, which means being “a little off” is still… off. Measure carefully, then mark your drill location with a pencil.
For extra controlespecially on finished woodput an “X” of painter’s tape over the spot and mark on the tape. The tape helps reduce
surface splintering and gives your drill bit a little more grip.
Example: Installing cabinet hardware? Tape the face frame, mark your hole centers, and you’ll avoid that heartbreaking
“oops” hole that turns a clean install into a creative story about why the handle is “intentionally asymmetrical.”
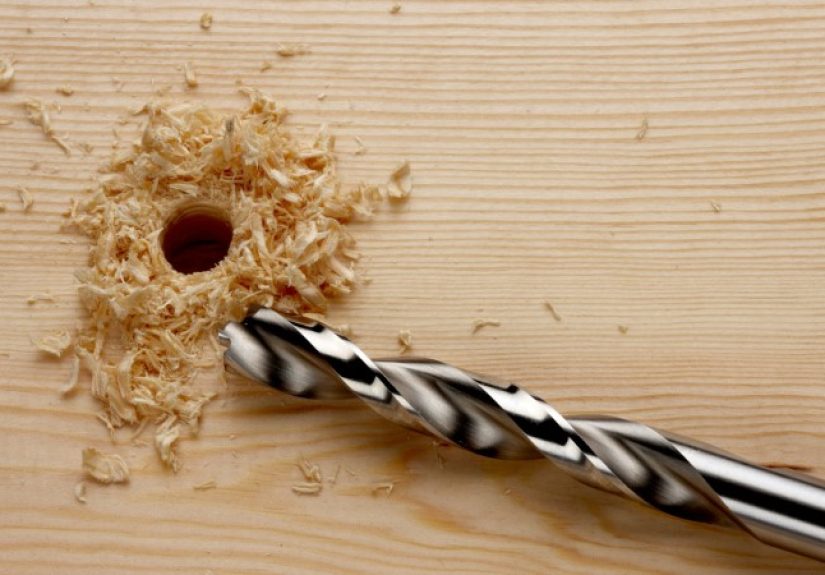
Tip 2: Make a Starter Dimple So the Bit Doesn’t Skate
Wood grain, glossy finishes, and angled drilling can cause your bit to wander at the start. Fix that by making a small indentation
right on your mark using an awl or the tip of a nail. This “dimple” gives the drill bit a starting point so it doesn’t slip and
scratch the surface.
If you do a lot of woodworking, consider using a brad-point bit for pilot holes in wood. The sharp center point helps the bit start
exactly where you place it, and the cutting spurs tend to leave cleaner edges than a standard twist bit.
Tip 3: Choose the Right Drill Bit Size (Match the Shank, Not the Ego)
The goal is simple: the hole should be big enough that the screw goes in smoothly, but small enough that the threads still bite
into solid wood. A classic rule of thumb:
- For nails: use a bit slightly smaller than the nail’s shank.
- For screws: use a bit about the size of the screw’s shank/body (not including the threads).
A quick field method: hold the drill bit in front of the screw. In good light, you should be able to see the threads “peeking out”
on both sides of the bit, while the bit covers the screw’s core. If the bit hides the threads too, it’s probably too big.
Hardwood vs. softwood matters: dense hardwoods (oak, maple) often need a slightly larger pilot hole than softwoods
(pine, cedar) to reduce splitting and prevent snapping screws. When you’re unsure, start slightly smalleryou can always enlarge the hole,
but you can’t un-split wood.
Mini Reference: Common Pilot Hole Examples (Wood Screws)
Different charts exist, but here’s a practical snapshot many DIYers use for common screw sizes. Always test on scrap if the wood is
unusually hard, knotty, or prone to splitting.
| Screw Size | Softwood Pilot (example) | Hardwood Pilot (example) | Notes |
|---|---|---|---|
| #6 | 3/32″ | 7/64″–9/64″ | Good for light hinges, trim, small brackets |
| #8 | 7/64″ | 1/8″–11/64″ | Common for general woodworking and hardware |
| #10 | 1/8″ | 9/64″–13/64″ | Heavier fastening; test in hardwoods |
Pro-level add-on: If you’re joining two boards, consider drilling a clearance hole in the top board (close to the screw’s
major diameter) so the screw can pull the boards tight without “bridging” or holding them slightly apart.
Tip 4: Clamp the Boards So Nothing Shifts Mid-Drill
Even a tiny shift while drilling can misalign pilot holes, especially when you’re fastening two pieces together. Clamping keeps the work
stable and frees both hands to control the drill. If you’re gluing and screwing, clamp first for tight jointsthen the screws act more like
helpers than bullies.
Example: Building a simple shelf bracket? Clamp the upright and the shelf support together before drilling. Your screw will
go in straighter, the joint will close tighter, and you’ll be less likely to “steer” the drill to compensate (which usually ends in angled
holes and silent frustration).
Tip 5: Keep the Bit Perpendicularand Start Slow
A perfect pilot hole is straight. The easiest way to drill straight with a handheld drill is to start at low speed with light pressure,
keeping the drill perpendicular to the surface. Once the bit is seated and cutting cleanly, you can increase speed slightly.
If you struggle with keeping a consistent angle, use a simple visual reference: line the drill up with a small square, or check your drill’s
alignment from two directions (front and side) before committing. For precision-heavy work (cabinetry, hardware alignment), a drill guide
or drill press can make “straight” feel effortless.
Tip 6: Control Depth So You Don’t Drill to the Center of the Earth
Drill the pilot hole to about the same depth as the screw (or slightly deeper). Too shallow and the screw still fights you; too deep and you
reduce holding power. The easiest depth trick is old-school and reliable: wrap painter’s tape around the bit as a depth flag, or use a drill
stop collar for repeatable accuracy.
When you hit your depth mark, back the bit out slowly while keeping the drill straight. Yanking the bit out fast can enlarge the hole or
tear the fibers near the surfaceespecially in softer woods.
Bonus: Countersink for a Clean, Flush Finish
If you’re using flat-head screws, add a countersink so the screw head sits flush (or slightly below the surface). This looks cleaner,
helps prevent wood fibers from “volcanoing” around the screw head, and makes sanding/finishing easier. Combination drill/countersink bits can
speed things up when you’re doing a lot of identical holes.
Tip 7: No Drill? You Can Still Make a Pilot Hole in a Pinch
If you don’t have a power drill available, you can still create a workable pilot hole: choose a nail about the size of the screw’s shank,
tap it straight into the wood to the needed depth, then pull it out. You’ve now created a rough pilot hole that can reduce splitting and make
driving the screw far easier with a manual screwdriver.
This is especially handy for quick fixes, light hardware installs, or situations where you’d rather not haul out the whole tool kit.
Is it as clean as a drilled pilot hole? No. Is it better than splitting your workpiece and pretending you “meant to do that”? Absolutely.
Common Pilot Hole Problems (and Fast Fixes)
- The wood splits anyway: Your pilot hole may be too small, too close to the edge, or you’re forcing a large screw into dense wood. Size up slightly and try again.
- The screw feels loose: The pilot hole may be too large. If it’s already drilled, fill with a glued dowel or wood plug, let it cure, then re-drill.
- The bit “wanders” at the start: Use the awl/nail dimple trick (Tip 2) and start drilling slowly.
- The screw snaps in hardwood: Use the right pilot size, avoid over-torque, and consider lubricating the screw threads with paraffin or beeswax.
- Ragged edges around the hole: Use painter’s tape on the surface, try a brad-point bit, and keep the drill steady.
Pro Notes for Special Situations
Hardwoods (Oak, Maple, Hickory) Require More Respect
Hardwoods don’t forgive undersized pilot holes. If you’re driving long screws, consider stepping up the pilot size slightly, drilling a
clearance hole in the top piece, and lubricating the screw with paraffin or beeswax. You’ll drive the screw more smoothly and reduce the odds
of snapping the head off mid-install (which is a special kind of heartbreak).
MDF and Plywood: Drill Near Edges, Drill Carefully
MDF can bulge and crumble if you drive screws without prepespecially close to edges. Plywood can splinter or “mushroom” on the surface. A pilot
hole plus a light countersink tends to produce cleaner results and better-looking fastener seats.
Lag Screws and Structural Fasteners: Think in Two Holes (Lead + Clearance)
For lag screws (and many structural fasteners), you often need:
(1) a clearance hole through the top board so the lag can spin freely and pull boards tight, and
(2) a smaller pilot/lead hole in the framing member sized near the lag’s root/minor diameter so threads bite without splitting.
For wet pressure-treated lumber, pros sometimes slightly increase hole sizes because the wood can tighten back up as it dries.
Important: For decks, ledgers, and other safety-critical connections, follow fastener manufacturer instructions and local code.
Pilot holes aren’t just “nice to have” herethey can affect connection strength and reduce the risk of splitting.
Real-World Experience Notes (500+ Words): Where Pilot Holes Pay Off Fast
People often think pilot holes are “extra work,” but in real projects they’re usually the shortcut. Not because drilling is faster than screwing
(it isn’t), but because pilot holes prevent the problems that eat time: split boards, crooked screws, stripped heads, and joints that refuse to
close. Here are common real-world moments where pilot holes quietly save the day.
1) Hanging shelves into studs: A long screw into a stud can wander if it meets dense grain. A pilot hole helps the screw track
straight and reduces the chance of cam-out (when the driver slips and chews up the head). The result is less wall drama and more “this shelf is
not going anywhere” confidence.
2) Building picture frames and small boxes: Thin stock splits easily, especially at the ends. Pilot holes let you fasten near
corners without turning your carefully cut miters into a tiny wooden explosion. For delicate work, the starter dimple (awl/nail) matters even
more than you’d expectit keeps the bit from skating off the narrow edge.
3) Installing hinges and hardware: Hinge screws are small, and small screws love to snap in hardwoods or tight-grained material.
A properly sized pilot hole is the difference between a smooth install and an evening spent learning new words you probably shouldn’t say around
family. Many woodworkers treat hinge pilots as non-negotiable, even when they “could probably get away with it.”
4) Working with reclaimed lumber: Old boards can be dry, brittle, and full of surprises. Pilot holes reduce the stress that
causes cracking, especially when the grain is unpredictable. If you’re using reclaimed wood with knots, mineral streaks, or mixed density,
testing pilot sizes on scrap from the same board can prevent a lot of avoidable mistakes.
5) Pocket-hole joinery and furniture builds: Pocket-hole systems handle much of the drilling for you, but the principle still
shows up everywhere else in furniture: you want clean, repeatable fasteners that pull joints tight without shifting parts. Clamping plus pilot
holes is a classic combolike peanut butter and jelly, but with fewer sticky fingers and more accurate alignment.
6) Deck and outdoor projects: Pressure-treated lumber is often wet and prone to splitting as it dries. Pilot holes (and the right
clearance holes for lags) help prevent cracks that can run along bolt lines. Outdoors, a split board isn’t just uglyit can shorten the life of
the assembly as water and movement exploit every weakness.
7) “One screw left” situations: This is the moment where patience disappears: you’ve driven 47 screws successfully and decide the
last one doesn’t need a pilot hole because you’re “basically done.” The universe hears this and responds with a split board or a snapped screw.
The practical lesson: if pilot holes mattered on screw #1, they matter on screw #48. Consistency is boringbut boring is how projects get finished.
In short, pilot holes aren’t about being fancy. They’re about control. Control of where the screw goes, how the wood behaves, and how the joint
tightens. Once you’ve experienced a clean, straight, split-free install (especially in hardwood), drilling pilots stops feeling like a chore and
starts feeling like the moment you quietly take charge of the project.
Conclusion
Drilling perfect pilot holes is one of the easiest ways to make DIY work look more professionaland behave more reliably. Mark carefully, start
with a dimple, choose the right bit size, clamp your work, drill straight at a controlled speed, and manage your depth. Add countersinks and
clearance holes when the project calls for it, and don’t be afraid to use the “nail method” when tools are limited. Your boards will split less,
your screws will seat cleaner, and you’ll spend more time building and less time fixing.


