Table of Contents >> Show >> Hide
- Why This Cherry Pie Recipe Works
- Ingredients for Cherry Pie with a Lattice Crust
- How to Make the Pie Crust
- Make the Cherry Filling
- Assemble the Bottom Crust
- How to Make a Lattice Crust Without Panic
- Egg Wash, Bake Time, and the Secret to a Golden Top
- Cool Completely Before Slicing
- Tips for the Best Cherry Pie Every Time
- Serving Ideas and Storage
- Common Mistakes to Avoid
- Why a Lattice Crust Makes Cherry Pie Better
- Experience Notes: What Baking Cherry Pie Really Feels Like
- Conclusion
Some desserts whisper. Cherry pie struts into the room like it owns the place. And honestly? With its glossy ruby filling and golden woven top, it kind of does. A good cherry pie with a lattice crust is equal parts comfort food and edible show-off: juicy fruit, flaky pastry, buttery aroma, and that satisfying moment when everyone suddenly becomes very interested in dessert.
This recipe is built for home bakers who want a classic cherry pie that tastes as good as it looks. You will get a rich, sliceable filling, a crisp bottom crust, and a lattice top that says, “Yes, I made this,” without requiring pastry-school trauma. Whether you are baking for a summer cookout, a holiday table, or just a random Tuesday that needed improvement, this pie earns its spot.
Why This Cherry Pie Recipe Works
The best homemade cherry pie balances sweetness, tartness, and texture. Too much sugar and the filling tastes flat. Too little thickener and your first slice becomes cherry soup in a trench coat. This version solves both problems with a thoughtful mix of fruit, sugar, lemon juice, and a reliable thickener that helps the filling set without turning gummy.
The lattice crust is not just for looks, either. Those woven strips help steam escape while the filling bubbles and thickens in the oven. Translation: prettier pie, better texture, fewer dramatic filling eruptions. We love a dessert with both beauty and common sense.
Ingredients for Cherry Pie with a Lattice Crust
For the Double Pie Crust
- 2 1/2 cups all-purpose flour
- 1 tablespoon granulated sugar
- 1 teaspoon kosher salt
- 1 cup unsalted butter, very cold and cut into cubes
- 6 to 8 tablespoons ice water
For the Cherry Pie Filling
- 6 cups cherries, pitted (sweet cherries, tart cherries, or a mix)
- 3/4 to 1 cup granulated sugar, depending on the tartness of the fruit
- 1/4 cup cornstarch
- 1 tablespoon tapioca starch or quick-cooking tapioca (optional, but helpful for a firmer filling)
- 1 tablespoon fresh lemon juice
- 1 teaspoon lemon zest
- 1/4 teaspoon salt
- 1/2 teaspoon vanilla extract
- 1/4 teaspoon almond extract
- 1 tablespoon unsalted butter, cut into small pieces
For Finishing
- 1 egg
- 1 tablespoon water or milk
- Coarse sugar for sprinkling
Ingredient note: Fresh cherries are wonderful when in season, but frozen cherries work beautifully too. Just thaw and drain excess liquid before mixing the filling. If you use only sweet cherries, keep the lemon juice in the recipe; it wakes everything up and keeps the flavor from drifting into one-note jam territory.
How to Make the Pie Crust
Start with the crust because flaky pastry loves cold ingredients and a little patience. In a large bowl, whisk together the flour, sugar, and salt. Cut in the cold butter using a pastry cutter or your fingertips until the mixture looks shaggy with pea-size and bean-size bits of butter throughout. Those butter pieces are not a mistake. They are your future flaky layers, and they deserve respect.
Drizzle in the ice water, a tablespoon at a time, tossing gently until the dough begins to clump. Press a handful together; if it holds, stop adding water. Divide the dough into two disks, one slightly larger than the other, wrap them well, and chill for at least 1 hour. A rushed pie crust is like a bad haircut: technically fixable, but why create the problem in the first place?
Make the Cherry Filling
In a large bowl, combine the cherries, sugar, cornstarch, optional tapioca, lemon juice, lemon zest, salt, vanilla, and almond extract. Stir until the fruit is evenly coated. Let the mixture sit for about 10 to 15 minutes while you roll the crust. This gives the sugar time to draw out some juice, which helps the thickener distribute more evenly.
If your cherries are especially juicy, transfer the mixture to a saucepan and cook it over medium heat for 3 to 5 minutes, just until the juices begin to thicken slightly. Then cool it for a few minutes before filling the pie. That extra step can make the difference between a neat slice and a plate that looks like a red weather event.
Assemble the Bottom Crust
Preheat the oven to 425°F. Place a baking sheet on the lower rack while the oven heats; this helps the bottom crust bake more thoroughly.
Roll the larger dough disk on a lightly floured surface into a circle about 12 to 13 inches wide. Transfer it to a 9-inch pie dish, letting the dough settle naturally into the corners without stretching. Trim the overhang to about 1 inch. Spoon in the cherry filling and spread it evenly, then dot the top with the small pieces of butter.
How to Make a Lattice Crust Without Panic
Roll out the second dough disk into a roughly 12-inch circle. Use a knife, pizza cutter, or pastry wheel to cut it into even strips, about 1/2 to 1 inch wide. Wider strips create a more dramatic, rustic look and are easier to weave, especially if this is your first lattice pie crust.
Lay half of the strips across the pie in one direction. Fold back every other strip halfway. Place one strip across the center in the opposite direction, then unfold the folded strips back over it. Next, fold back the alternate strips and place another cross strip. Repeat until the whole top is woven. Trim the ends, tuck them under the edge of the bottom crust, and crimp as desired.
If the dough starts to feel soft or sticky at any point, chill the assembled pie for 10 to 15 minutes before baking. Cold dough holds its shape better and browns more beautifully. Warm dough, on the other hand, behaves like it has abandoned the mission.
Egg Wash, Bake Time, and the Secret to a Golden Top
Whisk the egg with the water or milk and brush it lightly over the lattice and edges. Sprinkle with coarse sugar for sparkle and crunch. Bake the pie at 425°F for 20 minutes, then reduce the heat to 375°F and continue baking for 30 to 40 minutes more.
The pie is done when the crust is deeply golden and the filling is bubbling thickly through the center of the lattice, not just around the edges. If the crust begins browning too fast, tent the edges loosely with foil. There is no shame in protecting the crust. Pie is baking, not gladiator combat.
Cool Completely Before Slicing
This may be the hardest step in the entire recipe. Cool the pie on a wire rack for at least 3 to 4 hours before slicing. That cooling time allows the filling to set properly. Cut too early, and your gorgeous cherry pie recipe turns into a lava flow with a crust border.
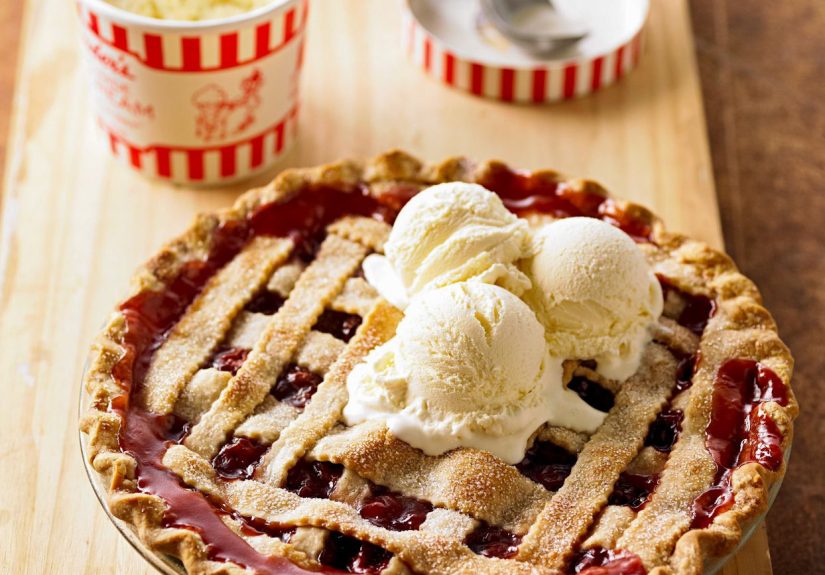
Once cooled, the slices should hold together with a glossy, thick fruit filling that tastes bright, buttery, and just a little luxurious. Add vanilla ice cream if you want to turn a good decision into an excellent one.
Tips for the Best Cherry Pie Every Time
1. Mix Sweet and Tart Cherries
If you can, combine sweet and tart cherries for deeper flavor. Sweet cherries bring body, while tart cherries add classic pie brightness. A half-and-half blend often tastes more balanced than either one alone.
2. Do Not Skip the Thickener
Fruit pies need structure. Cornstarch gives the filling a glossy finish, while a little tapioca can help absorb extra juice. This is especially helpful with frozen fruit or very ripe cherries.
3. Keep Everything Cold
Cold butter, cold dough, and a brief chill before baking all support a flakier crust. If your kitchen is warm, work in short bursts and refrigerate the dough as needed.
4. Bake on a Preheated Sheet Pan
A hot baking sheet gives the bottom crust a head start, reducing the chances of a pale or soggy underside. Nobody dreams of serving “mostly excellent pie, except for the floor.”
5. Watch for Thick Bubbles
The filling needs to bubble in the center so the thickener fully activates. That bubbling is your visual cue that the pie is truly done, not merely pretending.
Serving Ideas and Storage
Serve this old-fashioned cherry pie at room temperature or slightly warm. It pairs beautifully with vanilla ice cream, whipped cream, or even lightly sweetened crème fraîche if you want a tangy contrast.
For short-term storage, loosely cover the pie once fully cooled. Fruit pie keeps well for a day at room temperature, but for longer storage, refrigerate it and enjoy within several days. If you want to refresh the crust, reheat slices in a low oven for a few minutes before serving. Cold pie is also excellent straight from the fridge, which is useful information for midnight snackers with low self-control and high standards.
Common Mistakes to Avoid
- Using too much liquid: Extra juice sounds harmless until it floods the crust.
- Underbaking the pie: Pale crust and runny filling are usually signs the pie needed more time.
- Skipping the cooling period: The pie sets after baking, not during your first impatient slice.
- Overworking the dough: Tough crust is usually the result of too much handling or too much water.
- Uneven lattice strips: Not a disaster, but consistent strips bake more evenly and look cleaner.
Why a Lattice Crust Makes Cherry Pie Better
There is something timeless about a woven top crust. A lattice lets the filling peek through, which is part of the charm, but it also adds texture. You get crisp pastry edges, caramelized sugar on top, and little windows where the filling bubbles into glossy, jewel-toned perfection. In other words, the cherry pie with a lattice crust is not merely pretty. It is strategically delicious.
It also turns a familiar dessert into a centerpiece. Bring a lattice-top cherry pie to a gathering and people will react as though you have mastered some ancient pastry rite. In reality, you folded strips over each other while listening to a podcast. We love a low-drama path to high praise.
Experience Notes: What Baking Cherry Pie Really Feels Like
One of the best things about making a cherry pie with a lattice crust is that it feels special long before anyone takes a bite. It starts with the cherries. Fresh cherries are beautiful, but they also demand commitment. Pitting them can feel like a tiny red endurance sport, especially if you do not own a cherry pitter and end up improvising with a straw, a chopstick, or whatever kitchen object suddenly gets promoted to “tool.” By the time the bowl is full, your fingers may look slightly suspicious, your cutting board may resemble a crime scene, and yet somehow it still feels worth it. There is something deeply satisfying about turning a pile of fruit into dessert architecture.
Then there is the dough, which always teaches the same lesson: cold ingredients reward patience, and patience is easier to admire than to practice. At first the butter seems too firm, the flour too dry, the dough too crumbly. Then, almost magically, it comes together. Rolling it out becomes one of those kitchen moments that is oddly calming, especially when the dough behaves. When it does not, you get a quick reminder that pastry is humble pie before it ever becomes cherry pie.
The lattice step is where many bakers expect chaos, but it often turns out to be the most fun part. Once you begin weaving the strips, the pie suddenly looks real. Not just “I made dessert,” but “I made this dessert.” Even a slightly crooked lattice has charm. In fact, a perfectly imperfect lattice often looks more homemade in the best possible way. It tells people the pie was made in a real kitchen by a real person, not beamed in from a pastry showroom.
The smell while it bakes is another part of the experience that deserves its own fan club. Butter, fruit, toasted sugar, and warm pastry have a way of filling the house with a kind of edible optimism. The bubbling filling peeks through the lattice like it is waving from the oven, and suddenly waiting for the pie to cool feels outrageously unfair. This is usually the moment when everyone in the house starts “casually” walking through the kitchen for no reason.
And then comes the final payoff: slicing into a pie that actually holds together. That first clean wedge feels like a small domestic triumph. It means the filling thickened, the crust baked through, and all that waiting paid off. Whether you serve it plain, with vanilla ice cream, or with whipped cream that collapses a little on contact, cherry pie has a way of creating a pause at the table. People stop talking for a second. Forks get serious. Someone says, “Wow,” with their mouth half full. That is the beauty of this dessert. It looks nostalgic, tastes bright and buttery, and somehow makes an ordinary meal feel like an occasion. A good lattice-top cherry pie does not just end dinner. It steals the show and asks for an encore.


