Table of Contents >> Show >> Hide
- Why Cream Cheese Thumbprint Cookies Are So Addictive
- Ingredients for Cream Cheese Thumbprint Cookies
- Step-by-Step: How to Make Cream Cheese Thumbprint Cookies
- Pro Tips for Perfect Cream Cheese Thumbprint Cookies
- Variations You’ll Want to Try
- Storage, Freezing, and Make-Ahead Tips
- Frequently Asked Questions
- Conclusion: Your New Go-To “Wow” Cookie
- Real-Life Experiences with Cream Cheese Thumbprint Cookies
If you’re looking for a cookie that makes people think you spent all day in the kitchen (when secretly you didn’t), cream cheese thumbprint cookies are your new best friend. They’re buttery, tender, just a little tangy from the cream cheese, and filled with jewel-like jam that looks straight out of a bakery display case.
These cream cheese thumbprint cookies are perfect for Christmas cookie trays, bake sales, after-school treats, or those nights when “just one more cookie” becomes a personality trait. Let’s walk through exactly how to make them, plus how to avoid cracking, spreading, and other little cookie dramas bakers often run into.
Why Cream Cheese Thumbprint Cookies Are So Addictive
Thumbprint cookies are a classic: a buttery dough rolled into balls, pressed with a thumb (or spoon), and filled with jam before baking. Adding cream cheese to the dough takes things up several notches.
- Ultra-tender texture: Cream cheese softens the crumb and gives these cookies a melt-in-your-mouth bite.
- Balanced flavor: The gentle tang from the cream cheese keeps the cookies from being cloyingly sweet, especially when paired with fruity jam.
- Endless flavor combos: Raspberry, apricot, strawberry, lemon curd, even chocolate ganacheif it’s spreadable, it can probably go in a thumbprint cookie.
- They look fancy without effort: You get big bakery energy with minimal fuss. Win-win.
In short, if classic butter cookies and cheesecake had a tiny, adorable baby, it would be these cream cheese thumbprint cookies.
Ingredients for Cream Cheese Thumbprint Cookies
For the Cookie Dough
This recipe makes about 30–36 cookies, depending on how generous you are with the dough scoops.
- 6 oz (170 g) full-fat brick cream cheese, softened to room temperature
- 1 cup (2 sticks / 226 g) unsalted butter, softened
- 3/4 cup (150 g) granulated sugar
- 1/4 cup (30 g) powdered sugar, sifted (for a softer, more tender crumb)
- 1 large egg, at room temperature
- 2 tsp pure vanilla extract
- 1/2 tsp almond extract (optional but highly recommended for “bakery” flavor)
- 2 3/4 cups (345 g) all-purpose flour, spooned and leveled
- 1/2 tsp baking powder
- 1/4 tsp fine salt
For the Filling
- About 1/2 to 2/3 cup seedless raspberry jam, strawberry jam, apricot preserves, or your favorite jam or fruit spread
- Powdered sugar for dusting after baking (optional, but looks very “cookie-exchange-chic”)
Jam tip: Seedless jams or preserves usually give the cleanest look and smoothest bite, but if you love seeds (looking at you, raspberry purists), go for it.
Step-by-Step: How to Make Cream Cheese Thumbprint Cookies
1. Make the Dough
- Prep your gear. Line two baking sheets with parchment paper or silicone baking mats. This helps prevent sticking and uneven browning.
- Cream the butter and cream cheese. In a large mixing bowl, beat the softened butter and cream cheese together until smooth, light, and fluffyabout 2–3 minutes with a hand mixer or stand mixer on medium speed.
- Add the sugars. Beat in the granulated sugar and powdered sugar until the mixture looks pale and slightly whipped, 1–2 more minutes.
- Mix in the egg and extracts. Add the egg, vanilla, and almond extract. Beat just until combined, scraping down the sides of the bowl as needed.
- Combine the dry ingredients. In a separate bowl, whisk together the flour, baking powder, and salt.
- Bring it all together. Add the dry ingredients to the wet ingredients in two additions, mixing on low speed until just combined. The dough should be soft but not sticky. If it’s very sticky, you can add 1–2 tablespoons of extra flour, but don’t overdo it.
- Chill the dough. Cover the bowl and refrigerate for about 30–45 minutes. This helps the dough firm up so the cookies hold their shape and don’t spread too much in the oven.
2. Shape and Fill the Cookies
- Preheat the oven. Set your oven to 350°F (175°C). Make sure it’s fully preheated before baking for even results.
- Portion the dough. Using a small cookie scoop or tablespoon, portion out 1–1.5 tablespoon-sized balls. Roll each portion between your palms until the surface is smooththis helps prevent cracking later.
- Arrange on baking sheets. Place the dough balls on the prepared baking sheets, leaving about 2 inches between them.
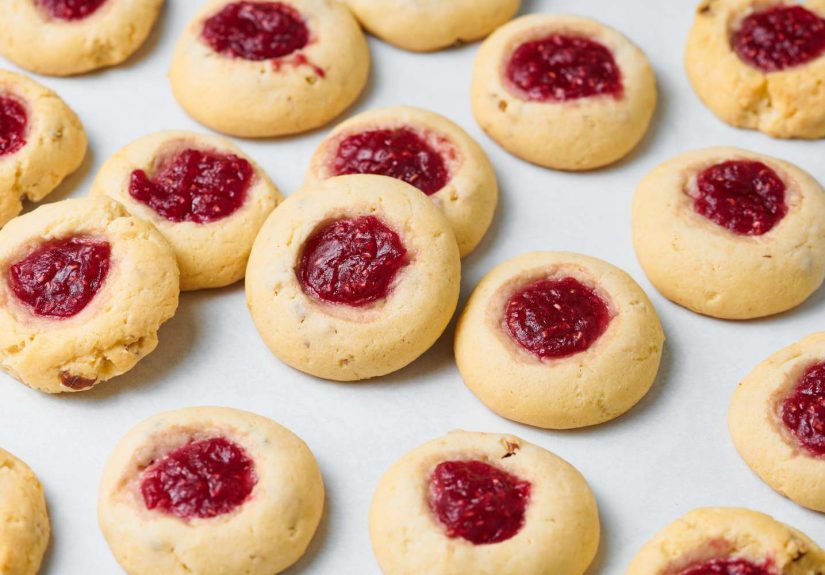
- Make the “thumbprint.” Using your thumb, forefinger, or the rounded back of a teaspoon, gently press into the center of each dough ball to create a shallow well. Press slowly and evenly to minimize cracking. If small cracks appear, gently push the dough back together with your fingers.
- Fill with jam. Stir your jam to loosen it slightly. Spoon about 1/2 teaspoon of jam into each indentationdon’t overfill or it may bubble out as it bakes.
3. Bake and Cool
- Bake. Bake the cookies for 12–15 minutes, or until the edges look set and the bottoms are just lightly golden. The tops should stay fairly palethat’s normal for thumbprint cookies.
- Cool on the pan. Let the cookies cool on the baking sheet for about 5 minutes. This gives them time to firm up so they don’t fall apart when moved.
- Transfer and finish cooling. Move the cookies to a wire rack to cool completely.
- Dust with powdered sugar. Once the cookies are fully cool, dust with powdered sugar if desired. It’s not mandatory, but it makes them look like they came out of a holiday catalog.
Pro Tips for Perfect Cream Cheese Thumbprint Cookies
How to Prevent Cracking
- Keep the dough soft when shaping. Don’t over-chill before forming the balls. If the dough is too cold, it’s more likely to crack.
- Roll until smooth. A smooth ball is less likely to crack when you press the indentation.
- Indent right away. Don’t roll all the balls first and then go back to press them. Make the indentation as soon as each ball hits the baking sheet so the surface doesn’t dry out.
- Press gently and gradually. Whether you use your thumb or the back of a spoon, press slowly and evenly instead of jabbing the dough.
Choosing and Handling the Jam
- Use thicker jams or preserves. Thin jams can boil over and run off the cookie.
- Stir before using. Stirring smooths out jam so it spoons more easily into the wells.
- Don’t overfill. Stick to about 1/2 teaspoon per cookie; they’re small, and the jam expands slightly in the oven.
Variations You’ll Want to Try
- Classic Raspberry: Use seedless raspberry jam for a tart-sweet punch that contrasts beautifully with the creamy cookie base.
- Apricot & Almond: Use apricot preserves and add an extra splash of almond extract to the dough. You can even roll the dough balls in finely chopped almonds before baking for crunch.
- Strawberry Cheesecake Vibes: Fill the wells with strawberry jam; once cool, drizzle with a tiny bit of melted white chocolate.
- Lemon Curd: Use lemon curd instead of jam for a bright, tangy twist. Sprinkle with powdered sugar and extra lemon zest after baking.
- Chocolate Center: Fill with a small spoonful of chocolate hazelnut spread or ganache for a “chocolate cheesecake” feel.
Storage, Freezing, and Make-Ahead Tips
Thumbprint cookies are surprisingly sturdy and freezer-friendly, which makes them ideal for holiday prep or whenever you want a stash of “just-bake-them” treats ready to go.
Storing Baked Cookies
- Room temperature: Store cooled cookies in an airtight container at room temperature for 3–5 days (sometimes up to a week, depending on humidity and jam).
- Layer carefully: Use parchment or wax paper between layers to prevent the jam centers from sticking to the cookies above.
Freezing Baked Cookies
- Let cookies cool completely so the jam sets.
- Layer in an airtight container with parchment between layers.
- Freeze for up to 1–2 months. Thaw at room temperature in the closed container to avoid condensation on the cookies.
Freezing Unbaked Dough Balls
For the freshest taste, freeze the unbaked dough:
- Shape the dough into balls and make the indentations.
- Freeze on a baking sheet until solid, then transfer to a zip-top freezer bag.
- Freeze for up to 1–2 months. When ready to bake, place the frozen dough balls on a baking sheet, let them sit at room temperature while the oven preheats, fill with jam, and bake. You may need to add 1–2 minutes to the bake time.
Frequently Asked Questions
Why did my thumbprint cookies crack?
Most often, the dough was too cold or too dry, or the indentation was made too aggressively. Keeping the dough soft (but not sticky), rolling it very smooth, and pressing gently right after rolling all help minimize cracking. Tiny surface cracks are normal; big fissures usually mean the dough dried out before you pressed it.
Why did my thumbprint cookies spread too much?
Possible culprits: warm, very soft dough; too much butter; or a hot baking sheet being reused without cooling. Chilling the dough, measuring flour correctly, and using fully cooled baking sheets between batches will help.
Do I fill the cookies with jam before or after baking?
For this recipe, fill before baking. The jam thickens and sets in the oven, giving you a neat, glossy center that holds up well in storage. Many thumbprint recipes follow this method for the best texture.
Do I need to refrigerate the cookies after baking?
No. These cookies are best stored at room temperature in an airtight container. The jam and baked dough are stable at room temp for several days, and the texture is softer and more pleasant than refrigerated cookies.
Conclusion: Your New Go-To “Wow” Cookie
Cream cheese thumbprint cookies check all the boxes: easy to make, impressive to look at, and dangerously easy to eat. With a simple dough, a spoonful of jam, and a few smart tricks to keep them from cracking or spreading, you’ll have a cookie that feels special enough for holidays but simple enough for a random Tuesday.
Once you’ve nailed the basic recipe, have fun with the fillingsapricot for something sophisticated, raspberry for a classic holiday vibe, lemon for a sunny twist, or chocolate for the chocoholics in your life. Just be warned: once people know you can make these, you’ll be “the cookie person” forever.
Real-Life Experiences with Cream Cheese Thumbprint Cookies
Part of what makes cream cheese thumbprint cookies so beloved isn’t just the flavorit’s the memories that tend to come with them. These are “people” cookies: the kind you bring to neighbors, pack in gift tins, or bake with kids who are mostly in it for the jam and the licking of beaters.
One of the first things bakers notice is how forgiving the dough feels compared to some fussy sugar cookies. If you’ve ever fought with cutout cookies that spread into unrecognizable shapes, thumbprints are a breath of fresh air. You roll, press, fill, and bake. Even if the wells are a little off-center or the jam levels are not perfectly uniform, they still look charminglike they were made by an actual human, not a machine.
Many home bakers find these cookies become a staple on holiday trays because they act as a “color pop.” When you have a plate filled with beige-ish cookiesshortbreads, peanut butter blossoms, chocolate chipthumbprints add those little rubies and golden centers that practically yell, “Take a picture of me for Instagram before you eat me.” Using a mix of jams (raspberry, apricot, strawberry) on one batch instantly makes it look like you baked three different recipes.
They’re also great “helper cookies” for kids. Even very young helpers can do small jobs like rolling dough balls in their hands or pressing the wells with a fingertip. Someone inevitably gets enthusiastic and presses too hard, creating a crater instead of a well, but that’s part of the fun. (And if the cookie cracks a bit? You just taught a mini baking lesson about fixing dough and not panicking.)
Another common experience: these cookies are sneaky crowd-pleasers. You might assume the chocolate cookies will disappear first, but there’s something about the buttery, cheesecake-adjacent cookie and bright jam that keeps people coming back “just for a half.” If you’re bringing them to an office party or potluck, plan on them disappearing faster than you thinkespecially if you label them “Cream Cheese Thumbprint Cookies” so people instantly know they’re getting more than a basic sugar cookie.
On the practical side, many bakers appreciate how well they freeze. You can prep the dough and pre-shaped, indented balls weeks ahead, store them in the freezer, and bake off fresh batches as needed. This is a sanity saver during the holidays when your schedule is a mess but you still want the house to smell like you live inside a bakery. Pull out a dozen, add jam, bake, and suddenly you look like the most prepared host on earth.
Of course, there are the “learning curve” stories too. Maybe the first batch spreads too much because the dough wasn’t chilled. Maybe you accidentally overfill them and end up with a few lava-flow cookies where jam escaped the wells. Or you forget to rotate the pan and one side of the cookies browns more than the other. The upside is that even the imperfect batches are almost always delicious. Slightly misshapen thumbprints taste just as good dunked in coffee, dipped in milk, or eaten straight off the cooling rack when no one’s looking.
Over time, these little cookies tend to become a customizable tradition. Some families stick to one “signature” jam filling year after yeargrandma’s raspberry, mom’s apricot, the jar you always buy from the local marketwhile others turn thumbprints into a flavor playground: one pan with lemon curd, one with dulce de leche, one with cherry preserves. However you spin them, cream cheese thumbprint cookies have a way of showing up in memory just as much as they do in the cookie jar.


