Table of Contents >> Show >> Hide
- Before You Cut Anything: Plan for Comfort and Safety
- Pick a Design That Matches Your Skill Level
- Materials and Hardware Checklist
- Tools You’ll Actually Use
- Build a Sturdy Porch Swing: Step-by-Step
- Step 1: Decide your dimensions (a reliable starting point)
- Step 2: Build the base frame (your swing’s skeleton)
- Step 3: Add back supports (set the recline)
- Step 4: Install arms (because you deserve somewhere to put your lemonade)
- Step 5: Add seat slats (drainage + comfort)
- Step 6: Add back slats (and avoid the “ladder back” vibe)
- Step 7: Sand, soften edges, and do the “hand check”
- Step 8: Drill for eye bolts (or chain attachment hardware)
- Finishing for the Outdoors: Make It Survive Real Weather
- How to Hang the Swing So It Doesn’t Become a Surprise Physics Lesson
- Troubleshooting and Easy Upgrades
- Real-World Experiences: of “What People Wish They Knew”
- Final Thoughts
A porch swing is basically a bench that decided it deserved hobbies. Build one the right way and you’ll get years of lazy evenings, iced drinks, and the occasional dramatic “thinking about life” sway. Build it the wrong way and you’ll get a very short lesson in gravity. Let’s do the first option.
This guide walks you through planning, building, finishing, and hanging a sturdy wooden porch swing using straightforward joinery and beginner-friendly techniqueswithout turning your garage into a graduate seminar in advanced woodworking. You’ll also find real-world tips (the kind people learn after the second trip to the hardware store).
Before You Cut Anything: Plan for Comfort and Safety
1) Choose a swing size that fits your porch (and your people)
Most porch swings fall into a few common widths:
- 4-foot swing (48″): Cozy for 1–2 adults, great for smaller porches.
- 5-foot swing (60″): More elbow room, better for two adults plus a kid or a dog who believes it pays rent.
Comfort comes from proportions more than fancy curves. A seat depth around 18–20 inches and a back angle that feels relaxed (not dentist-chair upright) goes a long way. If you plan to add cushions, build slightly deeper and leave space so the cushion doesn’t shove you forward like an impatient friend.
2) Leave the right clearances so it can actually swing
A porch swing needs breathing room. A few practical benchmarks:
- Side clearance: Leave roughly 14–16 inches on each side of the swing so chains don’t rub and you don’t clip railings.
- Back clearance: Plan for at least 18 inches behind the swing so it can move without smacking the wall or posts.
- Hanging height: A classic comfort target is about 17–19 inches from the floor to the seat.
- Hanger spacing: Install ceiling hang points about 2–4 inches wider than the swing’s overall length so the chains hang straight and don’t grind the arms.
Quick example: If you’re building a 48″ swing, place hangers about 52–56 inches apart. Then check you still have your side clearances on the porch. This small step prevents the classic DIY mistake: “It fits… as long as nobody swings.”
3) Decide how you’ll hang it (this affects how you build it)
You’ll typically hang a porch swing in one of two ways:
- Two-point hang (two ceiling hangers, chains meet at the arms): simpler overhead layout, but can allow more side-to-side twist.
- Four-point hang (four chains to four corners): feels more stable and “bed-like,” but needs more hardware and planning.
Either works. For a classic bench swing, two ceiling points with four attachment points on the swing (front/back on each side) is a common sweet spot for stability and adjustability.
Pick a Design That Matches Your Skill Level
Many gorgeous swings use complex joinery (mortises, tenons, sculpted slats, and other words that sound like medieval jobs). You can absolutely build a strong swing without all that by using a rigid base frame and slats for the seat/back, assembled with exterior-rated screws and waterproof glue.
For a first swing, aim for:
- A stout rectangular base frame (think: “tiny deck”)
- Back supports that bolt/screw firmly into that frame
- Seat/back slats spaced evenly for drainage
- Arms that tie the whole thing together (also: cup-holding real estate)
Materials and Hardware Checklist
Wood options (what lasts outdoors)
Outdoor furniture lives a hard life: sun, rain, temperature swings, and the occasional spilled lemonade. Choose wood accordingly:
- Western red cedar, redwood, and cypress are widely used for exterior projects because they naturally resist decay.
- Pressure-treated lumber can be budget-friendly and durable, but it requires the right fasteners (more on that below) and may need extra attention for a smooth “furniture feel.”
Practical recommendation: Cedar is a favorite for DIY swings: easy to work, lighter than many hardwoods, and outdoor-friendly. If your swing will live in full weather (no roof coverage), prioritize rot resistance and a good finish.
Fasteners and hanging hardware (don’t cheap out here)
For the swing build:
- Exterior-rated wood screws (deck screws or structural screws depending on the joint)
- Waterproof wood glue (rated for exterior use)
- Washers and lock nuts (for any through-bolts)
For hanging:
- Swing hangers or heavy-duty screw eyes/eyebolts rated for overhead use
- Stainless steel or galvanized chain
- Quick links or carabiner-style connectors (rated, not novelty-keychain cute)
- Lag screws or structural screws (if your hanger system uses them)
Important note on treated wood: If you use pressure-treated lumber, use hot-dip galvanized or stainless fasteners/connectors that are compatible with treated-wood chemicals, and avoid mixing dissimilar metals in the same connection (it can accelerate corrosion). If you’re not using treated wood, exterior-rated screws are still a must.
Tools You’ll Actually Use
- Measuring tape, speed square, pencil
- Circular saw or miter saw
- Drill/driver + drill bits (including a countersink bit)
- Clamps (more clamps = less regret)
- Sander or sanding block (80/120/180 grit is plenty)
- Safety gear: eye protection, hearing protection, and a dust mask
If you have a pocket-hole jig, you can use it for cleaner joinery in some areas, but you can absolutely build a solid swing with pre-drilling and well-placed screws.
Build a Sturdy Porch Swing: Step-by-Step
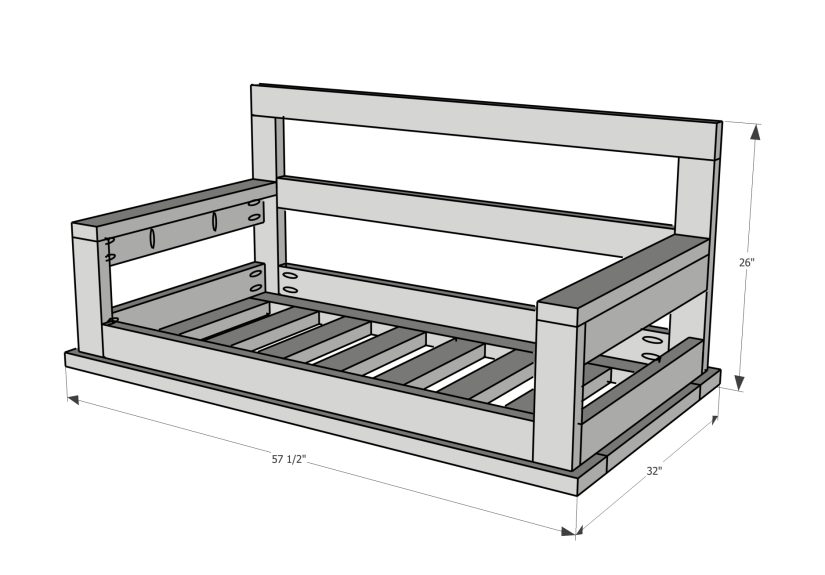
This build outline describes a 48-inch (4-foot) slat swing. You can scale to 60 inches by lengthening rails and adding an extra center support.
Step 1: Decide your dimensions (a reliable starting point)
- Seat width: 48″
- Seat depth: 18–20″
- Back height above seat: ~18–22″
- Overall depth (seat + back angle): typically ~24–28″
Tip: Sit on a dining chair and measure what feels good: seat depth and back height are “human factors,” not just lumber math.
Step 2: Build the base frame (your swing’s skeleton)
Create a rectangular frame using 2x4s (or 2x6s for a heavier look). The base frame should include:
- Front and back rails (48″)
- Two side rails (18–20″)
- At least one center support (same length as side rails) to prevent sag
Dry-fit the rectangle, check for square (measure diagonals; they should match), then glue and screw it together. Pre-drill and countersink to avoid splitting and to keep screw heads from snagging clothing.
Step 3: Add back supports (set the recline)
Cut two back uprights (2x4s). Attach them near the rear corners of the base frame. For comfort, angle the back slightlyenough to feel relaxed, not enough to make standing up an athletic event.
Simple method: Attach the uprights plumb first, then add angled blocking between the upright and base frame to lock in the recline. This is sturdy and forgiving if you’re eyeballing the perfect lounge angle.
Step 4: Install arms (because you deserve somewhere to put your lemonade)
Arms do more than provide comfortthey stiffen the entire structure. Use a solid arm support that ties into the base frame and the back upright. Then add armrests (often a 1×6 or similar board) on top.
Strength tip: If the arms will hold chain forces (common), reinforce the arm supports and use through-bolts with washers where appropriate.
Step 5: Add seat slats (drainage + comfort)
Attach 1×4 slats across the base frame. Leave a small, consistent gap (about the thickness of a nail or two stacked) between slats so water can drain and wood can expand/contract without buckling.
Start at the front edge, keep the overhang consistent, and work your way back. Use exterior screws, and pre-drill near ends to reduce splitting.
Step 6: Add back slats (and avoid the “ladder back” vibe)
Add a top back rail and a lower back rail between the uprights, then fasten vertical or horizontal slats. Horizontal slats are common and easy to align; vertical slats can look classic but require more careful spacing.
Comfort tip: Lightly round over edges with sandpaper so your back (and your favorite T-shirt) don’t pay the price.
Step 7: Sand, soften edges, and do the “hand check”
Sand everything you’ll toucharms, seat edges, top railup to at least 180 grit. Then run your hand across surfaces. If your hand catches, fabric will catch too. This is the difference between “handmade charm” and “handmade splinters.”
Step 8: Drill for eye bolts (or chain attachment hardware)
Most porch swings use four attachment points on the swing: front and back on each side. This helps keep the seat level and reduces twisting.
- Place the front attachment point near the front of the arm support/seat frame.
- Place the rear attachment point slightly behind the seat’s centerline, often near the back upright connection.
Use eye bolts sized for the load (commonly 3/8″ or larger, depending on the swing and hardware). Use washers and lock nuts, and ensure the bolt passes through solid structurenot just a decorative slat.
Finishing for the Outdoors: Make It Survive Real Weather
Outdoor finishes are less about “one perfect coat” and more about choosing a finish you’ll actually maintain.
Three common clear-finish strategies
- Exterior oil (easy to apply, easier to refresh, shorter lifespan)
- Exterior varnish/spar urethane (beautiful, more protective, needs upkeep)
- Epoxy sealer + exterior varnish topcoat (very durable, more work, more “boat builder energy”)
If you want the lowest maintenance, consider an exterior paint or solid stain system. Clear coats look gorgeous, but sun and moisture eventually win unless you refresh the finish periodically. A good rule of thumb is to inspect yearly and recoat before it flakesbecause once it flakes, refinishing becomes a whole weekend.
Finish tips that matter
- Seal end grain (cuts drink water like a straw).
- Finish parts before final assembly if you want maximum coverage.
- Don’t forget the underside; it sees moisture too.
How to Hang the Swing So It Doesn’t Become a Surprise Physics Lesson
1) Find solid structure overhead
Your porch swing must hang from structural framingtypically ceiling joists or a beam. Decorative boards (like beadboard or thin tongue-and-groove) are not structural. If you can’t confidently identify framing, it’s worth opening a small inspection area or consulting a pro. Overhead loads are not the place for “probably fine.”
2) Use a proper hanger method
Many systems use swing hangers secured with lag screws/structural screws into the joist/beam. Pre-drilling pilot holes helps prevent splitting and makes installation easier.
Pro move: If your joists aren’t ideally located, add blocking between joists or reinforce with additional lumber so hangers land exactly where you need themstrong, aligned, and evenly spaced.
3) Set spacing and height, then fine-tune level
Install your ceiling hang points 2–4 inches wider than the swing length. Aim for a seat height around 17–19 inches above the floor, then adjust chain lengths until the seat is level (or slightly higher in front if you like a “settle back” feel).
Attach chains with rated quick links or connectors. Tighten hardware fully, and re-check after the first few days of use as wood can compress slightly.
4) Test before you trust
Before the first joyful swing session, do a controlled test:
- Gently load the swing with weight (bags of sand, or a cautious adult sitting still).
- Check for movement in the hangers, creaking in the framing, or loosening hardware.
- Retighten as needed, then test with a slow, small swing arc.
Troubleshooting and Easy Upgrades
- Squeaks: Often chain-on-metal. Use appropriate connectors, ensure parts aren’t rubbing wood, and consider nylon spacers where needed.
- Seat tilts forward/back: Adjust front vs. rear chain lengths in small increments (a link at a time).
- Too stiff to enjoy: Add a cushion, slightly recline the back, or round edges more generously.
- Want “premium” feel fast? Add cup holders, a center armrest, or quick-link “height presets” for different users.
Real-World Experiences: of “What People Wish They Knew”
Ask a handful of DIYers about building a porch swing and you’ll hear a repeating theme: the woodworking is the fun part; the hanging is the part that makes you triple-check everything. People often underestimate how much tiny measurement differences show up once a swing moves. A hanger that’s even slightly off-center can cause chains to rub the swing arms. That rubbing doesn’t just sound annoyingit can slowly chew through wood fibers or wear away protective coatings on chain links.
Another common lesson: comfort is mostly geometry. Folks who copy a swing’s outside dimensions but ignore seat depth and back angle tend to end up with something that looks great in photos yet feels awkward in uselike sitting on a stylish suitcase. Builders who take five minutes to “mock sit” (even on stacked boards or a temporary frame) usually end up much happier. One easy trick people mention is using painter’s tape on the porch floor to outline the swing’s footprint and clearance arc. It feels silly for exactly 45 secondsright up until it prevents you from discovering, mid-swing, that your new project kisses the porch railing.
Finishing is where optimism goes to negotiate with reality. Many first-timers apply a beautiful clear coat only to realize a year later that sunlight is undefeated. The DIYers who stay happiest are the ones who choose a finish they’re willing to maintain. Exterior oils are popular because refreshing them is easy: clean, scuff lightly, reapply. Varnish and spar urethane can look stunning, but the people who swear by them also talk about maintenance schedules like they’re describing a beloved pet: “It needs attention every couple of years, and if you ignore it, it gets cranky.”
Hardware choices inspire strong opinions, and for good reason. Builders often say the biggest peace-of-mind upgrade is using rated hangers and connectors and installing into confirmed structure (joists/beam) rather than guessing. Plenty of people start with the idea, “I’ll just screw hooks into the ceiling.” Then they learn that porch ceilings can hide trim boards, thin paneling, or oddly spaced joists. The experienced voices consistently recommend taking the time to locate framing and adding blocking if needed. It’s not glamorous, but it’s the difference between “relaxing swing” and “loud story you tell at cookouts.”
Finally, there’s the “make it yours” phase. A lot of DIYers say their first version was sturdy but a little too… serious. The second round of tweaks is where the swing becomes a favorite: slightly rounded arm edges, a back cushion that actually fits, chain lengths dialed in so feet rest comfortably, and a finish color that matches the house. The funny part is that by the time you reach those tweaks, you’ve also earned the universal porch-swing-builder badge: the ability to spot a poorly hung swing from 20 feet away, simply by listening to it squeak.
Final Thoughts
A great porch swing is a blend of solid structure, smart hardware, and human comfort. Build a stiff frame, add slats for drainage and style, protect it with an outdoor-ready finish, and hang it from real framing with rated connectors. Do that, and your porch swing won’t just look like the one in the catalogit’ll feel better, because you built it, you leveled it, and you didn’t let gravity win the argument.


