Table of Contents >> Show >> Hide
- What Makes These Bars “Crème Brûlée” (Besides the Fancy Name)
- Equipment You’ll Want (So This Feels Easy, Not Like a Reality Show Challenge)
- Ingredients for Creme Brulee Cheesecake Bars
- Step-by-Step: How to Make Creme Brulee Cheesecake Bars
- How to Brûlée the Sugar Topping (The Best Part)
- Flavor Variations (So You Can Make This Recipe “Yours” Without Chaos)
- Troubleshooting (Because Cheesecake Is Delicious, But It’s Also Sensitive)
- Make-Ahead, Storage, and Freezing
- Serving Ideas (A.K.A. How to Make People Think You Went to Pastry School)
- of Real-World “Experience” With Creme Brulee Cheesecake Bars
- Conclusion
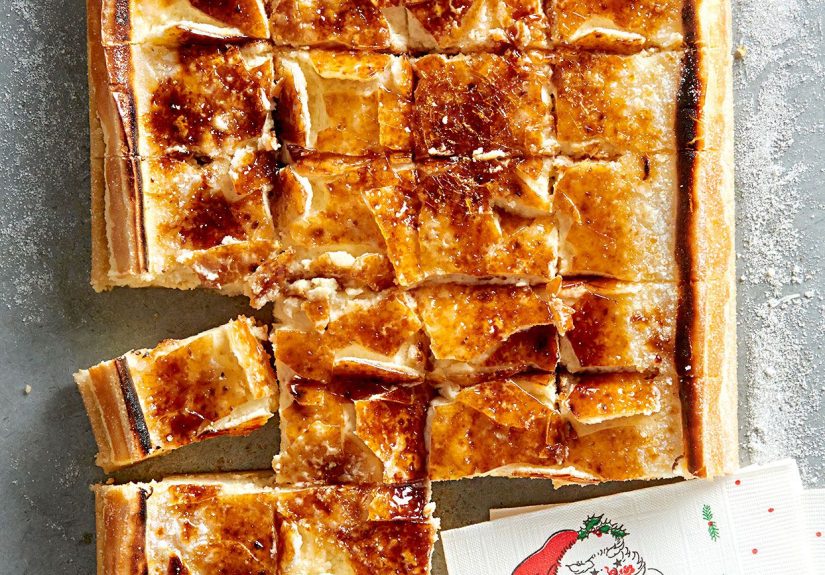
If crème brûlée and cheesecake had a fancy little baby that wore a tiny tuxedo to dessert, it would be these
creme brulee cheesecake bars. You get a buttery graham cracker crust, a velvety vanilla cheesecake layer,
and that signature “tap-tap-crack” caramelized sugar top that makes everyone at the table go quiet for two seconds
(the universal sign of approval).
This creme brulee cheesecake bars recipe is written for real life: simple ingredients, predictable timing,
and plenty of tips to keep the texture creamy and the topping crisp. No drama. No cracked cheesecake tragedy. Just
dessert confidence.
What Makes These Bars “Crème Brûlée” (Besides the Fancy Name)
Classic crème brûlée is a silky custard with a thin, brittle layer of caramelized sugar. Cheesecake is… well, cheesecake:
rich, tangy, and famously willing to crack if you look at it wrong. These bars split the difference:
- Cheesecake base: cream cheese + eggs + vanilla for richness and structure.
- Custard vibes: gentle baking and slow cooling to keep the center creamy, not rubbery.
- Brûlée finish: a quick sugar torch (or broiler) right before serving for the crisp caramel “lid.”
The big secret? Brûlée the sugar close to serving time. If it sits too long, that crisp topping can soften
and melt back into a shiny, sticky layer. Still tasty, just less “crackly crown.”
Equipment You’ll Want (So This Feels Easy, Not Like a Reality Show Challenge)
- 9×13-inch metal baking pan (metal bakes more evenly for bars)
- Parchment paper sling for lifting and clean slicing
- Electric mixer (hand or stand)
- Fine-mesh sieve (optional, for evenly sprinkling sugar)
- Kitchen torch (best for control) or a broiler (works with extra caution)
- Roasting pan or skillet if you want steam in the oven
A torch is the easiest way to get that caramelized sugar top without overheating the cheesecake. If you’re using a broiler,
you’ll want to make sure your pan is truly broiler-safe and watch it like a hawk (broilers do not play).
Ingredients for Creme Brulee Cheesecake Bars
For the Graham Cracker Crust
- 2 cups graham cracker crumbs (about 14–16 full sheets, finely crushed)
- 1/3 cup granulated sugar
- 10 tablespoons unsalted butter, melted
- 1/4 teaspoon kosher salt
For the Vanilla Cheesecake Layer
- 32 ounces full-fat cream cheese, softened (4 blocks)
- 1 cup granulated sugar
- 1 cup sour cream, room temperature
- 3 large eggs, room temperature
- 1 large egg yolk, room temperature (adds custardy richness)
- 2 teaspoons vanilla extract or 1 teaspoon vanilla bean paste
- 1/4 teaspoon kosher salt
- 1 tablespoon cornstarch (optional but helpful for clean slices)
For the Brûlée Topping
- 1/3 to 1/2 cup superfine sugar (or regular granulated sugar)
Ingredient note: Room-temperature dairy and eggs help the batter mix smoothly without overbeating.
Overbeating whips in air, and air bubbles are tiny chaos agents that can lead to cracks and a puff-then-sink situation.
Step-by-Step: How to Make Creme Brulee Cheesecake Bars
Step 1: Prep the Pan
Preheat oven to 325°F. Line a 9×13-inch pan with parchment paper, leaving extra hanging over the long sides
like handles (this is your easy-lift “sling”). Lightly grease the parchment and any exposed sides.
Step 2: Make and Prebake the Crust
In a bowl, stir together graham cracker crumbs, sugar, melted butter, and salt until the texture looks like wet sand.
Press firmly into the bottom of the pan in an even layer (a flat-bottom measuring cup works great here).
Bake for 10 minutes, then set aside to cool slightly while you make the filling.
Step 3: Mix the Cheesecake Batter (Smooth, Not Fluffy)
Beat softened cream cheese on medium-low speed until smooth, about 1–2 minutes. Add sugar and mix just until combined.
Scrape the bowl.
Add sour cream, vanilla, salt, and cornstarch (if using). Mix on low until smooth. Add eggs and yolk one at a time,
mixing on low and stopping as soon as each disappears into the batter.
Pro move: Tap the bowl on the counter a couple of times to pop big air bubbles. Less air = calmer cheesecake.
Step 4: Bake Gently (Steam Helps, But You Have Options)
Pour batter over the warm crust and smooth the top. Bake at 325°F for 32–40 minutes, depending on your oven.
You want the edges set and the center to jiggle slightly when you nudge the panlike soft-set pudding, not liquid.
If you want an easy anti-crack trick without a full water bath, place an oven-safe skillet filled with hot water on the
rack below the cheesecake while it bakes. The steam helps the top stay moist and bake more evenly.
Step 5: Cool Slowly (This Is Where Cracks Go to Die)
Turn off the oven, crack the door open, and let the bars rest inside for 1 hour. Then remove to a rack and
cool to room temperature.
Cover and refrigerate for at least 6 hours (overnight is even better). This chill time is not optional if you
want clean slices and that classic creamy texture.
How to Brûlée the Sugar Topping (The Best Part)
Option A: Kitchen Torch (Recommended)
- Lift chilled bars out using the parchment sling. Place on a cutting board.
- Cut into bars before brûléeing (easier to torch and serve).
- Sprinkle about 1 to 2 teaspoons sugar evenly over each bar in a thin layer.
-
Torch with a steady back-and-forth motion, keeping the flame moving so you don’t scorch one spot. Aim for a deep golden
caramel color, not “campfire souvenir.” - Let the sugar cool and harden for 2–3 minutes. Serve right away for max crunch.
Sugar tip: Superfine sugar melts more evenly and can give you a smoother brûlée “glass” effect, but regular
sugar works finejust keep the layer thin and even.
Option B: Broiler (Works, But Be Alert)
- Place cut bars on a metal, broiler-safe sheet pan.
- Sprinkle sugar in a thin, even layer.
- Broil close to the top for 30–90 seconds, watching constantly.
- Remove as soon as the sugar bubbles and turns amber. Cool a minute to harden.
Broilers can caramelize fastlike “blink and it’s black” fast. If you’re unsure about your bakeware under the broiler,
choose a torch instead.
Flavor Variations (So You Can Make This Recipe “Yours” Without Chaos)
1) Vanilla Bean Dream
Use vanilla bean paste or scrape one vanilla bean into the batter. You’ll get those pretty speckles and a deeper vanilla
flavor that screams “bakery case.”
2) Citrus-Kissed Brûlée
Add 1–2 teaspoons lemon or orange zest to the batter. It brightens the richness and makes the flavor feel a little lighter
(even though it’s still cheesecakelet’s not pretend it’s a salad).
3) Espresso Brûlée Bars
Dissolve 1–2 teaspoons instant espresso powder into the vanilla before adding. Coffee + caramelized sugar is a top-tier
combo.
4) Holiday Twist
Try a small pinch of cinnamon in the crust or a tiny drop of peppermint extract (very little!) in the filling for a festive
vibe. Keep the brûlée topping classic so it still caramelizes cleanly.
Troubleshooting (Because Cheesecake Is Delicious, But It’s Also Sensitive)
Why did my cheesecake bars crack?
- Overmixing: Too much air causes puffing and collapsing.
- Overbaking: If the center is fully firm in the oven, it’s probably gone too far.
- Fast cooling: Sudden temperature changes can shock the top.
Good news: cracks are purely cosmetic. Once you brûlée the top, nobody will know. And even if they do, they still have to
chew, which buys you time to change the subject.
My brûlée topping got soft. What happened?
Sugar attracts moisture. If it sits, it can dissolve back into a syrupy layer. Brûlée the topping shortly before serving,
and keep finished bars in a cool, dry spot for immediate enjoyment.
My bars taste a little dense.
Dense is often from overmixing or overbaking. Next time, mix on low once the eggs go in and pull the bars when the center
still has a slight jiggle.
Make-Ahead, Storage, and Freezing
Make Ahead
You can bake the bars up to 2 days ahead. Keep them covered in the fridge. Wait to add sugar and brûlée
until right before serving for that crisp “crack.”
Storage
Store un-brûléed bars covered in the refrigerator for up to 5 days. Once brûléed, the topping is best the
same day (still safe later, just less crunchy).
Freezing
Freeze bars without the brûlée topping. Wrap individual pieces tightly and freeze up to 2 months.
Thaw overnight in the fridge, then brûlée before serving.
Serving Ideas (A.K.A. How to Make People Think You Went to Pastry School)
- Fresh berries on the side for color and contrast
- Lightly sweetened whipped cream if you want extra drama
- Espresso or strong coffee to balance the sweetness
- Warm knife trick: dip a knife in hot water, wipe dry, slice, repeat for sharp edges
If you’re serving these at a party, brûlée in small batches. It keeps the topping crunchy and gives you an excuse to do a
little tableside “dessert fireworks.” (Crowd-pleasing and slightly theatrical. Perfect.)
of Real-World “Experience” With Creme Brulee Cheesecake Bars
If you’ve ever watched someone taste a dessert and immediately stand a little straighterlike their spine just received a
complimentthat’s the kind of reaction these bars tend to earn. Bakers who make creme brulee cheesecake bars
often discover the same pattern: the first batch is about learning the rhythm, the second batch is about confidence, and by
the third batch you’re casually saying things like, “Oh, I’ll just torch the sugar right before we eat,” as if everyone
owns a kitchen torch and not just people who have accepted their destiny as Dessert Person.
One of the biggest “aha” moments is realizing the brûlée topping is more like a finishing move than a topping you can
“set and forget.” In real kitchens, that sugar layer behaves like it has a personality: it’s crisp and snappy right after
caramelizing, then slowly softens if it sits in a humid fridge. That’s why experienced bakers treat brûlée as a last-minute
stepalmost like buttering toast. You can butter toast early, sure, but you’ll get sad toast. Same concept.
Another common experience: people worry about cracks, because cheesecake has a reputation for being dramatic. But bars are
more forgiving than tall cheesecakes, and the most consistent win comes from small habits: using room-temperature
ingredients, mixing gently once eggs are added, and pulling the pan while the center still has a slight jiggle. Many bakers
also learn that slow cooling is not “extra,” it’s the difference between a smooth top and a cheesecake that looks like it
tried to fold itself in half emotionally.
Flavor-wise, these bars are a great lesson in balance. The first time someone adds extra vanilla bean paste, they usually
don’t go backthose speckles read as “fancy” even when you baked in sweatpants. Some bakers love a whisper of citrus zest
because it cuts the richness and makes each bite feel brighter. Others experiment with a slightly saltier crust for more
contrast, especially if they’re serving the bars with coffee. The most “experienced” move is knowing you don’t need a lot of
extras: the caramelized sugar already brings bitterness, sweetness, and crunch, so anything else should support, not shout.
And then there’s the torch moment. People tend to hover too long in one spot the first time, which can scorch sugar or warm
the cheesecake too much. The skill that develops quickly is movement: steady passes, letting the sugar melt and brown
gradually, and stopping when it’s ambernot when it becomes a smoke signal. Once someone nails that, these bars become a
repeat dessert for birthdays, potlucks, and “I need to impress someone but also I’m tired” evenings. Because the truth is:
the crackly brûlée top makes the dessert feel like a showstopper… even though most of the work is just chilling while you
go live your life.


