Table of Contents >> Show >> Hide
- What Is a Custom Mini-Neon Sign?
- Can You Really Make One in 10 Minutes?
- Best Materials for a 10-Minute Mini-Neon Sign
- How to Make a Custom Mini-Neon Sign in 10 Minutes
- Design Ideas That Work Best for Mini-Neon Signs
- How to Make Your DIY Neon Sign Look More Professional
- Safety Tips Before You Plug It In
- Common Mistakes to Avoid
- Custom Mini-Neon Signs for Gifts
- Where a Mini-Neon Sign Looks Best
- Mini-Neon Sign Experience: What It Feels Like to Make One
- Conclusion
- SEO Tags
Custom mini-neon signs have a magical way of making a room look more intentional, even if the rest of the room currently features a laundry chair, three mystery cables, and a mug you forgot about yesterday. The good news? You do not need a glass-bending studio, a commercial sign permit, or the patience of a monk to create a small glowing sign. With modern LED neon flex, EL wire, acrylic boards, adhesive clips, and prewired kits, a simple mini-neon sign can go from “cute idea” to “look what I made” in about 10 minutes.
Let’s be clear: a true traditional neon sign is made from shaped glass tubes filled with gas and powered by specialized electrical components. That is not a quick kitchen-table craft. What most people call a DIY neon sign today is usually a faux neon sign made with LED neon rope, LED neon flex, or electroluminescent wire. It gives the soft glowing look of neon without requiring glasswork. For beginners, renters, students, party planners, small business owners, and anyone who likes a little glow with their personality, this is the practical path.
This guide explains how to make a quick custom mini-neon sign, what materials work best, how to design one that looks polished instead of “craft drawer emergency,” and how to keep safety, durability, and style in mind. We will focus on a fast, beginner-friendly version: a small sign with a short word, symbol, initials, or simple shape.
What Is a Custom Mini-Neon Sign?
A custom mini-neon sign is a small decorative light sign designed around a personal word, phrase, icon, logo, or shape. Popular examples include names, gaming tags, café-style words like “open” or “coffee,” tiny hearts, lightning bolts, moons, stars, music notes, and desk signs for video calls. The “mini” part matters because smaller signs are easier to shape, mount, power, and finish quickly.
Most modern mini-neon signs use one of two beginner-friendly materials: LED neon flex or EL wire. LED neon flex is brighter and closer to the look of commercial neon. It is usually covered in a silicone or PVC diffuser that spreads the LED light into a smooth line. EL wire is thinner, flexible, and great for delicate outlines, but it is usually dimmer than LED neon flex. If your sign will sit on a desk, shelf, dorm wall, bedroom wall, streaming backdrop, or party table, either option can work beautifully.
Can You Really Make One in 10 Minutes?
Yes, with one important condition: you need to keep the design simple. A 10-minute custom mini-neon sign is not the time to recreate the skyline of Manhattan, your entire brand logo, or a cursive quote from three different fonts. Think small, clean, and bold.
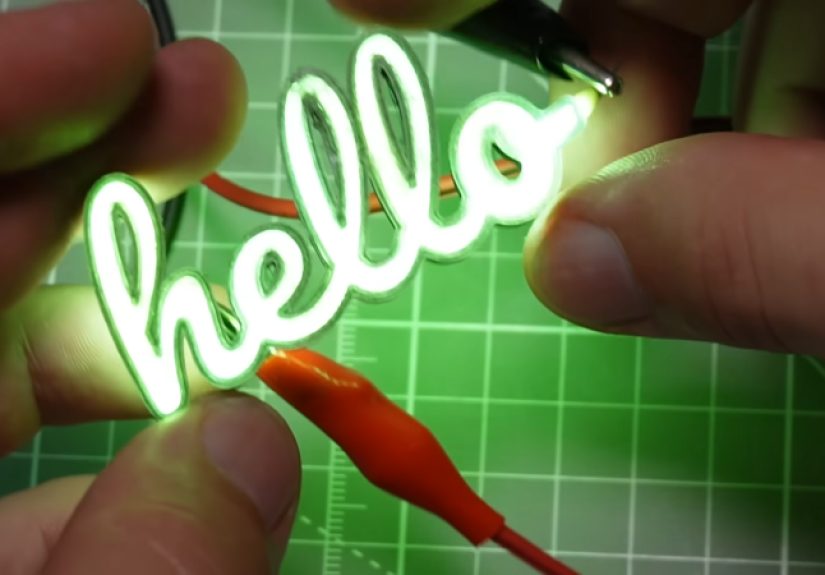
The fastest designs are one-word signs, initials, simple icons, or line-art shapes. A word like “joy,” “chill,” “love,” “vibe,” “yes,” “eat,” or “hello” can be made quickly if you use a template and flexible lighting material. A heart, cloud, lightning bolt, smiley face, or simple arrow is even faster. The key is to use a prewired light strip or EL wire kit so you are not cutting, soldering, or rewiring anything. In 10 minutes, your goal is assembly, not electrical engineering.
Best Materials for a 10-Minute Mini-Neon Sign
1. Prewired LED Neon Flex
LED neon flex is the best choice when you want a bright, bold glow. It usually comes in single-color or RGB versions and may run from USB, battery, or a compatible low-voltage adapter. For a fast project, choose a prewired strip that already includes the connector and power source. That way, you can shape and mount it without dealing with exposed wiring.
2. EL Wire
EL wire is thin, flexible, and easy to bend into letters or outlines. It is excellent for mini signs, costume decor, party signs, and wall art. It often uses a small battery pack or inverter. EL wire is less bright than LED neon flex, so it looks best in dim rooms, cozy corners, or evening displays.
3. Clear Acrylic, Foam Board, or Wood Backing
Acrylic gives the most professional look because it disappears behind the glow and makes the sign look like something from a boutique. Foam board is faster and cheaper. Thin wood creates a warm handmade style. For a 10-minute version, use a pre-cut backing board and avoid complex drilling.
4. Adhesive Clips, Clear Tape, or Zip Ties
Mounting is where many DIY neon signs either become sleek or turn into a glowing spaghetti situation. Adhesive clips are neat and fast. Clear tape works for temporary signs. Small zip ties can work well if your backing has holes. Hot glue is common in crafts, but it can be messy and may not hold well on every surface, so use it only if it suits your material and the light manufacturer’s guidance.
5. A Printed Template
A template is your cheat code. Print or sketch your design at the exact size you want. Place it under clear acrylic or on top of a backing board, then follow the lines. This prevents crooked letters, uneven spacing, and the dreaded “why does my heart look like a potato?” moment.
How to Make a Custom Mini-Neon Sign in 10 Minutes
Minute 1: Choose a Tiny, Bold Design
Pick one short word or symbol. The best quick signs use continuous lines and rounded shapes. For example, “hi,” “wow,” “love,” “bar,” “tea,” “cat,” a star, a moon, or a simple smiley face. Avoid sharp corners if your light material does not bend tightly. A clean design always looks more expensive than a complicated design rushed into chaos.
Minute 2: Lay Out the Template
Print or draw your design. Tape the template to your work surface or slide it under clear acrylic. If you are using foam board or wood, lightly trace the design. Do not press too hard. You want a guide, not an archaeological carving.
Minutes 3–5: Shape the Light
Start from the power-cord end and gently follow the template. Bend slowly and avoid forcing the material into tight angles. If you are using LED neon flex, pay attention to its bend direction. Some neon flex bends side-to-side but not up-and-down. If you are using EL wire, shape it with soft curves and let the wire relax naturally into place.
Minutes 6–8: Attach the Light
Use adhesive clips, clear tape, or small ties to secure the light along the design. Attach the beginning first, then the major curves, then the end. Do not cover the glowing face of the light. Keep the power cord positioned near the edge or back of the sign so the final piece looks clean.
Minute 9: Hide the Boring Parts
Every mini-neon sign has a less glamorous side: the battery pack, USB cable, or adapter. Place it behind the board, below a shelf, or along a table edge. For wall signs, use small removable adhesive strips or cable clips to guide the cord downward. A clean cable path makes the sign look finished.
Minute 10: Turn It On and Adjust
Power it up. Step back. Squint like an art critic. If one letter is leaning, adjust the clips. If a curve looks flat, loosen it slightly. If the whole sign looks amazing, take a photo immediately, because your confidence deserves documentation.
Design Ideas That Work Best for Mini-Neon Signs
Bedroom and Dorm Decor
Mini-neon signs are perfect for personal spaces because they add mood lighting without taking over the room. Try words like “dream,” “chill,” “glow,” “mood,” or your initials. A small moon, cloud, flower, or heart also works well above a desk, bed, bookshelf, or mirror.
Small Business Displays
A mini sign can help a market booth, salon station, coffee cart, bakery table, or craft fair display feel more memorable. Use short words like “open,” “fresh,” “hello,” “baked,” “nails,” “plants,” or “sale.” Keep the lettering large enough to read from a few feet away.
Party and Event Decor
For birthdays, graduation tables, baby showers, and photo corners, custom mini-neon signs add instant atmosphere. Names, dates, hashtags, hearts, stars, and simple icons are great choices. Because the sign is small, it is easy to move, photograph, and reuse.
Content Creator Backdrops
If you record videos, stream games, host online meetings, or make social media content, a mini-neon sign can add visual personality behind you. Choose a simple shape or word that matches your niche. A microphone outline, tiny game controller, lightning bolt, or “live” sign can work without overwhelming the frame.
How to Make Your DIY Neon Sign Look More Professional
The difference between homemade and handmade-with-style is often spacing. Keep letters evenly sized. Leave enough room between curves. Avoid trying to squeeze a long phrase onto a tiny board. Negative space is not empty; it is the sign breathing.
Color also matters. Warm white feels cozy and modern. Pink is playful. Blue feels futuristic. Green works for plants, gaming, and café-style signs. Red is bold but can look intense in a bedroom. RGB lights are fun if you want flexibility, but a single-color sign often looks cleaner.
Backing shape changes the mood. A clear rectangle looks modern. A circle feels soft and trendy. A cloud shape is cute for bedrooms or nurseries. A black backing makes the glow look stronger. A wood backing gives a handmade boutique look. For a 10-minute project, choose one design feature to shine instead of trying to make every part dramatic.
Safety Tips Before You Plug It In
Use lights and power supplies as intended by the manufacturer. Choose low-voltage, prewired products when possible, especially for beginner projects. Do not connect LED neon flex directly to a wall outlet unless the product is specifically designed for that. Do not power a strip while it is still tightly wound on a spool, because heat can build up. Inspect cords, connectors, and battery packs before using them.
Keep decorative lights away from water unless they are rated for that environment. A sign for a bedroom wall and a sign for an outdoor patio are not the same thing. If you plan to use a sign outside, choose outdoor-rated components and protect connections from moisture. For indoor decor, keep cords away from walkways, pets, and places where they may be pinched.
Turn off decorative lights when you leave home or go to sleep. LEDs are efficient, but a decorative sign is still an electrical item. A simple timer or smart plug can help you enjoy the glow without leaving it on all night. Also, do not overload power strips with a pile of glowing decorations. Your outlet is not auditioning for a nightclub.
Common Mistakes to Avoid
Choosing a Phrase That Is Too Long
“Good vibes only” may sound simple, but in mini-neon form it can become a tangled noodle opera. For fast signs, two to five letters are easiest. If you want a longer phrase, use a larger board and give yourself more time.
Ignoring Bend Direction
Some LED neon flex bends only one way. If you force it in the wrong direction, it may kink or stop looking smooth. Check how your light naturally curves before attaching it.
Using Weak Adhesive on Dusty Surfaces
Adhesive clips do not love dust, textured walls, or oily surfaces. Wipe the backing first and press clips firmly. For temporary signs, test your adhesive in a small area before committing.
Letting the Cord Steal the Show
A gorgeous sign with a messy cord hanging across the front is like wearing a tuxedo with one sneaker. Route the cord behind the board or along an edge. The glow should be the star.
Custom Mini-Neon Signs for Gifts
A mini-neon sign makes a surprisingly personal gift because it feels custom without requiring a huge budget. For a friend, use a nickname. For a gamer, use a tag or icon. For a baker, try a tiny cupcake outline. For a plant lover, make a leaf. For a new apartment, create “home,” “keys,” or “hello.” For a wedding shower, initials or a simple heart can become a keepsake.
The best gift signs are not overly complicated. They feel thoughtful because they match the person’s personality. Add a small stand, gift box, or hanging ribbon, and the sign suddenly looks boutique-ready. Nobody has to know you made it while drinking iced coffee and arguing with a roll of clear tape.
Where a Mini-Neon Sign Looks Best
Placement is half the magic. A mini-neon sign looks great on a floating shelf, desk wall, bar cart, vanity mirror, coffee station, bedroom headboard area, gallery wall, or entryway table. It also photographs well when placed slightly away from other bright lights. For the strongest glow effect, put it against a darker background or in a softly lit corner.
Avoid placing the sign in direct sunlight if you want the glow to stand out during the day. Faux neon looks strongest at night, in dim rooms, or as accent lighting. If you want daytime visibility, choose brighter LED neon flex instead of thin EL wire.
Mini-Neon Sign Experience: What It Feels Like to Make One
The first time you make a custom mini-neon sign, the process feels almost suspiciously easy. You lay down the template, bend the glowing line around the shape, attach a few clips, and suddenly the word on the table looks like it belongs in a tiny downtown studio. The most satisfying moment is the first power-on. Even a simple “hi” can feel like it has a personality. It is hard not to grin, because the project gives you a fast reward without demanding advanced skills.
One useful lesson from hands-on mini-neon projects is that simple designs usually win. A small heart made neatly often looks better than a complicated cursive phrase squeezed into a small space. Beginners often want to create something dramatic right away, but neon-style lighting rewards clean curves and confident spacing. After one or two projects, you start noticing which letters are easy. The letter “O” is friendly. The letter “S” needs patience. The letter “M” may try to ruin your afternoon if your material dislikes sharp corners.
Another experience worth mentioning is how much the backing affects the finished look. Clear acrylic makes the sign feel modern and airy. Black foam board makes the light pop harder. White backing feels cheerful but may reduce contrast. Wood backing gives the sign a cozy handmade feel, especially for words like “home,” “bake,” or “coffee.” If the same light is placed on three different backings, it can look like three different products.
Cable management is also a real-life lesson. In photos, DIY neon signs often look perfectly clean. In real life, there is always a battery pack, USB cord, or adapter trying to sneak into view. The trick is to plan where the power starts before attaching the light. Start near an edge, route the cable behind the board, and leave enough slack to plug it in comfortably. A sign can be beautiful, but if the cord stretches awkwardly across a wall, the illusion disappears.
Mini-neon signs are especially fun because they are easy to remake. If your first sign is not perfect, you can adjust clips, change the backing, or try a new word. That low-pressure quality makes the craft beginner-friendly. You are not carving marble. You are shaping light. Mistakes are usually fixable, and sometimes they inspire a better design. A crooked lightning bolt might become a playful cartoon style. A wobbly heart might look more handmade and charming than a perfect one.
The best part is how quickly a mini-neon sign changes a space. A plain desk becomes a streaming corner. A snack table becomes a party setup. A bookshelf becomes a backdrop. A small business display becomes more noticeable. Even a tiny sign can act like a visual anchor, telling the eye, “This area has a purpose.” For such a quick project, that is a pretty generous payoff.
Conclusion
Custom mini-neon signs in 10 minutes are not about building a commercial glass neon masterpiece. They are about using modern LED neon flex or EL wire to create a fast, personal, glowing accent that feels fun, stylish, and surprisingly polished. Keep the design short, use a template, choose prewired components, secure the light neatly, and respect basic electrical safety. Whether you are decorating a bedroom, upgrading a desk, styling a party table, or making a small business display more memorable, a mini-neon sign proves that a little light can do a lot of heavy lifting.
Start with one word. Make it glow. Then try not to make seven more signs in one weekend. No promises.
SEO Tags
Note: This article is written for web publishing and focuses on beginner-friendly faux neon signs using LED neon flex or EL wire, not traditional glass neon fabrication.


