Table of Contents >> Show >> Hide
- What Is a DIY Halloween Bean Mosaic?
- Why This Halloween Craft Works So Well
- Supplies You Will Need
- How to Make a DIY Halloween Bean Mosaic Step by Step
- Best Halloween Bean Mosaic Design Ideas
- Mistakes to Avoid
- How to Make Your Mosaic Look More Polished
- Ways to Adapt This Craft for Different Ages
- Storage, Cleanup, and Display Tips
- Experiences and Creative Moments With DIY Halloween Bean Mosaics
- Conclusion
Some Halloween crafts are adorable. Some are spooky. And some look like a pumpkin exploded in the craft aisle. A DIY Halloween bean mosaic, thankfully, lands in the sweet spot: festive, textured, affordable, and weirdly satisfying in the best possible way. With nothing more dramatic than dried beans, glue, and a sturdy base, you can create pumpkins, ghosts, bats, black cats, and other Halloween icons that feel handmade without looking accidental.
If you have ever wanted a seasonal project that is easy enough for kids, flexible enough for adults, and charming enough to display on a mantel, classroom wall, or entry table, this is it. Bean mosaics bring color, pattern, and texture together without requiring fancy tools, expensive supplies, or a PhD in hot glue. Better yet, they turn pantry staples into art. That bag of black beans sitting in the cabinet? It is now creative potential in a sack.
What Is a DIY Halloween Bean Mosaic?
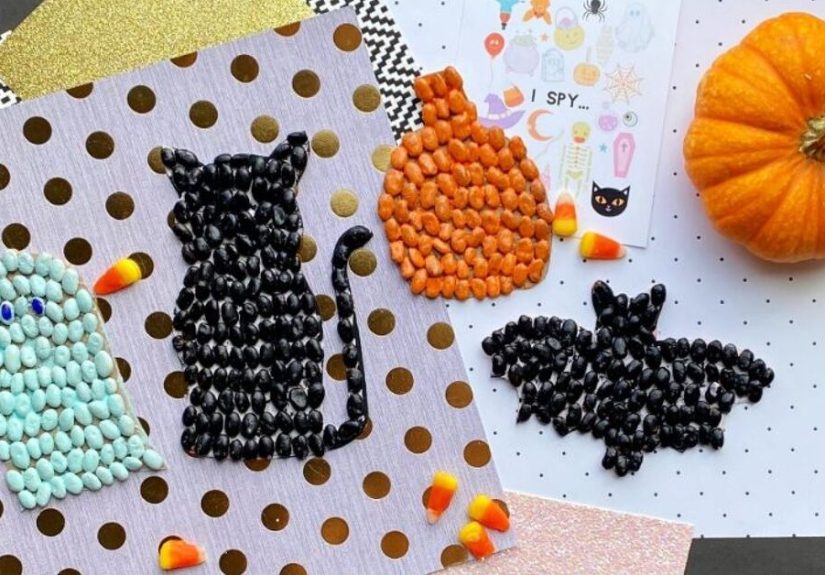
A bean mosaic is a craft made by gluing dried beans, peas, lentils, rice, corn, or other small pantry items onto a surface to form a picture or pattern. For Halloween, that picture usually becomes something delightfully seasonal: a jack-o’-lantern, a floating ghost, a bat silhouette, a candy corn design, or even a tiny haunted house if you are feeling ambitious and dramatic.
The appeal is simple. Beans come in natural shades of black, cream, tan, red, brown, and green, so they give your artwork built-in color and texture. Unlike flat crayons or paint, beans create a raised surface that looks rich and tactile. A pumpkin made from orange lentils and outlined with black beans has a lot more personality than a plain colored template. It practically says, “Yes, I am handmade, and yes, I am fabulous.”
Why This Halloween Craft Works So Well
There are plenty of reasons this project keeps showing up in family craft collections and seasonal DIY roundups. First, it is budget-friendly. You do not need specialty materials or a shopping cart full of glittery nonsense. Second, it is adaptable. Preschoolers can make simple shapes with help, while older kids and adults can work on more detailed designs. Third, it is surprisingly calming. Sorting beans by color and filling in sections of a design has the same gentle, repetitive satisfaction as coloring or puzzle-building, just with a bit more crunch potential if somebody bumps the table too soon.
It also works as a great no-carve Halloween activity. If you want pumpkin energy without handing children sharp tools, bean mosaics are a smart solution. You still get classic fall shapes and spooky fun, but the biggest danger is someone trying to use too much glue and creating a swamp where a ghost should be.
Supplies You Will Need
Base Materials
Start with a sturdy surface. Cardboard is the most practical choice because it is inexpensive, easy to cut, and strong enough to support the weight of dried beans. Poster board can work for lighter designs, but thick cardboard or foam board is usually better for larger projects. A cereal box is fine for a small ghost or bat, while shipping box cardboard is excellent for a pumpkin plaque you want to display.
Best Beans and Fillers for Halloween Colors
One of the best parts of making a DIY Halloween bean mosaic is choosing your “palette.” Black beans are perfect for outlines, bats, cat shapes, and spooky eyes. Red kidney beans and brown beans work well for shadows, tree branches, or haunted house details. White beans and rice are excellent for ghosts, moons, bones, and highlights. Green split peas and mung beans are ideal for pumpkin stems, vines, and eerie accents. Yellow lentils or corn can help with candy corn effects or warm fall backgrounds.
You do not need fifteen different legumes to make this work. In fact, using too many can make the design look busy. Pick four to six textures and colors that support your design. Think of it like decorating for Halloween: a few well-chosen pieces look stylish; twenty-seven clashing trends look like a haunted bargain bin.
Adhesives and Optional Finishing Supplies
For most projects, white school glue works beautifully. It dries clear, gives you enough working time to place the beans carefully, and is easy to use for family crafts. Tacky glue is another strong option because it is thicker and helps heavier beans stay in place. If you want a decorative finish once the mosaic is dry, you can brush on a light coat of decoupage medium. For display-only projects, that extra sealing layer can help reduce shedding and keep the design looking tidy.
Useful extras include a pencil, scissors, paper plates or small bowls for sorting beans, tweezers for detailed placement, and a paintbrush if you are applying glue or sealer in thin layers. Wax paper or a table cover is also wise unless you enjoy explaining to the dining table why it now has a permanent lentil attachment.
How to Make a DIY Halloween Bean Mosaic Step by Step
1. Choose a Simple Halloween Design
Start with a bold, recognizable shape. A pumpkin is the easiest beginner choice because it has clear sections and forgiving curves. Ghosts, bats, candy corn, black cats, spiderwebs, and witch hats are also excellent options. If you are working with children, bigger shapes with fewer tiny details are best. If you are crafting solo or with older kids, you can experiment with layered backgrounds, facial details, and mixed bean patterns.
2. Draw or Trace the Design
Sketch your design directly onto cardboard with pencil. If drawing is not your thing, trace a printable coloring page or a simple template. Keep the lines visible but light. The drawing is your roadmap, not the star of the show. You just need enough guidance so your ghost does not accidentally become a lumpy snowman with unresolved issues.
3. Sort the Beans Before You Glue
Pour each type of bean into a separate bowl, cup, or paper plate. This small step saves a surprising amount of time and frustration. Once glue is on the board, you do not want to rummage through a mixed pile like an archaeologist searching for one perfect black bean. Sorting first also helps you plan color placement and decide where texture contrast will matter most.
4. Outline the Main Shape
Apply glue to the outline of your design first. Use darker beans, such as black beans or kidney beans, to create definition. This makes the image easier to read from a distance and helps the finished piece look intentional. For pumpkins, outline the outer edge and facial features. For ghosts, define the body and eyes. For bats, focus on the wing shape.
5. Fill in the Design in Small Sections
Work one area at a time rather than coating the entire board with glue. Add glue to a manageable section, then place the beans while the adhesive is still tacky. This gives you better control and prevents the classic beginner mistake of creating a giant sticky field where everything slides around like it is auditioning for an ice show.
Try to place similar beans close together for a cleaner look. You can line them up neatly for a more polished mosaic or scatter them slightly for a rustic, organic style. Both approaches work. Just commit to one instead of switching halfway through like a decorator with stage fright.
6. Add Faces, Details, and Contrast
Halloween crafts live or die by their details. A jack-o’-lantern needs a grin. A ghost needs eyes. A bat needs crisp wing edges. Use smaller materials like lentils, rice, or split peas for areas that need precision. Contrast matters too. A white ghost on a pale background will disappear, while a ghost made from white beans against dark-painted cardboard looks dramatic and clean.
7. Let It Dry Flat
Once the mosaic is complete, let it dry flat for several hours or overnight. Do not prop it up too early. Do not “just quickly move it.” Do not test whether the beans are secure by poking them. That path leads to sorrow, loose lentils, and a sudden need to vacuum the floor.
8. Seal and Display if Desired
If the mosaic is meant for display rather than active handling, you can brush on a thin coat of decoupage medium after the glue is fully dry. Let that coat dry completely before adding another if needed. A sealer can help preserve the design and reduce bean shedding. Once finished, prop the piece on a shelf, frame it in a shadow box, hang it with twine, or use it as part of a Halloween centerpiece.
Best Halloween Bean Mosaic Design Ideas
A pumpkin is the obvious classic, and for good reason. Orange lentils, tan beans, black eyes, and a green split pea stem create instant Halloween charm. But there are plenty of other ideas worth trying. A ghost made with white beans on black cardboard looks graphic and bold. A bat silhouette made from black beans and outlined with rice pops beautifully. Candy corn can be recreated with white beans, yellow lentils, and orange materials in layered bands. A black cat with green pea eyes is charmingly spooky without being too scary for young children.
You can also think beyond single shapes. Create a trio of mini mosaics: pumpkin, ghost, and bat. Make a Halloween banner with individual cardboard cutouts. Turn several small mosaics into place cards for a party table. Use bean mosaics as classroom bulletin board pieces or window ledge decor. The project scales up or down easily, which is part of its magic.
Mistakes to Avoid
The biggest mistake is choosing a flimsy base. Thin paper buckles under glue and the weight of beans, which can turn your project into a warped little tragedy. The second is using too much glue. More glue does not equal better adhesion. It usually equals slow drying, sliding beans, and sticky edges. Another common error is making the design too detailed for the size. Tiny witch eyelashes made from giant lima beans are not a winning strategy.
Rushing the drying process is another problem. If you stack, move, or hang the mosaic before it sets, pieces can fall off. Finally, do not ignore color planning. Halloween designs look strongest when there is clear contrast between the image and the background. Your pumpkin should stand out. Your ghost should glow. Your bat should not vanish into artistic confusion.
How to Make Your Mosaic Look More Polished
Use a painted background if you want a cleaner finish. Black, orange, deep purple, and dark green all work beautifully for Halloween. Keep outlines strong and shapes simple. Repeat textures in intentional sections instead of scattering random beans everywhere. Leave a small margin around the edge so the design has room to breathe. And if you are sealing the piece, apply thin coats rather than one heavy layer.
You can also combine bean sizes strategically. Large beans create bold areas, while smaller lentils or rice fill tight spaces and smooth awkward gaps. Think of your mosaic like a puzzle of shapes and textures. The more thoughtfully each piece is placed, the more elevated the final craft feels.
Ways to Adapt This Craft for Different Ages
For preschoolers, keep the design large and use just a few bean types. Pre-draw the shape and let them fill it in with supervision. For elementary-age kids, encourage simple pattern-making inside the shape, like alternating rows on a pumpkin or a two-tone wing on a bat. For tweens and teens, introduce shading, layered colors, or mixed media by combining painted backgrounds with bean details. Adults can turn the project into rustic Halloween decor with cleaner composition, heavier cardboard, and a finishing sealer.
This flexibility is one reason the DIY Halloween bean mosaic remains such a practical seasonal craft. It can be cute, elegant, kid-friendly, farmhouse-style, classroom-ready, or gloriously weird depending on the choices you make.
Storage, Cleanup, and Display Tips
Store leftover beans in labeled containers so you can use them for future crafts. Keep finished mosaics in a dry area, especially if you did not seal them. Moisture and pantry materials are not best friends. To display them, lean them on mini easels, attach string for hanging, or incorporate them into a seasonal tray with mini pumpkins and candles. Cleanup is easy if you plan ahead: shake excess beans off your work surface, fold up the table cover, and rescue any usable pieces before the vacuum declares victory.
Experiences and Creative Moments With DIY Halloween Bean Mosaics
One of the best things about this craft is the experience around it, not just the final piece. A DIY Halloween bean mosaic has a way of slowing people down. In a season that can quickly become a blur of costumes, candy wrappers, and last-minute decorations, sitting at a table and arranging beans one by one feels almost refreshingly old-school. It is hands-on, a little messy, and surprisingly cozy.
In family settings, this craft often becomes less about perfection and more about personality. One child makes a pumpkin with three eyes because “it looks cooler.” Another turns a ghost into a smiling marshmallow blob. An adult starts with the noble intention of helping and then somehow becomes intensely competitive about making the best bat wings on the block. That is part of the fun. The project invites creativity without demanding precision, so people relax and let the design evolve.
It is also the kind of craft that creates funny little memories. Someone always spills the rice. Someone always asks whether beans can be spray-painted. Someone always eats the candy corn that was supposed to be “just for color inspiration.” By the time the mosaics are drying, the table looks like fall collided with a pantry explosion, but in an oddly satisfying way. The room smells faintly like glue and seasonal ambition.
Teachers and parents often appreciate how this project quietly holds attention. Kids who normally bounce from activity to activity may sit longer than expected, focused on choosing colors and filling shapes. There is a tactile reward in hearing the tiny tap of beans hitting cardboard and seeing a flat drawing become textured art. Even adults get pulled in. What starts as a simple holiday craft can feel meditative, especially when you are outlining a ghost with black beans or filling a moonlit background with split peas and rice.
Another great experience tied to this craft is the chance to use what you already have. There is something deeply satisfying about making decor from pantry items that would otherwise sit on a shelf. It feels resourceful without feeling cheap. Instead of buying another plastic Halloween sign, you end up with something handmade, textured, and unique. No two bean mosaics ever look exactly alike, and that imperfection is part of the charm.
Perhaps the most memorable part comes after the project is finished. A child proudly points to the crooked little pumpkin on the wall and says, “I made that.” Guests notice the texture. Someone reaches out to touch the beans. The mosaic becomes more than a decoration; it becomes a story from a specific afternoon, a rainy weekend, a classroom craft hour, or a family October night with cider nearby and paper plates full of lentils on the table. That is what makes a DIY Halloween bean mosaic worth doing. It is not just seasonal decor. It is an experience with glue on its sleeves and a lot of character.
Conclusion
A DIY Halloween bean mosaic is one of those rare crafts that checks nearly every box. It is affordable, creative, customizable, family-friendly, and visually fun. You can keep it simple with a pumpkin and a handful of beans, or build something more detailed with layered textures and bold Halloween colors. Either way, the result feels handmade in the best sense of the word: warm, personal, and just quirky enough to be memorable.
If you want a Halloween project that brings together art, texture, and seasonal spirit without requiring advanced tools or a giant budget, this craft deserves a place on your October list. Just remember: sturdy base, smart color choices, light glue, and patience while drying. Do that, and your spooky little masterpiece will look intentional instead of like your pantry staged a rebellion.


