Table of Contents >> Show >> Hide
- Before You Enable a Cisco Switch Port
- Step 1: Connect to the Cisco Switch
- Step 2: Enter Privileged EXEC Mode
- Step 3: Check the Current Port Status
- Step 4: Enter Global Configuration Mode
- Step 5: Select the Interface You Want to Enable
- Step 6: Configure the Port Type and VLAN
- Step 7: Enable the Port with the No Shutdown Command
- Step 8: Verify the Port and Save the Configuration
- Quick Command Cheat Sheet
- Troubleshooting: What If the Cisco Port Still Does Not Work?
- Best Practices for Enabling Cisco Switch Ports
- Specific Example: Enabling a Port for a Front Desk Computer
- Experience Notes: Real-World Lessons from Enabling Cisco Switch Ports
- Conclusion
Enabling a port on a Cisco switch sounds simple: log in, type a few commands, and watch the link light come alive like a tiny green celebration. In real network life, though, there are a few details that matter. You need to know which interface you are changing, whether the port should be an access port or trunk port, whether it belongs to the right VLAN, and whether the port is merely administratively shut down or stuck in an error-disabled state because something else went sideways.
This guide walks through the practical, beginner-friendly way to enable a Cisco switch port using the command-line interface. The main command is no shutdown, but the best practice is not to throw that command around like confetti. A Cisco switch port connects real devices: computers, printers, wireless access points, IP phones, uplinks, servers, cameras, and sometimes that one mystery cable nobody admits installing. So before you enable a port, it helps to verify, configure, test, and save your changes properly.
Below are eight clear steps for enabling a port on a Cisco switch, plus examples, troubleshooting tips, and field-tested advice for avoiding those “why did the network just get weird?” moments.
Before You Enable a Cisco Switch Port
Before touching the configuration, make sure you have permission to administer the switch. Enabling the wrong port can reconnect an unauthorized device, create a loop, expose the wrong VLAN, or bring an unused wall jack back to life. In a lab, that may be funny. In production, it can become a very long afternoon.
You should also confirm the interface name. Cisco switches use names such as FastEthernet0/1, GigabitEthernet1/0/10, TenGigabitEthernet1/1/1, or shorter versions like Fa0/1, Gi1/0/10, and Te1/1/1. The exact format depends on the switch model and platform.
Step 1: Connect to the Cisco Switch
Start by connecting to the switch through the console port, SSH, or a secure terminal session. SSH is preferred for remote administration because it encrypts the session. Console access is common when the switch is new, unreachable, or having a dramatic networking moment.
Once connected, you will usually land at a prompt that looks like this:
This is user EXEC mode. You can view some information from here, but you cannot make configuration changes yet. Think of it as standing in the lobby. Nice view, limited access.
Step 2: Enter Privileged EXEC Mode
To make changes, enter privileged EXEC mode by typing:
The prompt changes from > to #, which means you now have higher-level access. Depending on the switch configuration, you may be asked for an enable password or secret.
Privileged EXEC mode lets you run important show commands, copy configurations, reload the device, and enter global configuration mode. In other words, this is where you should slow down, double-check your target port, and avoid typing like you are racing a microwave timer.
Step 3: Check the Current Port Status
Before enabling anything, inspect the interface. This helps you understand whether the port is disabled, disconnected, error-disabled, assigned to the wrong VLAN, or already working perfectly while someone sent you on a networking treasure hunt.
Use one or more of these commands:
The show interfaces status command gives a quick table with the port name, status, VLAN, duplex, speed, and type. You may see statuses such as connected, notconnect, disabled, or err-disabled.
What Common Port Status Messages Mean
Disabled usually means the port has been administratively shut down with the shutdown command. This is the classic case where no shutdown can bring the port back administratively.
Notconnect means the port is enabled but does not detect an active link. This may be normal if nothing is plugged in. It may also mean the cable, patch panel, endpoint, SFP, or remote port needs attention.
Connected means the physical link is up. If users still cannot communicate, check VLANs, trunks, IP addressing, access control lists, authentication, or upstream routing.
Err-disabled means the switch disabled the port because of a detected problem, such as BPDU Guard, port security violation, link flapping, EtherChannel misconfiguration, storm control, or unsupported transceiver behavior. Do not simply enable it again without finding the cause, or the port may shut itself down again faster than you can say “change window.”
Step 4: Enter Global Configuration Mode
After confirming the target port, enter global configuration mode:
Global configuration mode is where you can change device-wide settings or move into a specific interface. This is also a good time to confirm you are working on the correct switch. In stacked environments, port numbering can be easy to misread. For example, Gi1/0/10 and Gi2/0/10 may be the same port number on different stack members.
Step 5: Select the Interface You Want to Enable
Now enter interface configuration mode for the port you want to enable. Replace the example interface with your real port:
You can also use abbreviated interface names:
If you need to enable several ports with the same configuration, you can use an interface range:
Use interface ranges carefully. They are convenient, but they can also multiply mistakes. One wrong range can turn a single-port task into a “why are three printers on the voice VLAN?” situation.
Step 6: Configure the Port Type and VLAN
If the port is for a regular end device such as a computer, printer, camera, or access point management connection, it is usually configured as an access port. An access port carries traffic for one VLAN, except in cases such as voice VLAN configurations for IP phones.
Example access port configuration:
The description command is optional, but it is one of those small habits that makes future troubleshooting much easier. A good description tells the next administrator what is connected, where it goes, or why the port exists. Future-you counts as “the next administrator,” and future-you appreciates snacks and documentation.
If the port connects to another switch, router-on-a-stick interface, firewall, hypervisor, or device that must carry multiple VLANs, it may need to be a trunk port:
Do not configure a trunk unless you actually need one. Trunks can carry multiple VLANs, which is powerful, but power and accidental broadcast chaos are distant cousins. For user-facing wall ports, access mode is usually safer and clearer.
Step 7: Enable the Port with the No Shutdown Command
Now comes the main event. To enable the Cisco switch port, type:
The no shutdown command removes the administrative shutdown state from the interface. If a valid cable and active device are connected, the port may transition to up/up or connected after a short delay. If nothing is connected, it may remain notconnect, which is normal.
A complete access port example looks like this:
If you are recovering a port that was error-disabled, first correct the actual problem. Then, in many cases, you can reset the interface with:
This administrative bounce can re-enable the interface after the root cause is fixed. If the violation or physical problem still exists, the port may return to error-disabled state.
Step 8: Verify the Port and Save the Configuration
After enabling the port, verify the result:
For a quick connectivity check, you can also use:
The MAC address table can show whether the switch is learning a device on the port. CDP or LLDP can reveal connected network devices, IP phones, access points, and other infrastructure gear when those discovery protocols are enabled.
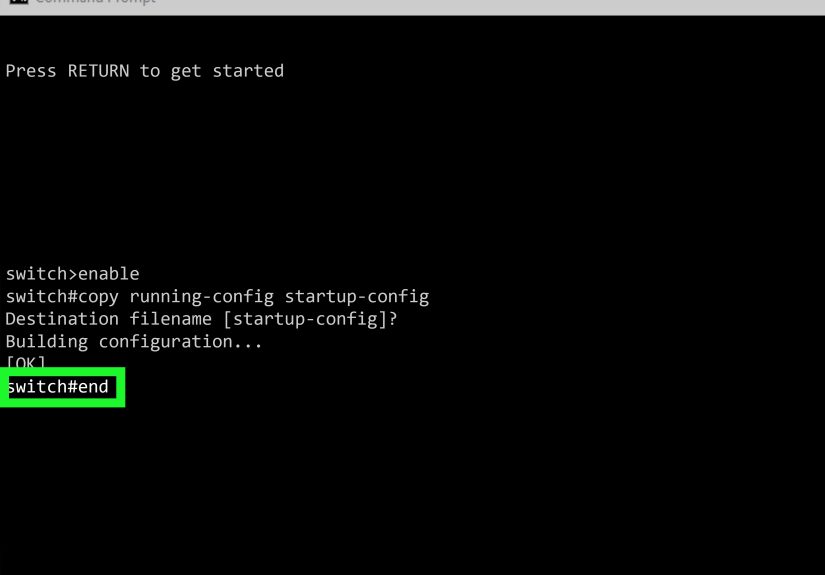
If the change works and should survive a reboot, save the running configuration to startup configuration:
Some administrators use:
Both are commonly seen, but copy running-config startup-config is explicit and easy for newer administrators to understand. If you do not save the configuration, the port may revert after a reload. Nothing says “networking comedy” like fixing the same port twice because the first fix lived only in RAM.
Quick Command Cheat Sheet
Troubleshooting: What If the Cisco Port Still Does Not Work?
The Port Says Notconnect
If the port is enabled but shows notconnect, check the physical layer first. Confirm the cable is plugged in at both ends, test with a known-good patch cable, try a different endpoint, and verify the patch panel path. For fiber or SFP ports, confirm compatible optics, correct fiber type, and matching speed requirements.
The Port Is Err-Disabled
If the port is err-disabled, inspect logs and the error-disabled reason:
Common causes include BPDU Guard receiving a bridge protocol data unit on a protected access port, port security detecting an unauthorized MAC address, link flap events, storm control thresholds, or channel-group mismatches. Fix the cause before re-enabling the interface.
The Port Is Up, But the Device Cannot Reach the Network
If the port is connected but traffic fails, check VLAN assignment. A computer in VLAN 20 will not behave correctly if the port was accidentally assigned to VLAN 30. Also check DHCP availability, default gateway configuration, ACLs, 802.1X authentication, and whether the upstream trunk allows the VLAN.
A PoE Device Does Not Power On
For IP phones, cameras, and wireless access points, link status is only part of the story. Check Power over Ethernet with:
If the switch power budget is exhausted, the device may not power up even though the port configuration looks perfect. Also verify that power inline never is not configured on the interface.
Best Practices for Enabling Cisco Switch Ports
First, label and document ports. A description such as description AP-Lobby-Ceiling is far more useful than a blank line in the configuration. Second, assign user ports to the correct access VLAN and avoid leaving active user ports in the default VLAN unless your design specifically requires it.
Third, do not enable unused ports casually. Many organizations keep unused switch ports shut down for security. If a port is not assigned to a known device or location, confirm before activating it. Fourth, be careful with trunk ports. A trunk should be intentional, documented, and limited to the VLANs that need to cross it.
Finally, verify and save. The best network engineers do not trust a command just because the switch accepted it. They check the operational status, confirm the intended VLAN, test connectivity, and save only after the change behaves as expected.
Specific Example: Enabling a Port for a Front Desk Computer
Imagine a front desk PC is plugged into port Gi1/0/10, and the office data VLAN is VLAN 20. The port was previously disabled because the desk was unused. You want to enable it safely.
This sequence checks the port, configures it clearly, enables it, verifies activity, and saves the change. It is simple, clean, and much less likely to create confusion later.
Experience Notes: Real-World Lessons from Enabling Cisco Switch Ports
In real environments, enabling a Cisco switch port is rarely just about one command. The command is easy; the context is where the work lives. One common experience is discovering that the port was shut down for a reason nobody wrote down. Maybe it connected to an old unmanaged switch that caused a loop. Maybe it was tied to a conference room jack where visitors kept plugging in unknown devices. Maybe it was disabled during an office move and never documented. Before enabling a port, it is worth asking, “Why was this disabled in the first place?” That question can save you from reintroducing an old problem wearing a new cable.
Another practical lesson is that port descriptions are not decorative. They are operational gold. When a switch has forty-eight ports and half of them say nothing, troubleshooting becomes detective work. A simple description like Finance-Printer-East, AP-3rd-Floor-Hall, or Uplink-to-Core-1 can reduce guesswork immediately. Good descriptions also help during audits, migrations, and emergency repairs. The best time to add a description is when you configure the port. The second-best time is now.
VLAN accuracy is another place where experience matters. A port can be enabled, physically connected, and still completely wrong if it is in the wrong VLAN. The user may say, “The cable works, but I have no internet.” The switch may say, “Connected.” Both can be true. If the device lands in the wrong network segment, DHCP may fail, the gateway may be unreachable, or security policies may block access. Always verify the VLAN shown in show interfaces status and compare it with the intended network design.
Error-disabled ports deserve special respect. New administrators sometimes try shutdown and no shutdown immediately, hoping the port will behave. Sometimes it does, briefly. But if BPDU Guard, port security, storm control, or link flapping caused the shutdown, the port may disable itself again. The better workflow is to read the logs, identify the cause, correct the root problem, and then re-enable the port. Treat err-disable like a smoke alarm. You can silence it, but first make sure the kitchen is not actually on fire.
PoE ports add another layer of reality. A wireless access point or IP phone may need both data and power. If the port is enabled but the device stays dark, check the power budget, cable length, and PoE configuration. Long cable runs, damaged patch cords, overloaded power budgets, or disabled inline power can all make the port look fine on paper while the device refuses to wake up.
The final experience-based tip is to save changes intentionally. In a busy day, it is easy to enable a port, confirm the user is happy, and move on. Then the switch reloads during maintenance, and the fix disappears. Make verification and saving part of the same habit. Enable, test, document, save. It is not glamorous, but neither is explaining why the same desk lost connectivity again after a power event.
Conclusion
Enabling a port on a Cisco switch is straightforward when you follow a careful process. Connect to the switch, enter privileged mode, inspect the port, configure the correct interface, assign the proper port mode and VLAN, run no shutdown, verify the result, and save the configuration. The key is not only knowing the command, but also understanding what the port is supposed to do.
A good Cisco switch port configuration is clear, intentional, and easy to troubleshoot later. Use descriptions, verify VLANs, watch for err-disabled states, check PoE when needed, and avoid enabling mystery ports without context. With those habits, the humble no shutdown command becomes more than a switch port wake-up call. It becomes part of a reliable network administration workflow.


