Table of Contents >> Show >> Hide
- First, Know What “Display Size” Actually Means
- The 10 Steps to Adjust Display Size on Windows 10
- Step 1) Open Display Settings (the fast way)
- Step 2) If you have multiple monitors, select the right screen first
- Step 3) Adjust “Scale” to make everything bigger (or smaller)
- Step 4) Apply the changeand sign out if Windows acts stubborn
- Step 5) Use Advanced Scaling Settings for custom sizing (carefully)
- Step 6) Set the correct display resolution (sharpness + workspace)
- Step 7) Check orientation and “layout” settings (especially for rotated screens)
- Step 8) Make text bigger without changing everything else
- Step 9) Fix blurry or weirdly scaled apps (per-app High DPI override)
- Step 10) If your desktop doesn’t fit the screen (TV overscan), fix overscan/underscan
- Quick Troubleshooting: What to Do If Things Still Look Wrong
- FAQ
- Real-World Experiences: My “Display Size Fix” Greatest Hits
- Conclusion
If your Windows 10 screen looks like it’s either auditioning for a dollhouse (tiny text) or
trying to win a billboard award (huge icons), you don’t need new glassesor a new computer.
You need the right combo of Scale, Resolution, and a couple of “secret handshake”
settings Windows keeps tucked away like it’s protecting state secrets.
This guide walks you through 10 practical steps to adjust display size on Windows 10, including:
making everything bigger (or smaller), changing screen resolution, fixing blurry apps, and even handling
the classic “I plugged into a TV and now my desktop is wearing a crop top” overscan problem.
First, Know What “Display Size” Actually Means
In Windows 10, “display size” can refer to a few different knobs:
- Scale: Makes text, apps, icons, and UI elements bigger or smaller without changing resolution.
- Resolution: Changes how many pixels are used (sharpness and workspace size).
- Text-only size: Makes just the text bigger (great if icons are fine, but menus look microscopic).
- Per-app DPI fixes: Helps when one stubborn app refuses to scale nicely.
- TV overscan/underscan: Fixes the “my screen is cut off” situation on TVs/AV receivers.
Pro tip: If your screen is sharp but everything is too small, start with Scale.
If things look stretched, fuzzy, or you can’t fit content properly, check Resolution.
The 10 Steps to Adjust Display Size on Windows 10
Step 1) Open Display Settings (the fast way)
Right-click an empty spot on your desktop and select Display settings.
(Or press Windows + I → System → Display.)
Step 2) If you have multiple monitors, select the right screen first
Under Select and rearrange displays, click the monitor you want to adjust.
Windows highlights the selected display, and that’s the one your changes apply to.
If you’re not sure which is which, click Identify so Windows shows big numbers on each screen.
(Yes, it’s like putting name tags on your monitors. No shame.)
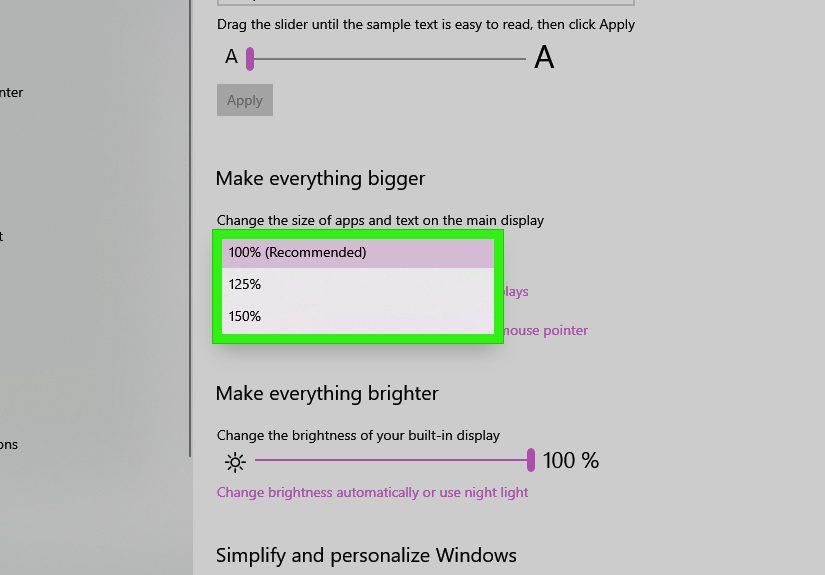
Step 3) Adjust “Scale” to make everything bigger (or smaller)
Scroll to Scale and layout. Find the dropdown that says
Change the size of text, apps, and other items (often shown as a percentage).
- 100% = default size (usually best on 1080p monitors at normal sizes)
- 125% = a common sweet spot for laptops and smaller monitors
- 150%+ = helpful for high-resolution screens or when you sit farther away
Start with the option marked (Recommended). Windows picks that based on your display.
Step 4) Apply the changeand sign out if Windows acts stubborn
After changing Scale, Windows may prompt you to sign out to fully apply it.
If things don’t look right immediately (or some apps refuse to cooperate), sign out and back inor reboot.
Example: You set Scale to 125% but your taskbar icons look like they didn’t get the memo.
A quick sign-out usually fixes that.
Step 5) Use Advanced Scaling Settings for custom sizing (carefully)
Still not perfect? Click Advanced scaling settings.
Here you can enter a custom scaling value (like 110% or 135%) if the presets feel “too big” or “too small.”
A friendly warning: custom scaling can sometimes make certain apps look blurry or oddly spaced.
If your screen starts looking like it’s been lightly smeared with petroleum jelly, don’t panicyou can undo it.
- If you used custom scaling and want to reset, return here and remove/clear the custom value (or set it back to 100%).
- Look for the option that lets Windows help reduce blurry scaling issues (when available in your build).
Step 6) Set the correct display resolution (sharpness + workspace)
Back in Scale and layout, find Display resolution.
Choose the one marked (Recommended) for the sharpest, most natural look.
What happens if you pick the “wrong” one?
- Too low: everything looks bigger, but softer/blurry (like watching HD through a fog machine).
- Too high (or unsupported): text can get tiny, or the screen may not display properly.
If you’re using a 24-inch 1080p monitor, 1920×1080 is usually the right resolution.
If you’re on a 4K display, 3840×2160 is typically correctthen you use Scale to make items readable.
Step 7) Check orientation and “layout” settings (especially for rotated screens)
If your screen suddenly looks like it’s lying on its side, check Display orientation.
Set it to Landscape (most common) or Portrait if you physically rotated the monitor.
This doesn’t change “size,” but it can change how content fits and feelsespecially on vertical monitors used for reading,
coding, or pretending you’re a Wall Street chart wizard.
Step 8) Make text bigger without changing everything else
If icons are fine but menus and reading text are too small, change text size only.
Go to Start → Settings → Ease of Access → Display,
then use Make text bigger and click Apply.
This is perfect for people who want comfortable reading without turning the whole interface into a children’s picture book.
Step 9) Fix blurry or weirdly scaled apps (per-app High DPI override)
Some older apps (and a few newer ones that should honestly know better) don’t scale cleanly.
If one app is blurry or the UI looks “off,” use the app’s High DPI settings:
- Right-click the app’s shortcut or its .exe file → Properties
- Open the Compatibility tab
- Click Change high DPI settings
- Enable the override and try different scaling modes (often Application works best for crisp text)
Use this when: Windows looks fine overall, but one program insists on being blurry, huge, or tiny.
Step 10) If your desktop doesn’t fit the screen (TV overscan), fix overscan/underscan
If the edges of your desktop are cut off on a TV, you’re dealing with overscan.
The best fix is usually on the TV itself: look for settings like Just Scan, 1:1,
Screen Fit, Full Pixel, or Aspect Ratio.
If the TV settings don’t solve it, use your graphics control panel:
- Intel: Intel Graphics Command Center → Display → Scale → Custom sliders until it fits.
- NVIDIA: NVIDIA Control Panel → Display → Adjust desktop size and position (and/or Resize desktop).
- AMD: AMD Software/Radeon Settings → Display → HDMI Scaling slider (when available).
Bonus clarity move: run ClearType tuning if text looks fuzzy. Search Windows for “ClearType”
and follow the on-screen wizard to pick the sharpest text samples.
Quick Troubleshooting: What to Do If Things Still Look Wrong
If everything is huge suddenly
- Check Scale (you may have bumped it to 175% or 200%).
- Check browser zoom: Ctrl + 0 resets zoom in most browsers.
- If you’re using Magnifier, turn it off with Windows + Esc.
If everything is tiny but sharp
- Raise Scale to 125% or 150%.
- Or increase text size only if you like the current UI spacing.
If text is blurry after scaling
- Try a different Scale preset (125% sometimes looks cleaner than a custom 117%).
- Use Advanced scaling options that help with blurry apps (when available).
- Apply the per-app DPI override (Step 9).
- Run ClearType tuning (Step 10 bonus).
If you have two monitors and one looks “off”
Don’t assume both displays should use the same Scale and resolution.
A 27-inch 1440p monitor and a 24-inch 1080p monitor may need different scaling to feel “the same size.”
Set each monitor individually (Step 2), then adjust.
FAQ
Should I change Scale or Resolution to make things bigger?
Usually Scale. Resolution should typically stay at (Recommended) for sharpness.
Lowering resolution can make things bigger, but it often looks fuzzier.
Why do some apps ignore my scaling?
Some apps aren’t DPI-aware (or only partially aware). That’s exactly why the per-app High DPI override exists (Step 9).
What’s a good “default” setup?
There isn’t one perfect setup, but here’s a practical baseline:
- Use the resolution marked (Recommended).
- Use the Scale marked (Recommended), then tweak one step up/down if needed.
- Use text-only sizing if reading is the only pain point.
Real-World Experiences: My “Display Size Fix” Greatest Hits
I’ve adjusted Windows 10 display size enough times to have a complicated relationship with the word “scaling.”
The first time I did it, I thought changing resolution was the obvious movebecause bigger numbers must mean bigger things, right?
Wrong. I dropped a monitor from its recommended resolution, the icons did get bigger… and everything looked like it was being
broadcast through a slightly damp sock. That was my “aha” moment: resolution is for clarity, and scale is for comfort.
The second most common scenario in my life is the “new laptop surprise.” You open a shiny Windows 10 laptop with a high-resolution screen,
and the text is so tiny you start leaning in like you’re trying to read ants’ legal documents. The fix is almost always the same:
leave the resolution alone and bump Scale to 125% or 150%. It’s such a simple change that it feels suspiciouslike Windows
is letting you win too easily. But it works, and suddenly your eyeballs stop filing complaints.
Then there’s the multi-monitor circus. I once paired a 27-inch display with a smaller screen and wondered why my mouse pointer felt like it
teleported into a different universe when it crossed the seam. The trick was realizing each monitor is its own little country with its own laws:
select each display in Settings and tune Scale and resolution separately. Once I matched the “feel” (not necessarily the numbers), dragging windows
between screens stopped feeling like moving furniture between two apartments with different door sizes.
My personal favorite mess, though, is connecting a PC to a TV. You plug in HDMI, Windows detects the display, and immediately your taskbar is cut off.
Now you’re living in a world where the Start button is half visible, like it’s shy. The first instinct is to blame Windows.
Sometimes the real culprit is the TV’s picture modeanything from “Zoom” to “Wide” to “Why would anyone ever want to see the whole image?”
Once you find settings like “Just Scan,” “Screen Fit,” or “1:1,” the desktop snaps into place and you feel like you just solved a puzzle box.
When TV settings fail, the GPU tools are the next stop. Intel’s custom scaling sliders can be a lifesaver.
NVIDIA’s resize/desktop size controls feel slightly intimidating at firstlike you might accidentally unlock a secret level of the computer
but once you’re in the right menu, it’s just a matter of nudging the desktop until it fits. AMD’s HDMI Scaling is similarly satisfying when it’s available:
one slider, instant sanity.
Finally, the “blurry app” problem deserves a special mention. Windows can look perfectly crisp, but one older program shows up with smeared text.
That’s when the High DPI override trick feels like magic. You change a setting, reopen the app, and suddenly the UI becomes readable instead of
looking like it was printed on a moving bus. The best part is that you don’t have to sacrifice your whole system’s scaling just to make one
rebellious app behave.
If there’s one lesson I keep coming back to, it’s this: don’t fight your monitor’s recommended resolution.
Use Scale for size, use text-only settings for reading comfort, and keep the “advanced” tools in your back pocket for the weird edge cases.
Windows 10 display size fixes aren’t hardyou just need the right lever for the right problem (and maybe a little patience for that sign-out prompt).
Conclusion
Adjusting display size on Windows 10 is mostly about choosing the right combination of Scale and Resolution,
then applying targeted fixes when a specific app or external display misbehaves. Follow the 10 steps above, stick with recommended settings as your
starting point, and you’ll get a screen that’s comfortable, sharp, and not secretly trying to prank you.


