Table of Contents >> Show >> Hide
- What Plumber’s Putty Does (and Doesn’t) Do
- Plumber’s Putty vs. Silicone: A Quick Decision Guide
- Tools and Materials
- How to Apply Plumber’s Putty: 12 Steps
- Step 1: Confirm compatibility (this saves regrets)
- Step 2: Shut off water (if you’re touching supply lines)
- Step 3: Dry-fit the parts so you know what “right” looks like
- Step 4: Remove old putty, old caulk, and old mystery gunk
- Step 5: Clean and dry both mating surfaces
- Step 6: Warm and knead the putty until it’s pliable
- Step 7: Roll an even rope (a “putty snake,” if you want to sound fancy)
- Step 8: Place the putty where it belongs (usually under the flange)
- Step 9: Seat the fixture straight down (no twisting victory dance)
- Step 10: Tighten gradually and evenly (snug beats “gorilla-tight”)
- Step 11: Remove the squeeze-out neatly (future-you will thank you)
- Step 12: Reconnect, test for leaks, and do a second check
- Troubleshooting: Common Problems (and Fixes That Actually Work)
- FAQ: Quick Answers to Real Questions
- Real-World Experiences: What People Learn After a Few Installs (So You Don’t Have To)
- Conclusion
- SEO JSON
Plumber’s putty is one of those old-school plumbing “cheat codes” that feels like it shouldn’t work.
It’s basically soft, moldable goopyet it can keep a sink strainer watertight for years. The secret is
that plumber’s putty isn’t a glue and it isn’t magic. It’s a bedding compound: you compress it
between two rigid surfaces so water can’t sneak through the tiny gaps.
In this guide, you’ll learn how to apply plumber’s putty in 12 clear steps, plus when to use silicone instead,
how to avoid stains on stone countertops, and what to do if your “perfect install” still drips like it’s crying for help.
What Plumber’s Putty Does (and Doesn’t) Do
Think of plumber’s putty like a custom-fit gasket you make with your hands. It stays flexible, fills micro-gaps,
and creates a watertight seal when a flange is tightened down. That’s why it’s commonly used for
sink basket strainers, pop-up drains, and some faucet bases.
What it doesn’t do: it doesn’t bond parts together, it’s not meant for high-pressure leaks, and it’s not a substitute
for caulk around showers, tubs, or toilets. If a connection needs adhesion or needs to withstand movement,
putty is usually the wrong tool for the job.
Plumber’s Putty vs. Silicone: A Quick Decision Guide
If you’re stuck choosing between putty and silicone, here’s a simple way to decide:
- Use plumber’s putty for removable, compression-style seals on rigid surfaces (common examples: metal drain flange to a porcelain/stainless sink, basket strainer seating, many sink drain flanges).
- Use silicone when you need adhesion, flexibility, or long-term water exposure in open areas (common examples: sealing around tubs/showers, toilets, and many plastic/stone applications).
- When in doubt, follow the fixture’s instructions. Many modern drains ship with gaskets designed to do the sealingputty may be optional, or even discouraged.
Also: regular (oil-based) putty can stain porous stone and may not be compatible with some plastics.
If you’re working with granite, marble, quartz, or plastic components, read labels carefully and consider a
stain-free/oil-free putty or silicone instead.
Tools and Materials
- Plumber’s putty (regular or stain-free, depending on surfaces)
- Clean rags or paper towels
- Plastic scraper or old credit card (for cleanup/removal)
- Putty knife (optional but handy)
- Adjustable wrench or channel-lock pliers
- Basin wrench (often needed for faucets)
- Mild dish soap + warm water (for cleaning surfaces)
- Optional: mineral spirits for stubborn residue on metal (spot-test first), nitrile gloves for clean hands
How to Apply Plumber’s Putty: 12 Steps
-
Step 1: Confirm compatibility (this saves regrets)
Before you touch the putty, check what you’re sealing:
stone counters, plastic drain parts, and acrylic are where people get burned (sometimes literallyby their own frustration).
If the label says “not for plastic” or “may stain porous stone,” believe it.Rule of thumb: metal-to-porcelain/stainless is usually putty-friendly. Plastic parts and porous stone may need
stain-free putty or silicone. If you’re not sure, choose the product the manufacturer recommends. -
Step 2: Shut off water (if you’re touching supply lines)
If you’re installing a faucet, pop-up drain, or anything connected to supply lines, turn off the shutoff valves.
For a simple sink strainer swap, you might not need to shut water offbut you do want the sink dry and the work area clear. -
Step 3: Dry-fit the parts so you know what “right” looks like
Assemble the drain or strainer without putty first (just hand-tight).
This helps you understand which parts go above vs. below the sink, which side the gasket faces, and where putty belongs.
It also prevents the classic mistake of applying putty beautifully… to the wrong surface. -
Step 4: Remove old putty, old caulk, and old mystery gunk
Putty seals best when it’s contacting clean, rigid surfaces.
Scrape off old putty with a plastic scraper to avoid scratching. For stubborn bits, a putty knife can helpjust use a light touch.
Remove any silicone residue too, because silicone left behind can create channels that encourage leaks. -
Step 5: Clean and dry both mating surfaces
Wipe the underside of the flange and the sink surface where it will sit. Remove soap scum, grease, waxy cleaners, and dust.
Then dry everything. Putty can tolerate a little moisture, but you’ll get a better seal when surfaces are dry. -
Step 6: Warm and knead the putty until it’s pliable
Pull off a golf-ball-sized chunk (more for big strainers, less for small drains).
Knead it in your hands until it feels like firm modeling clay. If it cracks and crumbles instead of stretching,
it’s probably too oldfresh putty should roll smoothly. -
Step 7: Roll an even rope (a “putty snake,” if you want to sound fancy)
Roll the putty between your palms into a rope that’s evenly thickcommonly around 1/4 to 1/2 inch,
depending on the gap you’re filling. The goal is a continuous bead that will compress and squeeze out slightly when tightened.Important: don’t try to patch a too-short rope by sticking on extra pieces. That seam is a future leak.
If you’re short, reroll a longer rope. -
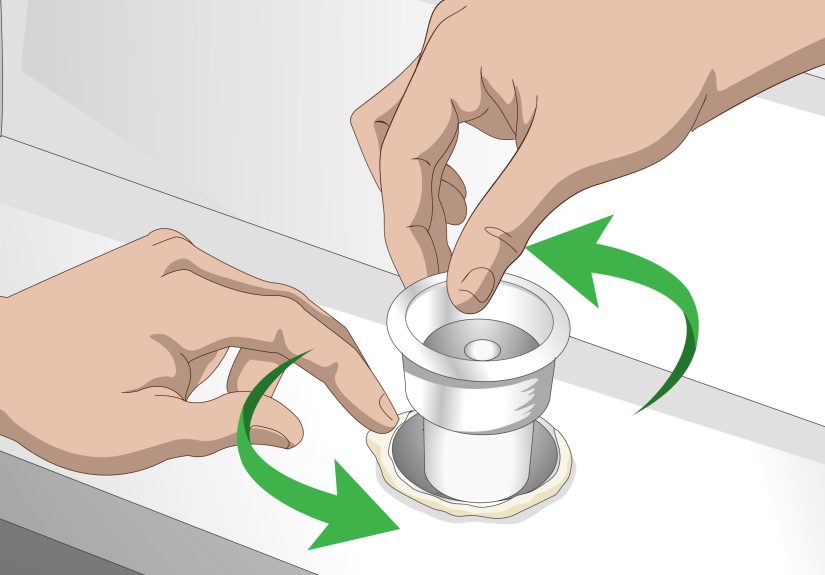
Step 8: Place the putty where it belongs (usually under the flange)
For most sink drains and basket strainers, press the rope onto the underside of the flange in a full circle.
Overlap the ends slightly and blend them together so the ring is continuous.Example: basket strainer Putty goes under the strainer lip that sits on top of the sink.
When you tighten the locknut underneath, the putty compresses and seals the rim.Example: pop-up drain Putty typically goes under the decorative flange at the top of the sink bowl.
Tightening the nut from below compresses the seal. -
Step 9: Seat the fixture straight down (no twisting victory dance)
Insert the drain/strainer into the opening and press it down firmly and evenly.
Try not to rotate it once the putty makes contacttwisting can smear the putty unevenly and create thin spots.If you must rotate slightly to align a logo or a lift-rod opening, do it gently and only after the part is supported and centered.
-
Step 10: Tighten gradually and evenly (snug beats “gorilla-tight”)
Assemble washers and the locknut underneath according to the drain/strainer instructions.
Tighten by hand first, then use a wrench to go snug. You should see putty squeeze out around the flangethis is a good sign.Overtightening can warp gaskets, crack some sink materials, and squeeze out too much putty (leaving a thin seal).
Think “firm handshake,” not “arm-wrestling contest.” -
Step 11: Remove the squeeze-out neatly (future-you will thank you)
Wipe away excess putty from around the flange. Use your finger for a quick cleanup, then a rag for final polish.
If the squeezed-out putty is clean (no hair, grit, or sawdust), you can usually put it back in the container.Don’t leave a putty halo on the sink. It can attract grime and turn your “new install” into “why is this sticky?” within a week.
-
Step 12: Reconnect, test for leaks, and do a second check
Reconnect the trap and any drain pieces. Then test:
- Run water and watch the underside with a flashlight.
- Fill the sink partway, then drain it while checking the flange and joints.
- Wipe everything dry, then check again after a few minutes for slow weeping.
In colder rooms or with stiffer putty, it’s smart to re-check the locknut after a short wait and confirm it doesn’t need a tiny extra snug.
Troubleshooting: Common Problems (and Fixes That Actually Work)
Problem: It leaks right away
- Cause: Not enough putty, a broken ring, or a dirty surface.
- Fix: Disassemble, clean everything, apply a fresh continuous rope, and reinstall. Putty works best on a clean re-install, not as an “after-the-fact patch.”
Problem: It leaks only after a day or two
- Cause: Slight shifting, uneven tightening, or putty used on a material it doesn’t like (stone/plastic issues).
- Fix: Verify the nut is snug. If materials are questionable (plastic drain or porous stone), switch to the recommended gasket/silicone or stain-free putty designed for that surface.
Problem: The putty won’t roll and keeps cracking
- Cause: Putty is old or dried out from air exposure.
- Fix: Replace it. Fresh putty should knead and roll smoothlylife’s too short to argue with crumbly putty.
Problem: The flange keeps spinning while you tighten underneath
- Cause: Not enough downward pressure, or the top isn’t held steady.
- Fix: Hold the flange from above while tightening below. For basket strainers, some kits include a tool or allow a gentle hold using padded pliers (avoid scratching finishes).
FAQ: Quick Answers to Real Questions
Does plumber’s putty need to dry or cure?
Usually, no. Plumber’s putty is designed to stay flexible and seal by compression. You can typically use the fixture right away once everything is tightened and tested.
Can I use plumber’s putty on granite, marble, or quartz?
Regular putty can stain porous stone. If your label says stain-free and safe for stone, you’re in much better shapebut if the sink or fixture manufacturer recommends silicone, follow that.
Can I use plumber’s putty on plastic parts?
Some traditional putties can damage or discolor certain plastics. If you have plastic drain components, acrylic fixtures, or ABS/PVC concerns, check the putty label and the fixture instructions. When unsure, silicone or the supplied gasket is often safer.
How much putty is too much?
In most cases, “a little extra” is safer than “too little.” Excess can be wiped off. Too little can leave gaps that leak.
Aim for a rope thick enough that you get a visible squeeze-out around the flange when tightened.
How do I store plumber’s putty so it doesn’t dry out?
Keep the lid sealed tightly and don’t leave the putty exposed to air. If it hardens and becomes brittle, it’s time for a new container.
Real-World Experiences: What People Learn After a Few Installs (So You Don’t Have To)
If plumber’s putty had a personality, it would be the laid-back friend who’s easy to get along with… until you ignore their one boundary and then everything gets awkward.
Most “putty fails” aren’t because putty is badit’s because the setup wasn’t right, the material choice was wrong, or the tightening went from “snug” to “I will now crush physics.”
One of the most common real-life moments is the basket strainer redo. Someone replaces a kitchen sink strainer,
rolls a putty rope that looks perfect, tightens it down, wipes the squeeze-out, and feels unstoppable. Then they run the faucet,
and there’s a slow drip underneath. The instinct is to tighten more. Sometimes that works, but sometimes it makes it worse by squeezing out
too much putty and leaving a thin seal. The better fix is annoying-but-effective: take it apart, clean everything, and reinstall with a slightly thicker rope.
The second attempt usually works because the installer is calmer, the surfaces are cleaner, and the putty ring is continuous.
Another classic: the pop-up drain that won’t stop weeping. Bathroom sink drains are famous for this because the flange is small,
the sink surface might be slightly uneven, and people tend to under-apply putty to “keep it neat.” In practice, neatness comes from
wiping away extra putty, not from starving the seal. A slightly larger ring that compresses and squeezes out evenly is usually the winner.
Also, many drain kits include a rubber gasket meant to do the sealing; mixing gaskets and putty in the wrong places can create leaks.
The lesson: follow the drain kit’s order of washers and gaskets, and use putty where the instructions expect ittypically under the top flange.
Cold weather adds its own plot twist. Putty can feel stiff when the room is chilly, leading to cracks while rolling.
People try to “fix” it by mashing chunks together like a desperate snowball. That seam is a leak waiting to happen.
The practical move is to warm it in your hands longer (or let the container sit at room temp), knead until uniform, and roll one continuous rope.
And if the putty is genuinely old and crumbly, replacing it is faster than wrestling it into obedience.
Material choice is where experience really pays off. A lot of homeowners discoverafter the factthat regular putty and certain surfaces don’t get along.
For example, some plastics and acrylic finishes can discolor or degrade with oil-based putties. Stone counters can stain with the wrong product.
That’s why “stain-free” and “safe for stone/plastics” formulas exist, and why silicone is still the go-to in showers, tubs, and other places where adhesion matters.
The most experienced DIYers aren’t the ones who use putty everywherethey’re the ones who pause, read the label, and pick the sealant that matches the materials.
Finally, here’s the most confidence-boosting experience tip: testing is part of the install, not an optional bonus level.
Run water, fill the basin, drain it, and watch underneath with a flashlight. Then wipe everything dry and check again.
Catching a slow weep immediately means you’re dealing with a clean redo, not a soggy cabinet floor and a new appreciation for mildew.
Plumber’s putty is forgivingtake advantage of that, and you’ll end up with a seal that stays boring (which is exactly what you want from plumbing).
Conclusion
Applying plumber’s putty is simple, but “simple” isn’t the same as “careless.”
When you choose the right putty for your materials, prep the surfaces, roll one continuous rope, and tighten to a snug seal,
you can get a clean, leak-free install on drains and strainers that lasts for years.
Remember: putty is a compression seal, not an adhesive. Use it where it shines, switch to silicone where it makes sense,
and always follow the fixture’s instructions. Your reward is a dry cabinet, a drip-free drain, and the smug satisfaction of fixing it yourself.


