Table of Contents >> Show >> Hide
- Why Dutch Oven Cleaning Goes Wrong So Fast
- The Best Way to Clean a Dutch Oven Step by Step
- Enameled vs. Raw Cast Iron: Know Your Dutch Oven Before You Clean
- How to Remove Burnt Food Without Ruining the Finish
- How to Remove Stains From a Dutch Oven
- Can You Put a Dutch Oven in the Dishwasher?
- Mistakes Pros Say to Avoid
- How to Keep a Dutch Oven Cleaner in the First Place
- How to Store a Dutch Oven Properly
- Final Take: The Best Way to Clean a Dutch Oven
- Kitchen Experiences: What Home Cooks Learn After Cleaning a Dutch Oven the Wrong Way Once
- SEO Tags
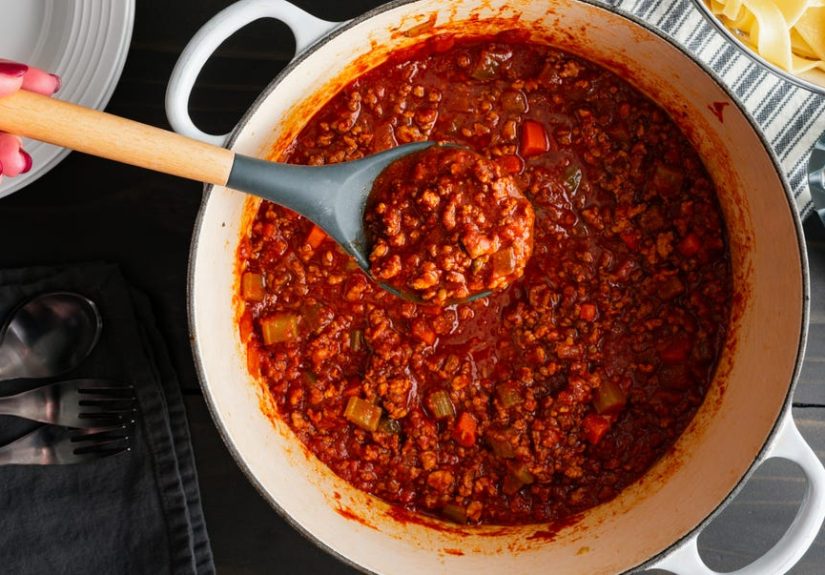
A Dutch oven is one of those kitchen tools that makes you feel like a very competent adult right up until you burn tomato sauce onto the bottom and start wondering whether you have ruined a $300 pot or merely your evening. The good news: most Dutch ovens are tougher than they look, and cleaning one properly is far less dramatic than the internet sometimes makes it seem.
The best way to clean a Dutch oven, according to cookware brands, kitchen experts, and cleaning pros, is surprisingly simple. Let it cool, wash it with warm water, mild dish soap, and a soft sponge, then step up to a gentle baking-soda method if food is stuck on. No medieval scraping tools. No rage-soaking for three days. No mystery TikTok potion bubbling on your stove like a science fair volcano.
That said, one important detail changes everything: not all Dutch ovens should be cleaned the same way. An enameled cast iron Dutch oven is the low-maintenance overachiever of the cookware world, while a raw cast iron Dutch oven needs a little extra love to protect its seasoning and prevent rust. Once you know which type you own, cleanup gets a whole lot easier.
Why Dutch Oven Cleaning Goes Wrong So Fast
Most Dutch oven disasters start with good intentions and bad timing. You finish cooking, the pot is blazing hot, and you want the mess gone immediately. So you run cold water into it. That can be a mistake, especially with enameled cast iron. Sudden temperature changes can stress the enamel and lead to cracking or chipping over time.
The second common mistake is using the wrong scrubber. A Dutch oven may be sturdy, but that does not mean it wants to be attacked with steel wool like it owes you money. Abrasive pads can scratch enamel, dull the finish, and make the pot look older than it really is. For raw cast iron, overly aggressive cleaning can strip seasoning and invite rust to the party.
The third mistake is not drying the pot completely. Even enameled Dutch ovens often have exposed cast iron around the rim, and that area can rust if moisture hangs around. Raw cast iron, of course, rusts even faster. So yes, the final towel-dry matters. Boring? A little. Worth it? Absolutely.
The Best Way to Clean a Dutch Oven Step by Step
1. Let the Dutch oven cool first
Set the pot aside and let it come down to room temperature or at least cool enough that warm wash water will not shock it. This is the first rule of smart Dutch oven care. Patience here saves you from enamel damage, warping stress, and that sad feeling of realizing your shortcut just became an expensive lesson.
2. Wash with warm water, mild dish soap, and a soft sponge
For everyday cleanup, this is the gold standard. Add warm water, a small amount of dish soap, and use a non-abrasive sponge, nylon brush, or soft cloth to wipe the interior and exterior. Most of the time, that is all your Dutch oven needs. If the mess is fresh and you did not char a roast into a geological formation, the food should release without drama.
3. Soak before you scrub harder
If food is stuck on, do not reach for metal tools right away. Fill the pot with warm soapy water and let it sit for 15 to 20 minutes. This softens residue and makes cleanup easier. A silicone or wooden scraper can help lift bits without scratching the surface.
4. Use a baking-soda simmer for stubborn burnt-on residue
When the pot looks like it survived a house fire, a baking-soda simmer is usually the best next step. Add water to cover the stuck-on area, stir in a couple tablespoons of baking soda, and simmer gently for a few minutes. Then use a wooden spoon or non-abrasive tool to loosen the residue. This method works especially well for enameled cast iron because it tackles burnt food without rough scrubbing.
5. Rinse well and dry completely
Once the pot is clean, rinse away soap or baking soda thoroughly. Dry it right away with a soft towel. Pay extra attention to the rim, handles, and lid edge. If your Dutch oven is raw cast iron, place it over low heat for a minute or two after drying to evaporate every trace of moisture.
6. If it is raw cast iron, apply a very light coat of oil
This step is for non-enameled cast iron only. After the pot is dry and still slightly warm, wipe on a whisper-thin layer of cooking oil, then buff away any excess. You want protection, not a greasy slip-and-slide. This helps preserve seasoning and keeps rust from moving in uninvited.
Enameled vs. Raw Cast Iron: Know Your Dutch Oven Before You Clean
If your Dutch oven has a glossy, cream-colored or black-coated interior, it is probably enameled cast iron. That enamel coating means you do not need to season it, and mild soap is perfectly fine. It is easier to clean than raw cast iron, but it is also more sensitive to scratches, harsh abrasives, and rough treatment.
If your Dutch oven is plain black cast iron inside and out, it is raw cast iron. This type is durable in a “survived a campfire” kind of way, but it needs seasoning and complete drying after every wash. Soap is not the villain it used to be in old kitchen folklore, but soaking for long periods, leaving it wet, or storing it dirty is still a terrible idea.
In other words, enameled cast iron is the friend who wears linen and says things like “I prefer sparkling water.” Raw cast iron is the friend who owns hiking boots, an axe, and knows how to build a fire without matches. Both are great. They just need different care.
How to Remove Burnt Food Without Ruining the Finish
Burnt food is the moment when many people panic and start googling “can I use oven cleaner on my Dutch oven?” Please step away from the panic. Start gently.
For enameled Dutch ovens
- Fill with warm water and dish soap, then soak.
- Use a silicone or wooden scraper to lift softened bits.
- Simmer water with baking soda for several minutes if residue remains.
- Use a baking soda paste for spots that need a little extra persuasion.
- Rinse and dry thoroughly.
For raw cast iron Dutch ovens
- Scrape out food while the pot is still slightly warm, not blazing hot.
- Wash by hand with hot water and a small amount of mild soap if needed.
- Use coarse kosher salt as a gentle scrub if food is stubborn.
- Dry completely, then oil lightly to restore the surface.
The biggest rule in both cases is simple: use the least aggressive method that gets the job done. A Dutch oven is cookware, not a driveway stain.
How to Remove Stains From a Dutch Oven
Let us talk about the cosmetic issue that drives neat freaks into the emotional danger zone: stains. Light brown marks inside an enameled Dutch oven are common, especially if you cook tomato sauce, beans, chili, curry, or anything that simmers for a long time. A stained pot is not automatically a dirty pot. Sometimes it is just a well-loved pot with a résumé.
If the interior is stained, try a baking soda paste first. Spread it over the affected area, let it sit briefly, then scrub gently with a soft sponge. If that does not do enough, use the baking-soda simmer method. Some experts also recommend a specialty cleaner designed for enameled cast iron or a gentle cookware cleanser for more persistent discoloration.
For raw cast iron, darkening is usually part of the seasoning and not a stain you should chase away. In fact, trying to scrub it back to bare metal is a fine way to create extra work for yourself. If you see orange rust, that is different. Rust needs to be removed, the pot dried thoroughly, and the seasoning refreshed.
Can You Put a Dutch Oven in the Dishwasher?
Here is the slightly annoying but useful answer: some enameled Dutch ovens are technically dishwasher-safe, but hand-washing is still the better choice. Repeated dishwasher cycles can dull enamel and shorten the pretty years of your pot. So yes, the dishwasher may be allowed in theory, but in practice it is more of an emergency backup dancer than the star of the show.
Raw cast iron Dutch ovens should not go in the dishwasher. That is a fast route to rust, seasoning damage, and regret.
Mistakes Pros Say to Avoid
Using metal scouring pads
These can scratch enamel and leave your pot looking rough. Choose non-abrasive tools instead.
Adding cold water to a hot pot
Thermal shock is not just a fancy phrase. It can damage enamel and stress cookware.
Letting the pot air-dry forever
Moisture left on the rim or inside raw cast iron can lead to rust. Towel-dry it, then dry it a bit more than you think you need to.
Using harsh cleaners too often
A specialty cleaner now and then is fine for tough stains, but regular care should stay gentle.
Forgetting that the outside needs cleaning too
The exterior of a Dutch oven collects grease splatter, smoke marks, and baked-on drips. Wipe it down routinely so it does not become a crusty side project.
How to Keep a Dutch Oven Cleaner in the First Place
The easiest Dutch oven to clean is the one you did not scorch into oblivion. A few cooking habits make a real difference.
- Use medium or medium-low heat most of the time. Dutch ovens hold heat well and rarely need the burner cranked up like a sports car.
- Preheat gradually instead of blasting the pot with high heat.
- Stir saucy or sugary foods before they settle and burn.
- Add enough liquid when braising or simmering.
- Clean the pot soon after it cools instead of letting residue cement itself in place overnight.
Think of it this way: a Dutch oven rewards calm, steady cooking and calm, steady cleaning. It does not respond well to chaos in either direction.
How to Store a Dutch Oven Properly
Once the pot is fully clean and dry, store it somewhere dry with the lid slightly ajar if possible, especially for raw cast iron. This helps prevent trapped moisture and that mysterious stale smell cookware can get when sealed up too tightly.
If you stack your Dutch oven with other cookware, use a soft cloth, paper towel, or pan protector between the lid and pot to help prevent scratches. This is especially smart for enameled interiors. Your Dutch oven does not need a luxury spa treatment, but a little protection goes a long way.
Final Take: The Best Way to Clean a Dutch Oven
If you want the simplest professional-approved answer, here it is: let your Dutch oven cool, wash it by hand with warm water, mild dish soap, and a soft sponge, use a baking-soda soak or simmer for stubborn messes, and dry it thoroughly before storing. That is the best way to clean a Dutch oven without damaging the finish or shortening its lifespan.
If it is enameled, skip abrasive scrubbers and baby the finish a little. If it is raw cast iron, dry it completely and apply a light coat of oil after cleaning. Either way, the goal is not to make the pot look untouched by life. The goal is to keep it functional, beautiful, and ready for the next stew, loaf of bread, or ambitious Sunday braise that makes your kitchen smell like you know exactly what you are doing.
And honestly, that is the beauty of a Dutch oven. It can handle a lot. It just asks that you do not clean it like you are settling a grudge.
Kitchen Experiences: What Home Cooks Learn After Cleaning a Dutch Oven the Wrong Way Once
There is a special kind of confidence that comes from cooking in a Dutch oven for the first time. You brown onions, build flavor, slide the whole thing into the oven, and suddenly you feel like you should own more linen aprons. Then dinner is over, the pot is crusted with sauce, and reality arrives holding a sponge.
Many home cooks learn the same lesson the hard way: the Dutch oven is easy to cook in, but it punishes impatience during cleanup. One person tries to rinse a hot pot under cold water and hears that little hiss that sounds suspiciously like cookware disapproval. Another scrubs too hard with a rough pad and spends the rest of the evening wondering if the enamel looks different or if guilt is just making it seem worse. Most of us get wiser after one of these moments.
The most common experience is discovering that stuck-on food usually looks worse than it is. A pot that seems doomed after chili night often cleans up beautifully with warm soapy water, a short soak, and a baking soda simmer. That is the moment people stop treating the Dutch oven like fragile royalty and start treating it like a durable kitchen tool with a few preferences.
There is also the quiet victory of learning that stains are not the same thing as dirt. A cream-colored enamel interior may pick up tan rings, brown shadows, or faint marks from years of soups and braises. At first, that can feel frustrating. Later, it starts to feel like proof of a life well cooked. The pot that made winter stews, crusty bread, pot roast, and Sunday pasta sauce is not supposed to look brand new forever. It is supposed to look useful.
People who switch from raw cast iron to enameled cast iron often talk about relief. Cleanup is easier. Acidic foods are less stressful. Soap is not a debate topic anymore. On the flip side, cooks who love raw cast iron often appreciate the ritual of cleaning, drying, and oiling it. It feels less like maintenance and more like finishing the meal properly, almost like putting knives back in their block or wiping down a wooden board.
Then there is the universal experience of discovering that high heat is often the real villain. Plenty of Dutch oven messes begin not because the pot is hard to clean, but because the burner was too high from the start. Once cooks realize that Dutch ovens retain heat extremely well, meals get better and cleanup gets easier. Fewer scorch marks. Less scrubbing. More dinner, less detective work.
Over time, people develop their own small routines. Some fill the pot with warm water while they eat so cleanup starts itself. Some keep a silicone scraper nearby because it saves the sponge and their patience. Some always dry the rim twice because one rusty spot was enough of a life lesson. These habits are not glamorous, but they are the reason a Dutch oven can last for years and still be the first pot you reach for when company comes over.
In the end, the experience of cleaning a Dutch oven teaches something useful beyond cookware care: gentle methods usually work best, panic usually makes things worse, and the kitchen is a lot more enjoyable when you stop expecting every good tool to remain showroom perfect. A Dutch oven does not need perfection. It needs smart care, a little respect, and someone willing to let the baking soda do the heavy lifting.


