Table of Contents >> Show >> Hide
- What “Configuring a VPN” Actually Means
- Before You Start: Gather These Details
- Choose the Right Protocol (Without Falling Into a Time Machine)
- Option A (Easiest): Configure a VPN Using an App
- Option B (Power Move): Configure a VPN Manually in System Settings
- Windows 11/10: How to Add a VPN (Built-In)
- macOS: How to Add a VPN (Built-In)
- iPhone (iOS): How to Configure a VPN
- Android: How to Configure a VPN
- How to Tell Your VPN Is Actually Working
- Troubleshooting: The “Why Won’t It Connect?” Checklist
- Security Tips (Stuff That Actually Matters)
- Real-World VPN Setup Experiences (Common Scenarios) Extra Field Notes
- 1) The Coffee Shop Wi-Fi Test: Windows Laptop + Public Network
- 2) The Hotel Network Surprise: MacBook + Corporate VPN
- 3) The iPhone On-the-Go Reality: Cellular/Wi-Fi Switching
- 4) Android Always-on: The “Stop Leaks When Apps Wake Up” Strategy
- 5) The “It Connects But Nothing Works” Mystery: Split Tunneling and DNS
- Conclusion
Setting up a VPN sounds like one of those chores that should come with a tiny screwdriver and a warning label. In reality, it’s usually
straightforwardif you know which path you’re taking: VPN app (fast, friendly) or manual configuration (powerful, slightly nerdy).
This guide walks you through both, on Windows, macOS, iPhone, and Android, with practical tips and
real-world “why is this happening to me” fixes along the way.
What “Configuring a VPN” Actually Means
A VPN (Virtual Private Network) creates an encrypted connection between your device and a VPN server. That can help protect you on public Wi-Fi,
reduce tracking tied to your IP address, and let you securely access work resources (like internal apps or file servers).
“Configuring” a VPN usually means one of these:
- Using a VPN provider’s app (recommended for most personal use): you sign in, tap Connect, done.
- Adding a VPN profile manually (common for work/school or self-hosted setups): you enter server, protocol, and authentication details.
Before You Start: Gather These Details
Manual setup is painless only if you have the right ingredients. Ask your VPN provider or IT admin for:
- Server address (hostname or IP), sometimes multiple regions (e.g., us-west.example.com)
- VPN type / protocol (commonly IKEv2/IPsec; sometimes L2TP/IPsec; or you’ll use WireGuard/OpenVPN via an app)
- Username + password (or single sign-on instructions)
- Shared secret (aka “pre-shared key”) if required
- Certificates (sometimes a .crt/.pem file, sometimes a mobileconfig profile on Apple devices)
- DNS settings or “routes” only if your IT team specifies them (don’t improviseVPNs are picky)
Choose the Right Protocol (Without Falling Into a Time Machine)
VPN protocol names can feel like license plates: IKEv2, IPsec, L2TP… and the occasional “PPTP” that should be retired to a museum gift shop.
Here’s the practical take:
- IKEv2/IPsec: Modern, secure, and stableespecially good on phones that switch between Wi-Fi and cellular.
- WireGuard: Fast and efficient, typically configured via a dedicated app using a QR code or config file.
- OpenVPN: Mature and flexible, typically configured via the OpenVPN client with a .ovpn file.
- L2TP/IPsec: Legacy. Still used in some corporate networks, but less ideal today.
- PPTP: Avoid. If this is your only option, it’s time to have an awkward conversation with whoever runs that VPN server.
One more reality check: Android’s built-in options vary by version and manufacturer. Many people end up using a WireGuard/OpenVPN/IKEv2 app
on Android even when other platforms can connect “natively.”
Option A (Easiest): Configure a VPN Using an App
If you’re using a commercial VPN service, the app route is usually the best mix of security and convenience. Most reputable VPN apps also include
features like a kill switch, auto-connect, and modern protocols without you needing to hand-enter anything.
- Install your VPN provider’s app from the official store (Microsoft Store, Mac App Store, App Store, or Google Play).
- Sign in, select a server/location if desired, and tap Connect.
- When prompted, allow the VPN configuration/profile installation (this is normalyour OS needs permission).
- Turn on options like Auto-connect on untrusted Wi-Fi and Kill Switch if the app provides them.
If your VPN provider gave you configuration files (like .ovpn or WireGuard configs), you’ll still likely use an appjust a specialized one.
Option B (Power Move): Configure a VPN Manually in System Settings
Manual setup is most common for work/school VPNs, self-hosted servers, or firewall appliances. It can also be helpful when an app isn’t available
(older devices, restricted app stores, or very locked-down environments).
Windows 11/10: How to Add a VPN (Built-In)
Windows makes this pretty civilized. You’ll create a VPN profile, then connect from the network menu.
Step-by-step: Add the VPN profile
- Open Settings.
- Go to Network & internet → VPN.
- Select Add VPN (or Add a VPN connection).
-
For VPN provider, choose Windows (built-in).
- Connection name: a label you’ll recognize (e.g., “Work VPN”).
- Server name or address: the hostname/IP provided by your VPN admin.
- VPN type: choose what your provider/IT specifies (IKEv2, L2TP/IPsec, etc.).
- Type of sign-in info: usually Username and password (or certificate/smart card in corporate setups).
- Click Save.
Connect and confirm
- Back in Settings → VPN, select your VPN profile.
- Click Connect.
- Confirm you see a Connected status and a VPN icon in your network area.
Windows gotchas (common issues)
- Authentication errors: double-check username format (some orgs require DOMAINusername) and password resets/MFA steps.
- Certificate-based VPNs: you may need to import a certificate into Windows certificate storage first.
- L2TP/IPsec fails: shared secret (pre-shared key) mismatches are the #1 culprit.
macOS: How to Add a VPN (Built-In)
On modern macOS, VPN is managed through System Settings. Apple’s native setup is cleanjust make sure you pick the protocol your VPN supports.
Step-by-step: Add the VPN configuration
- Open System Settings.
- Go to Network.
- Click the Action menu (often a three-dot or dropdown control), then choose Add VPN Configuration.
- Select the VPN type (commonly IKEv2 or L2TP over IPsec).
- Enter the Server Address, Remote ID (if provided), and authentication details (username/password or certificate).
- Click Create or Apply, then toggle Connect.
macOS tips
- Remote ID / Local ID: Only fill these if your IT admin tells you to. Wrong values can block connections.
- Certificates: If you’re given a certificate, install it into Keychain and ensure the VPN profile is referencing it properly.
- Menu bar access: Many users prefer enabling VPN status in the menu bar for quick connect/disconnect.
iPhone (iOS): How to Configure a VPN
On iPhone, you’ll either use a provider app (easiest) or add a VPN manually in Settings. For work VPNs, you may also receive a configuration profile
from your employer (MDM or a signed profile), which is often the smoothest path.
Manual setup: Add VPN configuration
- Open Settings.
- Tap General.
- Tap VPN & Device Management (or similar wording depending on iOS version).
- Tap VPN → Add VPN Configuration.
-
Choose Type (often IKEv2, sometimes IPsec or L2TP).
- Description: your label (“Work VPN”).
- Server: provided hostname/IP.
- Remote ID: often required for IKEv2 (provided by IT).
- User Authentication: username/password or certificate.
- Tap Done, then toggle the VPN on.
iPhone tips
- Profiles are normal: If your VPN uses certificates, you may need to install a profile/certificate first.
- On-demand/always-on: Some managed setups can enforce VPN automaticallyuseful for corporate compliance and less chance of forgetting.
Android: How to Configure a VPN
Android can be either delightfully simple or mysteriously different depending on your device maker and Android version. The official path typically looks like:
Settings → Network & internet → VPN. From there you can add, edit, or enable “Always-on VPN.”
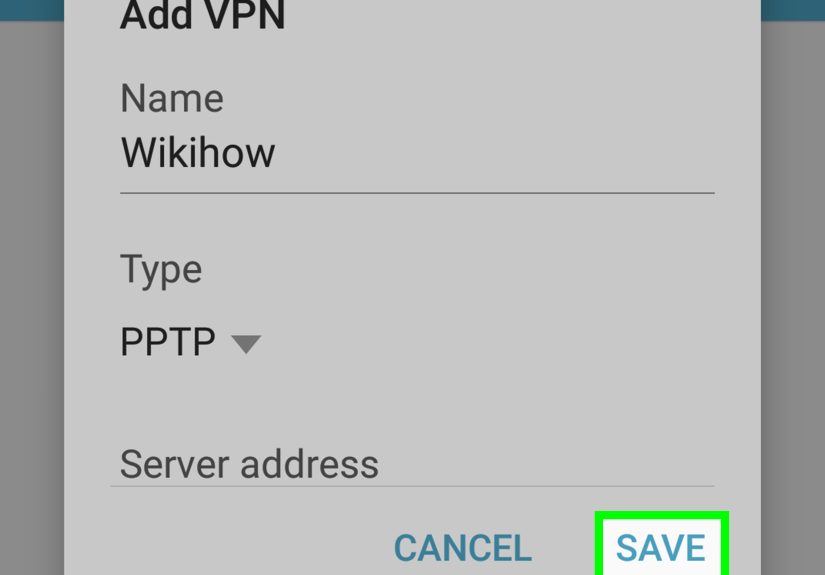
Manual setup: Add a VPN
- Open Settings.
- Tap Network & internet → VPN. (If you don’t see it, search Settings for “VPN.”)
- Tap Add or the + icon.
- Enter the VPN name, server address, and VPN type your network supports.
- Tap Save, then tap the VPN to connect and enter credentials.
Always-on VPN (recommended for security)
- Settings → Network & internet → VPN.
- Tap the gear icon next to your VPN.
- Enable Always-on VPN if available.
- If your device offers it and you want maximum protection, enable “Block connections without VPN” (wording varies).
Android reality check
If your workplace uses a protocol Android doesn’t support natively on your device, don’t panicthis usually just means you’ll use an app:
WireGuard for WireGuard configs, OpenVPN for .ovpn files, or an IKEv2/IPsec client app for those environments.
Your IT admin can tell you which one to use (and ideally provide a QR code or config file, because typing long secrets on a phone is how thumbs declare war).
How to Tell Your VPN Is Actually Working
“Connected” is a good start. “Connected and doing the right thing” is better. Here are practical checks:
- IP address looks different: your apparent public IP should match the VPN region/server, not your ISP’s typical range.
- DNS isn’t leaking: a well-configured VPN should route DNS through the VPN (or your organization’s DNS if it’s a work VPN).
- Kill switch behavior: if your VPN drops, the device should not silently fall back to regular internet (when kill switch is enabled).
- Work resources are reachable: for corporate VPNs, test an internal site/app that only works on VPN.
Troubleshooting: The “Why Won’t It Connect?” Checklist
VPN errors love vague messages. Here’s a checklist that solves the majority of real issues without sacrificing your weekend:
- Confirm your credentials: try signing in to your VPN portal (if one exists). Password changes and expired accounts are common.
- Check server address: one missing character can ruin your day. Copy/paste when possible.
- Verify date/time: incorrect system time can break certificate-based authentication.
- Switch networks: some Wi-Fi networks block VPN traffic; test on cellular or another hotspot.
- Try a different protocol: if you have the option, IKEv2 or WireGuard often succeeds where legacy options fail.
- Reinstall profiles/certs: on Apple devices, a stale profile/certificate can cause repeated failures.
- Update client and OS: VPN vulnerabilities and compatibility issues are frequently solved via updates.
Security Tips (Stuff That Actually Matters)
Configuring a VPN is only half the story; the other half is not turning it into a false sense of security.
A VPN can protect traffic in transit, but it can’t fix weak passwords, malware, or suspicious “free” VPN apps that treat your browsing history like a fundraising opportunity.
- Prefer modern protocols like IKEv2, WireGuard, or OpenVPN over legacy choices.
- Keep VPN software updated: many real-world VPN compromises happen through unpatched systems.
- Use MFA where possible (especially for work VPNs).
- Download apps from official stores and stick with reputable providersprivacy claims should be backed by transparent policies and a track record.
- Use Always-on VPN for mobile devices if you rely on VPN for security, especially on public Wi-Fi.
Real-World VPN Setup Experiences (Common Scenarios) Extra Field Notes
To make this guide more than just “click here, type this,” here are realistic scenarios users commonly run into when configuring VPNs across devices.
Think of these as the “I didn’t know I needed to know that” moments.
1) The Coffee Shop Wi-Fi Test: Windows Laptop + Public Network
A common first-time setup is on a Windows laptop at a coffee shop, because that’s when people suddenly remember privacy exists.
The VPN connects… but web pages load slowly or certain sites refuse to cooperate. The most frequent cause is not “the VPN is broken,” but that the
public Wi-Fi is doing something weirdlike forcing a captive portal, blocking VPN ports, or throttling encrypted traffic.
The fix that usually works: connect to the Wi-Fi first, open a browser to complete any captive portal login, then connect the VPN.
If it still fails, switching protocols (when your VPN supports it) often solves it immediatelyIKEv2 or WireGuard tends to handle flaky networks better
than older configurations. Users also learn a valuable lesson: “Connected” doesn’t guarantee “fast,” so choosing a closer server location can make a night-and-day difference.
2) The Hotel Network Surprise: MacBook + Corporate VPN
Hotel Wi-Fi is famous for two things: being slow and being creative about blocking things. A typical corporate setup on macOS uses IKEv2 with certificates
and a Remote ID requirement. The VPN profile looks correct, but the connection fails repeatedly. In many cases, the missing piece is certificate trust:
the certificate may be installed, but not trusted properly, or the server certificate chain isn’t recognized.
When users switch from “manual guesswork” to “install the official company profile,” the problem magically disappears.
That’s not magicit’s configuration management. Profiles can bundle trusted certs, correct IDs, and on-demand rules in a way humans rarely reproduce perfectly.
The takeaway: if your organization offers a configuration profile, it’s usually safer and more reliable than manual entry (and less likely to summon IT support).
3) The iPhone On-the-Go Reality: Cellular/Wi-Fi Switching
On iPhone, a VPN that drops every time you walk out the door isn’t helpful; it’s just cardio for your patience.
This is where IKEv2 shines in real life because it handles network changes gracefully. Users commonly report that IKEv2 stays stable when switching between
Wi-Fi and cellular, while older setups can be more fragile. Another real-world win is enabling auto-connect on untrusted networks:
instead of remembering to turn on VPN at the airport, your iPhone does it for you.
People also discover the “VPN profile permission prompt” isn’t scaryit’s iOS protecting you from silent network reconfiguration.
Once allowed, the VPN toggle becomes a simple on/off switch, and the mental overhead disappears.
4) Android Always-on: The “Stop Leaks When Apps Wake Up” Strategy
Android users who rely on VPN for privacy often move from “manual connect” to “Always-on VPN” after learning how background apps behave.
Phones do a lot of network activity when you’re not lookingsyncing, refreshing, uploading photos, checking messages.
If your VPN isn’t always-on, some of that traffic can slip out unprotected during reconnects or after reboots.
Enabling Always-on VPN (and “block without VPN” when available) turns the VPN from a sometimes tool into a default security posture.
The setup experience here is usually: connect once, enable Always-on, and then forget it existsin the best way.
5) The “It Connects But Nothing Works” Mystery: Split Tunneling and DNS
One of the most confusing experiences is a VPN connection that succeeds, but your internet feels broken.
This can happen when a corporate VPN is configured to route all traffic through the organization (full tunnel) and the DNS settings don’t resolve properly
on your current network. Another variant is split tunneling rules that route only certain traffic through the VPN, causing odd behavior if an app expects
everything to come from one network path. The practical move is to test: can you reach internal work resources? Can you load normal websites?
If internal resources work but the public web is unstable, it’s often DNS or routing rulessomething your IT admin needs to adjust.
For personal VPNs, switching servers or toggling “use VPN DNS” in the app frequently fixes it.
The takeaway: a VPN is networking, and networking is basically organized chaos with documentation.
Conclusion
Configuring a VPN doesn’t have to feel like defusing a bomb with oven mitts. For most people, the best approach is a reputable VPN app with modern protocols.
For work or custom networks, manual configuration is totally doablejust gather the right details and follow the platform steps carefully.
Once connected, verify it’s working (IP, DNS, stability), turn on Always-on where it makes sense, and keep everything updated.
Your future selfespecially the one using airport Wi-Fiwill be grateful.


